These steps will guide you through a migration of a database using Full Transportable Export/Import (FTEX) and incremental backups. I covered the concept in a previous blog post, which you should read to understand the basics. Remember Transportable Tablespaces and Full Transportable Export/Import requires Enterprise Edition.
My demo environment looks like this:
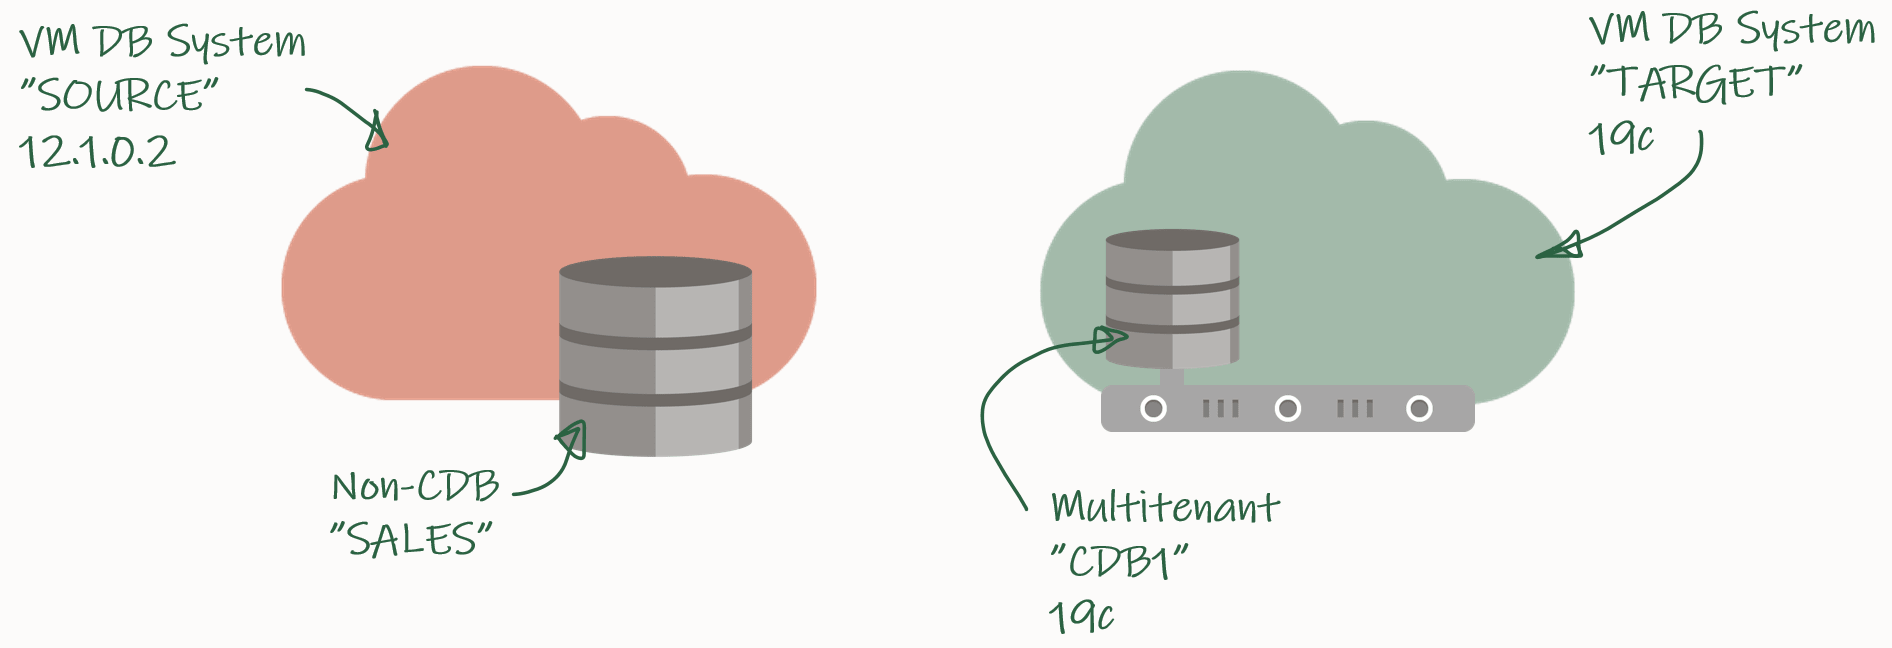
I have an 12.1.0.2 database that I want to migrate to a PDB in a new CDB that runs 19c.
Check Prerequisites
Create a new PDB called SALES in the target CDB:
TARGET/CDB1 SQL> create pluggable database sales admin user admin identified by admin;
TARGET/CDB1 SQL> alter pluggable database sales open;
TARGET/CDB1 SQL> alter pluggable database sales save state;
Prepare the database to use TDE Tablespace Encryption:
TARGET/CDB1 SQL> alter session set container=sales;
TARGET/CDB1 SQL> administer key management set key force keystore identified by <keystore-pwd> with backup;
Verify SQL*Net connectivity from source host to target PDB:
[oracle@source]$ sqlplus system@<target ip>/<pdb-service-name>
Verify database character set and national character set are the same:
SOURCE/SALES SQL> select property_name, property_value from database_properties where property_name in ('NLS_CHARACTERSET', 'NLS_NCHAR_CHARACTERSET');

TARGET/SALES SQL> select property_name, property_value from database_properties where property_name in ('NLS_CHARACTERSET', 'NLS_NCHAR_CHARACTERSET');
Ensure the source database is in ARCHIVELOG mode:
SOURCE/SALES SQL> select log_mode from v$database;
Enable block change tracking on source database. Requires Enterprise Edition (on-prem), DBCS EE-EP (cloud) or Exadata. Although strictly speaking not required, it is strongly recommended:
SOURCE/SALES SQL> select status, filename from v$block_change_tracking;
SOURCE/SALES SQL> alter database enable block change tracking;
Ensure that you can connect from the source to the target host as oracle:
[oracle@source]$ ssh <target ip> date
Identify Tablespaces And External Data
Identify all the tablespaces that you will migrate. With FTEX you should transport all the tablespaces, except those that contain Oracle maintained data, like SYSTEM, SYSAUX, UNDO and so forth:
SOURCE/SALES SQL> select tablespace_name from dba_tablespaces;
Save the list of tablespaces for later. In my demo, I only have the tablespace SALES except the Oracle maintained ones.
Next, on the target database ensure that any of the existing tablespaces doesn’t conflict with the ones you are transporting:
TARGET/SALES SQL> select tablespace_name from dba_tablespaces;
If there is a conflict of names, you have to drop or rename the tablespaces in the target database.
Use DBMS_TDB to easily identify external stuff like directories, external tables and BFILEs. Any files stored in the file system outside the database must be manually transferred to the file system on the target host:
SOURCE/SALES SQL> SET SERVEROUTPUT ON
SOURCE/SALES SQL> DECLARE
      external BOOLEAN;
   BEGIN
      external := DBMS_TDB.CHECK_EXTERNAL;
   END;
/
Download and Configure Perl Scripts
Create a folder to hold the perl scripts, download the scripts from MOS doc ID 2471245.1, and unzip:
[oracle@source]$ rm -rf /home/oracle/xtts
[oracle@source]$ mkdir /home/oracle/xtts
[oracle@source]$ cd /home/oracle/xtts
[oracle@source]$ --Download file from MOS
[oracle@source]$ unzip rman_xttconvert_VER4.3.zip
Create a working directory (aka. scratch location) which will hold the backups. Ensure that you have enough space at this location at both source and target database.
[oracle@source]$ rm -rf /u01/app/oracle/xtts_scratch
[oracle@source]$ mkdir -p /u01/app/oracle/xtts_scratch
Create the same location on the target host:
[oracle@target]$ rm -rf /u01/app/oracle/xtts_scratch
[oracle@target]$ mkdir -p /u01/app/oracle/xtts_scratch
Configure your migration in xtt.properties. In this demo the file looks like this:
tablespaces=SALES
platformid=13
src_scratch_location=/u01/app/oracle/xtts_scratch
dest_scratch_location=/u01/app/oracle/xtts_scratch
dest_datafile_location=+DATA
asm_home=/u01/app/19.0.0.0/grid
asm_sid=+ASM1
parallel=4
rollparallel=4
getfileparallel=4
metatransfer=1
dest_user=oracle
dest_host=<target_ip>
desttmpdir=/u01/app/oracle/xtts_scratch
srcconnstr=sys/<password>@sales
destconnstr=sys/<password>@newsales
usermantransport=1
A little explanation:
platformidis set to 13 because this is a Linux migration. You can get the number by queryingv$transportable_platform.- Adjust the parallel options according to the capabilities of the source and target system.
- When you are using ASM disk group in
dest_datafile_locationyou must also setasm_homeandasm_sid.
Finally, copy the scripts (and the configuration) to your target system:
[oracle@source]$ scp -r /home/oracle/xtts/ <target_ip>:/home/oracle/
Initial Backup and Restore
Now, you can start the first initial backup of the database. You take it while the source database is up and running, so it doesn’t matter if the backup/restore cycle take hours or days to complete:
[oracle@source]$ export TMPDIR=/home/oracle/xtts
[oracle@source]$ cd /home/oracle/xtts
[oracle@source]$ $ORACLE_HOME/perl/bin/perl xttdriver.pl --backup
The perl script has been configured in such a way that it automatically transfers the backups to the target system. In addition to that, a small text file must be transferred as well:
[oracle@source]$ scp res.txt oracle@<target_ip>:/home/oracle/xtts
Now, on the target system, you can restore the backup that was just taken. If needed, the data files are automatically converted to the proper endian format. If conversion is needed, you need space for a copy of all the data files:
[oracle@target]$ export TMPDIR=/home/oracle/xtts
[oracle@target]$ cd /home/oracle/xtts
[oracle@target]$ $ORACLE_HOME/perl/bin/perl xttdriver.pl --restore
Incremental Backup and Restore
You can – and should – run the incremental backup and restores as many times as possible. The more frequent you run them, the faster they will run because there will be fewer changes. At least, close to the migration downtime window starts you should run them often, to minimize the time it will take to perform the final backup and restore:
[oracle@source]$ export TMPDIR=/home/oracle/xtts
[oracle@source]$ cd /home/oracle/xtts
[oracle@source]$ $ORACLE_HOME/perl/bin/perl xttdriver.pl --backup
Transfer res.txt:
[oracle@source]$ scp res.txt oracle@<target_ip>:/home/oracle/xtts
And restore on the target system:
[oracle@target]$ export TMPDIR=/home/oracle/xtts
[oracle@target]$ cd /home/oracle/xtts
[oracle@target]$ $ORACLE_HOME/perl/bin/perl xttdriver.pl --restore
Final Incremental Backup and Restore
Gather dictionary statistics to ensure the Data Pump export runs as fast as possible:
SOURCE/SALES SQL> exec dbms_stats.gather_dictionary_stats;
Now downtime starts! Set the tablespaces read-only:
SOURCE/SALES SQL> alter tablespace SALES read only;
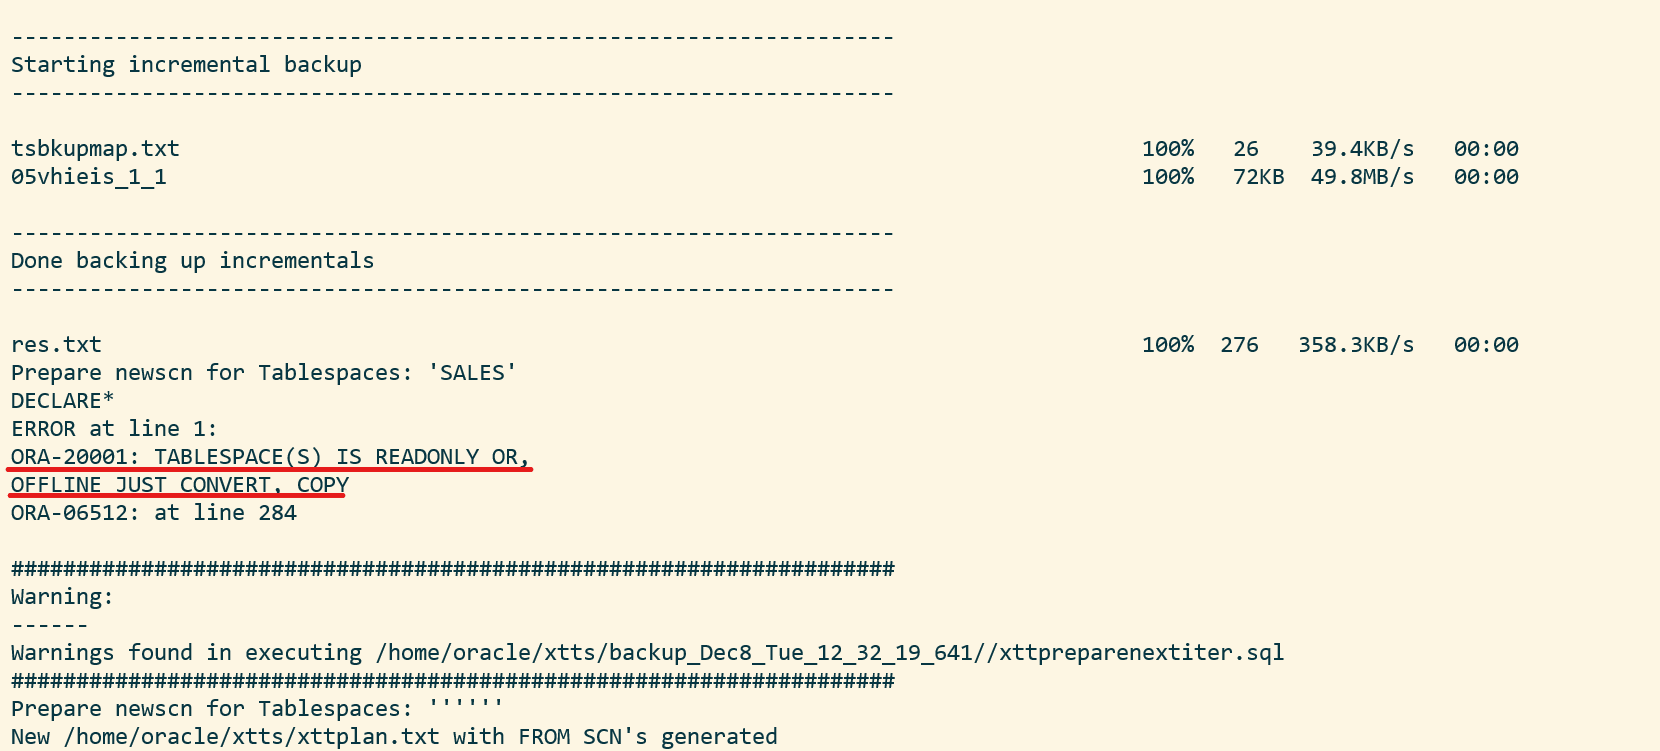
Perform the final incremental backup:
[oracle@source]$ export TMPDIR=/home/oracle/xtts
[oracle@source]$ cd /home/oracle/xtts
[oracle@source]$ $ORACLE_HOME/perl/bin/perl xttdriver.pl --backup
You will receive an error because the tablespace is read-only. This is ignorable:
Transfer res.txt:
[oracle@source]$ scp res.txt oracle@<target_ip>:/home/oracle/xtts
And restore on the target system:
[oracle@target]$ export TMPDIR=/home/oracle/xtts
[oracle@target]$ cd /home/oracle/xtts
[oracle@target]$ $ORACLE_HOME/perl/bin/perl xttdriver.pl --restore
Import Metadata Using FTEX
Create a directory object that points to the xtts folder:
TARGET/SALES SQL> create directory LOGDIR as '/home/oracle/xtts';
Next, create a database link to the source database that can be used to import the metadata. If the source database is already a PDB, ensure that the database link points directly into the PDB:
TARGET/SALES SQL> create public database link SRCLNK connect to system identified by <password> using '//<source_ip>:1521/<service_name>';
Test that it works:
TARGET/SALES SQL> select * from dual@srclnk;
Next, create a par file (sales_imp.par) that you can use for the Data Pump import (see appendix below for explanation):
network_link=SRCLNK
full=y
transportable=always
metrics=y
logtime=all
exclude=TABLE_STATISTICS,INDEX_STATISTICS
exclude=SYS_USER
exclude=TABLESPACE:"IN('TEMP')"
exclude=SCHEMA:"IN('SPATIAL_CSW_ADMIN_USR','SPATIAL_WFS_ADMIN_USR')"
directory=logdir
logfile=sales_imp.log
transport_datafiles='+DATA/CDB1_FRA2VD/B2D617FCB79B0684E053AF01000A6DCE/DATAFILE/SALES.281.105552609'
Start Data Pump and perform the import. newsales is a TNS alias that points into the SALES PDB in the target CDB. If you have encrypted tablespaces, you should use the option encryption_pwd_prompt. It allows you to input the TDE password. It can be omitted if there are no encrypted tablespaces.
$ impdp system@newsales parfile=sales_imp.par encryption_pwd_prompt=yes
Once the import has completed, you should examine the Data Pump log file for any critical errors. Check the appendix (see below) for ignorable errors:
[oracle@target]$ vi /home/oracle/xtts/sales_imp.log
That’s it! Your data has been migrated. Now would be a good time to:
-
Check data files for corruption using RMAN
VALIDATEcommandAlthough not mandatory, it is recommended if time allows. It is a read-only check that you can run while other stuff is happening in the database. See step 6.1 in MOS doc ID 2471245.1.
-
Gather dictionary statistics
-
Test your application
-
Start a backup
-
Gather statistics – they were excluded from the export
-
Drop the database link that points to the source database
-
Cleanup the file system:
- /home/oracle/xtts
- /u01/app/oracle/xtts_scratch
Conclusion
Even huge, TB-sized, databases can be migrated with very little downtime by using incremental backups. By using the perl script from My Oracle Support and combined with Full Transportable Export/Import it is a simple process. In addition, you can even migrate to a new endian format, to a higher release and into a PDB in one operation. It requires Enterprise Edition and you must have plenty of disk space – potentially twice the size of your database.
There is a video on our YouTube channel that you can watch. It demos the entire process. I suggest that you subscribe to our channel and get notified whenever there are new videos.
Thanks to my good colleague, Robert Pastijn, for supplying a runbook that was used as inspiration.
Further Reading
- Mike Dietrich blog post: Full Transportable Export/Import – PAR File Examples
Other Blog Posts in This Series
- Introduction
- Prerequisites
- Full Transportable Export/Import
- What Is a Self-contained Transportable Tablespace Set
- How to Migrate a Database Using Full Transportable Export/Import and Incremental Backups
- Make It Fast
- Backup on Standby Database
- Slow Network Between Source and Target
- Bigfile Tablespaces
- Testing the Procedure On Activated Standby Database
- Testing the Procedure Multiple Times Using Read-Only Tablespaces
- Target Database and Data Guard
- ASM Aliases and Why You Should Get Rid of Them
- How to use Transportable Tablespace with TDE Tablespace Encryption
- Pro Tips
Appendix
If Source Database Is in OCI and Automatic Backup Is Enabled
If the source database is running in OCI and you have enabled automatic backup, you must make a few changes.
In xttprep.tmpl around line 319 change:
cp('backup for transport allow inconsistent ' ||
to
cp('set encryption off for all tablespaces;set compression algorithm "basic";backup for transport allow inconsistent ' ||
In xttdriver.pl around line 4268 change:
my $rman_str1 = "set nocfau;";
to
my $rman_str1 = "set nocfau;".
                "set encryption off for all tablespaces ;".
                "set compression algorithm 'basic' ;" ;
ORA-02085
If you get ORA-02085 when querying over the database link:
TARGET/SALES SQL> alter system set global_names=false;
ORA-39032
If you are exporting from 11.2.0.4, you must add the VERSION parameter:
expdp ... version=12
ORA-39187, ORA-39921 And ORA-39922
If the Data Pump job aborts and complain about object named CLI_SWPXXXXXXXX or SYS_ILYYYYYYYYY:
ORA-39123: Data Pump transportable tablespace job aborted
ORA-39187: The transportable set is not self-contained, violation list is
ORA-39921: Default Partition (Table) Tablespace SYSAUX for CLI_SWPXXXXXXXX not contained in transportable set.
ORA-39922: Default Partition (Index) Tablespace SYSAUX for SYS_ILYYYYYYYYY not contained in transportable set.
Job "SYS"."SYS_EXPORT_FULL_01" stopped due to fatal error at Wed Jul 18 13:51:01 2018 elapsed 0 00:05:55
You should have a look at MOS note ORA-39187 & ORA-39921 for CLI_SWP$ tables while performing Full Transportable Tablespace export (Doc ID 2426177.1). The objects are related to Unified Auditing.
Data Pump Parameters
Use network_link to specify the name of the database link that points back to the source database.
full=y and transportable=always instructs Data Pump to perform a full transportable export/import.
exclude=TABLE_STATISTICS,INDEX_STATISTICS exclude statistics from the import. It is better and faster to gather new, fresh statistics on the target database. If you insist on importing your statistics, you should use DBMS_STATS.
exclude=SYS_USER excludes the import of the SYS user. In a PDB that is not even allowed, and most likely you are not interested in importing the definition of the SYS user.
exclude=TABLESPACE:"IN('TEMP')" excludes the temporary tablespace from the import. Most likely there is already a temporary tablespace in the new, target PDB. It is faster to create a TEMP tablespace in advance – and name it the same as in the source database.
A change was made to Spatial in 19c and some Spatial admin users are removed. To avoid errors/noise in the log file you can safely exclude them from the import by specifying exclude=SCHEMA:"IN('SPATIAL_CSW_ADMIN_USR','SPATIAL_WFS_ADMIN_USR')".
transport_datafiles is used to specify the data files that make you the tablespace you are transporting. Specify the parameter multiple times to specify more data files. You can use asmcmd to get the data file paths and names.
Data Pump Ignorable Errors
Multimedia desupported in 19c, but code is still there. You can safely disregard this error:
Processing object type DATABASE_EXPORT/NORMAL_OPTIONS/TABLE
ORA-39342: Internal error - failed to import internal objects tagged with ORDIM due to ORA-00955: name is already used by an existing object.
Package is removed in 12.2. See ORA-39083 And ORA-04042 Errors On DBMS_DEFER_SYS When Importing Into 12.2 Database (Doc ID 2335846.1):
Processing object type DATABASE_EXPORT/SYSTEM_PROCOBJACT/POST_SYSTEM_ACTIONS/PROCACT_SYSTEM
ORA-39083: Object type PROCACT_SYSTEM failed to create with error:ORA-04042: procedure, function, package, or package body does not exist

Failing sql is:
BEGIN
SYS.DBMS_UTILITY.EXEC_DDL_STATEMENT('GRANT EXECUTE ON DBMS_DEFER_SYS TO "DBA"');COMMIT; END;

Thanks for this blog, it makes OCI migration easier.
Regards
Greg
LikeLiked by 1 person
Hi Greg,
I am glad that you liked it, and found it useful.
See you in the cloud,
Daniel
LikeLiked by 1 person
Am I missing something ? But seems like there was not upgrade step and we went from 12.1 non-cdb directly into 19c pdb ? Is that possible/supported ?
Greg
LikeLiked by 1 person
No, you are not missing something. When you use Data Pump (either with transportable tablespaces or a regular export) the upgrade and also PDB conversion happens implicitly when you import into the new target database (that is already running on the new version, and as a PDB). This is one of the biggest advantages of doing it this way.
LikeLiked by 1 person
Thanks, When you do final incremental restore and impdp as shown, does it import all users and other objects like scheduler jobs , public synonyms , public db links etc. I did not see that you have created user in target before you ran import.
LikeLiked by 1 person
Hi Sanjay,
Thank you for your question. When you use FTEX to migrate the data you should not create any objects in the target database. Data Pump will bring over the definitions of users, scheduler jobs, synonyms and so forth. And I am pretty sure it applies to DB links as well.
Regards,
Daniel
LikeLiked by 1 person
Thanks Daniel for a really helpful Demo! Can you please clarify some questions below:
– What do you mean by “Imagefile Backup” in your Video use case? Is it the Image Copy Backup – exact byte-for-byte copy of DB files?
– Can the backup be compressed before moving it to target server to reduce the transfer time?
– Can we migrate with the same scenario (full backup + incremental) but using backup sets with compression? Like described in the MOS Note: MOS 2013271.1
– From the same MOS Note above I see that we can create Metadata export during the RMAN back using “DATAPUMP FORMAT ‘/tmp/xplat_backups/trans_ts_dmp.bck’”. Will this type of export work for your migration scenario? Will it be faster maybe compared to the Datapump FULL Transportable Exp/Imp like in your example?
Thanks
LikeLike
Hi Kirill,
Those are good questions.
1. You are right. What I mean is “Image Copy backup”.
2. You can’t compress the initial image copy backup. Not natively with RMAN at least. You would have to use OS utilities for that.
There is the option of using compressed backupset for rolling forward the image copies, but that is not supported by the perl scripts. However, if you perform frequent incremental backup and restores, then the size of the backup should be of much concern.
3. No, that procedure works only with a full backup. Hence, it is not really usable, I think. Because a full backup simply takes too long in much cases.
4. I can’t recall the exact details, but I am pretty sure that RMAN is doing a full transportable export as part of the backup. So it is the same as I do.
I hope that help.
Thanks,
Daniel
LikeLike
Hi Daniel, Great video! I’m doing a migration using version Oracle 19c from AIX non-cdb to cloud at customer PDB. In my impdp parfile I have:
network_link=SRCLNK
full=y
job_name=imp_job
transportable=always
exclude=SYS_USER
and the importing is complaining with ORA-39038: Object path “SYS_USER” is not supported for FULL jobs.
What am I missing?
Thanks in Advance, Sue
LikeLike
Hi Sue,
Is that your complete par file? There are parameters missing, like “transport_datafiles”. See a complete example in the blog post.
However, you can actually remove “exclude=SYS_USER” from the par file. I added it to the example because it can remove some of the “noise” from the Data Pump logfile. If you don’t do it, you will see some ORA errors in the log file that involves SYS objects. However, in most cases these can be safely excluded. Because SYS is not imported anyway.
Regards,
Daniel
LikeLike
… and thanks for the nice feedback. Much appreciated. I am glad you liked it.
Daniel
LikeLike
Hi Daniel,
can I use this method on ExaCs to upgrade 12.1 to 19 on the same node/machine ?
Are there any better ways ?
Regards
Greg
LikeLike
Hi Greg,
Yes. You can use TTS to import into a higher release database and also into a PDB from a non-CDB. When you stay on the same endian format (Linux to Linux) you don’t need the extra disk space to convert the data files. But with this method you loose a lot of the internal stuff, like AWR, SQL Plan Baselines, SQL Profiles and so forth. Why not do a regular upgrade? You can use Flashback Database to quickly revert the upgrade if something fails.
Optionally, if you want less downtime, you can do it in a rolling manner with DBMS_ROLLING. I know that my colleagues in the MAA team are working on creating a new procedure for that.
Regards,
Daniel
LikeLike
Thank You for prompt answer, I’m not sure what ‘regular upgrade’ means in ExaCS, this DBMS_ROLLING sounds promising though. My config us just simple 1/2 4 node rac ExaCS already migrated from on-prem.
Regards
Greg
LikeLike
Hi Greg,
Our MAA team has the following recommendations for upgrades on ExaCS:
Upgrading to 19c Oracle Database on Exadata Cloud Service (ExaCS) and Exadata Cloud at Customer Gen2 (ExaCC) (Doc ID 2628228.1)
Regards,
Daniel
LikeLike
Thanks a lot!
Regards
Greg
LikeLike
excellent
LikeLike
Hi Daniel,
Thanks for sharing this content, this is very helpful.
Have a question, I did this for cross-platform migration recently using this MOS “V4 Reduce Transportable Tablespace Downtime using Cross Platform Incremental Backup (Doc ID 2471245.1)” (The doc where you downloaded the xtt scripts). Can we refer to the same doc for migration from EXADATA X7 to X8M??
Thank you!!
LikeLike
Hi Ramesh,
You can use this approach to migrate from one Exadata to another.
However, to migrate between two Exadata systems you should look into using standby databases. This would be my preferred approach as it easily avoids downtime issues because you just need a switchover to complete the migration from one system to the other. If you also need to upgrade the database as part of the migration, then you will have to do a regular database upgrade afterward. I would consider this the easiest solution.
And with the latest version of Zero Downtime Migration, you can use it to migrate to an Exadata on-prem as well. Very easy!
Regards,
Daniel
LikeLike
Hi Daniel,
Thanks for your reply.
Yes, Have done a couple of migrations using the ZDM and Data Gaurd model. We have proposed the same to one of our customers. But, they would like to go for this strategy for their Dev/Test boxes.
Yes, The latest version of ZDM 21c is amazing. Thanks for your response again.
Regards,
Ramesh
LikeLike
Hi Daniel,
Thanks for sharing this content, this is very helpful!
I did this for cross-platform migration recently using this MOS “V4 Reduce Transportable Tablespace Downtime using Cross Platform Incremental Backup (Doc ID 2471245.1)” (The doc where you downloaded the xtt scripts). The source was 11.2.0.4 standalone instance on AIX, and the Target is to a 19c PDB in Exadata. Level 0 backup and restore was successful, so was level 1 backup.
Wonder if you ever saw error while doing level 1 restore (roll forward) like this —
——————————————————————–
Start rollforward
——————————————————————–
Connected to an idle instance.
Connected to an idle instance.
ASMCMD-8102: no connection to Oracle ASM; command requires Oracle ASM to run
ASMCMD-8102: no connection to Oracle ASM; command requires Oracle ASM to run
So basically instead of shutdown and startup (in NOMOUNT) of TARGET PDB, it was doing to the CDB instead!
I checked xtt.properties file over and it looks good to me, and I am able to connect to Target PDB, startup/shutdown etc.
Can you shed some light here? Let me know if you need any other information!
Thanks!!
LikeLike
Hi Daniel,
Thanks for sharing, this is great content!
I am doing database migration using XTTS Version V4 approach by following Doc ID 2471245.1. The source database is version 11.2.0.4 in AIX, and the destination database is in version 19c on Exadata. I was able to complete level 0 backup and restore successful, also level 1 backup. But when I do the level 1 restore on the TARGET database (i.e. PDB name is MKTSVS_DEV), it always tries to bring down the entire CDB (INFDCDB1) instead of target PDB! The error message was —
——————————————————————–
Start rollforward
——————————————————————–
Connected to an idle instance.
Connected to an idle instance.
ASMCMD-8102: no connection to Oracle ASM; command requires Oracle ASM to run
ASMCMD-8102: no connection to Oracle ASM; command requires Oracle ASM to run
Wonder if you’ve ever seen this before? FYI, destconnstr was setup in xtt.properties file along with other parameters. I was able to manually connect to the Target PDB and shutdown/startup etc.
I tried a few times and always the same issue. Stuck now.. What else shall I check?
Thanks!!
LikeLike
Hi Elaine,
I am glad you like the content. Thanks for the feedback.
I haven’t seen this error before. In my blog post, I migrate also directly into a PDB, so it is odd that you encounter this problem. I suggest that you raise an SR at MOS.
Regards,
Daniel
LikeLike
Hi ,
While do transport tablespaces between 12.1.0.2 to 19c i faced this error :
ORA-39083: Object type TABLE:”JTF”.”JTF_PF_REPOSITORY” failed to create with error:
ORA-39218: type check on object type “APPS_NE”.”JTF_PF_PAGE_OBJECT” failed
ORA-39216: object type “APPS_NE”.”JTF_PF_PAGE_OBJECT” hashcode or version number mismatch
Any idea ? i cannot find any thing in Oracle notes.
Thanks
LikeLike
Hi Sherif,
I haven’t seen that problem before. I did a quick search in our internal systems, and there are a few hits that might be related. On a test system, you can try to apply patches 21490917 and 25139545 before you start the Data Pump export. That might solve the problem. If not, you need to open an SR.
Regards,
Daniel
LikeLike
Planning to migrate from Solaris 12.1.0.2 to Linux 12.1.0.2 .
Presume this would work. are you aware of any issues?
LikeLike
Hi Baliji,
Migrating from Solaris to Linux is a very good use case for this procedure. Many customers have made similar migrations with success. Get started and let me know what happens. I am not aware of any issues specific to this migration path.
Regards,
Daniel
LikeLike
We have done one 12TB migration from Solaris Sparc to Linux 64 bit. Use XTTS and Full Transportable Tablespace expdp/impdp. You have test out process. You have to take care of any system objects ( e..g DB level triggers and create them on target . Any personal objects in sys/system schema ). I did have issues with ASM Aliases which XTTS creates , issue came when we tried to to do another database restore on same host and some tablespace name were common in both databases e.g. users and some others which have created issue during restore operation kind of overwrite and causes corruption with another database. This issue will come only when you are trying to do migration multiple DB on same host.
LikeLike
Hi Sanjay,
Thanks for your comment. When doing a full transportable export/import we won’t move over such triggers. That’s a good point. I will find a way to get that highlighted. When it comes to personal objects in SYS and SYSTEM schema, you are also right. But you should really not be doing that. This is not considered good practice.
It is a good point about the ASM aliases. I will get that added as well. Generally, after a migration I would recommend that you move the data files into the proper OMF locations by doing online datafile move. I hope to have a blog post out in next week about that. Stay tuned.
Thanks for such useful feedback. Much appreciated!
Kind regards,
Daniel
LikeLike
Thanks Daniel. I agree that no one should be creating but sometimes you have to deal with other people work who have done this. I did during time of final import used full paths for file names instead of asm aliases in transport datafiles so control file, data files were using correct path however, I did not delete alias and never thought this would create issues since these were not in use but that’s what caused issue for another database restore.
LikeLike
Hi Sanjay,
It is a very good point about the aliases – even if you use the absolute file names. I will get my blog posts updated, so this is made very clear. Thanks for the feedback!
Regards,
Daniel
LikeLike
Hi all
Thanks for sharing
I have some questions about this method.
1) How to gather statistic (database, schema , or only dictionary ?) after completing import metadata step ?
2) Do we need RMAN “validate tablespace check logical” as Oracle recommended in Metalink before taking tablespace ONLINE ? –> this will take long time with big tablespace
Please help me on this questions
LikeLike
@HieuHoang,
Recently, I have done 12TB database migration and next week we are planning to do 120 TB database migration.
For Q No 1: While taking expdp/impdp, I am including stats since in my case generating db stats for whole database/schema will take long time so excluding stats is not option, however, I will run system stats, dictionary stats on new system which does not take that much time. So it all depends on your DB size and time required to do new stats generation vs exporting/importing
Q No 2 : I did not do any validate tablespace check logical while doing 12TB migration which was already done couple months ago, neither I am doing such for 120TB migration plan,
Hope this help.
LikeLiked by 1 person
Hi,
1: Take a look at this blog posts. There are two sections on statistics. https://dohdatabase.com/2022/03/23/xtts-make-it-fast/
2: It is not required to run RMAN “validate tablespace” before turning the tablespaces online. Typically, in large migrations – as you mention – there is not time for this. Which My Oracle Support note recommends/requires this?
Regards,
Daniel
LikeLike
Hi Daniel
I have followed Metalink DocID 2471245.1 Phase 6 , Step 6.1 (Check tablespaces for corruption) . Do you think we need this step as mandatory ? What if data blocks get corrupted if skip this step
Additionally, After migrating tablespaces from On-prem to Cloud by this method, I faced some issues which need to solve before golive:
1) missing some global temporary objects . Need to compare between source and target then take datapump these missing objects
2) i used filesystem (/oradata/db_unique_name/datafile) for hosting the DB datafiles , however I need have to restore datafiles on both target primary and standby which have different location
Finally I chose to restore to /oradata , then rename the datafiles to right localtion on both target primary and standby respectively
xtt.properties parameter below is on both target primary and standby :
dest_datafile_location=/oradata
LikeLike
Hi,
I checked the MOS note. If time allows it is good to run it, but it is not required. The operation is “read-only” so you can do it, while you are using the database for other things. Plus you can run it in parallel.
I suggest that you have a look at this blog post which has details on what is included – and what isn’t: https://dohdatabase.com/2022/03/28/xtts-full-transportable-export-import/
Happy migrating,
Daniel
LikeLike
Hi Daniel
Thanks for your response
I have followed FTEX methods to fix missing objects issues and everything was ok but got another issues.during import phase.
I only want to migrate APP user schema which their objects are hosting on APP_DATA tablespace ,I don’t need to migrate other user schemas (ADMIN) and tablespaces (USERS and ADMIN)
1) ORA-39151: Table “APP”.”xxx” exists. All dependent metadata and data will be skipped due to table_exists_action of skip
2) ORA-00959: tablespace ‘ADMIN’ does not exist —-> no need to migrate
My question is that do we have to remove them in PAR file as below during import phase ?
exclude=TABLESPACE:”IN(‘TEMP’,’ADMIN’,’USERS’)”
exclude=SCHEMA:”IN(‘SPATIAL_CSW_ADMIN_USR’,’SPATIAL_WFS_ADMIN_USR’,’ADMIN’)”
LikeLike
Hi,
FTEX was made as a way of easily migrating an entire database. If you need only a portion of the schema, then you are better of with a traditional TTS import.
The SPATIAL users should have been removed automatically by FTEX since they are internal users, but that is currently not the case. It if perfectly fine to exclude them as you mention.
TEMP tablespaces can be moved (or rather re-created by FTEX), but I find it easiest to create the TEMP tablespaces in advance, and exclude them as you also mention.
Regards,
Daniel
LikeLike
Hi Daniel,
I have tried with 2 ways : FTEX and traditional TTS import during export and import metadata phase and the result is as following
1) FTEX : all objects of users hosting on all tablespaces excluding USERS were OK but need have to remove USERS during import (exclude=TABLESPACE:”IN(‘USERS’)”) or not migrate USERS tablespace in the beginning . If not, it came up with error USERS existed already
2) Traditional TTS import: missed some objects which belong to APP user schema but hosting on TEMP tablespace and SYS tablespace .I created APP user schema and grant all privileges to it before doing import
–this is script for export
dumpfile=xttdump.dmp
directory= DATA_PUMP_DIR
transport_tablespaces= DATA_TABLESPACE,LOB_TABLESPACE
transport_full_check=yes
logfile=tts_export.log
SQL> SELECT A.OBJECT_TYPE SOURCE_OBJTYPE, SRC_NUMBER, NVL(DEST_NUMBER,0) DEST_NUMBER, NVL(SRC_NUMBER, 0) – NVL(DEST_NUMBER,0) MISSING_NUMBER FROM
(select object_type, count(*) SRC_NUMBER from dba_objects where owner=’APP’ GROUP BY OBJECT_TYPE) A
LEFT JOIN
(select object_type, count(*) DEST_NUMBER from dba_objects@dxtts04db where owner=’APP’ GROUP BY OBJECT_TYPE) B
ON A.OBJECT_TYPE = B.OBJECT_TYPE; 2 3 4 5
SOURCE_OBJTYPE SRC_NUMBER DEST_NUMBER MISSING_NUMBER
———————– ———- ———– ————–
INDEX 1533 1520 13
LOB 89 83 6
TABLE 612 532 80
SEQUENCE 313 0 313
PROCEDURE 6 0 6
PACKAGE BODY 31 0 31
FUNCTION 2 0 2
VIEW 24 0 24
PACKAGE 31 0 31
TYPE 8 0 58
LikeLike
HI Daniel
I need to migrate all objects of one schema but XTTS (with TTS during Transport phase ) which only support to migrate all objects hosting on tablespace. However some schemas have some objects which don’t fit into one tablespace , they also have objects on temp and system tablespaces (such as global temporary tables on temp tablespace, functions and packages on SYSTEM tablespace)
Do you know how to use XTTS to migrate all these objects during Transport phase ?
LikeLike
Hi,
It is a requirement for transportable tablespaces that you are using self-contained tablespaces. I suggest that you read: https://dohdatabase.com/2022/02/07/what-is-a-self-contained-transportable-tablespace-set/
If you don’t want to migrate all schemas, you can still use Full Transportable Export/Import. You can exclude certain schemas during the import, but you still need to transport all tablespaces.
If you only want a subset of the schemas in a database, you should probably use regular transportable tablespaces. However, when you do that Data Pump transports only the data files. You need to move or re-create all supporting metadata information. You can still use Data Pump for that (contents=metadata_only). You can also do it with simple commands, like CREATE USER …., CREATE PACKAGE … etc.
Regards,
Daniel
LikeLike
Hi Daniel
Thanks for your quick response
1) For XTTS in combination with TTS , i have already checked self-contained and it was ok because all tables , indexes , constraints have been already located on same tablespace. However some objects (such as global temporary tables, functions, packages) of schema have been located on temp and system tablespace , so these objects were missed during migrating subset of the tablespaces to target –> it makes sense because we are migrating tablespaces , not schema
2) For FTEX , why it got the error : “tablespace USERS already existed” when I set the import parameter as below. I have to exclude USERS tablespace to fix the error and all users was migrated successfully
network_link=SRCLNK
full=y
transportable=always
metrics=y
logtime=all
exclude=TABLE_STATISTICS,INDEX_STATISTICS
exclude=TABLESPACE:”IN(‘TEMP’)” –> need to add ‘USERS’ here to fix the error
exclude=SCHEMA:”IN(‘SPATIAL_CSW_ADMIN_USR’,’SPATIAL_WFS_ADMIN_USR’)”
directory=DPUMP_TTS
transport_datafiles
3) For subset schema migration by regular transportable tablespaces, do you mean that we need to add additional Data Pump (contents=metadata_only) step to fill in missed objects (such as global temporary tables, functions, packages) to the last step of the normal process ?
LikeLike
2. If you already have a USERS tablespace in your new, empty database, you can either drop it or rename it.
3. Yes, you need to find a way to transfer all that metadata.
Regards,
Daniel
LikeLike
Hi Daniel,
I have 2 questions,
1. Base on what, the perl script backup full or incr ?
2. When I want to re-restore from full backup, I can not run with res.txt copied first time. I must re-copy res.txt from source. Is there any changes in res.txt after restoring ?
Regards,
ChiMai
LikeLike
Hi,
The perl script will take either a level 0 the first time it is executed. The next times it will run incrementals only to be applied on top of the original level 0.
Every time you perform a backup and transfers the backup files to the target database, you must copy res.txt as well. Res.txt contains important information about the backup that the perl script needs to perform the restore. The perl script will figure out by itself from which backup to restore. You just run the –restore command.
Regards,
Daniel
LikeLiked by 1 person
Dear Daniel,
I think the content of res.txt file show me how oracle backup and restore in this method.
I have another question. My company has plan to upgrade core database, from 10gR2 (10.2.0.4) with over 15TB to 19c. Please give me advice about the method with minimun downtime
Regards,
ChiMai
LikeLike
Hi,
You can still use much of the information from this blog post series: https://dohdatabase.com/xtts/. It has links to V3 (11g) of the perl scripts. It can be used when source database is 10g.
Regards,
Daniel
LikeLiked by 1 person
Hello Daniel,
getting this error:
Connected to: Oracle Database 19c Enterprise Edition Release 19.0.0.0.0 – Production
ORA-39001: invalid argument value
ORA-39038: Object path “SYS_USER” is not supported for FULL jobs.
Regards,
Gerrit
LikeLike
Hi,
Are you using Oracle Database 19c – the latest Release Update and Data Pump bundle patch? That error should not occur when importing into PDBs. Nevertheless, you can safely remove it from the parameter file.
You might an error about changes on SYS user that won’t work, but that should not be a problem.
Regards,
Daniel
LikeLike