What if the database you want to migrate has bigfile tablespaces? Bigfile tablespaces are very often used in very large databases. Do they influence on the migration using cross-platform transportable tablespaces and incremental backups?
A bigfile tablespace is a tablespace with a single, but potentially very large (up to 4G blocks) data file. Traditional smallfile tablespaces, in contrast, can contain multiple data files, but the files cannot be as large.
The benefits of bigfile tablespaces are the following:
A bigfile tablespace with 8K blocks can contain a 32 terabyte data file…
Important to note is that a bigfile tablespace contains one big data file. That file can be huge.
What Do You Normally Do?
When RMAN backs up a database or a tablespace it will parallelize by using several channels – each channel will process one or more data files.
Imagine a 32 TB data file (from a bigfile tablespace). One RMAN channel will be allocated and needs to process that data file alone. That will take a while!
To solve that multisection backup was implemented. That allows multiple channels to work on the same data file. You can enable multisection backup by using the clause section size.
Backup
The initial, level 0 backup of the source database is executed by the Perl script during the migration. The Perl script generates the RMAN backup commands on-the-fly, and it does not specify a section size.
In addition, it is not possible to specify section size as a default channel configuration (see RMAN show all command).
So there is no way to enable the use of multisection backup. Currently, multisection backup is simply not supported by the Perl script.
Now What
If multisection backup is essential to your migration, I suggest you create a Service Request and ask for an enhancement. The more customers request it, the more likely it is that the feature will be added.
If you have bigfile tablespaces you have only one option. Use multiple Perl scripts. It is a good workaround if you have many bigfile tablespaces. The workaround probably won’t add much value if you only have one.
I have another blog post describing the use of multiple Perl scripts.
When doing a cross-platform migration with transportable tablespaces and incremental backup, is it possible to perform backups on a standby database? If so, you could offload the work from a primary database.
The short answer is yes. You can use a physical standby database but not a snapshot standby database.
Using a standby database for the backups is an advantage in some situations:
The primary database does not have the capacity to perform the extra backups (CPU, disk space, or I/O).
You want the primary database to be completely unaffected by the migration.
Perform the Data Pump export on the primary database:
[oracle@src-pri]$ expdp system ... full=y transportable=always ...
Active Data Guard
If you have a license for Active Data Guard, you can simply keep the physical standby database in OPEN WITH REDO APPLY mode. You don’t need to switch from OPEN mode to MOUNT mode.
Conclusion
Being able to perform the backups on a standby database is a huge advantage. But it makes the process slightly more complicated, so I would recommend it only if really needed. In addition, if you don’t follow the procedure strictly, you might accidentally use a feature that requires Active Data Guard.
When you migrate an Oracle Database using cross-platform transportable tablespaces (XTTS) and incremental backups, you will need to transfer a large amount of data to the target host. In some situations, especially if the target host is in a remote data center or the cloud, you are restricted by the network throughput, and it can be a limiting factor.
One approach to speed up the data transfer is to compress it before it leaves the source host. Compressing and decompressing takes time and CPU. But if your network connection is slow enough, it may pay off in the end.
First, you start the initial level 0 backup of the source database:
$ORACLE_HOME/perl/bin/perl xttdriver.pl --backup
The backups will be stored in the directory defined by src_scratch_location. In my case, the directory is /u01/app/oracle/xtts_src_scratch. Now you can simple compress the entire directory:
gzip -r /u01/app/oracle/xtts_src_scratch
This should significantly reduce the size of the files. Transfer the compressed files to your target host, and put them into the directory defined by dest_scratch_location. Then, uncompress the files:
gunzip -r /u01/app/oracle/xtts_dest_scratch
Continue the procedure described in the above MOS note and start the restore:
$ORACLE_HOME/perl/bin/perl xttdriver.pl --restore
Some Figures
I made a little test to give you an idea of how much there is to save.
Size
Data files total size
197 GB
Backup set size
197 GB
After gzip compression
12 GB
Because I don’t have any free space in my data files, the backup sets have almost the same size as the actual data files – 197 GB. By gzipping the files I could reduce the file size to 12 GB.
So there is a significant amount to save – from 197 GB to 12 GB. It makes a huge difference whether you have to transfer 197 or 12 GB. But you must consider the time it takes to compress and decompress.
Elapsed time
Compression
13 min 52 sec
Decompression
8 min 7 sec
I made the same test but with image file backups and the numbers were almost the same. Generally, you should always try to use backup sets over image file backups. Backup sets use unused block compression which will skip all the unused blocks in your data files. That can make quite a difference for database with a lot of free space.
What About RMAN Compression
RMAN does have the option of compressing the backup set, but that is currently not supported by the Perl scripts. If the Perl scripts would be able to do that, you could get a good compression ratio with RMAN compression as well (of course provided you have a license for Advanced Compression Option) and avoid the gzip trick. Using the example above, by using RMAN compressed backup sets (medium compression) the backup files would be 0,3 GB which is very good as well.
But for now, you are "stuck" with the gzip trick.
Final Words
A few things to consider:
You should only consider this approach if you have a slow network.
You will need extra disk space during the compression/decompression operation.
You should only compress the initial, level 0 backup. The subsequent level 1 incremental backups will be much smaller in size, and it is unlikely to pay off.
You should test on your own database and hardware to know the actual compression ratio. Add the network throughput to the equation, and you can do the math to see if it is a good idea for your specific project.
Yesterday a comment was made on a video on our YouTube channel. The question was, what happens when you try to transport a tablespace that is not self-contained. Let’s find out.
The Error
First, some test data:
create tablespace a;
create tablespace b;
create tablespace c;
create user daniel identified by oracle;
grant dba to daniel;
create table daniel.sales (c1 number) tablespace a;
create table daniel.orders (c1 number) tablespace c;
create index daniel.i_orders on daniel.orders (c1) tablespace b;
Then, let’s run the Data Pump command to start the process
alter tablespace a read only;
alter tablespace b read only;

host expdp daniel/oracle transport_tablespaces=a,b
Export: Release 19.0.0.0.0 - Production on Fri Feb 4 12:32:14 2022
Version 19.14.0.0.0

...

Processing object type TRANSPORTABLE_EXPORT/STATISTICS/TABLE_STATISTICS
ORA-39123: Data Pump transportable tablespace job aborted
ORA-39187: The transportable set is not self-contained, violation list is

ORA-39907: Index DANIEL.I_ORDERS in tablespace B points to table DANIEL.ORDERS in tablespace C.
Job "DANIEL"."SYS_EXPORT_TRANSPORTABLE_01" stopped due to fatal error at Fri Feb 4 12:32:33 2022 elapsed 0 00:00:17
The answer is: Data Pump will check the set of tablespaces and ensure they are self-contained, when you perform the export.
Self-Contained
In the documentation it lists the following as one of the tasks for transporting tablespaces:
Pick a self-contained set of tablespaces.
What does that mean exactly? Later on, in the documentation there are some examples of violations:
An index inside the set of tablespaces is for a table outside of the set of tablespaces.
A partitioned table is partially contained in the set of tablespaces.
A referential integrity constraint points to a table across a set boundary.
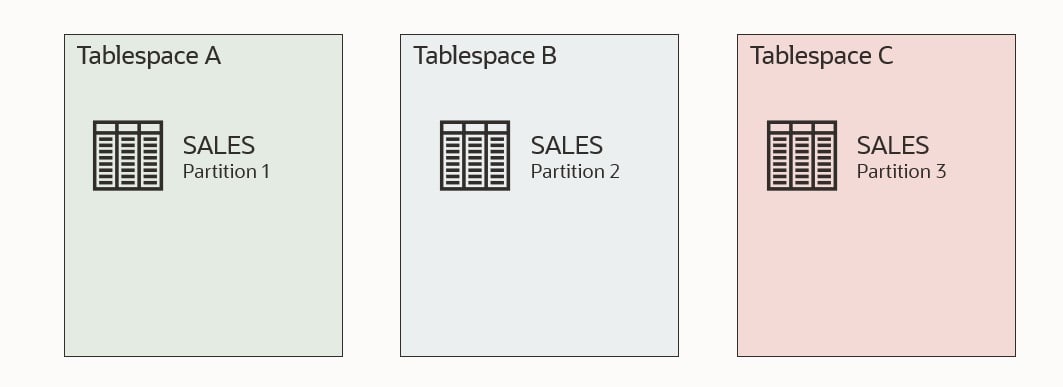
Let me illustrate it. Imagine I want to transport tablespaces A and B.
This first illustration shows a self-contained tablespace set. Table SALES is in tablespace A and a corresponding index I_SALES in tablespace B. Both tablespaces are part of the set that I want to transport. All good!
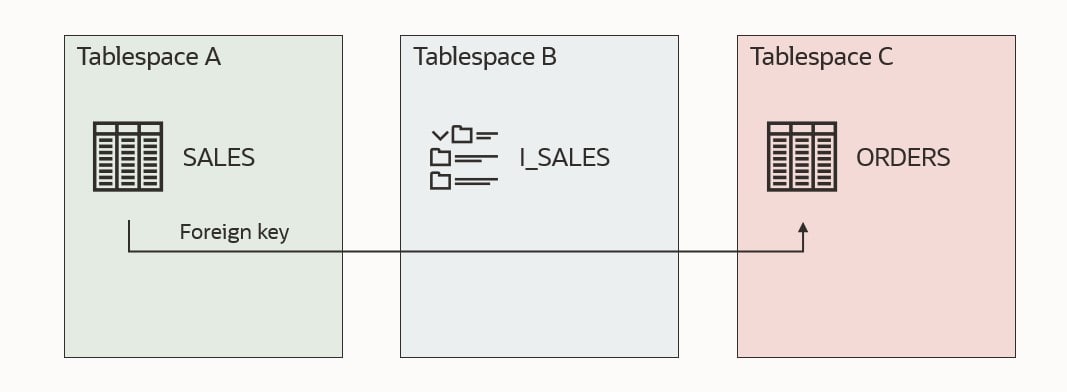
The next example is no good. Tablespace B now contains an index I_ORDERS, which refers to a table ORDERS which is not placed in the tablespaces that I want to transport. Either I have to drop the index I_ORDERS or move the table ORDERS into one of the tablespaces I am transporting.
This example is also no good. Table SALES has three partitions. One of the partitions is in a tablespace that I am not transporting. I need to either drop the partition in tablespace C or move it to one of the other tablespaces.
This last example is also no good. Table SALES has a foreign key constraint that refers table ORDERS, but ORDERS is located outside the tablespace set. There is a solution to this which will be discussed shortly.
Checking
You can use DBMS_TTS to check whether a given set of tablespaces are self-contained. Using my previous example. I would run:
execute dbms_tts.transport_set_check('A,B');
Next, I could check the result:
SQL> select * from transport_set_violations;
By default, the procedure transport_set_check doesn’t check for foreign keys that refer to something outside the tablespace set. This means that my last illustration above would not be found by transport_set_check, and you would end up with an error when you try to transport the tablespaces.
If you have foreign key constraints that refer to a table outside of the tablespace set, it is one of the issues which can be ignored. You can instruct Data Pump to exclude constraints, and this issue will be ignored:
When you import the tablespaces into another database, there won’t be any constraints. Even those foreign key constraints that were valid are gone. And even check constaints. All of them!
You should consider whether you want to create them again manually.
Indexes
If you can exclude constraints, can you also exclude indexes? If possible, you could avoid dropping or moving an offending index.
Let’s try! I am using the same test data as the first example.
Check for violations:
execute dbms_tts.transport_set_check('A,B');
select * from transport_set_violations;

VIOLATIONS
-----------------------------------------------------------------
ORA-39907: Index DANIEL.I_ORDERS in tablespace B points to table DANIEL.ORDERS in tablespace C.
As expected, index I_ORDERS is a problem. Let’s try to export and exclude indexes (exclude=index):
alter tablespace a read only;
alter tablespace b read only;
host expdp daniel/oracle transport_tablespaces=a,b exclude=index
Export: Release 19.0.0.0.0 - Production on Fri Feb 4 12:32:14 2022
Version 19.14.0.0.0

Copyright (c) 1982, 2019, Oracle and/or its affiliates.  All rights reserved.

Connected to: Oracle Database 19c Enterprise Edition Release 19.0.0.0.0 - Production
Starting "DANIEL"."SYS_EXPORT_TRANSPORTABLE_01":  daniel/******** transport_tablespaces=a,b exclude=index
Processing object type TRANSPORTABLE_EXPORT/STATISTICS/TABLE_STATISTICS
ORA-39123: Data Pump transportable tablespace job aborted
ORA-39187: The transportable set is not self-contained, violation list is

ORA-39907: Index DANIEL.I_ORDERS in tablespace B points to table DANIEL.ORDERS in tablespace C.
Job "DANIEL"."SYS_EXPORT_TRANSPORTABLE_01" stopped due to fatal error at Fri Feb 4 12:32:33 2022 elapsed 0 00:00:17
It is not possible to exclude indexes in the same way as constraints. However, I think it makes sense. A constraint is just metadata; something that is recorded in the dictionary. We can easily ignore that when doing the Data Pump export.
An index is an object with segments; data in the tablespace. Imagine we could somehow exclude the index. All those blocks belonging to the index would now be zombie blocks belonging to nothing.
Standby Database
If you need to move data out of a running database and your tablespaces are not self-contained, you need to fix the issues. Some of the solutions involve dropping or moving data, but you might not want to do that in a running database.
Imagine the example above where there is an index that refers to a table outside of the tablespace set (I_ORDERS). You probably need that index in your running database, so not a good idea to drop the index.
But you can use your standby database if you have one.
On your snapshot standby, do the required changes to make your tablespace set self-contained.
Still, on the snapshot standby, copy the data files and perform the Data Pump export to generate your transportable tablespace set and corresponding Data Pump dump file.
Revert the snapshot standby back into a physical standby. This will automatically revert all the temporary changes you made and re-sync with the primary database.
If you don’t have a standby database, you could achieve the same with Flashback Database, but that would require an outage on the running database.
Conclusion
If you try to transport tablespaces that are not self-contained, you will get an error. There is no way around the issues except for foreign key constraints.
If you need to make changes to your database to have self-contained tablespaces, you can do it on a snapshot standby database to avoid interfering with a running database.
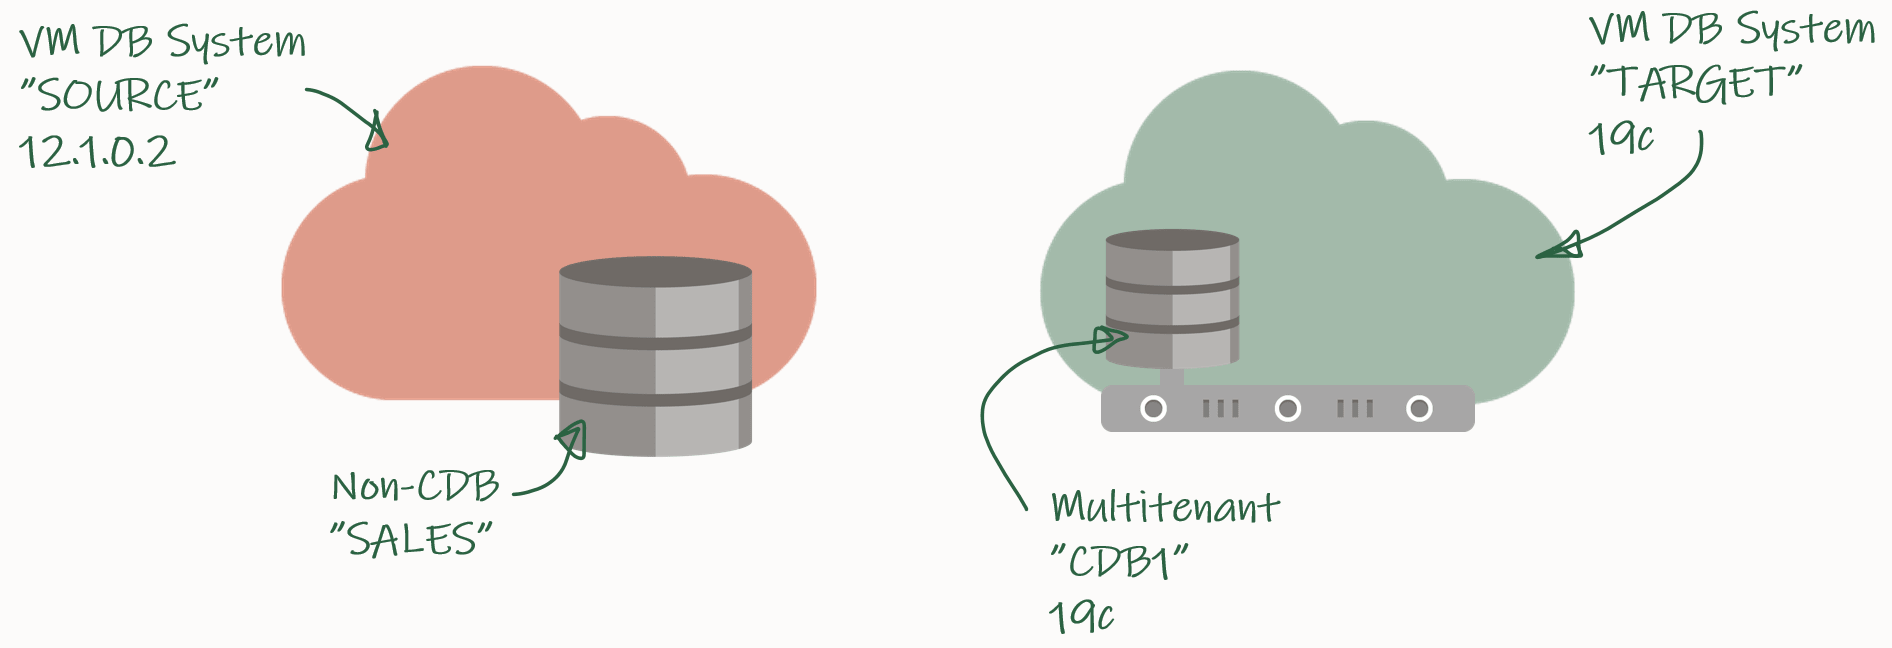
These steps will guide you through a migration of a database using Full Transportable Export/Import (FTEX) and incremental backups. I covered the concept in a previous blog post, which you should read to understand the basics. Remember Transportable Tablespaces and Full Transportable Export/Import requires Enterprise Edition.
My demo environment looks like this:
I have an 12.1.0.2 database that I want to migrate to a PDB in a new CDB that runs 19c.
Check Prerequisites
Create a new PDB called SALES in the target CDB:
TARGET/CDB1 SQL> create pluggable database sales admin user admin identified by admin;
TARGET/CDB1 SQL> alter pluggable database sales open;
TARGET/CDB1 SQL> alter pluggable database sales save state;
Prepare the database to use TDE Tablespace Encryption:
TARGET/CDB1 SQL> alter session set container=sales;
TARGET/CDB1 SQL> administer key management set key force keystore identified by <keystore-pwd> with backup;
Verify SQL*Net connectivity from source host to target PDB:
Verify database character set and national character set are the same:
SOURCE/SALES SQL> select property_name, property_value from database_properties where property_name in ('NLS_CHARACTERSET', 'NLS_NCHAR_CHARACTERSET');

TARGET/SALES SQL> select property_name, property_value from database_properties where property_name in ('NLS_CHARACTERSET', 'NLS_NCHAR_CHARACTERSET');
Ensure the source database is in ARCHIVELOG mode:
SOURCE/SALES SQL> select log_mode from v$database;
Enable block change tracking on source database. Requires Enterprise Edition (on-prem), DBCS EE-EP (cloud) or Exadata. Although strictly speaking not required, it is strongly recommended:
SOURCE/SALES SQL> select status, filename from v$block_change_tracking;
SOURCE/SALES SQL> alter database enable block change tracking;
Ensure that you can connect from the source to the target host as oracle:
[oracle@source]$ ssh <target ip> date
Identify Tablespaces And External Data
Identify all the tablespaces that you will migrate. With FTEX you should transport all the tablespaces, except those that contain Oracle maintained data, like SYSTEM, SYSAUX, UNDO and so forth:
SOURCE/SALES SQL> select tablespace_name from dba_tablespaces;
Save the list of tablespaces for later. In my demo, I only have the tablespace SALES except the Oracle maintained ones.
Next, on the target database ensure that any of the existing tablespaces doesn’t conflict with the ones you are transporting:
TARGET/SALES SQL> select tablespace_name from dba_tablespaces;
If there is a conflict of names, you have to drop or rename the tablespaces in the target database.
Use DBMS_TDB to easily identify external stuff like directories, external tables and BFILEs. Any files stored in the file system outside the database must be manually transferred to the file system on the target host:
SOURCE/SALES SQL> SET SERVEROUTPUT ON
SOURCE/SALES SQL> DECLARE
      external BOOLEAN;
   BEGIN
      external := DBMS_TDB.CHECK_EXTERNAL;
   END;
/
Download and Configure Perl Scripts
Create a folder to hold the perl scripts, download the scripts from MOS doc ID 2471245.1, and unzip:
[oracle@source]$ rm -rf /home/oracle/xtts
[oracle@source]$ mkdir /home/oracle/xtts
[oracle@source]$ cd /home/oracle/xtts
[oracle@source]$ --Download file from MOS
[oracle@source]$ unzip rman_xttconvert_VER4.3.zip
Create a working directory (aka. scratch location) which will hold the backups. Ensure that you have enough space at this location at both source and target database.
Now, you can start the first initial backup of the database. You take it while the source database is up and running, so it doesn’t matter if the backup/restore cycle take hours or days to complete:
[oracle@source]$ export TMPDIR=/home/oracle/xtts
[oracle@source]$ cd /home/oracle/xtts
[oracle@source]$ $ORACLE_HOME/perl/bin/perl xttdriver.pl --backup
The perl script has been configured in such a way that it automatically transfers the backups to the target system. In addition to that, a small text file must be transferred as well:
Now, on the target system, you can restore the backup that was just taken. If needed, the data files are automatically converted to the proper endian format. If conversion is needed, you need space for a copy of all the data files:
[oracle@target]$ export TMPDIR=/home/oracle/xtts
[oracle@target]$ cd /home/oracle/xtts
[oracle@target]$ $ORACLE_HOME/perl/bin/perl xttdriver.pl --restore
Incremental Backup and Restore
You can – and should – run the incremental backup and restores as many times as possible. The more frequent you run them, the faster they will run because there will be fewer changes.
At least, close to the migration downtime window starts you should run them often, to minimize the time it will take to perform the final backup and restore:
[oracle@source]$ export TMPDIR=/home/oracle/xtts
[oracle@source]$ cd /home/oracle/xtts
[oracle@source]$ $ORACLE_HOME/perl/bin/perl xttdriver.pl --backup
[oracle@target]$ export TMPDIR=/home/oracle/xtts
[oracle@target]$ cd /home/oracle/xtts
[oracle@target]$ $ORACLE_HOME/perl/bin/perl xttdriver.pl --restore
Import Metadata Using FTEX
Create a directory object that points to the xtts folder:
TARGET/SALES SQL> create directory LOGDIR as '/home/oracle/xtts';
Next, create a database link to the source database that can be used to import the metadata. If the source database is already a PDB, ensure that the database link points directly into the PDB:
TARGET/SALES SQL> create public database link SRCLNK connect to system identified by <password> using '//<source_ip>:1521/<service_name>';
Test that it works:
TARGET/SALES SQL> select * from dual@srclnk;
Next, create a par file (sales_imp.par) that you can use for the Data Pump import (see appendix below for explanation):
Start Data Pump and perform the import. newsales is a TNS alias that points into the SALES PDB in the target CDB. If you have encrypted tablespaces, you should use the option encryption_pwd_prompt. It allows you to input the TDE password. It can be omitted if there are no encrypted tablespaces.
Once the import has completed, you should examine the Data Pump log file for any critical errors. Check the appendix (see below) for ignorable errors:
[oracle@target]$ vi /home/oracle/xtts/sales_imp.log
That’s it! Your data has been migrated. Now would be a good time to:
Check data files for corruption using RMAN VALIDATE command
Although not mandatory, it is recommended if time allows. It is a read-only check that you can run while other stuff is happening in the database. See step 6.1 in MOS doc ID 2471245.1.
Gather dictionary statistics
Test your application
Start a backup
Gather statistics – they were excluded from the export
Drop the database link that points to the source database
Cleanup the file system:
/home/oracle/xtts
/u01/app/oracle/xtts_scratch
Conclusion
Even huge, TB-sized, databases can be migrated with very little downtime by using incremental backups. By using the perl script from My Oracle Support and combined with Full Transportable Export/Import it is a simple process. In addition, you can even migrate to a new endian format, to a higher release and into a PDB in one operation. It requires Enterprise Edition and you must have plenty of disk space – potentially twice the size of your database.
There is a video on our YouTube channel that you can watch. It demos the entire process. I suggest that you subscribe to our channel and get notified whenever there are new videos.
Thanks to my good colleague, Robert Pastijn, for supplying a runbook that was used as inspiration.
If Source Database Is in OCI and Automatic Backup Is Enabled
If the source database is running in OCI and you have enabled automatic backup, you must make a few changes.
In xttprep.tmpl around line 319 change:
cp('backup for transport allow inconsistent ' ||
to
cp('set encryption off for all tablespaces;set compression algorithm "basic";backup for transport allow inconsistent ' ||
In xttdriver.pl around line 4268 change:
my $rman_str1 = "set nocfau;";
to
my $rman_str1 = "set nocfau;".
                "set encryption off for all tablespaces ;".
                "set compression algorithm 'basic' ;" ;
ORA-02085
If you get ORA-02085 when querying over the database link:
TARGET/SALES SQL> alter system set global_names=false;
ORA-39032
If you are exporting from 11.2.0.4, you must add the VERSION parameter:
expdp ... version=12
ORA-39187, ORA-39921 And ORA-39922
If the Data Pump job aborts and complain about object named CLI_SWPXXXXXXXX or SYS_ILYYYYYYYYY:
ORA-39123: Data Pump transportable tablespace job aborted
ORA-39187: The transportable set is not self-contained, violation list is
ORA-39921: Default Partition (Table) Tablespace SYSAUX for CLI_SWPXXXXXXXX not contained in transportable set.
ORA-39922: Default Partition (Index) Tablespace SYSAUX for SYS_ILYYYYYYYYY not contained in transportable set.
Job "SYS"."SYS_EXPORT_FULL_01" stopped due to fatal error at Wed Jul 18 13:51:01 2018 elapsed 0 00:05:55
Use network_link to specify the name of the database link that points back to the source database.
full=y and transportable=always instructs Data Pump to perform a full transportable export/import.
exclude=TABLE_STATISTICS,INDEX_STATISTICS exclude statistics from the import. It is better and faster to gather new, fresh statistics on the target database. If you insist on importing your statistics, you should use DBMS_STATS.
exclude=SYS_USER excludes the import of the SYS user. In a PDB that is not even allowed, and most likely you are not interested in importing the definition of the SYS user.
exclude=TABLESPACE:"IN('TEMP')" excludes the temporary tablespace from the import. Most likely there is already a temporary tablespace in the new, target PDB. It is faster to create a TEMP tablespace in advance – and name it the same as in the source database.
A change was made to Spatial in 19c and some Spatial admin users are removed. To avoid errors/noise in the log file you can safely exclude them from the import by specifying exclude=SCHEMA:"IN('SPATIAL_CSW_ADMIN_USR','SPATIAL_WFS_ADMIN_USR')".
transport_datafiles is used to specify the data files that make you the tablespace you are transporting. Specify the parameter multiple times to specify more data files. You can use asmcmd to get the data file paths and names.
Data Pump Ignorable Errors
Multimedia desupported in 19c, but code is still there. You can safely disregard this error:
Processing object type DATABASE_EXPORT/NORMAL_OPTIONS/TABLE
ORA-39342: Internal error - failed to import internal objects tagged with ORDIM due to ORA-00955: name is already used by an existing object.
Processing object type DATABASE_EXPORT/SYSTEM_PROCOBJACT/POST_SYSTEM_ACTIONS/PROCACT_SYSTEM
ORA-39083: Object type PROCACT_SYSTEM failed to create with error:ORA-04042: procedure, function, package, or package body does not exist

Failing sql is:
BEGIN
SYS.DBMS_UTILITY.EXEC_DDL_STATEMENT('GRANT EXECUTE ON DBMS_DEFER_SYS TO "DBA"');COMMIT; END;