How to Perform Standby-first Patch Apply When You Have Different Primary and Standby Databases in the Same Oracle Home

I am a big fan of Oracle Data Guard Standby-First Patch Apply. You can:

  • Reduce downtime to the time it takes to perform a switchover.
  • Test the patching procedure on the standby database.

I received an interesting question the other day:

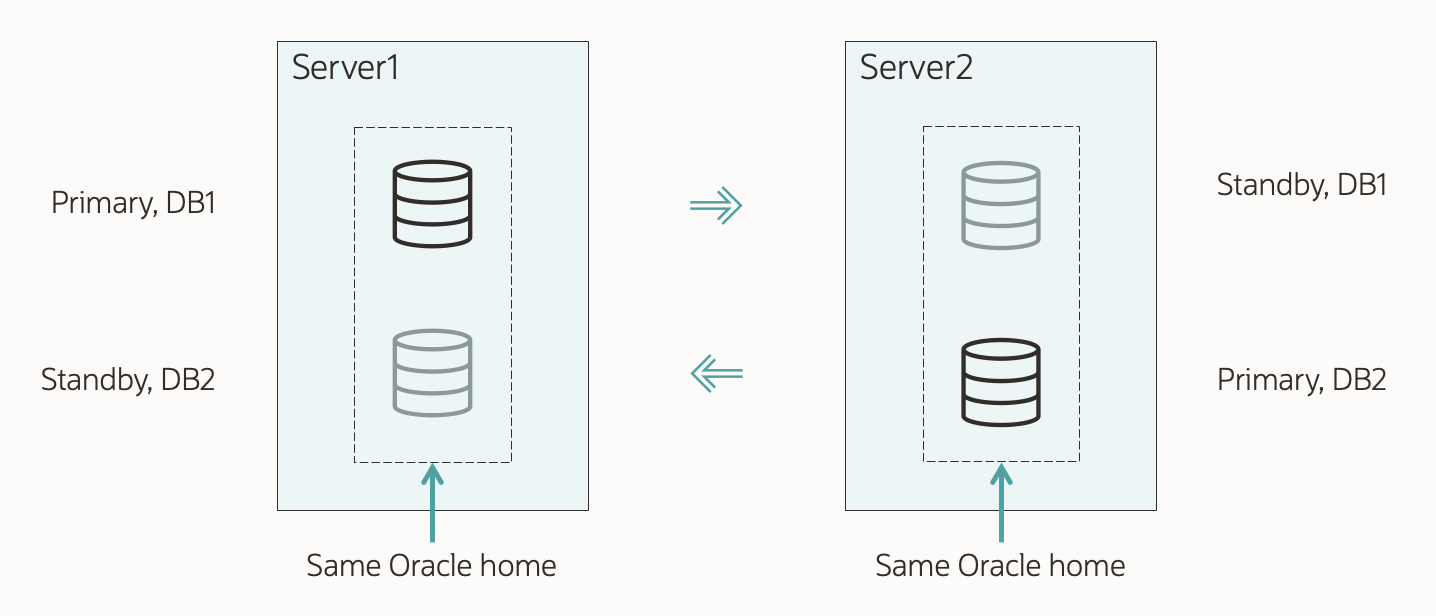
I have the following two Data Guard configurations. I want to patch all the databases using standby-first patch apply. How do I do that when I have primary and standby databases running out of the same Oracle home on the same machine?

Overview of Data Guard standby-first environment

Requirements

In this case, the databases are on 19.17.0, and the customer wants to patch them to 19.23.0.

To use standby-first patch apply, you must meet a set of requirements, one being:

Data Guard Standby-First Patch Apply is supported between database patch releases that are a maximum of one year (1 year) apart based on the patch release date.

Here are the release dates of the following Release Updates:

  • 19.17.0: October 2022
  • 19.23.0: April 2024

So, in this case, the customer can’t use standby-first patch apply directly. There is a year and a half in between. They need to patch cycles in this case:

  • Patch to 19.21.0 (release October 2023)
  • Patch to 19.23.0 (release April 2024)

In the future, they should apply patches more often to avoid ending up in this situation again.

Patching Oracle Home

The customer has one Oracle home on each server from where both databases run. On any server, there is a primary and a standby database (from two different Data Guard configs).

The customer uses in-place patching. If they patch the entire Oracle home, it means one of the primary databases is now on a higher Oracle home than its standby database, which is not allowed. The standby database is the only one which may run on a higher patch level.

Using the above configuration with primary and standby databases running out of the same Oracle home, you can’t use in-place patching and standby-first patch apply.

The customer must switch to out-of-place patching to achieve this. Then you can patch standby databases first, then the primaries.

Plus, you get all the other benefits of out-of-place patching.

Datapatch

Once all the databases in a Data Guard configuration run in the new Oracle home, you still haven’t completed the patching process:

A patch or patch bundle is not considered fully installed until all of the following actions have occurred:

  • Patch binary installation has been performed to the database home on all standby systems.
  • Patch binary installation has been performed to the database home on the primary system.
  • Patch SQL installation, if required by the patch, has been performed on the primary database and the redo applied to the standby database(s).

You must do the above steps in the specified order, and the last step is to execute Datapatch:

$ $ORACLE_HOME/OPatch/datapatch -verbose

Summary

Here is an overview of the procedure.

  1. Provision a brand-new Oracle home on both servers and patch them with the required patches.
  2. Move the standby database to the new Oracle home. Remember to move configuration files as well.
  3. Optionally, test the patching procedure on the standby database.
    • Convert the standby database to snapshot standby.
    • Run Datapatch on the snapshot standby database.
    • Perform testing as needed.
    • Convert the standby databases back to physical standby.
  4. Perform switchover to the standby database (that now runs in the new Oracle home).
  5. Move the former primary to the new Oracle home. Remember to move configuration files as well.
  6. Run Datapatch on the primary database.

Happy Patching!

What Happens to Your Oracle Data Guard During Conversion to Multitenant

Oracle Data Guard is an amazing piece of tech. It helps keeping your data safe. When you convert to the multitenant architecture, it is crucial that you don’t jeopardize your Data Guard configuration.

Follow the below steps to bring along your standby database.

What’s The Problem

When you prepare for multitenant conversion, you prepare two things:

  • Data files – you make the data files consistent by opening the non-CDB in read-only mode.
  • Manifest file – you create an XML file which contains information about the non-CDB.

The manifest file contains information about the data files, including the location. However, the manifest file lists only the location on the primary database. There is no information about the standby database.

When you plug in the non-CDB, the plug-in happens without problems on the CDB primary database. It reads the manifest file and finds the data files.

But what about the CDB standby database? Since the manifest file does not list the file location on the standby host, how can the standby database find the corresponding data files?

The Options

There are two options which you control with the standbys clause on the create pluggable database statement:

  • Enabled recovery:
    • You specify standbys=all, or you explicitly list the standby database in the standbys clause.
    • On plug-in, the CDB standby database must find the data files. How the standby database finds the data files depends on the configuration.
    • The new PDB is protected by Data Guard immediately on plug-in.
    • If the standby database fails to find the data files, recovery stops for the entire CDB. All your PDBs are now unprotected unless you use PDB Recovery Isolation (see appendix).
  • Deferred recovery:
    • You specify standbys=none, or you don’t list the standby database in the standbys clause.
    • On plug-in, the CDB standby notes the creation of the PDB but does not attempt to find and recover the data files.
    • The new PDB is not protected by Data Guard until you provide the data files and re-enable recovery as described in Making Use Deferred PDB Recovery and the STANDBYS=NONE Feature with Oracle Multitenant (Doc ID 1916648.1). Typically, this means restoring all data files to the standby system. The other PDBs in the CDB standby are fully protected during the entire process.

Convert with AutoUpgrade

You must convert with deferred recovery on the CDB standby database. AutoUpgrade uses this approach by default:

upg1.manage_standbys_clause=standbys=none

When AutoUpgrade completes, you must follow the process to restore the data files on the CDB standby database and re-enable recovery.

There is no way to plug in with enabled recovery. This includes the alias trick. This requires work on the primary and standby systems. AutoUpgrade is a fully automated process that does not allow you to intervene midway.

If you set manage_standbys_clause to anything but the default to plug in with enabled recovery, you will most likely end up in problems. Either the data files are missing on the standby system or not at the right SCN. This stops the MRP process in the standby database. Since the MRP process is responsible for recovering all the other PDBs as well, you are not only breaking the recently added PDB, but also all other PDBs.

Convert Manually

ASM

You can plug-in with enabled recovery and use the data files on the standby. The standby database searches the OMF location for the data files. ASM does not you manually moving files into an OMF location. Instead, you can create aliases in the OMF location as described in Reusing the Source Standby Database Files When Plugging a non-CDB as a PDB into the Primary Database of a Data Guard Configuration (Doc ID 2273304.1). The standby database follows the plug-in operation.

This option won’t work, if you use the as clone clause on the create pluggable database statement. The clause generates a new GUID and since the GUID is part of the OMF location, you won’t be able to create aliases upfront.

Alternatively, you can plug in with deferred recovery.

OMF in File System

You can plug-in with enabled recovery and use the data files on the standby. The CDB standby database searches the OMF location for the data files. Either:

  • Move the data files into the OMF location.
  • Create soft links in the OMF location for each data file pointing to the current location.

These options won’t work, if you want to use the as clone clause. The clause generates a new GUID and since the GUID is part of the OMF location, you don’t know the OMF location upfront.

If you set standby_pdb_source_file_directory in the CDB standby database, it looks for the data files in that directory. However, it will always copy the data files into the OMF location. Even if you specify create pluggable database ... nocopy. Setting standby_pdb_source_file_directory is, however, compatible with the as clone clause.

Alternatively, you can plug in with deferred recovery.

Regular Files

The database uses regular files when db_create_file_dest is empty.

If you plug in with enabled recovery, the CDB standby database expects to find the data files in the exact same location (path and file name) as on the primary database. The location is either the full path from the manifest file or the location specified by create pluggable database ... source_file_directory='<data_file_location>'.

If the data files are in a different location on the CDB standby database, you either:

  • Set db_file_name_convert in your CDB standby database. This changes the name of each of the data files accordingly.
  • Set standby_pdb_source_file_directory in your CDB standby database. When media recovery looks for a specific file during plug-in, it searches this directory instead of the full path from the manifest file.

You can plug-in using the as clone clause without problems.

Alternatively, you can plug in with deferred recovery.

Refreshable Clone PDBs

When you migrate a non-CDB using refreshable clone PDBs, you are using a clone of the non-CDB database. Thus, there are no existing data files on the standby database that you can use.

You can only create a refreshable clone PDB with deferred recovery (standbys=none). After you transition the refreshable clone PDB into a regular, stand-alone PDB using alter pluggable database ... refresh mode none, you must follow the process to restore the data files and re-enable recovery. If you use AutoUpgrade, you must wait until the entire job completes.

Until you have completed the recovery process, the PDB is not protected by Data Guard.

For further information, including how Oracle Cloud Infrastructure makes it easier for you, have a look at Sinan’s blog post.

Important

Whichever method you choose, you must check your Data Guard configuration before going live.

  1. Check the recovery status on all standby databases:

    select name, recovery_status
    from   v$pdbs;
    
  2. Test the Data Guard configuration by performing a switchover.

Don’t go live without checking your Data Guard configuration!

Appendix

PDB Recovery Isolation

PDB Recovery Isolation is a new feature in Oracle Database 21c.

In an Active Data Guard environment, PDB recovery isolation ensures that media recovery of a CDB on the standby is not impacted when one or more PDBs are not consistent with the rest of the CDB.

Source: About PDB Recovery Isolation

If you plug in a database with standbys=all and the standby database can’t find the data files, PDB recovery isolation kicks in:

  • The standby database disables recovery of the affected PDB.
  • The standby database restores the data files from the primary database.
  • After restore, the standby database re-enables recovery of the PDB.
  • The affected PDB is unprotected until the process is completed.
  • The other PDBs are unaffected by the situation.

PDB Recovery Isolation reduces risk and automates the resolution of the problem.

At the time of writing, it requires a license for Active Data Guard.

Further Reading

Thank You

A big thank you to my valued colleague, Sinan Petrus Toma, for teaching me about PDB recovery isolation.

How to Apply Patches Out-of-place to Oracle Grid Infrastructure and Oracle Data Guard Using Standby-First

I strongly recommend that you always patch out-of-place. Here’s an example of how to do it on Oracle Grid Infrastructure (GI) and Oracle Data Guard using Standby-First Patch Apply.

Standby-First Patch Apply allows you to minimize downtime to the time it takes to perform a Data Guard switchover. Further, it allows you to test the apply mechanism on the standby database by temporarily converting it into a snapshot standby database.

The scenario:

  • Oracle Grid Infrastructure 19c and Oracle Database 19c
  • Patching from Release Update 19.17.0 to 19.19.0
  • Vertical patching – GI and database at the same time
  • Data Guard setup with two RAC databases
    • Cluster 1: copenhagen1 and copenhagen2
    • Cluster 2: aarhus1 and aarhus2
    • DB_NAME: CDB1
    • DB_UNIQUE_NAME: CDB1_COPENHAGEN and CDB1_AARHUS
  • Using Data Guard broker
  • Patching GI using SwitchGridHome method

Let’s get started!

Step 1: Prepare

I can make the preparations without interrupting the database.

Step 2: Restart Standby in New Oracle Homes

Now, I can move the standby database to the new GI and database homes.

  • On the standby hosts, aarhus1 and aarhus2, I first move the database configuration files from the old database home to the new one.

  • I change the database configuration in GI. Next time the database restarts, it will be in the new Oracle Home:

    [oracle@aarhus1]$ $OLD_ORACLE_HOME/bin/srvctl modify database \
       -db $ORACLE_UNQNAME \
       -oraclehome $NEW_ORACLE_HOME
    
  • I switch to the new GI on all standby hosts, aarhus1 and aarhus2, by executing step 2 (Switch to the new Grid Home) of the SwitchGridHome method.

    • It involves running gridSetup.sh ... -switchGridHome and root.sh.
    • You can perform the switch in a rolling manner or all at once.
    • The switch restarts the standby database instance. The standby database instance restarts in the new Oracle Home.
    • If the profile of grid (like .bashrc) sets the ORACLE_HOME environment variable, I ensure to update it.
  • If I had multiple standby databases, I would process all standby databases in this step.

Step 3: Test Standby Database

This is an optional step, but I recommend that you do it.

  • I convert the standby database (CDB1_AARHUS) to a snapshot standby database:
    DGMGRL> convert database CDB1_AARHUS to snapshot standby;
    
  • I test Datapatch on the standby database. It is important that I run the command on the standby database:
    [oracle@aarhus1]$ $ORACLE_HOME/OPatch/datapatch -verbose
    
  • I can also test my application on the standby database.
  • At the end of my testing, I revert the standby database to a physical standby database. The database automatically reverts all the changes made during testing:
    DGMGRL> convert database CDB1_AARHUS to physical standby;
    

Step 4: Switchover

I can perform the previous steps without interrupting my users. This step requires a maintenance window because I am doing a Data Guard switchover.

  • I check that my standby database is ready to become primary. Then, I start a Data Guard switchover:
    DGMGRL> connect sys/<password> as sysdba
    DGMGRL> validate database CDB1_AARHUS;
    DGMGRL> switchover to CDB1_AARHUS;
    

A switchover does not have to mean downtime.

If my application is configured properly, the users will experience a brownout; a short hang, while the connections switch to the new primary database.

Step 5: Restart New Standby in New Oracle Homes

Now, the primary database runs on aarhus1 and aarhus2. Next, I can move the new standby hosts, copenhagen1 and copenhagen2, to the new GI and database homes.

  • I repeat step 2 (Restart Standby In New Oracle Homes) but this time for the new standby hosts, copenhagen1 and copenhagen2.

Step 6: Complete Patching

Now, both databases in my Data Guard configuration run out of the new Oracle Homes.

Only proceed with this step once all databases run out of the new Oracle Home.

I need to run this step as fast as possible after I have completed the previous step.

  • I complete the patching by running Datapatch on the primary database (CDB1_AARHUS). I add the recomp_threshold parameter to ensure Datapatch recompiles all objects that the patching invalidated:

    [orale@aarhus1]$ $ORACLE_HOME/OPatch/datapatch \
       -verbose \
       -recomp_threshold 10000
    
    • I only need to run Datapatch one time. On the primary database and only on one of the instances.
  • I can run Datapatch while users are connected to my database.

  • Optionally, I can switch back to the original primary database on copenhagen1 and copenhagen2, if I prefer to run it there.

That’s it. Happy patching!

Appendix

Further Reading

Other Blog Posts in This Series

Patching Oracle Grid Infrastructure 19c – Beginner’s Guide

This is the start of a blog post series on patching Oracle Grid Infrastructure 19c (GI). It is supposed to be easy to follow, so that I may have skipped a detail here and there.

I know my way around database patching. I have done it countless times. When it comes to GI, it’s the other way around. I have never really done it in the real world (i.e., before joining Oracle) and my knowledge was limited. I told my boss, Mike, and he gave me a challenge: Learn about it by writing a blog post series.

Why Do I Need to Patch Oracle Grid Infrastructure

Like any other piece of software, you need to patch GI to get rid of security issues and fix issues.

You should keep the GI and Oracle Database patch level in sync. This means that you need to patch GI and your Oracle Database at the same cadence. Ideally, that cadence is quarterly.

It is supported to run GI and Oracle Database at different patch levels as long as they are on the same release. GI is also certified to run some of the older Oracle Database releases. This is useful in upgrade projects. Check Oracle Clusterware (CRS/GI) – ASM – Database Version Compatibility (Doc ID 337737.1) for details.

A few examples:

GI Database Supported
19.18.0 19.18.0 Yes – recommended
19.16.0 19.18.0 Yes
19.18.0 19.16.0 Yes
19.18.0 11.2.0.4 Yes – used during upgrade, for instance
19.18.0 21.9.0 No

If possible and not too cumbersome, I recommend that you first patch GI and then Oracle Database. Some prefer to patch the two components in two separate operations, while others do it in one operation.

Which Patches Should You Apply to Oracle Grid Infrastructure

You should apply:

Whether you download the bundle patches individually or go with the combo patch is a matter of personal preference. Ultimately, they contain the same.

Some prefer an N-1 approach: When the April Release Update comes, they patch with the previous one from January; Always one quarter behind. For stability reasons, I assume.

What about OJVM patches for GI? The short answer is no.

Which Method Do I Use For Patching

You can patch in two ways:

  • In-place patching
  • Out-of-place patching
In-place Out-of-place
You apply patches to an existing Grid Home. You apply patches to a new Grid Home.
You need disk space for the patches. You need disk space for a brand new Grid Home and the patches.
You patch the existing Grid Home. When you start patching a node, GI drains all connections and moves services to other nodes. The node is down during patching. You create and patch a new Grid Home without downtime. You complete patching by switching to the new Grid Home. The node is down only during switching.
Longer node downtime. Shorter node downtime.
No changes to profile and scripts. Profile, scripts and the like must be updated to reflect the new Grid Home.
My recommended method.

Note: When I write node downtime, it does not mean database downtime. I discuss it shortly.

In other words:

In-place patching replaces the Oracle Clusterware software with the newer version in the same Grid home. Out-of-place upgrade has both versions of the same software present on the nodes at the same time, in different Grid homes, but only one version is active.

Oracle Fleet Patching and Provisioning

When you have more systems to manage, it is time to consider Fleet Patching and Provisioning (FPP).

Oracle Fleet Patching & Provisioning is the recommended solution for performing lifecycle operations (provisioning, patching & upgrades) across entire Oracle Grid Infrastructure and Oracle RAC Database fleets and the default solution used for Oracle Database Cloud services

It will make your life so much easier; more about that in a later blog post.

Zero Downtime Oracle Grid Infrastructure Patching

As of 19.16.0 you can also do Zero Downtime Oracle Grid Infrastructure Patching (ZDOGIP).

Use the zero-downtime Oracle Grid Infrastructure patching method to keep your Oracle RAC database instances running and client connections active during patching.

ZDOGIP is an extension to out-of-place patching. But ZDGIOP will not update the operating system drivers and will not bring down the Oracle stack (database instance, listener etc.). The new GI takes over control of the Oracle stack without users noticing. However, you must update the operating system drivers by taking down the node. But you can postpone it to a later point in time.

More details about ZDGIOP in a later blog post.

What about Oracle Database Downtime

When you patch GI on a node, the node is down. You don’t need to restart the operating system itself, but you do shut down the entire GI stack, including everything GI manages (database, listeners etc.).

What does that mean for Oracle Database?

Single Instance

If you have a single instance database managed by GI, your database is down during patching. Your users will experience downtime. By using out-of-place patching, you can reduce downtime.

Data Guard

If you have a Data Guard configuration, you can hide the outage from the end users.

First, you patch GI on your standby databases, then perform a switchover, and finally patch GI on the former primary database.

The only interruption is the switchover; a brownout period while the database switches roles. In the brownout period, the database appears to hang, but underneath the hood, you wait for the role switch to complete and connect to the new primary database.

If you have configured your application properly, it will not encounter any ORA-errors. Your users experience a short hang and continue as if nothing had happened.

RAC

If you have a RAC database, you can perform the patching in a rolling manner – node by node.

When you take down a node for patching, GI tells connections to drain from the affected instances and connect to other nodes.

If your application is properly configured, it will react to the drain events and connect seamlessly to another instance. The end users will not experience any interruption nor receive any errors.

If you haven’t configured your application properly or your application doesn’t react in due time, the connections will be forcefully terminated. How that will affect your users depend on the application. But it won’t look pretty.

Unless you configure Application Continuity. If so, the database can replay any in-flight transaction. From a user perspective, all looks fine. They won’t even notice that they have connected to a new instance and that the database replayed their transaction.

Happy Patching!

Appendix

Further Reading

Other Blog Posts in This Series

Upgrade, Data Guard and Downtime

How about downtime when you upgrade your Oracle Database with Data Guard?

Short answer: You should expect slightly more downtime. Unless you head into a rolling upgrade.

How Long Does An Upgrade Take?

If I had a dime for every time someone asked me this question, I would have bought a tractor, retired, and worked full-time at our farm.

What a handsome Ford

My boss, Mike, created a long blog post about it without giving a real answer. If he can’t estimate it, no one can!

But I will give it a try anyway. A ballpark figure is 15-45 minutes for the actual upgrade. Then add all the extra stuff that surrounds the upgrade.

Does Data Guard Change That?

Yes, it does. Extra downtime is needed.

You don’t add any extra time to the actual upgrade of the primary database. During the upgrade, redo transport is on, and the primary database ships redo to the standby database, but it has no significant impact on the duration of the upgrade.

But you do need a little extra time before and after the upgrade.

Primary Standby Added Time
Restart Data Guard in new Oracle Home 5 min
Upgrade primary database
Verify standby has applied all redo 2 min
Optionally, test a switchover 5 min
TOTAL 7-12 min

If you follow the standby offline approach, you need more downtime. In that approach, you keep the standby database offline during the entire upgrade, and it needs time to catch up afterward. I would estimate it adds 5 min of extra downtime, totaling 12-17 min instead.

This is the best you can do with a physical standby database. But …

Rolling Upgrades

If you want to upgrade with almost no downtime at all, you can do rolling upgrades. A rolling upgrade uses DBMS_ROLLING to reduce the downtime for an upgrade to the time it takes to perform a regular switchover.

Under the hood, a rolling upgrade uses Data Guard as well. This blog post series is about upgrading with physical standby databases, but a rolling upgrade requires a logical standby database. It’s out of scope for this blog post series.

Why don’t we all do rolling upgrades?

  • A logical standby database has more restrictions than a physical one.
  • A logical standby database uses SQL apply instead of redo apply. SQL apply is not as efficient as redo apply and can become a performance bottleneck.
  • It’s more complicated.

But rolling upgrades are really cool, as you will see in this demo.

You can find more details in our webinar How Low Can You Go? Zero Downtime Operations. Slides and recording is available on demand.

Other Blog Posts in This Series

Upgrade, Data Guard, and Restore Points

Flashback Database is the best way to protect your Oracle Database during upgrade. It requires that you create restore points before the upgrade. If the upgrade fails, getting back to the starting point is easy and fast.

Enterprise Edition

It requires Enterprise Edition, but so does Data Guard. So it is not an issue here.

Guaranteed Restore Points

The restore points that you create to protect your Oracle Database upgrade should be guaranteed restore points. This ensures that you can always go back to the starting point. If you run out of disk space in your Fast Recovery Area (FRA), the database will halt and thus not jeopardize your fallback plan. The alternative to regular restore points is that the database will overwrite flashback logs to maintain operation, which is not desirable in this situation. You are relying on the restore point as your fallback.

Order of Creation

Always follow this order when creating restore points:

  1. All standby databases
  2. Primary database

The SCN of the restore points on the standby database must be the same or lower than on the primary database.

Imagine this scenario:

SCN Primary Standby
100 Restore point created
105 Restore point created
110 Upgrade starts
200 Upgrade fails

To flashback:

Primary Standby
Flash back standby database to SCN 100
Flash back primary database to SCN 105
Open primary database with resetlogs. Creates a new incarnation as of SCN 105
Roll forward standby database from SCN 101 to 105 and follow new incarnation

If the restore point on the standby database was created at SCN 106, then the primary database is already at a new incarnation (as of SCN 105). The standby database can’t follow and needs to be completely rebuilt.

Primary Database

When you upgrade with AutoUpgrade, it will create a guaranteed restore point for you. It is the default behavior.

The restore point created by AutoUpgrade protects the primary database only.

Standby Database

Always create the restore points on the standby database:

From the docs:

Restore points that are created on a primary database are automatically replicated to the standby database. The restore points created on the standby database are called replicated restore points. Irrespective of whether a restore point on the primary database is a guaranteed restore point or a normal restore point, the corresponding replicated restore point is always a normal restore point.

By design, all replicated restore points are not guaranteed; even if it was guaranteed on the primary database. When you protect a standby database during upgrade, you want the restore point to be guaranteed; thus, you must create them manually.

To create a restore point on the standby database, you must cancel redo apply:

SQL> alter database recover managed standby database cancel;
SQL> create restore point STBY_GRP guarantee flashback database;
SQL> alter database recover managed standby database disconnect from session;

If you forget to cancel redo apply, you run into:

SQL> create restore point STBY_GRP guarantee flashback database;
create restore point STBY_GRP guarantee flashback database
*
ERROR at line 1:
ORA-38784: Cannot create restore point 'STBY_GRP'.
ORA-01153: an incompatible media recovery is active

Remove Restore Points

Don’t forget to remove the restore points after the upgrade. Do so when you have run your tests, and you are sure you won’t go back to the old release:

SQL> drop restore point STBY_GRP;
  • The order of removal is not important
  • It does not require downtime to remove the restore points

If you instruct AutoUpgrade to remove the restore point after upgrade (drop_grp_after_upgrade), it will happen only on the primary database. You must manually remove the restore points from the standby database.

Failure to remove the restore points will eventually fill up the FRA bringing the database to a complete halt.

Other Blog Posts in This Series

How To Upgrade Data Guard – Standby Offline Method

Let me show you how to upgrade your database to Oracle Database 19c when it is protected by Data Guard. I will use AutoUpgrade and follow the Standby Offline method.

This is my demo environment: Overview of the environment that is used for this procedure

  • Grid Infrastructure is managing the database.
  • Data Guard is configured using Data Guard broker.

Overall, the process looks like this: Overview of upgrade with a data guard
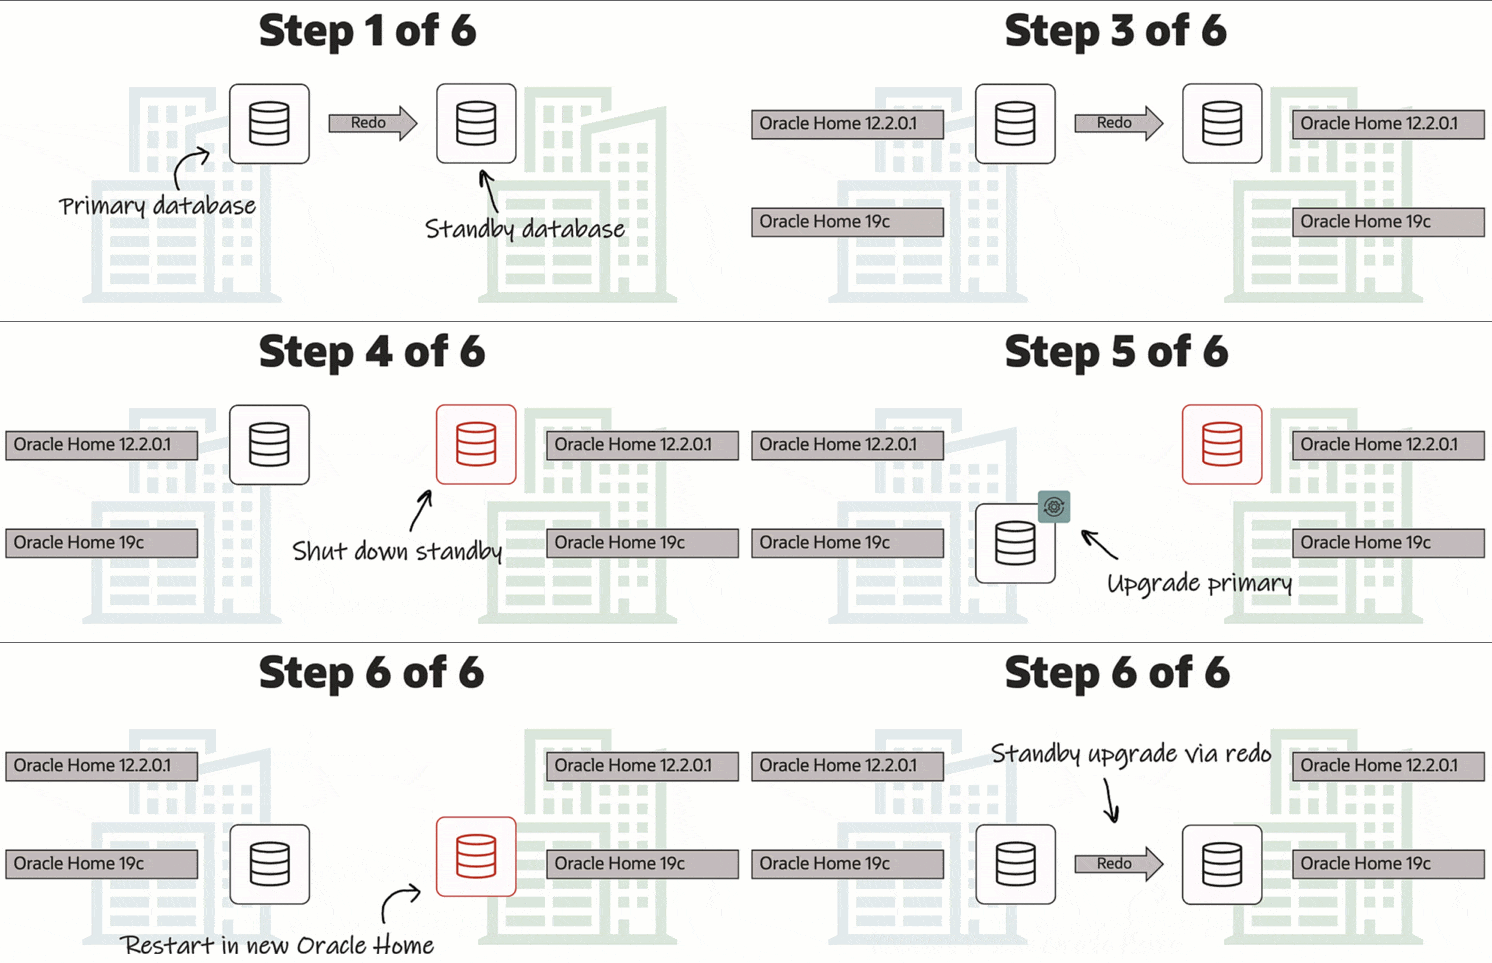
This procedure starts right before I start AutoUpgrade in DEPLOY mode. Downtime has begun, and no users are connected to the database.

Before Upgrade

I always use the latest version of AutoUpgrade. Download it and put it into $ORACLE_HOME/rdbms/admin.

A newer version of AutoUpgrade can also upgrade to older database releases, so don’t worry if the AutoUpgrade version doesn’t match the Oracle Database release that you are upgrading to.

Disable Fast-Start Failover (FSFO)

Fast-Start Failover must be disabled during upgrade. I connect to Data Guard CLI (dgmgrl) and disable it:

DGMGRL> disable fast_start failover;

Restore Point

My standby database is protected against errors during the upgrade by keeping it offline. However, to be on the safe side, I also create a guaranteed restore point on the standby database:

STANDBY SQL> alter database recover managed standby database cancel;
STANDBY SQL> create restore point stdby_before_upg guarantee flashback database;
STANDBY SQL> alter database recover managed standby database disconnect from session;

Stop Data Guard

I shut down and disable the standby database. Disabling the database is strictly speaking not necessary, but a better-safe-than-sorry approach:

[oracle@standby]$ $ORACLE_HOME/bin/srvctl stop database -d $ORACLE_UNQNAME -stopoption immediate
[oracle@standby]$ $ORACLE_HOME/bin/srvctl disable database -d $ORACLE_UNQNAME

Upgrade

During the upgrade, I want to defer redo log shipping to the standby database. I use the AutoUpgrade config file parameter defer_standby_log_shipping (see appendix for complete config file):

upg1.defer_standby_log_shipping=yes

Next, I upgrade the primary database by starting AutoUpgrade in DEPLOY mode:

[oracle@primary]$ java -jar autoupgrade.jar -config DB.cfg -mode deploy

As the upgrade progresses, it makes a lot of changes to the database data dictionary. Those changes are written to redo, which will accumulate on the primary database. The database will not send the redo logs to the standby database (yet).

At the end of the upgrade, AutoUpgrade informs me that redo log transport has been deferred and that I must enable it again:

---- Data Guard broker configuration is disabled. Enable it once ready to sync up standby database  ----
Enable Data Guard from DB_BOSTON using the following DGMGRL command: 
EDIT DATABASE DB_BOSTON SET STATE=TRANSPORT-ON;

After the upgrade, you should perform the necessary tests to validate the new database release. You should continue only when you are convinced to go live on the new release.

Remember that the standby database was left behind before we started, so if all other fails, simply restart the standby database and connect your users to it.

After Upgrade

Restart Standby Database In New Oracle Home

  • Ideally, I have stored these files outside the Oracle Home; like ASM. In that case, I don’t need to do anything:

    • SPFile
    • Password file
    • Data Guard broker config files
    • Network files (sqlnet.ora, tnsnames.ora etc.)

    If I stored the files inside the Oracle Home, I must move them to the new Oracle Home (see appendix).

  • I change my profiles and /etc/oratab (see appendix).

  • I upgrade the database in Grid Infrastructure, which updates the Oracle Home information. Grid Infrastructure now starts the database in the new Oracle Home. If you are licensed for Active Data Guard, you can change the startoption from mount to read only:

    [oracle@standby]$ export NEW_ORACLE_HOME=/u01/app/oracle/product/19.0.0.0/dbhome_1
    [oracle@standby]$ export ORACLE_HOME=$NEW_ORACLE_HOME
    [oracle@standby]$ $ORACLE_HOME/bin/srvctl upgrade database -db $ORACLE_UNQNAME -o $ORACLE_HOME
    [oracle@standby]$ $ORACLE_HOME/bin/srvctl modify database -db $ORACLE_UNQNAME -s "mount" -r PHYSICAL_STANDBY
    [oracle@standby]$ $ORACLE_HOME/bin/srvctl enable database -d $ORACLE_UNQNAME
    [oracle@standby]$ $ORACLE_HOME/bin/srvctl start database -d $ORACLE_UNQNAME
    

Set Parameters

Suppose I made any changes to the database initialization parameters as part of the upgrade of the primary database. In that case, I probably also want to make the same changes on the standby database.

I can make changes to database initialization parameters using these AutoUpgrade config file parameters:

  • remove_underscore_parameters
  • add_after_upgrade_pfile
  • add_during_upgrade_pfile
  • del_after_upgrade_pfile
  • del_during_upgrade_pfile

I can also review the Preupgrade Summary Report for suggested changes to the database initialization parameters.

STANDBY SQL> alter system set ... scope=both;

Re-enable Data Guard

To re-enable the Data Guard config, I use Data Guard CLI (dgmgrl) and re-enable redo transport:

DGMGRL> edit database "DB_BOSTON" set state=transport-on;

Now, redo is shipping to the standby database, and it will apply it. When the redo generated during the upgrade is applied on the standby database, it is implicitly upgraded.

Wait For Redo Apply

Ensure the standby database has caught up and applied all the redo generated during the upgrade.

DGMGRL> show database "DB_fra24r"

Database - DB_fra24r

  Role:               PHYSICAL STANDBY
  Intended State:     APPLY-ON
  Transport Lag:      0 seconds (computed 1 second ago)
  Apply Lag:          1 hours 56 seconds (computed 1 second ago)
  Average Apply Rate: 3.38 MByte/s
  Real Time Query:    OFF
  Instance(s):
    DB

  Database Warning(s):
    ORA-16853: apply lag has exceeded specified threshold

Database Status:
WARNING

The database reports a WARNING because there is an apply lag. The standby database has not caught up yet.

Wait a while and repeat the show database command until status changes to SUCCESS and there is no apply lag. Use Data Guard Broker to verify data guard setup after upgrade

If Data Guard broker reports an error the standby database is not applying logs, I can try to enable the configuration again:

DGMGRL> enable configuration;

Validate Data Guard

I validate the setup and ensure both databases are ready for a switchover. The database will not allow a switchover if there are any problems in the Data Guard setup. It is a good way of checking things are fine:

DGMGRL> validate database "DB_BOSTON"
DGMGRL> validate database "DB_fra24r"

After upgrading a primary database (data guard) with autoupgrade you can use validate database to ensure everything is fine

Optionally, I perform a switchover as well:

DGMGRL> switchover to "DB_fra24r"

Re-enable Fast-Start Failover

I can now re-enable FSFO:

DGMGRL> enable fast_start failover;

Remove Restore Points

After the upgrade, I should perform the necessary tests to validate the new database release. I should remove the restore points on both databases when I am convinced to go live on the new release.

Miscellaneous

Check the database registration in listener.ora. I must update the Oracle Home information if there is a static configuration.

What If

  • What if your Oracle Database is not managed by Grid Infrastructure? You can still use the above procedure, but you must change the commands accordingly.

  • What if you don’t use Data Guard broker? Manually configured Data Guard environments are fully supported by AutoUpgrade, but you must change some commands accordingly.

Conclusion

It is not that complicated to upgrade your database, even if it is part of a Data Guard setup. Using AutoUpgrade is fully supported and highly recommended. A little extra legwork is needed to take care of the standby database. But the good thing is that your Data Guard setup is maintained throughout the process. This procedure showed how to use the standby offline approach, which requires slightly more downtime but gives you extra protection.

Other Blog Posts in This Series

Appendix

Broker Config Files

Here is a query to determine the location of the Data Guard broker config files. In this example, the files are stored outside the Oracle Home; in ASM:

SQL> select name, value from v$parameter where name like 'dg_broker_config_file%';

NAME                   VALUES
---------------------- --------------------------------
dg_broker_config_file1 +DATA/DB_FRA2PR/dr1db_fra2pr.dat
dg_broker_config_file2 +DATA/DB_FRA2PR/dr2db_fra2pr.dat

Database Files

Here is a command to see where the SPFile and password file are located. In this example, the SPFile is stored outside the Oracle Home. However, the password file is in the default location inside the Oracle Home. The latter must be moved when you restart a database in the new Oracle Home:

[oracle@standby]$ srvctl config database -d $ORACLE_UNQNAME | grep -E "Spfile|Password"
Spfile: +DATA/<DB_UNIQUE_NAME>/PARAMETERFILE/spfileDB.ora
Password file: 

Updating /etc/oratab

Here is a little snippet to update /etc/oratab to match the new release Oracle Home. Since I am using Grid Infrastructure to manage my database, I don’t set the database to start automatically:

export NEW_ORACLE_HOME=/u01/app/oracle/product/19.0.0.0/dbhome_1
export ORACLE_SID=DB
#Backup file
cp /etc/oratab /tmp/oratab
#Use sed to remove the line that starts with ORACLE_SID
sed '/^'"$ORACLE_SID"':/d' /tmp/oratab > /etc/oratab
#Add new entry
echo "$ORACLE_SID:$NEW_ORACLE_HOME:N" >> /etc/oratab

Updating .bashrc

Here is a little snippet to update .bashrc replacing the old Oracle Home with the new Oracle Home:

export OLD_ORACLE_HOME=/u01/app/oracle/product/12.2.0.1/dbhome_1
export NEW_ORACLE_HOME=/u01/app/oracle/product/19.0.0.0/dbhome_1
cp ~/.bashrc ~/.bashrc-backup
sed 's|'"$OLD_ORACLE_HOME"'|'"$NEW_ORACLE_HOME"'|g' ~/.bashrc-backup > ~/.bashrc

Alert Log Messages

Before the upgrade of the primary database, I stop the standby database. Since I didn’t defer redo transport in the primary database, it will complain about losing connection to the standby database. The primary database alert log will contain an entry similar to this:

2022-08-19T05:21:39.389976+00:00
ARCH: Attempting destination LOG_ARCHIVE_DEST_2 network reconnect (1089)
ARCH: Destination LOG_ARCHIVE_DEST_2 network reconnect abandoned
krsg_gap_ping: Error 1089 when pinging <standby> (Process:TT00) (PID:82492)
2022-08-19T05:21:46.606834+00:00
TT04: Attempting destination LOG_ARCHIVE_DEST_2 network reconnect (3113)
TT04: Destination LOG_ARCHIVE_DEST_2 network reconnect abandoned
2022-08-19T05:21:46.607255+00:00
Errors in file /u01/app/oracle/diag/rdbms/db_boston/DB/trace/DB_tt04_66302.trc:
ORA-03113: end-of-file on communication channel
Error 3113 for archive log file 3 to '<standby>'
2022-08-19T05:21:47.002610+00:00
Errors in file /u01/app/oracle/diag/rdbms/db_boston/DB/trace/DB_tt04_66302.trc:
ORA-03113: end-of-file on communication channel

I can safely ignore it. My monitoring system might detect this and start to complain.

Config File

For your reference, this is the config file I used. It contains only the required information. All other parameters have a default value:

upg1.sid=DB
upg1.source_home=/u01/app/oracle/product/12.2.0.1/dbhome_1
upg1.target_home=/u01/app/oracle/product/19.0.0.0/dbhome_1
upg1.defer_standby_log_shipping=yes

Synchronize Standby Database

When I run AutoUpgrade in ANALYZE mode and check the preupgrade summary report, I find this information message:

Synchronize your standby databases before database upgrade.

The standby database is not currently synchronized with its associated primary database.

To keep data in the source primary database synchronized with its associated standby databases, all standby databases must be synchronized before database upgrade. See My Oracle Support Note 2064281.1 for details.

Don’t worry about it. It tells me to ensure that all redo gets applied.

What does it say? Basically, it says that all redo generated on the primary database before the downtime window started, should be sent to and applied on the standby database. This way, my standby database is ready to replace your primary database at any time, if something goes really wrong. Strictly speaking it is not necessary to ensure that, but it is strongly recommended.

Further Reading
Changing COMPATIBLE Parameter and Data Guard

When you upgrade your Oracle Database, you should also decide how to raise the COMPATIBLE parameter. The considerations are the same when you use Data Guard, but the procedure is different.

Why

The main reason for raising COMPATIBLE is to enable new features.

Some new features are not backward compatible, e.g., blockchain tables. When someone introduces such features, the database:

  • is no longer backward compatible
  • can no longer be downgraded

When you upgrade, COMPATIBLE stays at the old setting. You need to actively raise it and allow the use of these new features. You are in total control.

Here is a video with more details about COMPATIBLE.

When

I recommend that you raise COMPATIBLE one or two weeks after the upgrade.

  • When you have seen that the new release works fine in production.
  • When you are confident that a database downgrade won’t be needed.

Raising COMPATIBLE requires a database restart, i.e., an outage. If such is unacceptable, you must raise COMPATIBLE as part of the upgrade. But be advised, it severely limits your fallback options.

AutoUpgrade does not change COMPATIBLE, unless you explicitly state it in the config file:

upg1.drop_grp_after_upgrade=yes
upg1.raise_compatible=yes

What

I recommend that you always set COMPATIBLE to the default of a database release:

  • 19.0.0
  • 21.0.0

If you only have non-CDBs then it might not matter much. But in a multitenant environment, having a uniform, COMPATIBLE setting is very beneficial. This allows PDBs to move between CDBs without problems.

How

You need to raise COMPATIBLE on all databases in your Data Guard configuration. The order is important:

  • First, standby databases (individual order is not important)
    STANDBY SQL> --Ensure redo apply is running
    STANDBY SQL> alter database recover managed standby database disconnect from session;
    STANDBY SQL> alter system set compatible='19.0.0' scope=spfile sid='*';
    STANDBY SQL> alter database recover managed standby database cancel;
    
    [oracle@standby]$ srvctl stop database -d $ORACLE_UNQNAME
    [oracle@standby]$ srvctl start database -d $ORACLE_UNQNAME -o mount
    
    STANDBY SQL> alter database recover managed standby database disconnect from session;
    
  • Last, primary database
    PRIMARY SQL> alter system set compatible='19.0.0' scope=spfile sid='*';
    
    [oracle@primary]$ srvctl stop database -d $ORACLE_UNQNAME
    [oracle@primary]$ srvctl start database -d $ORACLE_UNQNAME
    

Other Blog Posts in This Series

Further Reading

How To Upgrade Data Guard – MAA Method

Let me show you how to upgrade your database to Oracle Database 19c when it is protected by Data Guard. I will use AutoUpgrade and follow the MAA method.

This is my demo environment: Overview of the environment that is used for this procedure

  • Grid Infrastructure is managing the database.
  • Data Guard is configured using Data Guard broker.

Overall, the process looks like this: Overview of upgrade with a data guard

This procedure starts right before I start AutoUpgrade in DEPLOY mode. Downtime has begun, and no users are connected to the database.

Before Upgrade

I always use the latest version of AutoUpgrade. Download it and put it into $ORACLE_HOME/rdbms/admin.

A newer version of AutoUpgrade can also upgrade to older database releases, so don’t worry if the AutoUpgrade version doesn’t match the Oracle Database release that you are upgrading to.

Disable Fast-Start Failover (FSFO)

Fast-Start Failover must be disabled during upgrade. I connect to Data Guard CLI (dgmgrl) and disable it:

DGMGRL> disable fast_start failover;

Restore Point

I need to protect the standby database against errors during the upgrade. I create a guaranteed restore point on the standby database:

STANDBY SQL> alter database recover managed standby database cancel;
STANDBY SQL> create restore point stdby_before_upg guarantee flashback database;
STANDBY SQL> alter database recover managed standby database disconnect from session;

Set Parameters

If I plan on making changes to the database initialization parameters as part of the upgrade of the primary database, I probably also want to make the same changes on the standby database.

I can make changes to database initialization parameters using these AutoUpgrade config file parameters:

  • remove_underscore_parameters
  • add_after_upgrade_pfile
  • add_during_upgrade_pfile
  • del_after_upgrade_pfile
  • del_during_upgrade_pfile

I can also review the Preupgrade Summary Report for suggested changes to the database initialization parameters.

Save the changes to the SPFile only:

STANDBY SQL> alter system set ... scope=spfile;

Restart Standby Database In New Oracle Home

The standby database must be started in the new Oracle Home; the Oracle Home I upgrade to.

  • First, I stop the standby database:

    [oracle@standby]$ srvctl stop database -d $ORACLE_UNQNAME
    
  • Ideally, I have stored these files outside the Oracle Home; like ASM. In that case, I don’t need to do anything:

    • SPFile
    • Password file
    • Data Guard broker config files
    • Network files (sqlnet.ora, tnsnames.ora etc.)

    If I stored the files inside the Oracle Home, I must move them to the new Oracle Home (see appendix).

  • Next, I restart the database in the new Oracle Home. I must restart in mount mode:

    [oracle@standby]$ #Set environment to new Oracle Home
    [oracle@standby]$ export ORACLE_HOME=/u01/app/oracle/product/19.0.0.0/dbhome_1
    [oracle@standby]$ export PATH=$ORACLE_HOME/bin:$PATH
    [oracle@standby]$ srvctl upgrade database -d $ORACLE_UNQNAME -oraclehome $ORACLE_HOME
    [oracle@standby]$ srvctl start database -d $ORACLE_UNQNAME -o mount
    

    I don’t need to explicitly start redo apply. My Data Guard broker configuration has APPLY-ON for the standby database. Since the broker is still enabled, it will ensure that redo apply is started.

  • Finally, be sure also to change my profiles and /etc/oratab (see appendix).

Upgrade

Upgrade the primary database by starting AutoUpgrade in DEPLOY mode:

[oracle@primary]$ java -jar autoupgrade.jar -config DB.cfg -mode deploy

As the upgrade progresses, it makes a lot of changes to the database data dictionary. Those changes are written to redo, which the standby database will apply. Thus, the upgrade happens implicitly on the standby database via the redo.

After Upgrade

Check Standby Database

Ensure that the standby database has caught up and applied all the redo generated during the upgrade.

I use Data Guard CLI (dgmgrl) to check it. First, the configuration:

DGMGRL> show configuration

Configuration - DB_BOSTON_DB_fra2vp

  Protection Mode: MaxPerformance
  Members:
  DB_BOSTON - Primary database
    DB_fra2vp - Physical standby database 

Fast-Start Failover:  Disabled

Configuration Status:
SUCCESS   (status updated 28 seconds ago)

Status must be SUCCESS.

Next, I check each of the databases:

DGMGRL> show database "DB_BOSTON"
DGMGRL> show database "DB_fra2vp"

Both databases should have status SUCCESS, and the standby database must report no apply lag. Use Data Guard Broker to verify data guard setup after upgrade

If Data Guard broker reports an erroror the standby database is not applying logs, I can try to enable the configuration again:

DGMGRL> enable configuration;

Validate Data Guard

I validate the setup and ensure both databases are ready for a switchover. The database will not allow a switchover if there are any problems in the Data Guard setup. It is a good way of checking things are fine:

DGMGRL> validate database "DB_BOSTON"
DGMGRL> validate database "DB_fra2vp"

After upgrading a primary database (data guard) with autoupgrade you can use validate database to ensure everything is fine

Optionally, I perform a switchover as well:

DGMGRL> switchover to "DB_fra2vp"

Re-enable Fast-Start Failover

I can now re-enable FSFO:

DGMGRL> enable fast_start failover;

Active Data Guard

If the database is licensed to use Active Data Guard, I can now open the standby database in READ ONLY mode.

Remove Restore Points

After the upgrade, I should perform the necessary tests to validate the new database release. Only when I am convinced to go live on the new release, should I remove the restore points on both databases.

Miscellaneous

Check the database registration in listener.ora. I must update the Oracle Home information if there is a static configuration.

What If

  • What if your Oracle Database is not managed by Grid Infrastructure? You can still use the above procedure, but you must change the commands accordingly.

  • What if you don’t use Data Guard broker? Manually configured Data Guard environments are fully supported by AutoUpgrade, but you must change some commands accordingly.

Conclusion

It is not that complicated to upgrade your database, even if it is part of a Data Guard setup. Using AutoUpgrade is fully supported and highly recommended. A little extra legwork is needed to take care of the standby database. But the good thing is that your Data Guard setup is maintained throughout the process.

Here is a cool demo of the entire process:

Other Blog Posts in This Series

Appendix

Broker Config Files

Here is a query to determine the location of the Data Guard broker config files. In this example, the files are stored outside the Oracle Home; in ASM:

SQL> select name, value from v$parameter where name like 'dg_broker_config_file%';

NAME                   VALUES
---------------------- --------------------------------
dg_broker_config_file1 +DATA/DB_FRA2PR/dr1db_fra2pr.dat
dg_broker_config_file2 +DATA/DB_FRA2PR/dr2db_fra2pr.dat

Database Files

Here is a command to see where the SPFile and password file are located. In this example, the SPFile is stored outside the Oracle Home. However, the password file is in the default location inside the Oracle Home. The latter must be moved when you restart a database in the new Oracle Home:

[oracle@standby]$ srvctl config database -d $ORACLE_UNQNAME | grep -E "Spfile|Password"
Spfile: +DATA/<DB_UNIQUE_NAME>/PARAMETERFILE/spfileDB.ora
Password file: 

Updating /etc/oratab

Here is a little snippit to update /etc/oratab to match the new release Oracle Home. Since I am using Grid Infrastructure to manage my database, I don’t set the database to start automatically:

export NEW_ORACLE_HOME=/u01/app/oracle/product/19.0.0.0/dbhome_1
export ORACLE_SID=DB
#Backup file
cp /etc/oratab /tmp/oratab
#Use sed to remove the line that starts with ORACLE_SID
sed '/^'"$ORACLE_SID"':/d' /tmp/oratab > /etc/oratab
#Add new entry
echo "$ORACLE_SID:$NEW_ORACLE_HOME:N" >> /etc/oratab

Updating .bashrc

Here is a little snippit to update .bashrc replacing the old Oracle Home with the new Oracle Home:

export OLD_ORACLE_HOME=/u01/app/oracle/product/12.2.0.1/dbhome_1
export NEW_ORACLE_HOME=/u01/app/oracle/product/19.0.0.0/dbhome_1
cp ~/.bashrc ~/.bashrc-backup
sed 's|'"$OLD_ORACLE_HOME"'|'"$NEW_ORACLE_HOME"'|g' ~/.bashrc-backup > ~/.bashrc

Config File

For your reference, this is the config file I used. It contains only the required information. All other parameters have a default value:

upg1.sid=DB
upg1.source_home=/u01/app/oracle/product/12.2.0.1/dbhome_1
upg1.target_home=/u01/app/oracle/product/19.0.0.0/dbhome_1

Synchronize Standby Database

When I run AutoUpgrade in ANALYZE mode and check the preupgrade summary report, I find this information message:

Synchronize your standby databases before database upgrade.

The standby database is not currently synchronized with its associated primary database.

To keep data in the source primary database synchronized with its associated standby databases, all standby databases must be synchronized before database upgrade. See My Oracle Support Note 2064281.1 for details.

Don’t worry about it. It tells me to ensure that all redo gets applied

What does it say? Basically, it says that all redo generated on the primary database before the downtime window started, should be sent to and applied on the standby database. This way, my standby database is ready to replace your primary database at any time, if something goes really wrong. Strictly speaking it is not necessary to ensure that, but it is strongly recommended.

Further Reading

Downgrade and Data Guard

Oracle Database is capable of downgrading, and it is a cool fallback mechanism. You can use it even after go-live. Plus, Data Guard plays nicely together with downgrade. You don’t have to rebuild the standby database following a downgrade if you follow the correct procedure.

When To Use Downgrade

You should only consider downgrading after go-live. When users have made changes to your Oracle Database. In that case, you can downgrade to the previous release without any data loss. Before go-live, Flashback Database is our preferred fallback mechanism.

A comparison between the two:

Flashback Database Downgrade
Data loss No data loss
Use before go-live Use after go-live
After flashback, database is identical with before-upgrade state After downgrade, database is compatible with before-upgrade state, but not identical
Requires Enterprise Edition Works in all editions
Preferred method

General Considerations

It is a requirement that you have not changed the COMPATIBLE parameter. As soon as you change COMPATIBLE after upgrade, you can no longer downgrade your Oracle Database. If you have already changed the COMPATIBLE parameter, you must use other fallback methods like Data Pump or RMAN restore.

The old release Oracle Home must still exist on primary and standby hosts. I recommend that you keep them until you are absolutely sure you will not downgrade your Oracle Database.

When you downgrade your database, I recommend leaving your Grid Infrastructure at the new release. Don’t downgrade Grid Infrastructure as well. Ideally, you upgraded Grid Infrastructure to the new release in advance in a previous maintenance window. Thus, you know it can handle the old release of the database. Save yourself the added complexity of also downgrading Grid Infrastructure.

Data Guard broker does not support going back to a previous version. You must disable the broker before downgrade and afterward create a new configuration or restore broker configuration files from the old release.

The following works for Data Guard configuration with a physical standby database. Other considerations and a different procedure apply if you have a logical standby database.

Downgrade

To downgrade an Oracle Database protected by Data Guard the following applies:

  • You can downgrade hours, days, or even months after the upgrade. As long as you haven’t changed the COMPATIBLE parameter.
  • You must mount the standby database and start redo apply in real-time apply mode. Keep it running during the entire process.
  • You must not open the standby database until the end of the process.
  • The downgrade happens on the primary database. A downgrade will make changes to the data dictionary. Those changes are applied on the standby via redo.
  • A downgrade with a standby database generally follows the same procedure as a regular database. However, at the end of each step, you must ensure that the standby database has applied all the redo generated by the primary database during that step. I usually issue a few log switches and check the current sequence (SEQUENCE#) on the primary database. Then I wait for that sequence to be applied on the standby database.

Check our video on YouTube for essential information on downgrade and flip through the slides.

How To Downgrade

AutoUpgrade can’t perform downgrades. You need to do this manually.

In the following, $NEW_ORACLE_HOME refers to the release you were upgrading to (e.g., 19c), and $OLD_ORACLE_HOME refers to the release you upgraded from (e.g., 12.1.0.2).

  1. Follow the pre-downgrade instructions.
  2. Set the environment in your session to the new Oracle Home.
  3. For RAC, set CLUSTER_DATABASE parameter:
    alter system set cluster_database=false scope=spfile sid='*'
    
  4. Stop the primary database:
    srvctl stop database -d $ORACLE_UNQNAME
    
  5. Start the primary database (if RAC, just one instance) in downgrade mode:
    startup downgrade
    
  6. Set the executable flag on downgrade script in the new Oracle Home:
    chmod +x $ORACLE_HOME/bin/dbdowngrade
    
  7. Start downgrade script on primary database. The environment is still set to the new release Oracle Home.
    $ORACLE_HOME/bin/dbdowngrade
    
  8. Important: Ensure that the standby database has applied all redo from the downgrade operation. Perform a few log switches and note the sequence number. Ensure the standby database has applied that sequence.
  9. Shut down primary database and standby database (if RAC, all instances).
  10. Downgrade the standby database in Grid Infrastructure. This tells Grid Infrastructure to start the database in the old Oracle Home (in this example, it is 12.1.0.2):
    $ORACLE_HOME/bin/srvctl downgrade database \
      -db $ORACLE_UNQNAME
      -oraclehome $OLD_ORACLE_HOME
      -targetversion 12.1.0.2
    
  11. Important: Switch the environment in your session to the old Oracle Home.
  12. Start the standby database (if RAC, all instances).
  13. Start redo apply:
    alter database recover managed standby database disconnect from session
    
  14. Start primary database in upgrade mode (if RAC, only one instance):
    startup upgrade
    
  15. Finish the downgrade:
    set echo on termout on serveroutput on timing on
    spool catrelod.log
    @?/rdbms/admin/catrelod.sql
    
  16. Recompile:
    @?/rdbms/admin/utlrp.sql
    
  17. Set CLUSTER_DATABASE parameter and shut down:
    alter system set cluster_database=true scope=spfile sid='*'
    shutdown immediate
    
  18. Downgrade the primary database in Grid Infrastructure. Grid Infrastructure will now start the database in the old Oracle Home (in this example it is 12.1.0.2):
    $NEW_ORACLE_HOME/bin/srvctl downgrade database \
      -db $ORACLE_UNQNAME
      -oraclehome $OLD_ORACLE_HOME
      -targetversion 12.1.0.2
    
  19. Start the primary database:
    $ORACLE_HOME/bin/srvctl start database -d $ORACLE_UNQNAME
    
  20. Ensure all components are valid or option off:
    select comp_id, status 
    from   dba_registry
    where  status not in ('VALID', 'OPTION OFF')
    
  21. Important: Ensure that the standby database has applied all redo from the downgrade operation. Perform a few log switches and note the sequence number. Ensure the standby database has applied that sequence.
  22. Start Data Guard broker on primary and standby database
    • Either restore broker config files from old release, and start Data Guard broker.
    • Or, start Data Guard broker and recreate the configuration.
  23. : Ensure that your Data Guard configuration works. Use validate database command in Data Guard broker on all databases and ensure they are ready for switchover.
  24. Optionally, test your Data Guard by doing a switchover.
  25. Perform the post-downgrade instructions.

That’s it!

CDB

No specific Data Guard-related changes. The above procedure is written for a non-CDB database. The procedure is slightly different for a CDB; check the documentation or the demo below.

RAC

On the standby database, you can leave all instances running, and you don’t need to change CLUSTER_DATABASE.

Demo

Downgrade of a CDB running RAC and Data Guard environment:

Other Blog Posts in This Series