In Oracle Database 23ai, you can copy the dump files even before the export completes.
This saves time during your migration because you can start moving files to the target host while the export is in progress. Additionally, it potentially saves disk space because you can move the files away from the source host.
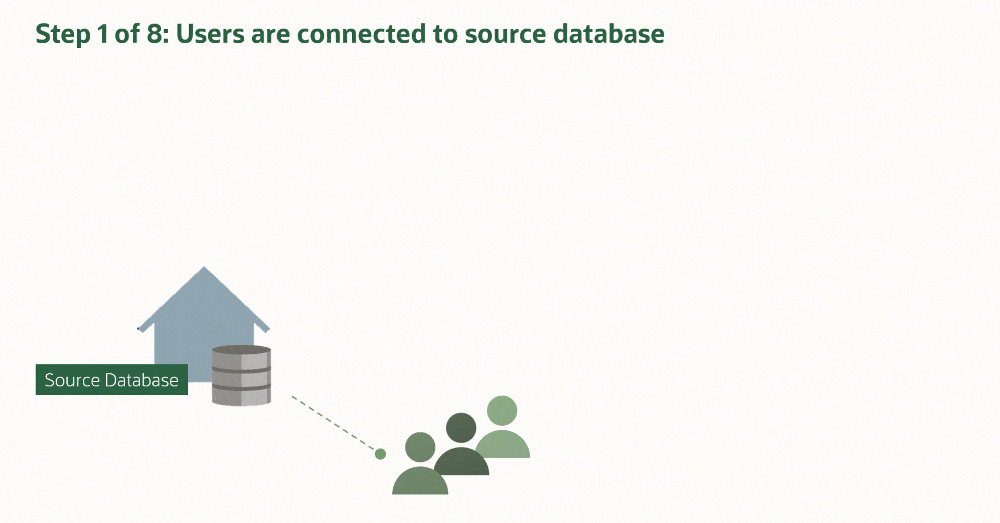
Which Files Can You Move
After starting the Data Pump export, you must connect to the database using:
The same user who started the export
A user with DATAPUMP_EXP_FULL_DATABASE role
Replace the job owner and name, and execute:
set serverout on
declare
   l_job_owner    varchar2(30) := 'DPUSER';
   l_job_name     varchar2(30) := 'SYS_EXPORT_FULL_01';
   l_handle       number;
   l_stsmask      integer := dbms_datapump.ku$_status_job_status;
   l_job_state    varchar2(30);
   l_status       ku$_status;
   l_dump_file    ku$_dumpfile;
begin
   l_handle := dbms_datapump.attach(l_job_name, l_job_owner);
   dbms_datapump.get_status(l_handle, l_stsmask, NULL, l_job_state, l_status);
   dbms_datapump.detach(l_handle);

   for i in l_status.job_status.files.first..l_status.job_status.files.last() loop

      l_dump_file := l_status.job_status.files(i);

      if l_dump_file.file_type = dbms_datapump.ku$_dumpfile_type_template then
        continue;
      end if;

      if (l_dump_file.file_bytes_written = l_dump_file.file_size) then
         dbms_output.put_line('DONE: ' || l_dump_file.file_name);
      end if;

    end loop;
end;
/
The code lists all the files that Data Pump has marked as completed. Data Pump no longer writes to those files, and you can safely start moving them to the target system.
Prerequisites
You must use multiple dump files. You do that by including %L in your DUMPFILE specification.
DUMPFILE=exp%L.dmp
You must specify a file size that allows Data Pump to rotate into multiple files when they are full. I suggest using 5G, which is also a good setting for most cloud migrations.
FILESIZE=5G
What About
The code examines the max file size and bytes written to determine if the file is full. This is not the same as the physical size of the file in the operating system. You can’t use the file size information from the file system.
What about using rsync or similar tools? I guess that could work; however, we didn’t test that.
You could query the Data Pump control table for the information:
SELECT file_name
FROM <control_table>
WHERE process_order = -21
AND file_max_size = completed_bytes
AND file_max_size <> 0
ORDER BY file_name;
However, querying the control table is not a supported approach. Use the above PL/SQL.
A brand-new Base Database System, which means the operating system and Oracle Grid Infrastructure is already on a newer version.
I’m using a Base Database Service as an example, but the target system could also be Exadata Database Service, Exadata Cloud@Customer, or, in fact, any other offering of Oracle Database.
My Environment
I have one PDB that I want to upgrade. It’s called SALES.
Copy the new version of AutoUpgrade to your source and target system. You can put it into $ORACLE_HOME/rdbms/admin if you like, but it is not a requirement.
I create an AutoUpgrade config file, named sales.cfg, which I store on both servers:
source_home and target_home list the Oracle Home of the source and target CDB, respectively. It doesn’t matter that the two homes exist on one server only.
sid and target_cdb contain the SID of the source and target CDB, respectively. The parameters are case sensitive.
pdbs contains the name of the PDB I want to upgrade, sales. If needed, I could specify more PDBs. Don’t include the domain or use the service name.
source_dblink has the name of the database link (CLONEPDB) and the rate at which the target CDB brings over redo and rolls forward the copy (600 seconds or 10 minutes).
I want to use ASM and Oracle Managed Files, so I set target_pdb_copy_option to file_name_convert. This triggers the use of OMF and the database generates new data files names automatically.
Since my source and target CDB are not on the same host, AutoUpgrade can’t automatically determine the target version. I specify that manually using target_version.
start_time specifies when downtime starts. I set this far out in the future, so I can manually control when the last refresh happens and the upgrade starts.
Prepare Source PDB
I connect to the source PDB. I create a user (for a database link) and grant privileges:
create user dblinkuser identified by ... ;
grant create session,
      create pluggable database,
      select_catalog_role to dblinkuser;
grant read on sys.enc$ to dblinkuser;
I can drop the user after the upgrade.
This could also be a common user. Remember to grant the privileges with container=all.
After the upgrade, I can drop the user.
Prepare Target CDB
I connect to the target CDB, as SYS, and create a database link pointing to my source PDB:
create database link clonepdb
connect to dblinkuser
identified by dblinkuser
using '<connection-string-to-source-pdb>';
Check that the database link works:
select * from dual@clonepdb;
If the query fails with ORA-02085, then you can use alter system set global_names=false;.
This changes my source PDB, so I do it as close to my maintenance window as possible.
AutoUpgrade issues a warning that the target Oracle home is not present. You can safely disregard this.
Upgrade
Since my PDB is encrypted, I must add the source and target CDB keystore password to the AutoUpgrade keystore. I start the load password console on the target host:
Rolls the copies of the data files forward with redo from the source.
Repeat the refresh with redo at regular interval.
At the time specified by start_time, issues a final refresh and disconnects the PDB from the source.
I did set start_time far out in the future, so I could manually control the next step.
I can change the start time using the proceed command in the AutoUpgrade console.
You can monitor the upgrade by using the command lsj -a 30.
When downtime starts and users have disconnected from the source database, I want to do a final refresh to bring over the latest changes and start the upgrade. In the AutoUpgrade console, I use the proceed command.
upg> proceed -job 100
Replace the job number accordingly.
This updates start_time to now.
After doing the final refresh, the PDB in the target CDB is disconnected from the source, and the upgrade starts.
I have now upgraded my PDB to Oracle AI Database 26ai.
The Fine Print
Before Upgrade
Ensure that redo is kept in the Fast Recovery Area of the source database until it has been applied on the target. Either postpone your archive backups or change the archive log deletion policy so the archive logs remain on disk.
The source PDB must be Oracle Database 19c or newer to upgrade directly to Oracle AI Database 26ai.
During Upgrade
Disconnect users from the source database. Right before the upgrade starts, AutoUpgrade executes a final refresh. The last redo from the source database is applied to ensure no data is lost. You must ensure that no users are connected to the source database after this time. Otherwise, that data will be lost.
AutoUpgrade starts the final refresh at the start time specified in the config file:
upg1.start_time=01/01/2040 00:00:00
Or, when I use the proceed command.
You must be careful about disconnecting users from the source database. Remember, AutoUpgrade connects to the source database over a database link as a regular user (not SYS). This means the listener must be available, and you can’t enable restricted session or similar means.
Check this blog post if you want to be in control over when the final refresh happens.
Update your connection string. The PDB is now on a different Base Database System.
Start a new full backup of the target database after the migration.
The OCI console will recognize and display the new PDB after a while. You don’t have to do anything … than to wait for the automatic sync job.
Data Guard
When using refreshable clone PDBs you can’t reuse the data files on the standby database. It is similar to STANDBYS=NONE on the CREATE PLUGGABLE DATABASE statement. So, you plug in with deferred recovery on the standby database.
If you want to minimize the downtime needed to upgrade your Oracle Database 19c on Exadata Cloud Service, one of the options is to use rolling upgrades. Our good friends in the Maximum Availability Architecture (MAA) team recently posted a very good MOS note with step-by-step instructions.
A rolling upgrade uses a standby database called a logical standby database.
A logical standby database is initially created as an identical copy of the primary database, but it later can be altered to have a different structure.
The logical standby database is updated by executing SQL statements. The flexibility of a logical standby database lets you upgrade Oracle Database software (patch sets and new Oracle Database releases) and perform other database maintenance in rolling fashion with almost no downtime.
With almost no downtime means the time it takes to perform a Data Guard switchover. Typically, that is a few minutes. If your application is configured properly, the downtime can be hidden from the end-user. The downtime will appear as a brown-out where the session will be waiting for the database to complete the switchover before continuing.
Other Options for Minimizing Downtime During Upgrades
If your database is not capable of performing rolling upgrades, you can still do something to minimize downtime. You can try to tune the upgrade itself or use Oracle GoldenGate. Both options are described in detail in our webinar How Low Can You Go? Zero Downtime Operations. You can flip through the slides or watch the complete recording.
If you decide to go with Oracle GoldenGate, and since your database is in OCI, you can benefit from the OCI GoldenGate service. Now, you may think: GoldenGate, that sounds expensive! But it is not.
The new OCI GoldenGate service comes at a completely new price model, which is very attractive for shorter use cases like upgrades and migrations. You don’t pay a license for the source and target CPUs but instead for usage of CPUs on the GoldenGate hub itself. And you only pay by the hour.
Conclusion
Finally, just a kudos to my colleague Sebastian Alasino for putting together a very good, easy-to-follow MOS note.
Here is a demo of rolling upgrades (not on ExaCS – but a lot is identical)
Ensure that dictionary statistics are up-to-date in the source database. Data Pump does a lot of querying in the data dictionary, and accurate statistics are vital for good execution plans. I recommend gathering stats on SYS and SYSTEM:
begin
   dbms_stats.gather_schema_stats('SYS');
   dbms_stats.gather_schema_stats('SYSTEM');
end;
/
You could also use dbms_stats.gather_dictionary_stats. But it gathers statistics on all internal schemas, and most often, only SYS and SYSTEM is sufficient:
begin
   dbms_stats.gather_dictionary_stats;
end;
/
Data
I think it goes without saying, but the less data, the faster the migration complete. If you have any junk data in your database, get rid of it.
Migration
Parallel
Apply a proper degree of parallelism. Rule-of-thumb:
On-prem: 2 x number of physical cores
OCI: Number of OCPUs
When you are importing in OCI, consider scaling up on CPUs. More CPUs, faster import. Bare Metal and Exadata DB Systems scales online, whereas Virtual Machines need around 10 minutes of downtime.
Import processes running in parallel can read from the same dump file. This means that the number of parallel processes for an import is not limited by the number of dump files (which is the case of an export). To illustrate with an example:
Export: parallel=8 – 8 dump files were created. Each parallel worker needs exclusive access to a dump file.
Import: parallel=16 – still only 8 dump files. Each parallel worker can read from all dump files, no locks required.
You can control Data Pump parallel in ZDM using these parameters:
Should you go via dump file or directly over a database link? Only your tests can tell the answer, but I am pretty sure that you will find that dump file mode is the quickest.
When you export via a dump file, you also need to figure out how you can transfer it to the target database:
Direct Transfer – you can use either scp or rsync. At the risk of starting a religious discussion, I don’t think it makes much of a difference in this use case. If you need rsync on Exadata, you can find guidance in MOS Doc ID 1556257.1.
Via Object Store – you can use either curl or OCI CLI. I would expect you can get better performance with OCI CLI. But you need to test it in your environment.
Remember to ensure you have adequate disk space on the source database host to hold the dump file. Use mount points that can deliver good write performance, and ideally, they should be separated from the storage that holds the database data files.
As soon as ZDM has completed the migration, gather dictionary stats in the target database. All those new objects that came in with the import have for sure made the statistics stale.
begin
   dbms_stats.gather_schema_stats('SYS');
   dbms_stats.gather_schema_stats('SYSTEM');
end;
/
Next, you need to figure out how you want to take care of the optimizer statistics. In a previous post, I discussed why this is needed and how to do it. If you decide to import statistics via DBMS_STATS, just ensure that you have gathered dictionary stats before.
Further Reading
I recommend that you also read the following posts:
When migrating from IBM AIX and Oracle Solaris, you use the logical offline approach, which means a lot of downtime. You have a few options to make it run as fast as possible.
If you decided to do a logical migration of your Oracle Database with Zero Downtime Migration (ZDM), here is something important about optimizer statistics. You must manually take care of the optimizer statistics on the target database after the Data Pump import. Either by recreating the statistics or transporting the statistics from the source database.
Background
Whenever I talk about migration of Oracle Database with Data Pump, I always mention that it is best practice to exclude optimizer statistics from the Data Pump export. Here is how you do it:
$ expdp ... exclude=statistics
Why is that recommended? Data Pump is not very good at extracting the optimizer statistics. There is nothing wrong with the statistics when they are imported. But it can take a very long time to do the export of statistics.
ZDM and Data Pump
The development team behind ZDM wanted the tool to be easy to use. Also, they wanted ZDM to use all the best practices that come with the various other tools that ZDM uses. When they talked to us about Data Pump, we told them to exclude statistics.
BUT – this also leaves you in a situation where you have a database completely without optimizer statistics. It goes without saying that it is a disaster waiting to happen. You must ensure that optimizer statistics are present on the target database before allowing the users to connect to it.
Regather
One option is to regather optimizer statistics on the target database after the Data Pump import. When the Data Pump import completes, and before you proceed with the switchover, it is time to regather the statistics. Typically, you would start ZDM something like this:
It will start by performing the initial load of the database with Data Pump. Then it will configure GoldenGate before it pauses – waiting for your signal to complete the migration. At this time, use DBMS_STATS to gather statistics:
SQL> exec dbms_stats.gather_database_stats;
This has some drawbacks:
It requires time and resources – which might not be the biggest problem. The source database is still open for business. We haven’t performed the switchover yet.
Column usage information (table COL_USAGE$) is not populated, so in some cases, no histograms will be created. This will happen if the database is supposed to automatically determine whether histograms are needed (method_opt includes size auto). In that case, you can merge the column usage information from another database via a database link, which can be a good idea if your application is depending on histograms.
The table, schema, or database statistics preferences are not present. It could be degree, method_opt, stale_pct or any other preferences that you can set with DBMS_STATS.SET_TABLE_PREFS (or schema or database-wide preferences). These preferences can be transferred to the new system, which is what I will talk about next.
The optimizer statistics in the source database are extracted from the data dictionary and stored in a transportable format in a regular heap table (referred to as a staging table).
Using Data Pump, you move that table to the target database.
Then you put the statistics into the data dictionary of the target database so that optimizer can use them.
Pro tip: You should perform step #1 before you start ZDM and store the staging table in one of the schemas that you are migrating with ZDM. That way, you don’t have to move the table manually. It is moved by ZDM together with the real data.
One thing to be aware of is that the table, schema or database statistics preferences are not transferred when you use e.g. DBMS_STATS.EXPORT_TABLE_STATS. There are dedicated procedures for transferring the statistics preferences:
You must figure out how to move the optimizer statistics into your target database when you use ZDM to perform logical migrations. If not, your target database will be without optimizer statistics which is a disaster waiting to happen.
Appendix
You might now ask. If Data Pump is bad at exporting statistics, but there are already better ways available in the database, why don’t we change the Data Pump code? And you are right – but so far, other things have been prioritized. I would love to see this one day fully embedded in Data Pump.
This blog post is written based on ZDM version 21. The latest version of ZDM has significant changes. Please consult the documentation for updates.
Following the blog post on migrating Very Large Databases (VLDBs) using Logical Online method, let’s touch upon the Physical Online method as well.
Existing Data Guard
VLDBs are very often protected by Data Guard with one or more standby databases. When you start a migration with Zero Downtime Migration (ZDM) you don’t want to promise your existing Data Guard setup. If something happens during the preparation of the migration to OCI, you still want to be able to switch over to an on-prem standby database. Something like this:
I recommend that you always configure Data Guard using Data Guard broker. ZDM supports using the broker for the migration. If you don’t have Data Guard broker configured, ZDM can use a manual configuration as well.
A few things to observe:
When ZDM is working, no switch-overs are allowed. This will cause the process to error out.
By working I mean – from the second you start the ZDM migration and until it is paused at ZDM_CONFIGURE_DG_SRC.
When ZDM is paused, you can do as many switch-overs as you like. Just ensure that the original source database become the primary database again as soon as possible.
When you need to complete the migration, the source database must be the primary database and no switch-overs are allowed. Which does make sense because in this last phase, ZDM is switching over to the OCI target database.
What about fail-overs. Fail-overs means loss of data and to accept that you need to open the database with RESETLOGS. This causes all sort of havoc in your Data Guard setup. You are back to start.
The Backup
ZDM needs a full backup that can be restored on your target.
DBCS: If your target database is one of the OCI Cloud Services (Virtual Machine, Bare Metal or Exadata DB System), ZDM will need to take a new full backup. Existing backups can’t be used.
ExaCC or Exadata on-prem: You can either take a new full backup or use an existing backup that is made available on disk. In addition, if you are so fortunate to have a Zero Data Loss Recovery Appliance (ZDLRA), you don’t need to take a backup. ZDM can just restore directly from ZDLRA.
If you are targeting a DBCS your DATA_TRANSFER_MEDIUM is set to OSS (Object Storage Service). The backup is stored in Object Storage using Oracle Database Cloud Backup Module for OCI. The backup in the source database and the restore in the target database will happen via a special sbt channel which streams the backup directly to and from Object Storage. This means:
The backup never hits the disk, so you don’t need additional disk space to hold the backup.
The duration of the backup is depending on your network speed to OCI. Since the backup is streamed directly to OCI, the network can become a bottleneck. If you have a slow connection to OCI, the backup will run equally slow. The same applies about the restore, however, the target database is already in OCI and does have a good connection to Object Storage.
ZDM will by default use 10 RMAN channels for the restore and the backup. With your knowledge of the source database, you might know better. You can tweak the number of channels in the response file. Look for the parameters SRC_RMAN_CHANNELS and TGT_RMAN_CHANNELS.
Based on your knowledge or testing you can determine which RMAN Compression algorithm that gives the best benefit on your database. You can adjust the compression algorithm in the response file using the parameter ZDM_RMAN_COMPRESSION_ALGORITHM. The default is MEDIUM which is normally gives the best balance between compression ratio and CPU time. And remember, RMAN Compression normally require a license for Advanced Compression Option but when you migrate with ZDM, there is a restricted use license.
While ZDM is taking a backup of the source database, no other backups should be running. Be sure to put your regular backups, including archive backups, on hold.
Redo Apply
In the source database, you should keep archive logs on disk until the target database has been restored, Data Guard has been configured, and the target database has caught up with redo apply.
If you have a slow network connection and a huge database, it can take days until the backup has completed, restored has completed and redo apply has caught up.
Imagine you start the backup at sequence 100.
The restore of the target database finishes two days later. The source database is now at sequence 200.
ZDM configure Data Guard and starts redo transfer and redo apply. The source database is now at sequence 220.
Sequences 100-220 must be available on disk on the source database host, so the source (primary) database can transfer them to the target (standby) database.
It is not uncommon for VLDBs to generate redo on a daily basis that are double-digit TB. Just the other day I talked to a customer whose database generated 15 TB of archive logs a day.
First, you must be able to transfer the redo from the source database (primary) to the target database (standby). This is simple math: If you have 15 TB redo a day, you should be able to transfer that using a 1,5 Gbps connection (amount of redo / 24 / 60 / 60 * 8).
If transferring redo becomes a problem, you can look into using redo transport compression. This can reduce the amount of data that must be transferred at the cost of CPU cycles. You can read more about it in the MOS note Redo Transport Compression in a Data Guard Environment (Doc ID 729551.1).
I learned from colleagues in the Maximum Availability Architecture (MAA) team that TDE Tablespace Encryption and redo transport compression doesn’t play very well together. If your source database is encrypted, you should not expect that much benefit from redo transport compression.
Next, redo must be applied on the target database. Is the target database capable of applying redo so fast? On Exadata the answer is most likely: YES – but as always in IT, it depends.
The numbers of the above graph comes from Redo Apply Best Practices – Oracle Data Guard and Active Data Guard. Based on your database release and the type of workload you have in the database; you can see the amount of redo that can be applied daily (in TB). The last two columns are using Multi-Instance Redo Apply (MIRA) with either two or four active RAC nodes. The numbers were generated on an Exadata.
Backup of Target Database
How do you backup your target database in OCI? You want to have a valid backup from the very second that you switch over to the target database.
The target placeholder database that you originally created will be overwritten by ZDM. This means that you can’t configure and enable automatic backup in OCI in advance. You must wait until the migration has completed until you enable automatic backup.
You could:
Extend the downtime window to allow automatic backup to be configured after the migration. Also, allow enough time for the first backup to complete.
Or, do your own backup in OCI. This is more cumbersome but will allow you to open the database for business immediately after the switchover. But you are in charge of the backup now. All the various bits and pieces are available:
Original backup is still in object storage.
Archive logs are on disk – you can back them up manually.
Perform incrementals if needed – put them somewhere safe.
In case of emergency – glue it all together
Data Guard on Target Database
Similar to automatic backup, you can’t create a Data Guard Association until ZDM has completed the migration. The cloud tooling does not support creating the standby database through a cascading standby.
This means that you can’t build your OCI standby database until after ZDM has completed the migration – and the OCI database is the primary database. You can start to create the OCI Data Guard as soon as ZDM is done, but
You must tolerate that the OCI Data Guard is missing
Or, take downtime
Conclusion
Even huge Oracle Databases can be migrated to OCI using Zero Downtime Migration. You might need to make a few adjustments from the standard flow, but it is absolutely doable. Automatic backup and data guard can’t be created in OCI until after the migration. This might force you to take downtime.
Besides the actual migration, you should also do your best to ensure performance stability once the database is open for business. For that purpose, you should have a look at our webinar Performance Stability, Tips and Tricks and Underscores.
Things always work on PowerPoint slides. And they almost always work in our lab environments as well. And recorded demos are also pretty bullet-proof.
But what happens when you have a huge database to migrate? A Very Large Database (VLDB). First, things get more exciting. Second, there are more knobs to turn and the smallest thing might become a big thing. Here are some things to consider when you migrate VLDBs using the Logical Online method.
Existing Data Guard
No need to worry about your existing on-prem Oracle Data Guard environment. The Logical Migration uses Oracle Data Pump and Oracle GoldenGate. Both tools can be used on a database in a Data Guard and does not interfere with Data Guard operations.
But no switchovers or failovers are allowed during replication. GoldenGate can be configured to fully support a Data Guard environment and seamlessly reconnect in case of a Data Guard switchover. But it requires advanced configuration of GoldenGate.
Zero Downtime Migration (ZDM) does the GoldenGate configuration but does so in a basic way that does not support Data Guard switchovers.
Data Pump
Data Pump is used for the initial load of data.
The initial load happens before downtime, so generally you shouldn’t worry too much about the time it takes to perform the Data Pump export and import. However, the longer it takes, the bigger a replication will GoldenGate need to catch up. If the gap is too big, it might become a problem.
Apply a proper degree of parallelism. Rule-of-thumb:
On-prem: 2 x number of physical cores
OCI: Number of OCPUs
You can change the Data Pump parallel setting using the ZDM response file parameters DATAPUMPSETTINGS_DATAPUMPPARAMETERS_EXPORTPARALLELISMDEGREE and DATAPUMPSETTINGS_DATAPUMPPARAMETERS_IMPORTPARALLELISMDEGREE
When you are importing in OCI, consider scaling up on CPUs. More CPUs, more Data Pump parallel, faster import. Bare Metal and Exadata DB Systems scales online, whereas Virtual Machines needs around 10 minutes of downtime.
ZDM applies Data Pump compression automatically. Remember you don’t need a license for Advanced Compression Option to use compression when you are migrating with ZDM. Our experience is that MEDIUM most of the time is the best alternative. It provides a good compression ratio at a low CPU footprint. Although HIGH can compress better, it often comes at a much higher CPU footprint. ZDM uses MEDIUM compression algorithm. It’s not possible to change the Data Pump compression algorithm. The interested reader may find a benchmark below, that compares the different compression algorithms:
ZDM automatically transforms BasicFile LOBs into SecureFile LOBs – which is very good. SecureFile LOBs are superior in many ways, also when it comes to importing. Based on a customer case, we did a benchmark that measures the time it takes to import LOB data. The customer saw a 3x improvement during by transforming to SecureFile LOBs – and got the benefits of SecureFile LOBs afterwards. ZDM transforms to SecureFile LOBs automatically. Don’t turn it off. Here are the log entries from the two imports. Notice the elapsed time:
BasicFile LOBs
10-OCT-20 21:43:21.848: W-3 . . imported "SCHEMA"."TABLE" 31.83 GB 681025 rows in 804 seconds using direct_path
SecureFile LOBs
15-OCT-20 18:16:48.663: W-13 . . imported "SCHEMA"."TABLES" 31.83 GB 681025 rows in 261 seconds using external_table
Don’t use import over network link. Use dump files. Performance-wise there are some restrictions when you import over network link. These restrictions really hurt on a VLDB.
The Data Pump works will automatically be started on all nodes, if the target database is a RAC database. That should allow for the fastest possible import. If needed, you can force all workers on to the same node using DATAPUMPSETTINGS_DATAPUMPPARAMETERS_NOCLUSTER
But when you export to dump files, remember to ensure you have adequate disk space on the source database host to hold the dump file. Use mount points that can deliver good write performance and ideally, they should be separated from the storage that holds the database data files.
A Data Pump export does not affect your existing backup operations. But the export and the backup will fight over the same resources, so I recommend suspending major backup operations (level 0+1) until after the export.
Speaking of fighting over resources. You should run the export at off peak hours. That will allow the export to use many more resources.
The export is not a fully consistent export. Each table is consistent, but ZDM does not use FLASHBACK_TIME or FLASHBACK_SCN to make the entire export consistent. This helps avoid ORA-01555 snapshot too old during the export. The SCN of each table is recorded in the dump file and GoldenGate later on uses that information to start replication on each table individually from the appropriate SCN.
GoldenGate Replication
How much data will GoldenGate need to transfer from source database to GoldenGate hub and from GoldenGate hub to target database? GoldenGate stores the replication data in trail files. The trail files are smaller than redo logs. The size of trail files is typically 30-40 % of the size of the redo logs.
Imagine a database generating 15 TB of redo a day. The size of the trail files will be 4,5-6 TB. If you further apply compression on the trail files, you can typically reduce the size to around 1/8. Using our example, the trail files are now 550-750 GB. Which is significantly less than the initial 15 TB.
In the ZDM response file there is a parameter called GOLDENGATESETTINGS_EXTRACT_PERFORMANCEPROFILE. The default value is MEDIUM, but you have the option of changing it do HIGH. This should increase the performance of the extract process.
ZDM configure GoldenGate to use Parallel Replicat. This gives you a few options. First, you can control the number of mappers by using the parameter GOLDENGATESETTINGS_REPLICAT_MAPPARALLELISM (default is 4). Also, apply parallelism is auto-tuned. You can set a minimum and maximum value using GOLDENGATESETTINGS_REPLICAT_MINAPPLYPARALLELISM and GOLDENGATESETTINGS_REPLICAT_MAXAPPLYPARALLELISM=50. Defaults are 4 and 50 so I don’t think it will be necessary to change.
By default, ZDM does not configure GoldenGate with DDL replication. Replicating without DDL gives the best performance. If you must have DDL replication in your migration project, you can look at the ZDM response file parameter GOLDENGATESETTINGS_REPLICATEDDL. But be prepared for a performance degradation.
In our webinar, Migrating Very Large Databases my team and I discuss what to consider when migrating databases with GoldenGate.
Last, you can find more advice in Administering Oracle GoldenGate 19.1, Tuning the Performance of Oracle GoldenGate.
GoldenGate Health Check
Oracle GoldenGate comes with health check scripts that you can use on the source and target database. This will help you monitor and troubleshoot the process. Here is information on how to install and use the health check scripts. You can also find information in
Administering Oracle GoldenGate 19.1, Using Healthcheck Scripts to Monitor and Troubleshoot.
Backup of Target Database
When you use logical online migration in ZDM, you create the target database in advance. In contrast to physical migration, the target database is not overwritten. This means that you can configure automatic backup of your target OCI database before you complete the migration and switch over to OCI. You will even have time to and possibility of testing the backup.
I recommend that you configure automatic backup after the Data Pump initial load. This way there is less archive logs to back up as well.
Data Guard on Target Database
Similar to automatic backup, you can also create your Data Guard association before the switchover. Likewise, wait until after the initial load has completed.
Conclusion
Even huge Oracle Databases can be migrated to OCI using Zero Downtime Migration. You might need to make a few adjustments from the standard flow, but it is absolutely doable. Your database can be protected by backup and Data Guard from the very second you switch over to OCI.
Besides the actual migration, you should also do your best to ensure performance stability once the database is open for business. For that purpose, you should have a look at our webinar Performance Stability, Tips and Tricks and Underscores.
Other Blog Posts in This Series
Introduction
Install And Configure ZDM
Physical Online Migration
Physical Online Migration to DBCS
Physical Online Migration to ExaCS
Physical Online Migration and Testing
Physical Online Migration of Very Large Databases
Logical Online Migration
Logical Online Migration to DBCS
Logical Offline Migration to Autonomous Database
Logical Online Migration and Testing
Logical Online Migration of Very Large Databases
Logical Online and Sequences
Logical Offline Migration How To Minimize Downtime
Logical Migration and Statistics
Logical Migration and the Final Touches
Create GoldenGate Hub
Monitor GoldenGate Replication
The Pro Tips
Since the method uses Data Guard as the migration vehicle, this can only be only with Enterprise Edition databases.
Benefits
Personally, I like this approach because it builds on technology that most of us know already. Data Guard is heavily in use in most organizations. Although ZDM does all the heavy lifting, it is nice to know what happens underneath the hood.
To complete the migration all you need is a regular Data Guard switchover (which ZDM also takes care of). A switchover operation ensures that there will be no data loss at all. In addition, if you have a properly configured application, it won’t experience downtime. Just a brown-out while the switchover takes place.
This method has an excellent fallback possibility. When you switch over to the OCI database, the redo flow is reversed. Now, the on-prem database is a standby database, and it is kept in sync via redo from the OCI database. For those with Advanced Security Option special attention is needed. Read more about it later on.
You migrate the entire database. All the internals are brought to the cloud as well. This includes:
AWR
SQL Plan Baseline
SQL Profiles
Public objects
Etc.
The initial backup of the source, on-prem database will use RMAN Compression. It will drastically reduce the size of the backup, and thus the amount of data that you must transport to the cloud. And the really good thing: ZDM can use RMAN Compression even if you don’t have a license for the Advanced Compression Option. Check the documentation for details on the restricted use license.
You can customize the RMAN backup. You know your system best, so it is possible to tweak the number of RMAN channels used and the compression algorithm applied. Default is 10 and medium.
When ZDM takes the full backup of your source database (Exadata on-prem and ExaCC excluded), it uses Oracle Database Cloud Backup Module for OCI to allocate a special sbt channel. The backup is sent directly to OCI Object Storage. Thus, you don’t need any additional disk space on your source system to hold the backup. The same applies on the target system.
When migrating to ExaCC or Exadata on-prem you can use an existing backup. Use the response file option DATA_TRANSFER_MEDIUM=EXTBACKUP. Also, if you have a Zero Data Loss Recovery Appliance (ZDLRA) you can restore directly from it, without taking a full backup first. If you are migrating to any other platform, ZDM will need to take a full backup as part of the workflow.
The standby database is kept in sync via redo apply. This means that there are no restrictions in supported data types. Further, DDL in any form is supported and even with a heavy workload on the primary database, your standby database should be able to keep up.
You can migrate to a higher patch level. ZDM will automatically invoke datapatch for you on the OCI database. But you must handle the on-prem database yourself. After switching over to the OCI database and datapatch has been executed, you should patch the on-prem Oracle Home to the same patch level.
Considerations
You can migrate to the same version only. This is a restriction of Data Guard. If you also need to upgrade the database, then you must do that after the migration. But it will incur additional downtime.
The same applies to PDB conversion. ZDM can run the noncdb_to_pdb.sql script for you. But that will incur downtime as well. If you decide to convert to PDB, you need to develop an alternate fallback plan (which is Data Pump or Transportable Tablespaces). The PDB conversion is irreversible, and your on-prem database will be useless as a fallback option.
It is not possible to migrate between editions.
The entire database is migrated. I listed this as a benefit as well, but it has a flipside as well. It is not possible to perform any transformation during the migration, e.g. converting any old BasicFile LOBs to SecureFile LOBs. Also, you bring over any old baggage in your database. Sometimes it is nice to start from scratch because garbage tends to accumulate in a database over time.
If you have a Standard Edition database, you can’t use Physical Online method. Only the Physical Offline is supported.
You can’t configure Automatic backup on your target database until after the migration has been completed.
If you need to protect your OCI database with Data Guard, then you must build the standby database after the migration has been completed. Normally, you would use a cascading standby database to keep the target database protected by Data Guard even after the migration has been completed. But currently the OCI tooling does not support that option.
If your source database is not encrypted, you must create a keystore that can be used later on for TDE Tablespace Encryption. The keystore is created in the source database with no downtime, and you don’t need a separate license just for creating a keystore. You do not have to actually encrypt your source database until it reaches the cloud.
Fallback
Using this approach, you have a great fallback option. When you switch over to the OCI database, then the redo flow is reversed and the source, on-prem database is now the standby database. If you need to fallback, simply issue another switchover (you could call that a switchback) and start to use the on-prem database again – with no data loss. See step 5 in MAA Practices for Cloud Migration Using ZDM (Doc ID 2562063.1).
There is a catch, however. The OCI database is encrypted using TDE Tablespace Encryption. Any redo generated for an encrypted tablespace is also encrypted. This means that the on-prem database must be able to decrypt the redo before it can be applied. This can happen in two ways:
You have a license the Advanced Security Option.
You tell the on-prem database to decrypt the redo and apply it to unencrypted tablespaces.
On-prem database:
SQL> alter system set tablespace_encryption=decrypt_only;
OCI database:
SQL> alter system set tablespace_encryption=auto_enable;
Conclusion
Using the Physical Online method in ZDM is a straight-forward way of migrating your database to OCI. It uses Data Guard which is very familiar to most of us.
The method does, however, have some limitations, and you can’t target Autonomous Databases.
Following a previous blog post here are all the details on automated upgrades in OCI, and (possibly) the answers to your questions.
Precheck
The precheck ensures the database is ready to upgrade. It uses DBUA which again uses preupgrade.jar to execute the checks. It is similar to running AutoUpgrade in analyze mode. The check is non-intrusive and can be executed while the database is in use.
Normally, when you use preupgrade.jar we always recommend you download the latest version from My Oracle Support. However, this is not possible when you use the tooling. The new, target Oracle Home is always deployed as part of the precheck process – and deleted again after the precheck. There is no way you can replace the preupgrade.jar package. You must use the version of preupgrade.jar that comes with the Oracle Home.
If there are no issues that prevent you from upgrading, you will see this message:
However, it could also be that there is an error in the database that must be fixed:
If you want to see the output from the precheck you must log on to the database host and find the file:
vi $ORACLE_BASE/cfgtoollogs/dbua/upgrade<timestamp>/$ORACLE_UNQNAME/upgrade.xml
Only the XML output is available, which might be a little hard to read. If you prefer you can also download AutoUpgrade to the server and run it in analyze mode. It can produce a much better output, and it works even if the target Oracle Home is not present. Create a simple config file:
You can use the preupgrade report to determine which issues prevents the upgrade from starting.
The database must be in ARCHIVELOG mode and the size of your Fast Recovery Area (FRA) must be at least 15G (parameter db_recovery_file_dest_size). As well, you must have 15G of free space on the mount point that hosts the FRA.
Upgrade
When you upgrade your database, all PDBs in the database are upgraded as well. There is no way to change it. If a PDB is closed when the upgrade starts, it is opened and upgraded.
After the upgrade, the PDB is left opened and in READ WRITE state. But the state is not saved, so after a CDB restart, the PDB will start in whatever state that has been previously saved.
The first version of the tooling does not support standby database. If your database is a primary database, you must remove the standby database, upgrade, and then recreate the standby database. It is in the plan for future enhancements to get this streamlined.
Fallback
Enterprise Edition databases are protected by a guaranteed restore point (GRP) and Flashback Database. The tooling automatically creates the GRP before it starts to work on the database. If an error occurs during the upgrade, you can use the OCI console to initiate a roll back.
After successful upgrade the GRP is dropped again. The GRP only protects the database during the upgrade, so you can’t rely on the GRP as a fallback mechanism if you decide to fall back after the upgrade. Let’s say that your testing reveals a critical problem after the upgrade, then your only fallback mechanism is to restore a backup.
Since Flashback Database is an Enterprise Edition feature, this fallback mechanism is not available on Standard Edition databases.
In addition, it is strongly recommended that you perform a manual backup of the database before you start the upgrade. The console will also give you this warning, before you can start the upgrade.
Monitoring and Troubleshooting
When you have started the upgrade, you can’t monitor it from the console. You must log on to the host. When you do so, be aware that the timestamps shown in the OCI console are UTC, but the timestamps in the log files on the host is local timestamp (depending on your region).
Using dbcli
Log on as root and use the dbcli tool to monitor the progress. First, list jobs:
[root@host]$ dbcli list-jobs
Which should produce a list like this:
Next, you can get additional information about the job using the ID:
[root@host]$ dbcli describe-job -i <id>
Which give you more details:
Using DBUA Log Files
But you can get even better information by looking in the log files from DBUA. Use the job id from the dbcli command to find the log file:
And for really detailed information look in this directory:
[oracle@host]$ export ORACLE_BASE=/u01/app/oracle
[oracle@host]$ export DBCLI_JOBID=f4b2597f-990f-4442-a774-153f3713fb7a
[oracle@host]$ cd $ORACLE_BASE/cfgtoollogs/dbua/$DBCLI_JOBID/$ORACLE_UNQNAME
Using DCS Agent
The OCI control plane communicates with your DB System using an agent, and sometimes it can be useful to look in those logs:
[root@host]$ cd /opt/oracle/dcs/log
[root@host]$ vi dcs-agent.log
To find the log entries that are related to a specific upgrade search for the job ID:
[root@host]$ cat dcs-agent.log | grep "<job-id>" | more
Q&A
Which version and release update can I upgrade to?
The tooling only allows upgrades to Database 19c. If you need to upgrade to any other version, you must do it manually.
You can decide to upgrade to an Oracle provided image or a custom image:
However, for both type of images, the Release Update (or patch level) must be the latest or previous two Release Updates. Even if you have a custom database software image that is older, it can’t be used. You must upgrade to one of the recent Release Updates.
If you select 19.0.0.0 you will not get the base release, but the latest Release Update. If you use the APIs this is a smart way of specifying that you always want the latest Release Update.
Where are my log files?
The output from the precheck is stored here:
$ORACLE_BASE/cfgtoollogs/dbua/upgrade<timestamp>
The output from the actual upgrade is stored here:
The precheck (phase 2) is really fast. Just as fast as if you would run AutoUpgrade in analyze mode or using preupgrade.jar. The extra time is needed to deploy and remove the Oracle Home again. For each execution of the precheck the procedure repeats, and a new Oracle Home is deployed. It is never re-used.
Why is the upgrade slower than if I do it manually?
Typically, when you upgrade a database you have already – outside of the maintenance window – deployed a new Oracle Home. When you use the tooling, this happens inside the maintenance window. The tooling can’t deploy an Oracle Home prior to the upgrade. In addition, the upgrade is executed with DBUA using default options, which for instance means that the time zone file is upgraded as well.
If you are sensitive to downtime and would like to complete the upgrade faster, you must perform the upgrade manually.
Will my 11.2.0.4 database get converted to a PDB?
No, the database is upgraded as-is and there is no PDB conversion. We are working on making it possible to perform the non-CDB conversion as well. If you must convert the non-CDB to a PDB, you must move the database to a new VM DB System that already have a CDB provision. In that case, I would recommend that you use the manual upgrade and plug-in as described in another blog post.
Can I perform an automated upgrade using dbcli?
No, although the command line help of dbcli suggests that such an option exist, it can’t be used.
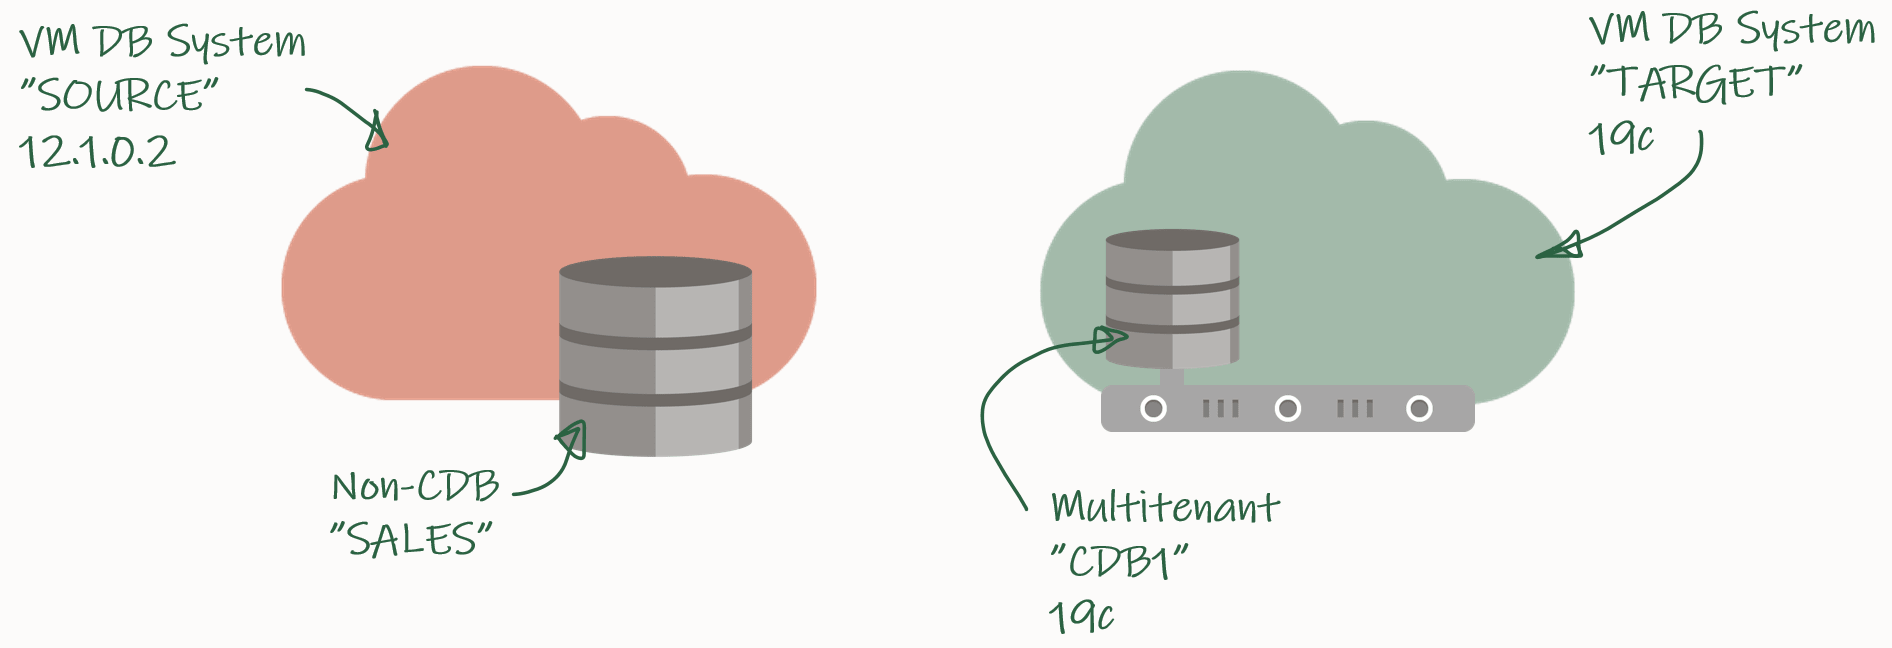
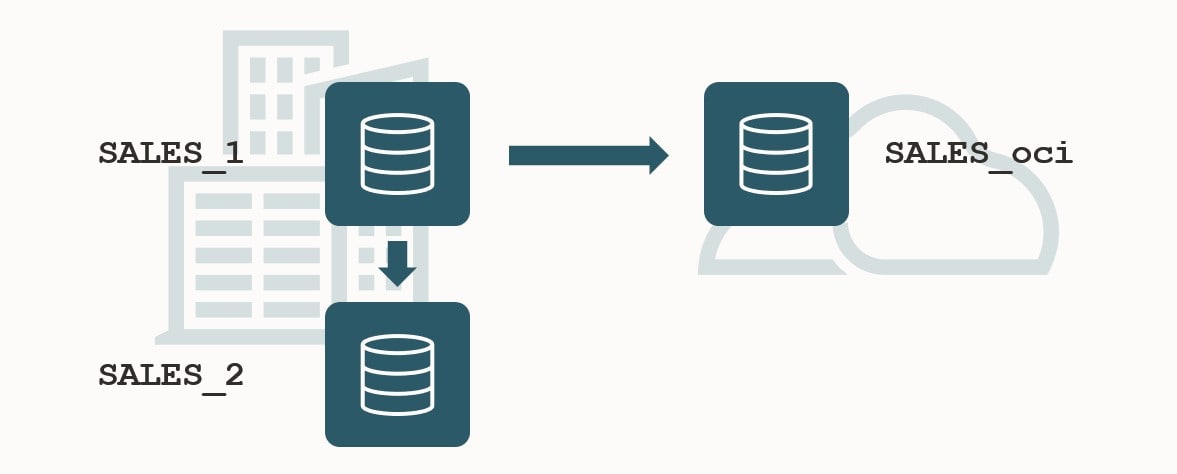
These steps will guide you through a migration of a database using Full Transportable Export/Import (FTEX) and incremental backups. I covered the concept in a previous blog post, which you should read to understand the basics. Remember Transportable Tablespaces and Full Transportable Export/Import requires Enterprise Edition.
My demo environment looks like this:
I have an 12.1.0.2 database that I want to migrate to a PDB in a new CDB that runs 19c.
Check Prerequisites
Create a new PDB called SALES in the target CDB:
TARGET/CDB1 SQL> create pluggable database sales admin user admin identified by admin;
TARGET/CDB1 SQL> alter pluggable database sales open;
TARGET/CDB1 SQL> alter pluggable database sales save state;
Prepare the database to use TDE Tablespace Encryption:
TARGET/CDB1 SQL> alter session set container=sales;
TARGET/CDB1 SQL> administer key management set key force keystore identified by <keystore-pwd> with backup;
Verify SQL*Net connectivity from source host to target PDB:
Verify database character set and national character set are the same:
SOURCE/SALES SQL> select property_name, property_value from database_properties where property_name in ('NLS_CHARACTERSET', 'NLS_NCHAR_CHARACTERSET');

TARGET/SALES SQL> select property_name, property_value from database_properties where property_name in ('NLS_CHARACTERSET', 'NLS_NCHAR_CHARACTERSET');
Ensure the source database is in ARCHIVELOG mode:
SOURCE/SALES SQL> select log_mode from v$database;
Enable block change tracking on source database. Requires Enterprise Edition (on-prem), DBCS EE-EP (cloud) or Exadata. Although strictly speaking not required, it is strongly recommended:
SOURCE/SALES SQL> select status, filename from v$block_change_tracking;
SOURCE/SALES SQL> alter database enable block change tracking;
Ensure that you can connect from the source to the target host as oracle:
[oracle@source]$ ssh <target ip> date
Identify Tablespaces And External Data
Identify all the tablespaces that you will migrate. With FTEX you should transport all the tablespaces, except those that contain Oracle maintained data, like SYSTEM, SYSAUX, UNDO and so forth:
SOURCE/SALES SQL> select tablespace_name from dba_tablespaces;
Save the list of tablespaces for later. In my demo, I only have the tablespace SALES except the Oracle maintained ones.
Next, on the target database ensure that any of the existing tablespaces doesn’t conflict with the ones you are transporting:
TARGET/SALES SQL> select tablespace_name from dba_tablespaces;
If there is a conflict of names, you have to drop or rename the tablespaces in the target database.
Use DBMS_TDB to easily identify external stuff like directories, external tables and BFILEs. Any files stored in the file system outside the database must be manually transferred to the file system on the target host:
SOURCE/SALES SQL> SET SERVEROUTPUT ON
SOURCE/SALES SQL> DECLARE
      external BOOLEAN;
   BEGIN
      external := DBMS_TDB.CHECK_EXTERNAL;
   END;
/
Download and Configure Perl Scripts
Create a folder to hold the perl scripts, download the scripts from MOS doc ID 2471245.1, and unzip:
[oracle@source]$ rm -rf /home/oracle/xtts
[oracle@source]$ mkdir /home/oracle/xtts
[oracle@source]$ cd /home/oracle/xtts
[oracle@source]$ --Download file from MOS
[oracle@source]$ unzip rman_xttconvert_VER4.3.zip
Create a working directory (aka. scratch location) which will hold the backups. Ensure that you have enough space at this location at both source and target database.
Now, you can start the first initial backup of the database. You take it while the source database is up and running, so it doesn’t matter if the backup/restore cycle take hours or days to complete:
[oracle@source]$ export TMPDIR=/home/oracle/xtts
[oracle@source]$ cd /home/oracle/xtts
[oracle@source]$ $ORACLE_HOME/perl/bin/perl xttdriver.pl --backup
The perl script has been configured in such a way that it automatically transfers the backups to the target system. In addition to that, a small text file must be transferred as well:
Now, on the target system, you can restore the backup that was just taken. If needed, the data files are automatically converted to the proper endian format. If conversion is needed, you need space for a copy of all the data files:
[oracle@target]$ export TMPDIR=/home/oracle/xtts
[oracle@target]$ cd /home/oracle/xtts
[oracle@target]$ $ORACLE_HOME/perl/bin/perl xttdriver.pl --restore
Incremental Backup and Restore
You can – and should – run the incremental backup and restores as many times as possible. The more frequent you run them, the faster they will run because there will be fewer changes.
At least, close to the migration downtime window starts you should run them often, to minimize the time it will take to perform the final backup and restore:
[oracle@source]$ export TMPDIR=/home/oracle/xtts
[oracle@source]$ cd /home/oracle/xtts
[oracle@source]$ $ORACLE_HOME/perl/bin/perl xttdriver.pl --backup
[oracle@target]$ export TMPDIR=/home/oracle/xtts
[oracle@target]$ cd /home/oracle/xtts
[oracle@target]$ $ORACLE_HOME/perl/bin/perl xttdriver.pl --restore
Import Metadata Using FTEX
Create a directory object that points to the xtts folder:
TARGET/SALES SQL> create directory LOGDIR as '/home/oracle/xtts';
Next, create a database link to the source database that can be used to import the metadata. If the source database is already a PDB, ensure that the database link points directly into the PDB:
TARGET/SALES SQL> create public database link SRCLNK connect to system identified by <password> using '//<source_ip>:1521/<service_name>';
Test that it works:
TARGET/SALES SQL> select * from dual@srclnk;
Next, create a par file (sales_imp.par) that you can use for the Data Pump import (see appendix below for explanation):
Start Data Pump and perform the import. newsales is a TNS alias that points into the SALES PDB in the target CDB. If you have encrypted tablespaces, you should use the option encryption_pwd_prompt. It allows you to input the TDE password. It can be omitted if there are no encrypted tablespaces.
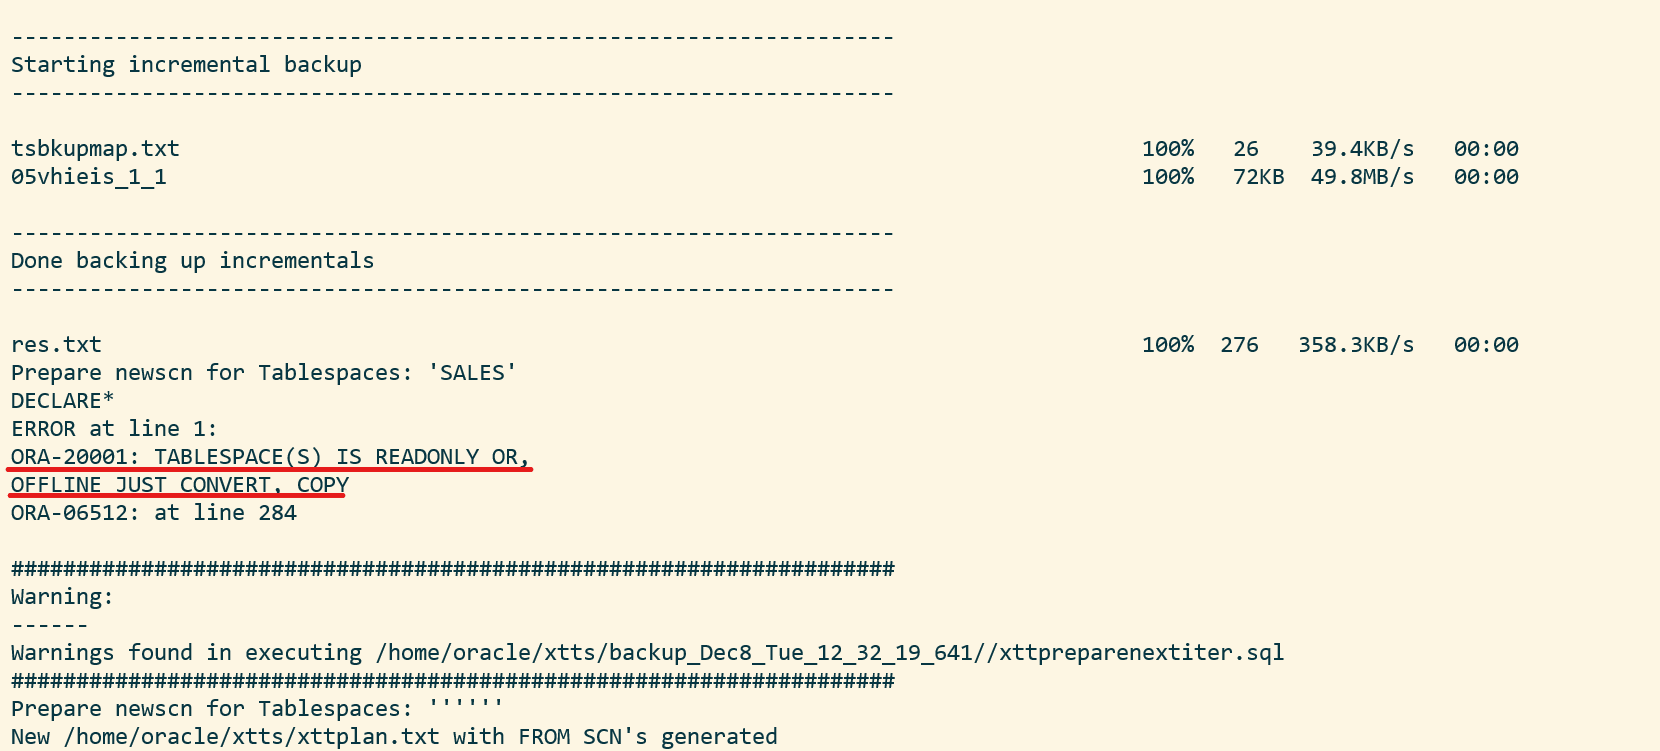
Once the import has completed, you should examine the Data Pump log file for any critical errors. Check the appendix (see below) for ignorable errors:
[oracle@target]$ vi /home/oracle/xtts/sales_imp.log
That’s it! Your data has been migrated. Now would be a good time to:
Check data files for corruption using RMAN VALIDATE command
Although not mandatory, it is recommended if time allows. It is a read-only check that you can run while other stuff is happening in the database. See step 6.1 in MOS doc ID 2471245.1.
Gather dictionary statistics
Test your application
Start a backup
Gather statistics – they were excluded from the export
Drop the database link that points to the source database
Cleanup the file system:
/home/oracle/xtts
/u01/app/oracle/xtts_scratch
Conclusion
Even huge, TB-sized, databases can be migrated with very little downtime by using incremental backups. By using the perl script from My Oracle Support and combined with Full Transportable Export/Import it is a simple process. In addition, you can even migrate to a new endian format, to a higher release and into a PDB in one operation. It requires Enterprise Edition and you must have plenty of disk space – potentially twice the size of your database.
There is a video on our YouTube channel that you can watch. It demos the entire process. I suggest that you subscribe to our channel and get notified whenever there are new videos.
Thanks to my good colleague, Robert Pastijn, for supplying a runbook that was used as inspiration.
If Source Database Is in OCI and Automatic Backup Is Enabled
If the source database is running in OCI and you have enabled automatic backup, you must make a few changes.
In xttprep.tmpl around line 319 change:
cp('backup for transport allow inconsistent ' ||
to
cp('set encryption off for all tablespaces;set compression algorithm "basic";backup for transport allow inconsistent ' ||
In xttdriver.pl around line 4268 change:
my $rman_str1 = "set nocfau;";
to
my $rman_str1 = "set nocfau;".
                "set encryption off for all tablespaces ;".
                "set compression algorithm 'basic' ;" ;
ORA-02085
If you get ORA-02085 when querying over the database link:
TARGET/SALES SQL> alter system set global_names=false;
ORA-39032
If you are exporting from 11.2.0.4, you must add the VERSION parameter:
expdp ... version=12
ORA-39187, ORA-39921 And ORA-39922
If the Data Pump job aborts and complain about object named CLI_SWPXXXXXXXX or SYS_ILYYYYYYYYY:
ORA-39123: Data Pump transportable tablespace job aborted
ORA-39187: The transportable set is not self-contained, violation list is
ORA-39921: Default Partition (Table) Tablespace SYSAUX for CLI_SWPXXXXXXXX not contained in transportable set.
ORA-39922: Default Partition (Index) Tablespace SYSAUX for SYS_ILYYYYYYYYY not contained in transportable set.
Job "SYS"."SYS_EXPORT_FULL_01" stopped due to fatal error at Wed Jul 18 13:51:01 2018 elapsed 0 00:05:55
Use network_link to specify the name of the database link that points back to the source database.
full=y and transportable=always instructs Data Pump to perform a full transportable export/import.
exclude=TABLE_STATISTICS,INDEX_STATISTICS exclude statistics from the import. It is better and faster to gather new, fresh statistics on the target database. If you insist on importing your statistics, you should use DBMS_STATS.
exclude=SYS_USER excludes the import of the SYS user. In a PDB that is not even allowed, and most likely you are not interested in importing the definition of the SYS user.
exclude=TABLESPACE:"IN('TEMP')" excludes the temporary tablespace from the import. Most likely there is already a temporary tablespace in the new, target PDB. It is faster to create a TEMP tablespace in advance – and name it the same as in the source database.
A change was made to Spatial in 19c and some Spatial admin users are removed. To avoid errors/noise in the log file you can safely exclude them from the import by specifying exclude=SCHEMA:"IN('SPATIAL_CSW_ADMIN_USR','SPATIAL_WFS_ADMIN_USR')".
transport_datafiles is used to specify the data files that make you the tablespace you are transporting. Specify the parameter multiple times to specify more data files. You can use asmcmd to get the data file paths and names.
Data Pump Ignorable Errors
Multimedia desupported in 19c, but code is still there. You can safely disregard this error:
Processing object type DATABASE_EXPORT/NORMAL_OPTIONS/TABLE
ORA-39342: Internal error - failed to import internal objects tagged with ORDIM due to ORA-00955: name is already used by an existing object.
Processing object type DATABASE_EXPORT/SYSTEM_PROCOBJACT/POST_SYSTEM_ACTIONS/PROCACT_SYSTEM
ORA-39083: Object type PROCACT_SYSTEM failed to create with error:ORA-04042: procedure, function, package, or package body does not exist

Failing sql is:
BEGIN
SYS.DBMS_UTILITY.EXEC_DDL_STATEMENT('GRANT EXECUTE ON DBMS_DEFER_SYS TO "DBA"');COMMIT; END;


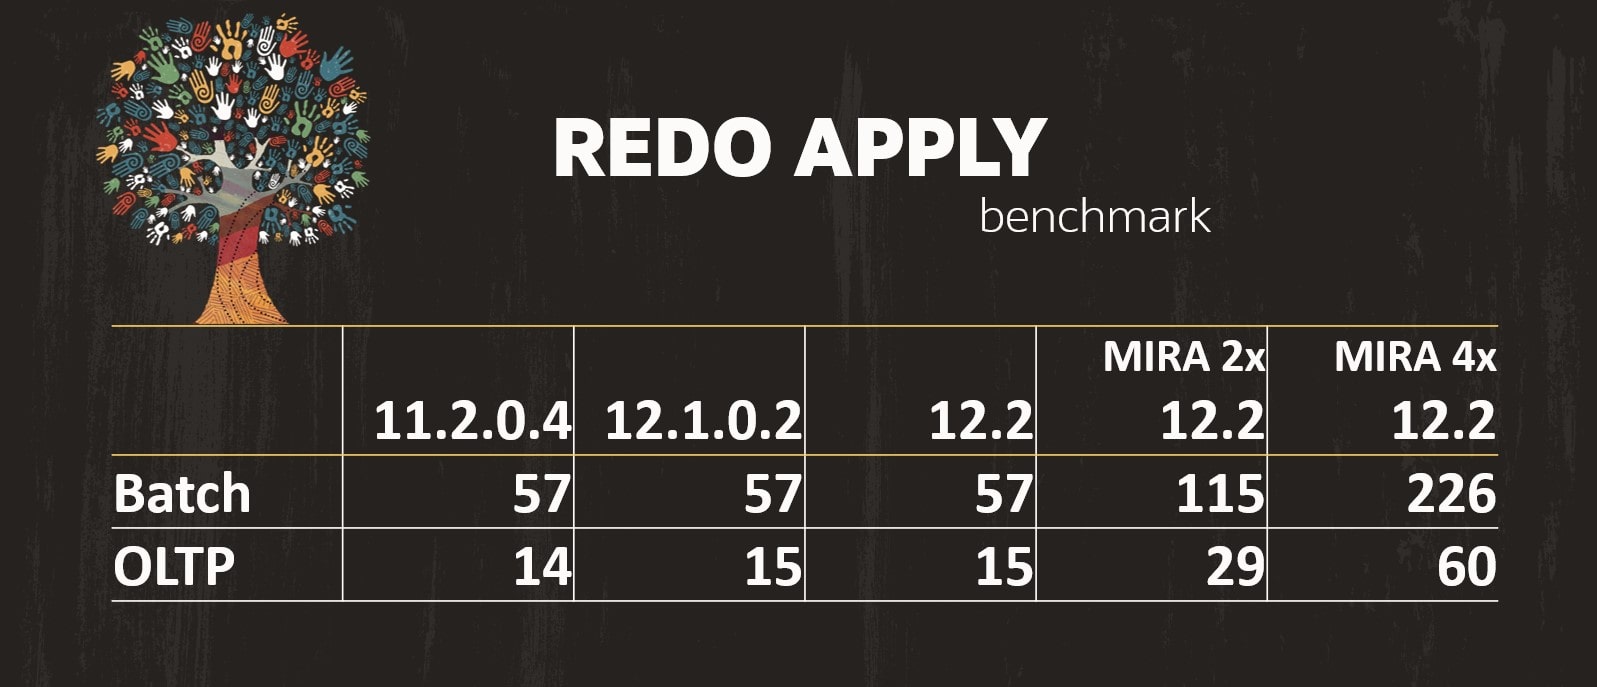 The numbers of the above graph comes from


 Next, you can get additional information about the job using the ID:
 However, for both type of images, the Release Update (or patch level) must be the latest or previous two Release Updates. Even if you have a custom database software image that is older, it can’t be used. You must upgrade to one of the recent Release Updates.
If you select 19.0.0.0 you will not get the base release, but the latest Release Update. If you use the APIs this is a smart way of specifying that you always want the latest Release Update.
However, for both type of images, the Release Update (or patch level) must be the latest or previous two Release Updates. Even if you have a custom database software image that is older, it can’t be used. You must upgrade to one of the recent Release Updates.
If you select 19.0.0.0 you will not get the base release, but the latest Release Update. If you use the APIs this is a smart way of specifying that you always want the latest Release Update.