
This blog post is a follow-up blog post to a previous post. The procedure I described earlier was a simple approach that required downtime while the entire database is moved from one VM DB System to another. If you have strict requirements to downtime you might not be able to use that approach. In this blog post I will come up with an alternative. I will describe how you can use incremental backups to significantly lower the downtime required. Instead of doing a full backup when the database is down my idea is to:
- Take a level 0 backup while the source database is up and running
- Restore the database on target system
- These two steps take time – but I don’t care because the source database is still up
- Take incremental backup on source database
- Recover target database using incremental backup
- Perform final incremental backup/recover after downtime has started
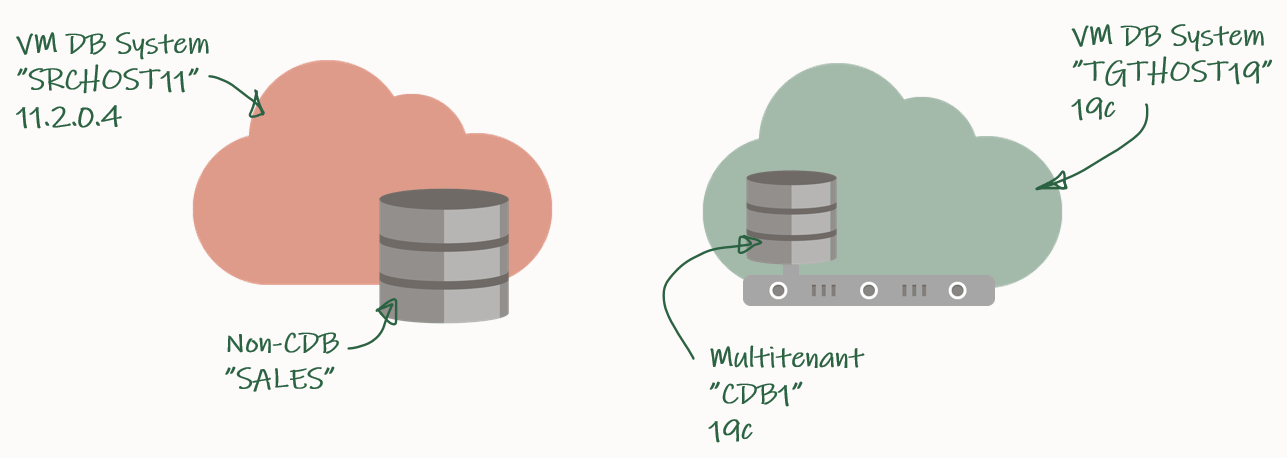
My source environment is the red environment. The DB System is called SRCHOST11 and it has an 11.2.0.4 database that is called SALES. Due to the restrictions of the VM DB System I have to move the database to a new DB System in order to upgrade it. I have created a brand-new target environment – the green environment – on the release that I want to target. I have named the DB System TGTHOST19 and it has a multitenant database called CDB1. When I am done, the target environment – CDB1 – will also contain a PDB named SALES. The SALES PDB will be the original 11.2.0.4 database that has been upgraded and converted.
For a short period of time I need to spin up a second database instance on the target system. This second – or temporary – instance will be a duplicate of the source database (as non-CDB database) and I will upgrade it to the new release. Then I can plug in the database as a PDB in the precreated CDB database and get rid of the second/temporary instance. You will see how it works later in the blog post.
Backup Database
I need to exchange files between the source and the target systems, and I will use a File Storage service for that. Check out the documentation if you need help creating one – I created one already called upgsales and now I can mount it on my source system:
[opc@srchost11]$ sudo mkdir -p /mnt/upgsales
[opc@srchost11]$ sudo chmod 777 /mnt/upgsales/
[opc@srchost11]$ sudo mount x.x.x.x:/upgsales /mnt/upgsales
While the source database is still open and in use, I will start preparing the backup. First, the password file and wallet:
[oracle@srchost11]$ mkdir -p /mnt/upgsales/backup
[oracle@srchost11]$ cp /opt/oracle/dcs/commonstore/wallets/tde/$ORACLE_UNQNAME/ewallet.p12 /mnt/upgsales/
[oracle@srchost11]$ cp $ORACLE_HOME/dbs/orapw$ORACLE_SID /mnt/upgsales/orapw$ORACLE_SID
If you are really concerned about security, you can copy the wallet file directly to the target system – instead of via the File Storage service. The File Storage service itself is secured, but the fewer places you have a copy of the wallet – the better and the safer, I assume. Further, you can also encrypt traffic to and from the File Storage service.
Next, a PFile:
SALES SQL> CREATE PFILE='/mnt/upgsales/init.ora' FROM SPFILE;
And now I start a level 0 backup:
SALES RMAN> BACKUP INCREMENTAL LEVEL 0 DATABASE FORMAT '/mnt/upgsales/backup/lvl0%U' PLUS ARCHIVELOG FORMAT '/mnt/upgsales/backup/arch%U' ;
SALES RMAN> BACKUP CURRENT CONTROLFILE FORMAT '/mnt/upgsales/backup/controlfile';
Restore Database
On my target system, I need to access the File Storage service as well:
[opc@tgthost19]$ sudo mkdir -p /mnt/upgsales
[opc@tgthost19]$ sudo chmod 777 /mnt/upgsales/
[opc@tgthost19]$ sudo mount x.x.x.x:/upgsales /mnt/upgsales
Next, I will copy the password file and PFile into the target Oracle Home. I need that in order to start the temporary instance. Note, the name of the temporary instance will be SALES – the same as the source database SID:
[oracle@tgthost19]$ cp /mnt/upgsales/init.ora $ORACLE_HOME/dbs/initSALES.ora
[oracle@tgthost19]$ cp /mnt/upgsales/orapwSALES $ORACLE_HOME/dbs/orapwSALES
I also need to copy the wallet:
[oracle@tgthost19]$ mkdir -p /opt/oracle/dcs/commonstore/wallets/tde/SALES
[oracle@tgthost19]$ cp /mnt/upgsales/ewallet.p12 /opt/oracle/dcs/commonstore/wallets/tde/SALES/
And I need to create a directory for audit_file_dest:
[oracle@tgthost19]$ mkdir -p /u01/app/oracle/admin/SALES/adump
Now, I must edit the PFile:
[oracle@tgthost19]$ vi $ORACLE_HOME/dbs/initSALES.ora
And make the following changes:
- Remove all the double-underscore parameters that contains the memory settings from last restart. That could for instance be SALES.__db_cache_size.
- Set audit_file_dest=’/u01/app/oracle/admin/SALES/adump’
- Set control_files=’+RECO/sales/controlfile/current.256.1048859635′
- Set SALES.sga_target=6G
- Set SALES.pga_aggregate_target=2G
- Set db_unique_name=’SALES’
I don’t have an abundance of memory on this system, so I keep the memory settings. Strictly speaking you don’t have to change db_unique_name, but I am doing it so it will be easier to cleanup afterwards.
While I work on the temporary instance, I must shut down the other database – the pre-created one that eventually will hold the PDB. Most likely there is not enough memory on the system to support two databases:
[oracle@tgthost19]$ $ORACLE_HOME/bin/srvctl stop database -db $ORACLE_UNQNAME
Let’s start the temporary instance in NOMOUNT mode. Remember to set the environment:
[oracle@tgthost19]$ export ORACLE_UNQNAME=SALES
[oracle@tgthost19]$ export ORACLE_SID=SALES
[oracle@tgthost19]$ sql / as sysdba

SALES SQL> STARTUP NOMOUNT
And finally, I can start the restore using RMAN. Once the database is mounted I must open the keystore, otherwise, the database can’t perform recovery. Then, I can use the catalog command to find the backup pieces in my staging area. And finally, do the restore:
[oracle@tgthost19]$ rman target /

SALES RMAN> RESTORE CONTROLFILE FROM '/mnt/upgsales/backup/controlfile';
SALES RMAN> ALTER DATABASE MOUNT;
SALES RMAN> sql 'ADMINISTER KEY MANAGEMENT SET KEYSTORE OPEN FORCE KEYSTORE IDENTIFIED BY <SALES-keystore-password>';
SALES RMAN> sql "ADMINISTER KEY MANAGEMENT CREATE LOCAL AUTO_LOGIN KEYSTORE FROM KEYSTORE ''/opt/oracle/dcs/commonstore/wallets/tde/$ORACLE_UNQNAME/'' IDENTIFIED BY <SALES-keystore-password>";
SALES RMAN> CATALOG START WITH '/mnt/upgsales/backup' NOPROMPT;
SALES RMAN> RESTORE DATABASE;
The SALES database is now restored on my target system. I will leave it there – unrecovered and in MOUNT mode so I can apply incremental backups later on.
Incremental Backup/Recover
I can do as many incremental backup/recover cycles as I want. But what matters is that I make one and restore it – as close to the start of the downtime window as possible. This will significantly reduce the time it takes to make the final incremental backup/restore later on.
On my source database, start an incremental backup:
[oracle@srchost11]$ rman target /

SALES RMAN> BACKUP INCREMENTAL LEVEL 1 DATABASE FORMAT '/mnt/upgsales/backup/lvl1%U' PLUS ARCHIVELOG FORMAT '/mnt/upgsales/backup/arch%U';
Now, switch to the target system and recover using that backup. I use the CATALOG command to instruct RMAN to find new backups at the shared file storage.
[oracle@tgthost19]$ rman target /

RMAN SALES> CATALOG START WITH '/mnt/upgsales/backup' NOPROMPT;
RMAN SALES> RECOVER DATABASE;
RMAN will complain about a missing log file. But worry – this is expected and will be fixed later on:
RMAN-00571: ===========================================================
RMAN-00569: =============== ERROR MESSAGE STACK FOLLOWS ===============
RMAN-00571: ===========================================================
RMAN-03002: failure of recover command at 08/28/2020 09:06:51
RMAN-06054: media recovery requesting unknown archived log for thread 1 with sequence 60 and starting SCN of 793358
Down Time Starts
Now it is time to kick users off the database. Your precious downtime starts now.
Prepare Database For Upgrade
In my database I will create some sample data so I can verify the upgrade:
SALES SQL> CREATE USER UPG19 IDENTIFIED BY <secret-password>;
SALES SQL> ALTER USER UPG19 QUOTA UNLIMITED ON USERS;
SALES SQL> CREATE TABLE UPG19.ORDERS(ID NUMBER, CUSTOMER VARCHAR2(50), AMOUNT NUMBER) TABLESPACE USERS;
SALES SQL> INSERT INTO UPG19.ORDERS VALUES(1, 'John', 500);
SALES SQL> COMMIT;
I must prepare my database for upgrade on the source system. When I open the database on the target system, I can only do that in UPGRADE mode (because the database will be restored using 19c Oracle Home). In UPGRADE mode it is impossible to do the pre-upgrade tasks.
I will use the classic preupgrade.jar tool in this demo, but you could also use the newer AutoUpgrade. Always get the latest preupgrade tool from My Oracle Support. Upload the zip file (named preupgrade_19_cbuild_7_lf.zip in my demo) to the source system, extract to $ORACLE_HOME/rdbms/admin and do the pre-upgrade checks:
[oracle@srchost11]$ cp preupgrade_19_cbuild_7_lf.zip $ORACLE_HOME/rdbms/admin
[oracle@srchost11]$ cd $ORACLE_HOME/rdbms/admin
[oracle@srchost11]$ unzip preupgrade_19_cbuild_7_lf.zip

[oracle@srchost11]$ mkdir -p /mnt/upgsales/preupg_logs_SALES
[oracle@srchost11]$ cd /mnt/upgsales/preupg_logs_SALES
[oracle@srchost11]$ $ORACLE_HOME/jdk/bin/java -jar $ORACLE_HOME/rdbms/admin/preupgrade.jar FILE TEXT DIR .
You must upload the same version of the preupgrade tool to the target system before you can run the post-upgrade fixups. Hence, save the zip file so you don’t have to download it again.
Next, I will review the report generated by the tool:
[oracle@srchost11]$ more /mnt/upgsales/preupg_logs_SALES/preupgrade.log
And I can execute the pre-upgrade fixups:
SALES SQL> SET SERVEROUT ON
SALES SQL> @/mnt/upgsales/preupg_logs_SALES/preupgrade_fixups.sql
Final Incremental Backup/Recover
I can now make the last incremental backup on my source system. To be absolutely sure nothing else gets into the source database from now on, I restart the database in restricted mode:
[oracle@srchost11]$ sqlplus / as sysdba

SALES SQL> SHUTDOWN IMMEDIATE
SALES SQL> STARTUP RESTRICT
Then I use RMAN to archive the current log file and start the last backup:
[oracle@srchost11]$ rman target /

SALES RMAN> sql 'ALTER SYSTEM ARCHIVE LOG CURRENT';
SALES RMAN> BACKUP INCREMENTAL LEVEL 1 DATABASE FORMAT '/mnt/upgsales/backup/lvl1%U' PLUS ARCHIVELOG FORMAT '/mnt/upgsales/backup/arch%U';
Now, switch to the target system, catalog the new backups:
[oracle@tgthost19]$ rman target /

RMAN SALES> CATALOG START WITH '/mnt/upgsales/backup' NOPROMPT;
By default, RMAN will try to perform complete recovery. But I can’t do that because I don’t have the online redo logs. I must perform incomplete recovery. That sounds dangerous, but it is not. I archived the current log file after I had ensured that no one was using the system (I started in restricted mode, remember). To perform incomplete recovery, I must know at which sequence to stop. I will use the LIST command in RMAN to do that:
RMAN SALES> LIST BACKUP OF ARCHIVELOG ALL;
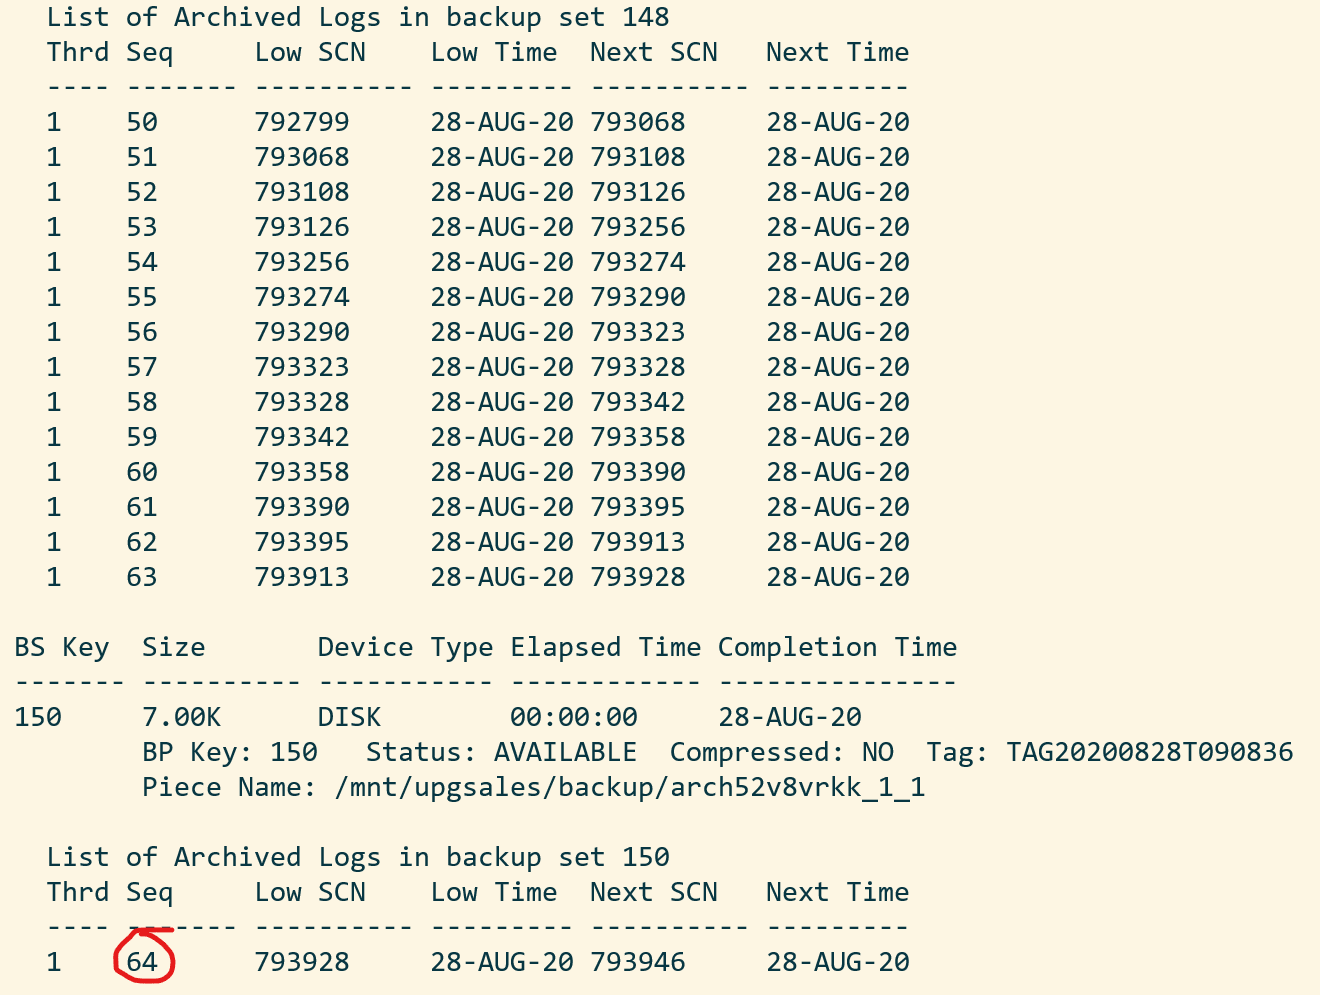 I take the last available sequence and add one. In my case, I will recover until sequence 65:
RMAN SALES> run {
   SET UNTIL SEQUENCE 65 THREAD 1;
   RECOVER DATABASE;
}
Finally, you can switch to SQLPlus and open the database. You could in theory also do that from RMAN but likely you will hit ORA-04023: Object SYS.STANDARD could not be validated or authorized:
[oracle@tgthost19]$ sqlplus / as sysdba

SALES SQL> ALTER DATABASE OPEN RESETLOGS UPGRADE;
Upgrade Database
I must upload the same version of the preupgrade tool to the target Oracle Home, before I can do the post-upgrade fixups:
[oracle@tgthost19]$ cp preupgrade_19_cbuild_7_lf.zip $ORACLE_HOME/rdbms/admin
[oracle@tgthost19]$ cd $ORACLE_HOME/rdbms/admin
[oracle@tgthost19]$ unzip preupgrade_19_cbuild_7_lf.zip
I can now upgrade the database. Ensure to use the same prompt that has the environment set to the SALES database – the temporary instance:
[oracle@tgthost19]$ mkdir -p /mnt/upgsales/upg_logs_SALES
[oracle@tgthost19]$ dbupgrade -l /mnt/upgsales/upg_logs_SALES
Once the upgrade completes, I will finish with the post-upgrade tasks
SQL> STARTUP

SQL> --Recompile
SQL> @$ORACLE_HOME/rdbms/admin/utlrp
SQL> --Check outcome of upgrade
SQL> @$ORACLE_HOME/rdbms/admin/utlusts.sql
SQL> --Post-upgrade fixups
SQL> @/mnt/upgsales/preupg_logs_$SOURCE_SID/postupgrade_fixups.sql
SQL> --Timezone file upgrade
SQL> SET SERVEROUTPUT ON
SQL> @$ORACLE_HOME/rdbms/admin/utltz_upg_check.sql
SQL> @$ORACLE_HOME/rdbms/admin/utltz_upg_apply.sql
Last, have a look in the report generated by preupgrade.jar to see if there are any post-upgrade tasks that you have to execute:
[oracle@tgthost19]$ more /mnt/upgsales/preupg_logs_SALES/preupgrade.log
Plug In Database
Now that the temporary database is upgraded let’s look at what we need to prepare for the conversion to a PDB. First, I will export the encryption keys:
SALES SQL> ADMINISTER KEY MANAGEMENT EXPORT ENCRYPTION KEYS WITH SECRET "<a-secret-password>" TO '/mnt/upgsales/key_export_SALES' FORCE KEYSTORE IDENTIFIED BY <SALES-keystore-password>;
And then I open the database in READ ONLY mode to create a manifest file. After that, I completely shut down the temporary database and, hopefully, it won’t be needed anymore:
SALES SQL> SHUTDOWN IMMEDIATE
SALES SQL> STARTUP MOUNT
SALES SQL> ALTER DATABASE OPEN READ ONLY;
SALES SQL> EXEC DBMS_PDB.DESCRIBE('/mnt/upgsales/manifest_sales.xml');
SALES SQL> SHUTDOWN IMMEDIATE
Now, I will restart CDB1 which I shut down previously. I will work in CDB1 for the rest of the blog post. Notice, how I am resetting my environment variables to the original values using the source command. You could also open a new SSH session instead. Anyway, just ensure that your environment is now set to work on the original database, CDB1:
[oracle@tgthost19]$ source ~/.bashrc
[oracle@tgthost19]$ env | grep ORA
[oracle@tgthost19]$ $ORACLE_HOME/bin/srvctl start database -db $ORACLE_UNQNAME
I check for plug in compatibility:
CDB1 SQL> SET SERVEROUT ON
CDB1 SQL> BEGIN
    IF DBMS_PDB.CHECK_PLUG_COMPATIBILITY('/mnt/upgsales/manifest_sales.xml', 'SALES') THEN
        DBMS_OUTPUT.PUT_LINE('SUCCESS');
    ELSE
        DBMS_OUTPUT.PUT_LINE('ERROR');
    END IF;
END;
/
Hopefully, it should read out SUCCESS. If not, you can query PDB_PLUG_IN_VIOLATIONS to find out why:
CDB1 SQL> SELECT type, message, action FROM pdb_plug_in_violations WHERE name='SALES' and status='PENDING';
I can plug in the SALES database as a new PDB – which I also will call SALES. I am using the MOVE keyword to have my data files moved to a directory that matches the naming standard:
CDB1 SQL> CREATE PLUGGABLE DATABASE SALES USING '/mnt/upgsales/manifest_sales.xml' MOVE;
CDB1 SQL> ALTER PLUGGABLE DATABASE SALES OPEN;
I could also use the NOCOPY keyword and just use the data files from where they currently are placed. Later on, I could move the data files to a proper directory that follows the naming standard, and if I were on Enterprise Edition, I could even use online datafile move.
Next, I can switch to the SALES PDB and import my encryption keys from the file I made a little earlier. Note, that I must enter the secret that I used in the export. And now I have to enter the keystore password for CDB1:
CDB1 SQL> ALTER SESSION SET CONTAINER=SALES;
CDB1 SQL> ADMINISTER KEY MANAGEMENT IMPORT ENCRYPTION KEYS WITH SECRET "a-secret-password" FROM '/mnt/upgsales/key_export_SALES' FORCE KEYSTORE IDENTIFIED BY <CDB1-keystore-password> WITH BACKUP;
Be aware, that if your system tablespaces are encrypted, you might have to import the encryption key into CDB$ROOT as well before you can open the database.
Now, it is time to fully convert the database to a PDB:
CDB1 SQL> ALTER SESSION SET CONTAINER=SALES;
CDB1 SQL> @$ORACLE_HOME/rdbms/admin/noncdb_to_pdb.sql
CDB1 SQL> SHUTDOWN IMMEDIATE
CDB1 SQL> STARTUP
Now, check and resolve any plug-in violations:
CDB1 SQL> ALTER SESSION SET CONTAINER=CDB$ROOT;
CDB1 SQL> SELECT type, message, action FROM pdb_plug_in_violations WHERE name='SALES' and status='PENDING';
And finally, ensure that OPEN_MODE=READ WRITE and RESTRICTED=NO. When so, I can save the state of the PDB so it will auto-open whenever the CDB restarts:
CDB1 SQL> ALTER SESSION SET CONTAINER=CDB$ROOT;
CDB1 SQL> SELECT OPEN_MODE, RESTRICTED FROM V$PDBS WHERE NAME='SALES';
CDB1 SQL> ALTER PLUGGABLE DATABASE SALES SAVE STATE;
Verify that my test data exist:
CDB1 SQL> ALTER SESSION SET CONTAINER=SALES;
CDB1 SQL> SELECT * FROM UPG19.ORDERS;
That’s it. The database is now fully upgraded to 19c and converted to a PDB. Be sure to:
- Start a backup
- Test your application
- Adjust your connection strings
- And what else your procedure mandates
Wrap-Up
Let’s clean up on the target system! I can remove the files and folders that were created to support the temporary instance:
[oracle@tgthost19]$ #audit dest
[oracle@tgthost19]$ rm -rf /u01/app/oracle/admin/SALES/adump
[oracle@tgthost19]$ #diag dest
[oracle@tgthost19]$ rm -rf /u01/app/oracle/diag/rdbms/sales
[oracle@tgthost19]$ #wallet
[oracle@tgthost19]$ rm -rf /opt/oracle/dcs/commonstore/wallets/tde/SALES
[oracle@tgthost19]$ #instance files
[oracle@tgthost19]$ rm $ORACLE_HOME/dbs/initSALES.ora
[oracle@tgthost19]$ rm $ORACLE_HOME/dbs/orapwSALES
[oracle@tgthost19]$ rm $ORACLE_HOME/dbs/spfileSALES.ora
[oracle@tgthost19]$ rm $ORACLE_HOME/dbs/hc_SALES.dat
[oracle@tgthost19]$ rm $ORACLE_HOME/dbs/lkSALES
[oracle@tgthost19]$ #exported master key
[oracle@tgthost19]$ rm /mnt/upgsales/key_export_SALES
Also, since I stored data files in ASM I can delete those as well. Note you have to log on as grid to do that:
[grid@tgthost19]$ asmcmd rm -rf +DATA/SALES
[grid@tgthost19]$ asmcmd rm -rf +RECO/SALES
I can also drop the PDB that gets created automatically when you deploy the new DB System. In my case it is named CDB1_PDB1:
SQL> ALTER PLUGGABLE DATABASE CDB1_PDB1 CLOSE;
SQL> DROP PLUGGABLE DATABASE CDB1_PDB1 INCLUDING DATAFILES;
Also, I can remove the File Storage service that I created. If you want to keep log files from the upgrade (or other files) be sure to copy them somewhere else.
Last, when I am convinced that my upgraded and converted database is doing good, I can terminate the entire source DB system.
Tweaks
If you have a license for any of the Enterprise Edition offerings you might be able to use some of the below features to speed up and backup and recovery. Before using any of them be sure to check the license guide and confirm you have a proper license.
- Block change tracking – reduces backup time because RMAN doesn’t need to scan the entire database.
- Parallel backup and recovery – more channels, faster backups and faster restores.
- Compression – reduces the size of the backups. Since you can apply incremental backups continuously the backup size should be fairly small anyway.
Disclaimer
I am not a backup expert (probably far from). When writing this post I was struggling a lot with missing archive logs. I even had to call an old mentor for advice. But in the end, I decided just to include them in all backups. Possibly, there is a die-hard-RMAN-expert out there that can tell me a better way of doing it. But for sure it doesn’t hurt to include them…
If you come up with a better way, please leave a comment. I would love to learn more.
Conclusion
You can upgrade a 11.2.0.4 database to 19c by moving the database to a new VM DB System. You can reduce downtime by using incremantal backups. You must convert the database to a pluggable database as well because multitenant is the only supported architecture for VM DB Systems on 19c.
References
- RMAN Restore of Backups as Part of a Database Upgrade (Doc ID 790559.1)
- How to UnPlug/Plug-in PDB (TDE Enabled) in DBaaS Environment (Doc ID 2392653.1)
- How to Download and Run Oracle’s Database Pre-Upgrade Utility (Doc ID 884522.1)

Really nice writeup. A few comments. Large database usually takes incremental backup daily while archivelog backup happens every few hrs. I would go level 0 + archivelog backup on the target db to have a even faster restore. It can also minimize the issue the article mentioned at the end – missing archivelog file. Another advantage for archivelog file restore is that you can check the fuzzy in the datafile headers to see when you can open db in a consistent way.
LikeLike
Hi,
Thanks for your input. I like your approach as well. It could make it even faster as you would only have to apply the very last archivelog to get started.
Regards,
Daniel
LikeLike
Hi Daniel
I won’t say it is better way but the approach we took was:
1. Run dbms_scheduler job on SRC which creates file image copies and takes incremental backups
2. Run dbms_scheduler job on TGT – i.e. in a pre-created 19c PDB – which copies the data from SRC using dbms_file_transfer and rolls forward the incremental backups
Let 1. and 2. happen for as long as it takes to fully transfer all application tablespace data files
3. On SRC set the application table spaces to READ ONLY – the job will take final incremental backup. The corresponding job on TGT will copy / apply these and finally DATAPUMP over same database link the metadata.
We had to develop a fully automated process because we have dozens of databases to be consistently migrated to 19c PDB in short period of time.
A main advantage is consistency – can easily ensure post migration tasks completed like gather statistics, grants on SYS-owned objects to migrated schemas / users etc, etc.
Regards,
Mark.
LikeLike
Hi Mark,
That is a good idea as well. In many situations, transportable tablespaces and Data Pump can be a good option. Especially if either the upgrade or PDB conversion takes a long time. It might be faster in many cases, unless you have a complex data dictionary which may take a while for Data Pump to import.
But a good approach – and I like the idea of having it “in the database” using scheduler jobs.
Regards,
Daniel
LikeLike
Using DG, then upgrade, plugin pdb, enable TDE…
LikeLike