In this blog post I will show you how you can upgrade a database on 11.2.0.4 to 19c. It will also include conversion from the non-CDB architecture into a pluggable database. I have to do this because for VM DB Systems the only supported architecture for 19c is multitenant. Finally, I will use a Standard Edition database to show you something that can be used in any edition.
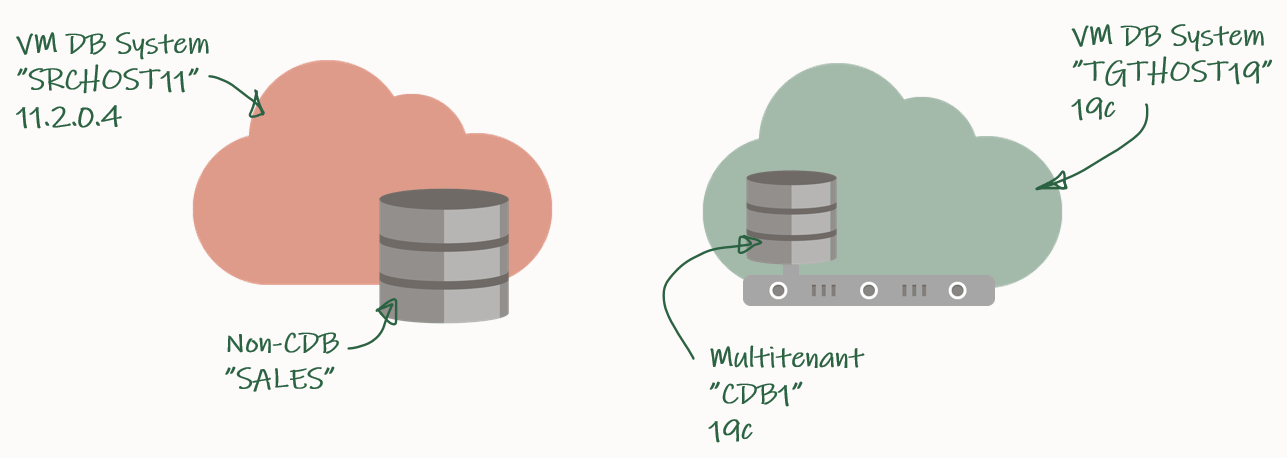
My source environment is the red environment. The DB System is called SRCHOST11 and it has an 11.2.0.4 database that is called SALES. Due to the restrictions of the VM DB System I have to move the database to a new DB System in order to upgrade it. I have created a brand-new target environment – the green environment – on the release that I want to target. I have named the DB System TGTHOST19 and it has a multitenant database called CDB1. When I am done, the target environment – CDB1 – will also contain a PDB named SALES. The SALES PDB will be the original 11.2.0.4 database that has been upgraded and converted.
The aim of this blog post is to make it as easy as possible. When I have to move the database from the source DB System to the target DB System, I will just make a full backup that I can restore on the target environment. Obviously, this requires downtime and the amount depends on the size of the database and the transfer speed between the two DB Systems.
My highlevel plan for the task looks like this:
- Prepare database for upgrade
- Backup database
- Restore database
- Upgrade database
- Plug in database
- Wrap-Up
I will elaborate a little on the Restore database part. On VM DB Systems you are not allowed to create your own databases. You can only use the database that gets created when the system is provisioned. However, for a short period of time I need to spin up a second database instance on the target system. This second – or temporary – instance will be a duplicate of the source database (as non-CDB database) and I will upgrade it to the new release. Then I can plug in the database as a PDB in the precreated CDB database, and get rid of the second/temporary instance. You will see how it works later in the blog post.
Prepare Database For Upgrade
I need to exchange files between the source and the target systems and I will use a File Storage service for that. Check out the documentation if you need help creating one – I created one already called upgsales and now I can mount it on my source system:
[opc@srchost11]$ sudo mkdir -p /mnt/upgsales
[opc@srchost11]$ sudo chmod 777 /mnt/upgsales/
[opc@srchost11]$ sudo mount x.x.x.x:/upgsales /mnt/upgsales
In my database I will create some sample data so we can verify the upgrade:
SALES SQL> CREATE USER UPG19 IDENTIFIED BY <secret-password>;
SALES SQL> ALTER USER UPG19 QUOTA UNLIMITED ON USERS;
SALES SQL> CREATE TABLE UPG19.ORDERS(ID NUMBER, CUSTOMER VARCHAR2(50), AMOUNT NUMBER) TABLESPACE USERS;
SALES SQL> INSERT INTO UPG19.ORDERS VALUES(1, 'John', 500);
SALES SQL> COMMIT;
DOWN TIME STARTS NOW – get those users off!
I must prepare my database for upgrade on the source system. When I restore the database on the target system I can only open the database in UPGRADE mode (because the database will be restored using 19c Oracle Home). In UPGRADE mode it is impossible to do the pre-upgrade tasks.
I will use the classic preupgrade.jar tool in this demo, but you could also use the newer AutoUpgrade. Always get the latest preupgrade tool from My Oracle Support. Upload the zip file (named preupgrade_19_cbuild_7_lf.zip in my demo) to the source system, extract to $ORACLE_HOME/rdbms/admin and do the pre-upgrade checks:
[oracle@srchost11]$ cp preupgrade_19_cbuild_7_lf.zip $ORACLE_HOME/rdbms/admin
[oracle@srchost11]$ cd $ORACLE_HOME/rdbms/admin
[oracle@srchost11]$ unzip preupgrade_19_cbuild_7_lf.zip

[oracle@srchost11]$ mkdir -p /mnt/upgsales/preupg_logs_SALES
[oracle@srchost11]$ cd /mnt/upgsales/preupg_logs_SALES
[oracle@srchost11]$ $ORACLE_HOME/jdk/bin/java -jar $ORACLE_HOME/rdbms/admin/preupgrade.jar FILE TEXT DIR .
You must upload the same version of the preupgrade tool to the target system before you can run the post-upgrade fixups. Hence, save the zip file so you don’t have to download it again.
Next, I will review the report generated by the tool:
[oracle@srchost11]$ more /mnt/upgsales/preupg_logs_SALES/preupgrade.log
And I can execute the pre-upgrade fixups:
SALES SQL> SET SERVEROUT ON
SALES SQL> @/mnt/upgsales/preupg_logs_SALES/preupgrade_fixups.sql
Backup Database
The database is now prepared for upgrade. Next, I will get what I need to move the database. First, a PFile:
SALES SQL> CREATE PFILE='/mnt/upgsales/init.ora' FROM SPFILE;
Now I will shut down the database and restart in MOUNT mode. Then I can start a level 0 backup:
SALES SQL> SHUTDOWN IMMEDIATE
SALES SQL> STARTUP MOUNT
SALES SQL> EXIT

[oracle@srchost11]$ rman target /

SALES RMAN> BACKUP DATABASE FORMAT '/mnt/upgsales/db_%U';
SALES RMAN> BACKUP CURRENT CONTROLFILE FORMAT '/mnt/upgsales/cf_%U';
Now we just need the password file and wallet:
[oracle@srchost11]$ cp /opt/oracle/dcs/commonstore/wallets/tde/$ORACLE_UNQNAME/ewallet.p12 /mnt/upgsales/
[oracle@srchost11]$ cp $ORACLE_HOME/dbs/orapw$ORACLE_SID /mnt/upgsales/orapw$ORACLE_SID
If you are really concerned about security you can copy the wallet file directly to the target system – instead of via the File Storage service. The File Storage service itself is secured, but the fewer places you have a copy of the wallet – the better and the safer, I assume. Further, you can also encrypt traffic to and from the File Storage service.
Restore Database
On my target system, I need to access the File Storage service as well:
[opc@tgthost19]$ sudo mkdir -p /mnt/upgsales
[opc@tgthost19]$ sudo chmod 777 /mnt/upgsales/
[opc@tgthost19]$ sudo mount x.x.x.x:/upgsales /mnt/upgsales
Next, I will copy the password file and PFile into the target Oracle Home. I need that in order to start the temporary instance. Note, the name of the temporary instance will be SALES – the same as the source database SID:
[oracle@tgthost19]$ cp /mnt/upgsales/init.ora $ORACLE_HOME/dbs/initSALES.ora
[oracle@tgthost19]$ cp /mnt/upgsales/orapwSALES $ORACLE_HOME/dbs/orapwSALES
I also need to copy the wallet:
[oracle@tgthost19]$ mkdir -p /opt/oracle/dcs/commonstore/wallets/tde/SALES
[oracle@tgthost19]$ cp /mnt/upgsales/ewallet.p12 /opt/oracle/dcs/commonstore/wallets/tde/SALES/
And I need to create a directory for audit_file_dest:
[oracle@tgthost19]$ mkdir -p /u01/app/oracle/admin/SALES/adump
Now, I must edit the PFile:
[oracle@tgthost19]$ vi $ORACLE_HOME/dbs/initSALES.ora
And make the following changes:
- Remove all the double-underscore parameters that contains the memory settings from last restart. That could for instance be SALES.__db_cache_size.
- Set audit_file_dest=’/u01/app/oracle/admin/SALES/adump’
- Set control_files=’+RECO/sales/controlfile/current.256.1048859635′
- Set SALES.sga_target=6G
- Set SALES.pga_aggregate_target=2G
- Set db_unique_name=’SALES’
I don’t have an abundance of memory on this sytem, so I keep the memory settings. Strictly speaking you don’t have to change db_unique_name, but I am doing it so it will be easier to cleanup afterwards.
While I work on the temporary instance I must shut down the other database – the pre-created one that eventually will hold the PDB. Most likely there is not enough memory on the system to support two databases:
[oracle@tgthost19]$ sql / as sysdba

CDB1 SQL> SHUTDOWN IMMEDIATE
Let’s start the temporary instance in NOMOUNT mode. Remember to set the environment:
[oracle@tgthost19]$ export ORACLE_UNQNAME=SALES
[oracle@tgthost19]$ export ORACLE_SID=SALES
[oracle@tgthost19]$ sql / as sysdba

SALES SQL> STARTUP NOMOUNT
And finally, I can start the restore using RMAN. Notice how I am using the NOOPEN keyword which instructs RMAN to keep the database MOUNTED and not try to attempt to open the database. If you try to open the database it will fail because the database must be open in UPGRADE mode. At this point in time, the database itself is on 11.2.0.4 but running on 19c binaries:
[oracle@tgthost19]$ rman auxiliary /

SALES RMAN> DUPLICATE DATABASE TO SALES NOOPEN BACKUP LOCATION '/mnt/upgsales/';
Upgrade Database
RMAN left the database in MOUNTED mode. Before I can open the database I must open the keystore:
SQL> ADMINISTER KEY MANAGEMENT SET KEYSTORE OPEN FORCE KEYSTORE IDENTIFIED BY <source-keystore-password>;
Now, I can open the database and execute the RESETLOGS operation that RMAN didn’t do:
SQL> ALTER DATABASE OPEN RESETLOGS UPGRADE;
I must upload the same version of the preupgrade tool to the target Oracle Home, before I can do the post-upgrade fixups:
[oracle@tgthost19]$ cp preupgrade_19_cbuild_7_lf.zip $ORACLE_HOME/rdbms/admin
[oracle@tgthost19]$ cd $ORACLE_HOME/rdbms/admin
[oracle@tgthost19]$ unzip preupgrade_19_cbuild_7_lf.zip
And I can now upgrade the database:
[oracle@tgthost19]$ mkdir -p /mnt/upgsales/upg_logs_SALES
[oracle@tgthost19]$ dbupgrade -l /mnt/upgsales/upg_logs_SALES
Once the upgrade completes I will finish with the post-upgrade tasks
SQL> STARTUP

SQL> --Recompile
SQL> @$ORACLE_HOME/rdbms/admin/utlrp
SQL> --Check outcome of upgrade
SQL> @$ORACLE_HOME/rdbms/admin/utlusts.sql
SQL> --Post-upgrade fixups
SQL> @/mnt/upgsales/preupg_logs_$SOURCE_SID/postupgrade_fixups.sql
SQL> --Timezone file upgrade
SQL> SET SERVEROUTPUT ON
SQL> @$ORACLE_HOME/rdbms/admin/utltz_upg_check.sql
SQL> @$ORACLE_HOME/rdbms/admin/utltz_upg_apply.sql
Last, have a look in the report generated by preupgrade.jar to see if there are any post-upgrade tasks that you have to execute:
[oracle@tgthost19]$ more /mnt/upgsales/preupg_logs_SALES/preupgrade.log
Plug In Database
Now that the temporary database is upgraded let’s look at what we need to prepare for the conversion to a PDB. First, I will export the encryption keys:
SALES SQL> ADMINISTER KEY MANAGEMENT EXPORT ENCRYPTION KEYS WITH SECRET "<a-secret-password>" TO '/mnt/upgsales/key_export_SALES' FORCE KEYSTORE IDENTIFIED BY <SALES-keystore-password>;
And then I open the database in READ ONLY mode to create a manifest file. After that, I completely shutdown the temporary database and, hopefully, it wont be needed anymore:
SALES SQL> SHUTDOWN IMMEDIATE
SALES SQL> STARTUP MOUNT
SALES SQL> ALTER DATABASE OPEN READ ONLY;
SALES SQL> EXEC DBMS_PDB.DESCRIBE('/mnt/upgsales/manifest_sales.xml');
SALES SQL> SHUTDOWN IMMEDIATE
Now, I will restart CDB1 which I shut down previously. I will work in CDB1 for the rest of the blog post. Notice, how I am resetting my environment variables to the original values using the source command. You could also open a new SSH session instead. Anyway, just ensure that your environment is now set to work on the original database, CDB1:
[oracle@tgthost19]$ source ~/.bashrc
[oracle@tgthost19]$ env | grep ORA
[oracle@tgthost19]$ sql / as sysdba

CDB1 SQL> STARTUP
I check for plug in compability:
CDB1 SQL> SET SERVEROUT ON
CDB1 SQL> BEGIN
    IF DBMS_PDB.CHECK_PLUG_COMPATIBILITY('/mnt/upgsales/manifest_sales.xml', 'SALES') THEN
        DBMS_OUTPUT.PUT_LINE('SUCCESS');
    ELSE
        DBMS_OUTPUT.PUT_LINE('ERROR');
    END IF;
END;
/
Hopefully, it should read out SUCCESS. If not, you can query PDB_PLUG_IN_VIOLATIONS to find out why:
CDB1 SQL> SELECT type, message, action FROM pdb_plug_in_violations WHERE name='SALES' and status='PENDING';
I can plugin the SALES database as a new PDB – which I also will call SALES. I am using the MOVE keyword to have my data files moved to a directory that matches the naming standard:
CDB1 SQL> CREATE PLUGGABLE DATABASE SALES USING '/mnt/upgsales/manifest_sales.xml' MOVE;
CDB1 SQL> ALTER PLUGGABLE DATABASE SALES OPEN;
I could also use the NOCOPY keyword and just use the data files from where they currently are placed. Later on, I could move the data files to a proper directory that follows the naming standard, and if I were on Enterprise Edition I could even use online datafile move.
Next, I can switch to the SALES PDB and import my encryption keys from the file I made a little earlier. Note, that I must enter the secret that I used in the export. And now I have to enter the keystore password for CDB1:
CDB1 SQL> ALTER SESSION SET CONTAINER=SALES;
CDB1 SQL> ADMINISTER KEY MANAGEMENT IMPORT ENCRYPTION KEYS WITH SECRET "a-secret-password" FROM '/mnt/upgsales/key_export_SALES' FORCE KEYSTORE IDENTIFIED BY <CDB1-keystore-password> WITH BACKUP;
Be aware, that if your system tablespaces are encrypted, you might have to import the encryption key into CDB$ROOT as well before you can open the database.
Now, it is time to fully convert the database into a PDB:
CDB1 SQL> ALTER SESSION SET CONTAINER=SALES;
CDB1 SQL> @$ORACLE_HOME/rdbms/admin/noncdb_to_pdb.sql
CDB1 SQL> SHUTDOWN IMMEDIATE
CDB1 SQL> STARTUP
Now, check and resolve any plug in violations:
CDB1 SQL> ALTER SESSION SET CONTAINER=CDB$ROOT;
CDB1 SQL> SELECT type, message, action FROM pdb_plug_in_violations WHERE name='SALES' and status='PENDING';
And finally, ensure that OPEN_MODE=READ WRITE and RESTRICTED=NO. When so, I can save the state of the PDB so it will auto-open whenever the CDB restarts:
CDB1 SQL> ALTER SESSION SET CONTAINER=CDB$ROOT;
CDB1 SQL> SELECT OPEN_MODE, RESTRICTED FROM V$PDBS WHERE NAME='SALES';
CDB1 SQL> ALTER PLUGGABLE DATABASE SALES SAVE STATE;
That’s it. The database is now fully upgraded to 19c and converted to a PDB. Be sure to:
- Start a backup
- Test your application
- Adjust your connection strings
- And what else your procedure mandates
Wrap-Up
Let’s clean up on the target system! I can remove the files and folders that were created to support the temporary instance:
[oracle@tgthost19]$ #audit dest
[oracle@tgthost19]$ rm -rf /u01/app/oracle/admin/SALES/adump
[oracle@tgthost19]$ #diag dest
[oracle@tgthost19]$ rm -rf /u01/app/oracle/diag/rdbms/sales
[oracle@tgthost19]$ #wallet
[oracle@tgthost19]$ rm -rf /opt/oracle/dcs/commonstore/wallets/tde/SALES
[oracle@tgthost19]$ #instance files
[oracle@tgthost19]$ rm $ORACLE_HOME/dbs/initSALES.ora
[oracle@tgthost19]$ rm $ORACLE_HOME/dbs/orapwSALES
[oracle@tgthost19]$ rm $ORACLE_HOME/dbs/spfileSALES.ora
[oracle@tgthost19]$ rm $ORACLE_HOME/dbs/hc_SALES.dat
[oracle@tgthost19]$ rm $ORACLE_HOME/dbs/lkSALES
[oracle@tgthost19]$ #exported master key
[oracle@tgthost19]$ rm /mnt/upgsales/key_export_SALES
Also, since I stored data files in ASM I can delete those as well. Note you have to log on as grid to do that:
[grid@tgthost19]$ asmcmd rm -rf +DATA/SALES
[grid@tgthost19]$ asmcmd rm -rf +RECO/SALES
I can also drop the PDB that gets created automatically when you deploy the new DB System. In my case it is named CDB1_PDB1:
SQL> ALTER PLUGGABLE DATABASE CDB1_PDB1 CLOSE;
SQL> DROP PLUGGABLE DATABASE CDB1_PDB1 INCLUDING DATAFILES;
Also, I can remove the File Storage service that I created. If you want to keep log files from the upgrade (or other files) be sure to copy them somewhere else.
Last, when I am convinced that my upgraded and converted database is doing good, I can terminate the entire source DB system.
Tweaks
The transfer speed to the File Storage service is depending on the number of CPUs on your system (more CPUs, more network speed). If the bottleneck is the network, you can try to temporarily add more CPUs.
If you have a license for any of the Enterprise Edition offerings you might be able to use some of the below features to speed up and backup and recovery. Before using any of them be sure to check the license guide and confirm you have a proper license.
- Parallel backup and recovery – more channels, faster backups and faster restores.
- Compression – reduces the size of the backups which is beneficial when they are transported over the network.
Conclusion
You can upgrade a 11.2.0.4 database to 19c by moving the database to a new VM DB System. You must convert the database to a pluggable database as well because multitenant is the only supported architecture for VM DB Systems on 19c.
References
- RMAN Restore of Backups as Part of a Database Upgrade (Doc ID 790559.1)
- How to UnPlug/Plug-in PDB (TDE Enabled) in DBaaS Environment (Doc ID 2392653.1)
- How to Download and Run Oracle’s Database Pre-Upgrade Utility (Doc ID 884522.1)

Hi
1 ) I am receiving this error when exporting Encryption key. Upgrade is completed successful and Database is in Read-Write mode. If you can help me to find the cause and how can i resolve it will be helpful?
SQL> ADMINISTER KEY MANAGEMENT EXPORT ENCRYPTION KEYS WITH SECRET “***********” TO ‘/home/oracle’ FORCE KEYSTORE IDENTIFIED BY **************;
ADMINISTER KEY MANAGEMENT EXPORT ENCRYPTION KEYS WITH SECRET “**********” TO ‘/home/oracle’ FORCE KEYSTORE IDENTIFIED BY *****************
*
ERROR at line 1:
ORA-65297: operation not allowed inside an application action
2) Alternatively, I have ewallet.p12 and cwallet.sso files from 11g host, can i use to import it after converting to pdb as above is failing? if yes, what is the process/command to import it ?
Thank you
LikeLike
Hi,
Are you using application containers? If so, you should try to export the keys when you are not in the middle of an install or upgrade of the app container.
I have not heard previously of this error, so I suggest that you contact My Oracle Support for further diagnostics.
Regards,
Daniel
LikeLike
Thank you Daniel for your reply. I am working with oracle support for further diagnostics.
LikeLike
Hi MS,
I have the exact same problem after upgrading from 11gR2 to 19c (non-cdb). I am trying to export the master key for use when plugging into CDB.
But I also get:
ORA-65297: operation not allowed inside an application action
Did Oracle Support manage to come up with a solution.
Regards,
Brian
LikeLike
Please DO NOT export from source i mean from 11gR2 home/server. It need to be exported from 19c home after non-cdb db is upgraded to 19c and prior to creation of pluggable database…Hope this helps!
LikeLike