You made it! You’ve upgraded your database.
But before allowing users back in, let’s do a few final touches.
Backup
Start a backup of your database:
- Preferably a level 0 backup, otherwise, a level 1 backup.
- It doesn’t have to finish inside your maintenance window.
- Although it is possible to restore a backup from the previous release and recover across an upgrade, it complicates the process.
If you also converted your database to a PDB:
- You just need a backup of the new data files, not the entire CDB.
- Backups taken while the database was a non-CDB (i.e., before the plug-in) are called preplugin backups. Although it is possible to restore and recover using a combination of preplugin backups and CDB backups, it complicates the process a lot.
- You should practice using preplugin backups.
- AutoUpgrade automatically runs the
DBMS_PDB.EXPORTRMANBACKUPduring a non-CDB to PDB conversion. This ensures that the backup metadata is transferred into the new PDB. This eases the use of preplugin backups.
Gather Fixed Objects Statistics
Fixed objects statistics are on those weird X$ structures in the database. You must refresh them after upgrade.
- Fixed objects vary in size and shape based on your workload.
- You must never gather fixed objects statistics right after a database restart. Only after a while, when the database is warmed up with a representative workload.
- As an example, there are structures related to the buffer cache. After a restart, the buffer cache is empty. After your workload, the buffer cache is full. You want those stats to reflect the full buffer cache.
So, come back to your database after a while and re-gather the stats. Since you’ll probably forget that, here’s how to do it via a scheduler job. AutoUpgrade can even create that job for you.
Parameters
I want to highlight an underscore parameter.
But you don’t want to set underscore parameters in your database, because some random dude on the internet says so. So, please check the corresponding MOS notes.
_cursor_obsolete_threshold
In Oracle Database 12.2, this parameter was raised from 1024 to 8192 to support CDBs with thousands of PDBs. But you don’t have that.
I’ve seen this change cause severe issues in non-CDBs and even CDBs with many PDBs.
Unless you have hundreds of PDBs in your CDB, set the following value:
alter system set "_cursor_obsolete_threshold"=1024 scope=spfile;
Optimizer Fixes – Installed But Disabled
Many of the optimizer fixes in your database are turned off. Yeah, that’s right. Oracle delivered a fix for an optimizer problem, but turned the fix off.
Optimizer fixes that have the potential to change an execution plan are not enabled. This ensures plan stability when you patch. The idea is that you only enable the fixes for problems you see in your database. Otherwise, you live without the fix and don’t have to worry about changing plans.
But when you upgrade to a new release, you want to benefit from all those optimizer fixes. After all, Oracle added the fixes for a reason. When you upgrade, you test your application, and you have time to fix any issues.
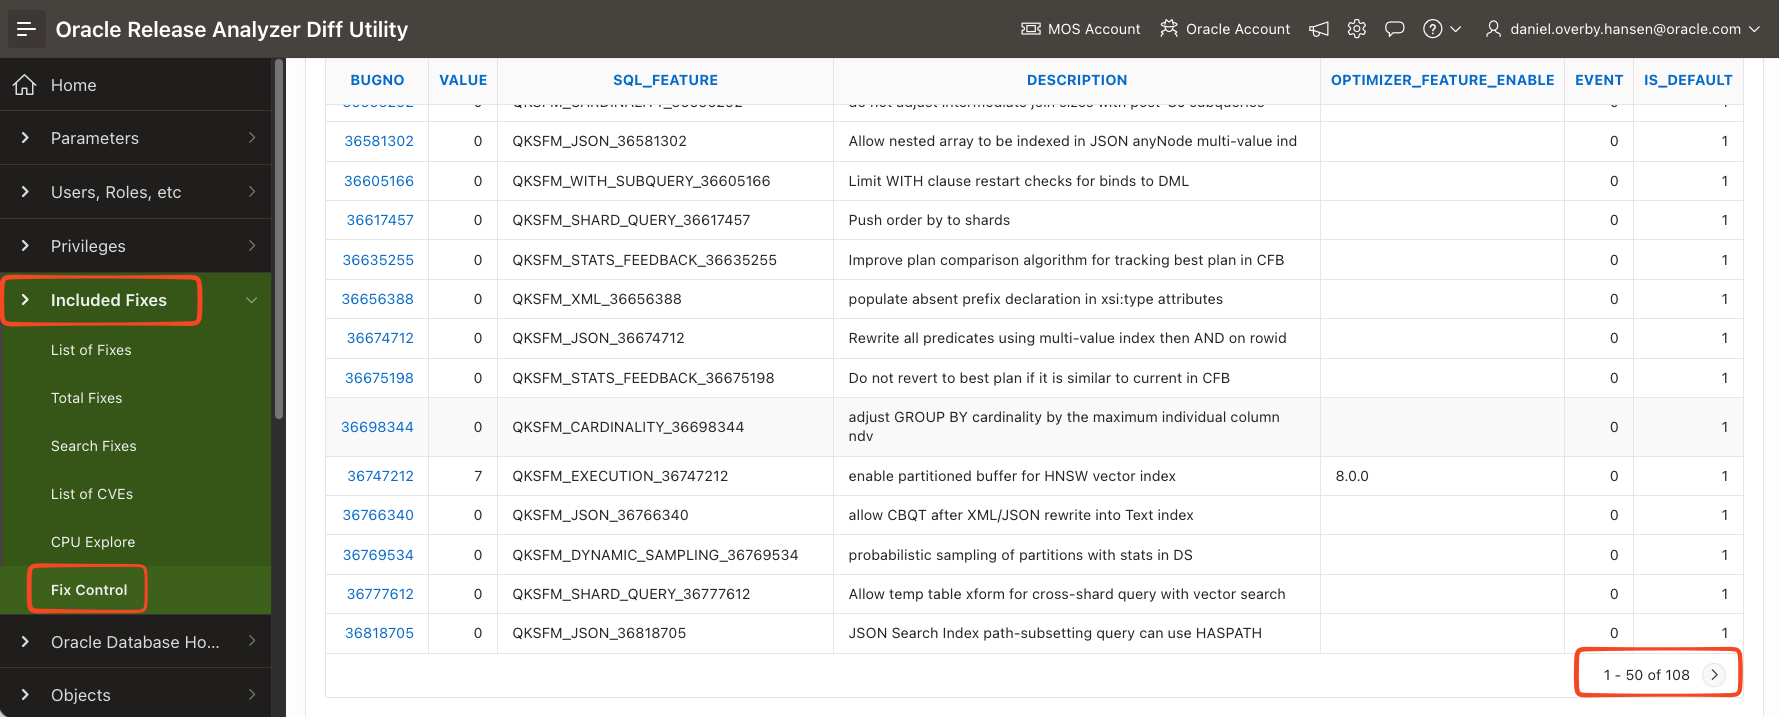
In Oracle AI Database 23.26.0, there are 108 optimizer fixes that are turned off. You can find a list in ORAdiff (under Included Fixes and Fix Control).
- Perform a test upgrade.
- Enable all optimizer fixes.
execute dbms_optim_bundle.enable_optim_fixes('ON','BOTH', 'YES'); - Test your application.
- Upgrade the production database.
- Enable the same optimizer fixes as in #2.
Data Guard
Check your Data Guard configuration:
- Ensure standbys have caught up and are ready to take over.
- Use the Data Guard broker command
VALIDATE DATABASEto check each database in your configuration.
If you also converted your database to a PDB:
- The plug-in operation has a different effect on standbys depending on whether you plug in with enabled or deferred recovery. It’s imperative that you check your Data Guard configuration.
- Use the Data Guard broker command
VALIDATE DATABASEto check each database in your configuration. - I recommend doing a switchover to each of your standbys and opening the PDB on each of the databases. The
VALIDATE DATABASEcommand will not reveal all the pitfalls. - My team discussed this in our webinar Move to Oracle Database 23ai – Everything you need to know about Oracle Multitenant – Part 1.
What Else
I’m sure your runbook has lots of other steps. Remember, you can automate many of them using an after action script in AutoUpgrade.
Check the other blog posts related to upgrade to Oracle AI Database 26ai.
Happy upgrading!