When you upgrade your Oracle Database, you should also decide how to raise the COMPATIBLE parameter. The considerations are the same when you use Data Guard, but the procedure is different.
Why
The main reason for raising COMPATIBLE is to enable new features.
Some new features are not backward compatible, e.g., blockchain tables. When someone introduces such features, the database:
is no longer backward compatible
can no longer be downgraded
When you upgrade, COMPATIBLE stays at the old setting. You need to actively raise it and allow the use of these new features. You are in total control.
Here is a video with more details about COMPATIBLE.
When
I recommend that you raise COMPATIBLE one or two weeks after the upgrade.
When you have seen that the new release works fine in production.
When you are confident that a database downgrade won’t be needed.
Raising COMPATIBLE requires a database restart, i.e., an outage. If such is unacceptable, you must raise COMPATIBLE as part of the upgrade. But be advised, it severely limits your fallback options.
AutoUpgrade does not change COMPATIBLE, unless you explicitly state it in the config file:
I recommend that you always set COMPATIBLE to the default of a database release:
19.0.0
21.0.0
If you only have non-CDBs then it might not matter much. But in a multitenant environment, having a uniform, COMPATIBLE setting is very beneficial. This allows PDBs to move between CDBs without problems.
How
You need to raise COMPATIBLE on all databases in your Data Guard configuration. The order is important:
First, standby databases (individual order is not important)
STANDBY SQL> --Ensure redo apply is running
STANDBY SQL> alter database recover managed standby database disconnect from session;
STANDBY SQL> alter system set compatible='19.0.0' scope=spfile sid='*';
STANDBY SQL> alter database recover managed standby database cancel;

[oracle@standby]$ srvctl stop database -d $ORACLE_UNQNAME
[oracle@standby]$ srvctl start database -d $ORACLE_UNQNAME -o mount

STANDBY SQL> alter database recover managed standby database disconnect from session;
Last, primary database
PRIMARY SQL> alter system set compatible='19.0.0' scope=spfile sid='*';

[oracle@primary]$ srvctl stop database -d $ORACLE_UNQNAME
[oracle@primary]$ srvctl start database -d $ORACLE_UNQNAME
Let me show you how to upgrade your database to Oracle Database 19c when it is protected by Data Guard. I will use AutoUpgrade and follow the MAA method.
This is my demo environment:
Grid Infrastructure is managing the database.
Data Guard is configured using Data Guard broker.
Overall, the process looks like this:
This procedure starts right before I start AutoUpgrade in DEPLOY mode. Downtime has begun, and no users are connected to the database.
Before Upgrade
I always use the latest version of AutoUpgrade. Download it and put it into $ORACLE_HOME/rdbms/admin.
A newer version of AutoUpgrade can also upgrade to older database releases, so don’t worry if the AutoUpgrade version doesn’t match the Oracle Database release that you are upgrading to.
Disable Fast-Start Failover (FSFO)
Fast-Start Failover must be disabled during upgrade. I connect to Data Guard CLI (dgmgrl) and disable it:
DGMGRL> disable fast_start failover;
Restore Point
I need to protect the standby database against errors during the upgrade. I create a guaranteed restore point on the standby database:
STANDBY SQL> alter database recover managed standby database cancel;
STANDBY SQL> create restore point stdby_before_upg guarantee flashback database;
STANDBY SQL> alter database recover managed standby database disconnect from session;
Set Parameters
If I plan on making changes to the database initialization parameters as part of the upgrade of the primary database, I probably also want to make the same changes on the standby database.
I can make changes to database initialization parameters using these AutoUpgrade config file parameters:
remove_underscore_parameters
add_after_upgrade_pfile
add_during_upgrade_pfile
del_after_upgrade_pfile
del_during_upgrade_pfile
I can also review the Preupgrade Summary Report for suggested changes to the database initialization parameters.
Save the changes to the SPFile only:
STANDBY SQL> alter system set ... scope=spfile;
Restart Standby Database In New Oracle Home
The standby database must be started in the new Oracle Home; the Oracle Home I upgrade to.
Ideally, I have stored these files outside the Oracle Home; like ASM. In that case, I don’t need to do anything:
SPFile
Password file
Data Guard broker config files
Network files (sqlnet.ora, tnsnames.ora etc.)
If I stored the files inside the Oracle Home, I must move them to the new Oracle Home (see appendix).
Next, I restart the database in the new Oracle Home. I must restart in mount mode:
[oracle@standby]$ #Set environment to new Oracle Home
[oracle@standby]$ export ORACLE_HOME=/u01/app/oracle/product/19.0.0.0/dbhome_1
[oracle@standby]$ export PATH=$ORACLE_HOME/bin:$PATH
[oracle@standby]$ srvctl upgrade database -d $ORACLE_UNQNAME -oraclehome $ORACLE_HOME
[oracle@standby]$ srvctl start database -d $ORACLE_UNQNAME -o mount
I don’t need to explicitly start redo apply. My Data Guard broker configuration has APPLY-ON for the standby database. Since the broker is still enabled, it will ensure that redo apply is started.
Finally, be sure also to change my profiles and /etc/oratab (see appendix).
Upgrade
Upgrade the primary database by starting AutoUpgrade in DEPLOY mode:
As the upgrade progresses, it makes a lot of changes to the database data dictionary. Those changes are written to redo, which the standby database will apply. Thus, the upgrade happens implicitly on the standby database via the redo.
After Upgrade
Check Standby Database
Ensure that the standby database has caught up and applied all the redo generated during the upgrade.
I use Data Guard CLI (dgmgrl) to check it. First, the configuration:
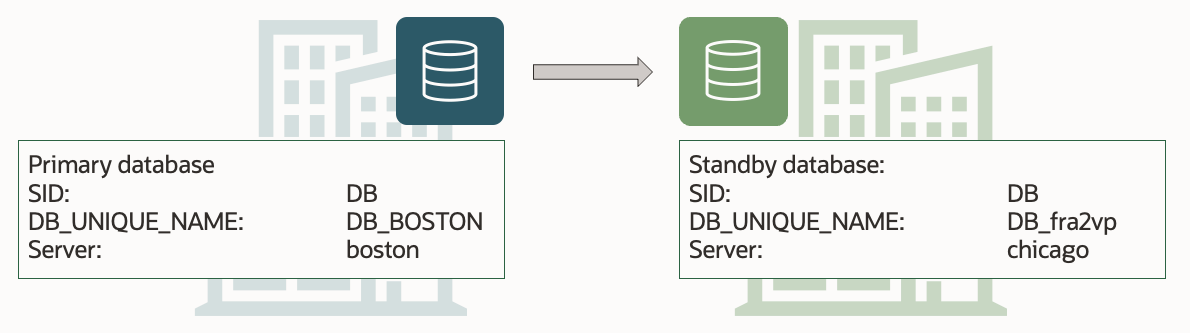
DGMGRL> show database "DB_BOSTON"
DGMGRL> show database "DB_fra2vp"
Both databases should have status SUCCESS, and the standby database must report no apply lag.
If Data Guard broker reports an erroror the standby database is not applying logs, I can try to enable the configuration again:
DGMGRL> enable configuration;
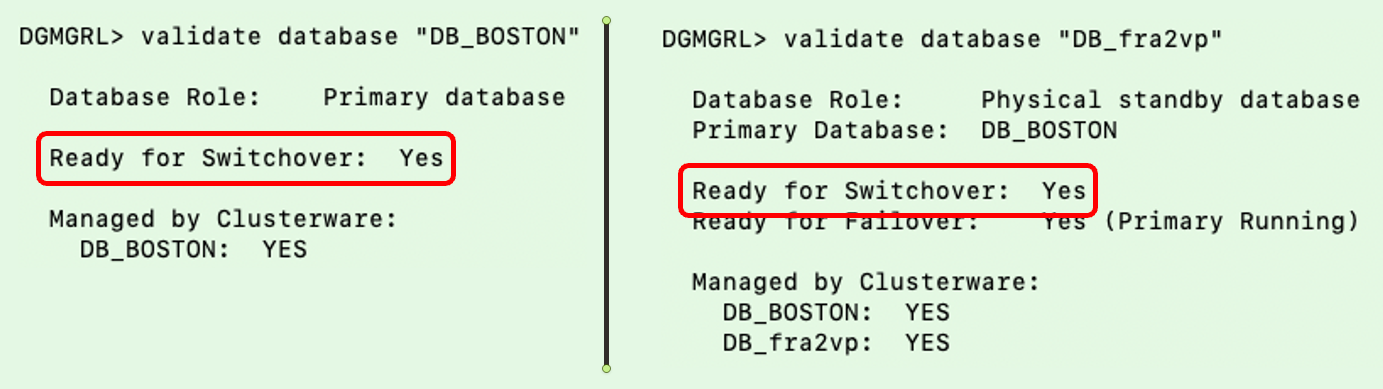
Validate Data Guard
I validate the setup and ensure both databases are ready for a switchover. The database will not allow a switchover if there are any problems in the Data Guard setup. It is a good way of checking things are fine:
If the database is licensed to use Active Data Guard, I can now open the standby database in READ ONLY mode.
Remove Restore Points
After the upgrade, I should perform the necessary tests to validate the new database release. Only when I am convinced to go live on the new release, should I remove the restore points on both databases.
Miscellaneous
Check the database registration in listener.ora. I must update the Oracle Home information if there is a static configuration.
What If
What if your Oracle Database is not managed by Grid Infrastructure?
You can still use the above procedure, but you must change the commands accordingly.
What if you don’t use Data Guard broker?
Manually configured Data Guard environments are fully supported by AutoUpgrade, but you must change some commands accordingly.
Conclusion
It is not that complicated to upgrade your database, even if it is part of a Data Guard setup. Using AutoUpgrade is fully supported and highly recommended. A little extra legwork is needed to take care of the standby database. But the good thing is that your Data Guard setup is maintained throughout the process.
Here is a query to determine the location of the Data Guard broker config files. In this example, the files are stored outside the Oracle Home; in ASM:
SQL> select name, value from v$parameter where name like 'dg_broker_config_file%';

NAME                   VALUES
---------------------- --------------------------------
dg_broker_config_file1 +DATA/DB_FRA2PR/dr1db_fra2pr.dat
dg_broker_config_file2 +DATA/DB_FRA2PR/dr2db_fra2pr.dat
Database Files
Here is a command to see where the SPFile and password file are located. In this example, the SPFile is stored outside the Oracle Home. However, the password file is in the default location inside the Oracle Home. The latter must be moved when you restart a database in the new Oracle Home:
Here is a little snippit to update /etc/oratab to match the new release Oracle Home. Since I am using Grid Infrastructure to manage my database, I don’t set the database to start automatically:
export NEW_ORACLE_HOME=/u01/app/oracle/product/19.0.0.0/dbhome_1
export ORACLE_SID=DB
#Backup file
cp /etc/oratab /tmp/oratab
#Use sed to remove the line that starts with ORACLE_SID
sed '/^'"$ORACLE_SID"':/d' /tmp/oratab > /etc/oratab
#Add new entry
echo "$ORACLE_SID:$NEW_ORACLE_HOME:N" >> /etc/oratab
Updating .bashrc
Here is a little snippit to update .bashrc replacing the old Oracle Home with the new Oracle Home:
When I run AutoUpgrade in ANALYZE mode and check the preupgrade summary report, I find this information message:
Synchronize your standby databases before database upgrade.
The standby database is not currently synchronized with its associated primary database.
To keep data in the source primary database synchronized with its associated standby databases, all standby databases must be synchronized before database upgrade. See My Oracle Support Note 2064281.1 for details.
Don’t worry about it. It tells me to ensure that all redo gets applied
What does it say? Basically, it says that all redo generated on the primary database before the downtime window started, should be sent to and applied on the standby database. This way, my standby database is ready to replace your primary database at any time, if something goes really wrong.
Strictly speaking it is not necessary to ensure that, but it is strongly recommended.
Oracle Database is capable of downgrading, and it is a cool fallback mechanism. You can use it even after go-live. Plus, Data Guard plays nicely together with downgrade. You don’t have to rebuild the standby database following a downgrade if you follow the correct procedure.
When To Use Downgrade
You should only consider downgrading after go-live. When users have made changes to your Oracle Database. In that case, you can downgrade to the previous release without any data loss. Before go-live, Flashback Database is our preferred fallback mechanism.
A comparison between the two:
Flashback Database
Downgrade
Data loss
No data loss
Use before go-live
Use after go-live
After flashback, database is identical with before-upgrade state
After downgrade, database is compatible with before-upgrade state, but not identical
Requires Enterprise Edition
Works in all editions
Preferred method
General Considerations
It is a requirement that you have not changed the COMPATIBLE parameter. As soon as you change COMPATIBLE after upgrade, you can no longer downgrade your Oracle Database. If you have already changed the COMPATIBLE parameter, you must use other fallback methods like Data Pump or RMAN restore.
The old release Oracle Home must still exist on primary and standby hosts. I recommend that you keep them until you are absolutely sure you will not downgrade your Oracle Database.
When you downgrade your database, I recommend leaving your Grid Infrastructure at the new release. Don’t downgrade Grid Infrastructure as well. Ideally, you upgraded Grid Infrastructure to the new release in advance in a previous maintenance window. Thus, you know it can handle the old release of the database. Save yourself the added complexity of also downgrading Grid Infrastructure.
Data Guard broker does not support going back to a previous version. You must disable the broker before downgrade and afterward create a new configuration or restore broker configuration files from the old release.
The following works for Data Guard configuration with a physical standby database. Other considerations and a different procedure apply if you have a logical standby database.
Downgrade
To downgrade an Oracle Database protected by Data Guard the following applies:
You can downgrade hours, days, or even months after the upgrade. As long as you haven’t changed the COMPATIBLE parameter.
You must mount the standby database and start redo apply in real-time apply mode. Keep it running during the entire process.
You must not open the standby database until the end of the process.
The downgrade happens on the primary database. A downgrade will make changes to the data dictionary. Those changes are applied on the standby via redo.
A downgrade with a standby database generally follows the same procedure as a regular database. However, at the end of each step, you must ensure that the standby database has applied all the redo generated by the primary database during that step. I usually issue a few log switches and check the current sequence (SEQUENCE#) on the primary database. Then I wait for that sequence to be applied on the standby database.
AutoUpgrade can’t perform downgrades. You need to do this manually.
In the following, $NEW_ORACLE_HOME refers to the release you were upgrading to (e.g., 19c), and $OLD_ORACLE_HOME refers to the release you upgraded from (e.g., 12.1.0.2).
Set the environment in your session to the new Oracle Home.
For RAC, set CLUSTER_DATABASE parameter:
alter system set cluster_database=false scope=spfile sid='*'
Stop the primary database:
srvctl stop database -d $ORACLE_UNQNAME
Start the primary database (if RAC, just one instance) in downgrade mode:
startup downgrade
Set the executable flag on downgrade script in the new Oracle Home:
chmod +x $ORACLE_HOME/bin/dbdowngrade
Start downgrade script on primary database. The environment is still set to the new release Oracle Home.
$ORACLE_HOME/bin/dbdowngrade
Important: Ensure that the standby database has applied all redo from the downgrade operation. Perform a few log switches and note the sequence number. Ensure the standby database has applied that sequence.
Shut down primary database and standby database (if RAC, all instances).
Downgrade the standby database in Grid Infrastructure. This tells Grid Infrastructure to start the database in the old Oracle Home (in this example, it is 12.1.0.2):
Important: Switch the environment in your session to the old Oracle Home.
Start the standby database (if RAC, all instances).
Start redo apply:
alter database recover managed standby database disconnect from session
Start primary database in upgrade mode (if RAC, only one instance):
startup upgrade
Finish the downgrade:
set echo on termout on serveroutput on timing on
spool catrelod.log
@?/rdbms/admin/catrelod.sql
Recompile:
@?/rdbms/admin/utlrp.sql
Set CLUSTER_DATABASE parameter and shut down:
alter system set cluster_database=true scope=spfile sid='*'
shutdown immediate
Downgrade the primary database in Grid Infrastructure. Grid Infrastructure will now start the database in the old Oracle Home (in this example it is 12.1.0.2):
select comp_id, status
from   dba_registry
where  status not in ('VALID', 'OPTION OFF')
Important: Ensure that the standby database has applied all redo from the downgrade operation. Perform a few log switches and note the sequence number. Ensure the standby database has applied that sequence.
Start Data Guard broker on primary and standby database
Either restore broker config files from old release, and start Data Guard broker.
Or, start Data Guard broker and recreate the configuration.
: Ensure that your Data Guard configuration works. Use validate database command in Data Guard broker on all databases and ensure they are ready for switchover.
Optionally, test your Data Guard by doing a switchover.
No specific Data Guard-related changes. The above procedure is written for a non-CDB database. The procedure is slightly different for a CDB; check the documentation or the demo below.
RAC
On the standby database, you can leave all instances running, and you don’t need to change CLUSTER_DATABASE.
Demo
Downgrade of a CDB running RAC and Data Guard environment:
Can you revert an upgrade of the time zone file using Flashback Database?
And the short answer: Yes!
A time zone file update is a two-step process:
Time zone patch to Oracle Home
Time zone file upgrade of the database
Applying the patch to the Oracle Home is a simple process. The Oracle Home already has a lot of time zone files present (the previous versions), so you can safely add a newer version. It doesn’t hurt anything; you should generally never roll them off again. The time zone patch adds a file with time zone definitions (in $ORACLE_HOME/oracore/zoneinfo).
The second step is to upgrade the time zone file inside the database. This step will make changes to the data dictionary using the information from the time zone file in the Oracle Home. All the changes made in this step are made inside the database.
There are situations when you want to revert the second step: Upgrading the time zone file in the database. For instance:
If the time zone file upgrade fails.
You performed a database upgrade to a new release and upgraded the time zone file afterward. Now you find a critical issue in the new release and decide to roll everything back.
How To Upgrade
Let’s give it a try and see how it works. I start with an Oracle Database running 19c, and I want to upgrade the time zone file and then revert the operation.
The database uses the default time zone file version (32 in Oracle Database 19c):
SQL> select * from v$timezone_file;

FILENAME                VERSION     CON_ID
-------------------- ---------- ----------
timezlrg_32.dat              32 	        0
I create a user and a table. Also, I insert data related to a time zone change in Yukon, Canada, that comes in with time zone file 35:
SQL> create user sales no authentication;
SQL> alter user sales quota unlimited on users;
SQL> grant create table to sales;
SQL> create table sales.t1 (
        c1 timestamp with time zone
     );

SQL> insert into sales.t1 values(TIMESTAMP '2020-03-07 12:00:00.00 America/Whitehorse');
SQL> insert into sales.t1 values(TIMESTAMP '2020-03-08 12:00:00.00 America/Whitehorse');
SQL> insert into sales.t1 values(TIMESTAMP '2020-03-09 12:00:00.00 America/Whitehorse');
SQL> commit;
$ ./opatch lsinventory
Oracle Interim Patch Installer version 12.2.0.1.28
Copyright (c) 2022, Oracle Corporation.  All rights reserved.

...

Patch  34006614     : applied on Sat Jul 30 12:46:16 CEST 2022
Unique Patch ID:  24751709
Patch description:  "RDBMS - DSTV38 UPDATE - TZDATA2022A"
   Created on 27 Apr 2022, 04:16:52 hrs PST8PDT
   Bugs fixed:
     34006614
So far – no changes have been made to the database. It still runs with the old time zone file.
Before performing the time zone file upgrade, I create a restore point:
SQL> create restore point before_tz_upg guarantee flashback database;

Restore point created.
I start the time zone file upgrade by running the pre-upgrade check:
SQL> @utltz_upg_check.sql

INFO: Starting with RDBMS DST update preparation.
INFO: NO actual RDBMS DST update will be done by this script.
...
A prepare window has been successfully ended.
INFO: A newer RDBMS DST version than the one currently used is found.
INFO: Note that NO DST update was yet done.
INFO: Now run utltz_upg_apply.sql to do the actual RDBMS DST update.
INFO: Note that the utltz_upg_apply.sql script will
INFO: restart the database 2 times WITHOUT any confirmation or prompt.
It looks good, so go ahead with the actual upgrade. This step requires a maintenance window:
SQL> @utltz_upg_apply.sql

INFO: If an ERROR occurs, the script will EXIT SQL*Plus.
INFO: The database RDBMS DST version will be updated to DSTv38 .
WARNING: This script will restart the database 2 times
...
An upgrade window has been successfully ended.
INFO: Your new Server RDBMS DST version is DSTv38 .
INFO: The RDBMS DST update is successfully finished.
That’s it. I have upgraded the time zone file in the database.
SQL> select * from v$timezone_file;

FILENAME		VERSION     CON_ID
-------------------- ---------- ----------
timezlrg_38.dat 	     38 	 0
How To Fall Back
To answer the original question: Can I use Flashback Database to back out of a time zone file upgrade?
Don’t roll off the time zone patch from the Oracle Home. It makes no difference to the database. Once you have reverted the second step, the database will work like before the upgrade.
If you insist on doing so, just ensure that no other database uses the time zone file that came in with the patch.
Conclusion
This proves that you can use Flashback Database to revert an upgrade of the database time zone file. Flashback Database is easy and effective.
There is no need to roll off the time zone patch from the Oracle Home. It makes no difference to the database.
When you upgrade your Oracle Database, you should also prepare for fallback. Data Guard plays nicely together with Flashback Database. You don’t have to rebuild the standby database following a Flashback Database if you follow the correct procedure.
When To Use Flashback Database
Flashback Database is easy to use, and it is our preferred fallback mechanism. However, Flashback Database also means data loss because the database is rewinded. So, Flashback Database is only useful before you go live on the new release.
A comparison between Flashback Database and downgrade.
Flashback Database
Downgrade
Data loss
No data loss
Use before go-live
Use after go-live
After flashback, database is identical with before-upgrade state
After downgrade, database is compatible with before-upgrade state, but not identical
It is a requirement that you have not changed the COMPATIBLE parameter. As soon as you change COMPATIBLE after upgrade, you can no longer use Flashback Database. If you have already changed the COMPATIBLE parameter, you must use other fallback methods like Data Pump or RMAN restore.
The old release Oracle Home must still exist on primary and standby hosts. I recommend that you keep them until you are absolutely sure you will not flashback (nor downgrade) your Oracle Database.
When you flashback your database, I recommend that you leave your Grid Infrastructure at the new release. Don’t downgrade Grid Infrastructure as well. Ideally, in a previous maintenance window, you upgraded Grid Infrastructure to the new release in advance. Thus, you know it can handle the old release of the database. Save yourself the added complexity of also downgrading Grid Infrastructure.
Data Guard broker does not support going back to a previous version. You must disable the broker during flashback and afterward create a new configuration or restore broker configuration files from the old release.
The following works for Data Guard configuration with a physical standby database. Other considerations and a different procedure apply if you have a logical standby database.
You must have a restore point on primary and all standby databases.
First, create restore points on standby database, then on primary database. The SCN of the restore points on the standby database must be lower than the SCN of the restore point on the primary database.
I recommend using guaranteed restore points when upgrading.
Don’t rely on restore point propagation. Manually create the restore points on the standby database.
The order of the operation is important: First, handle standby databases (order of standby databases is not important), then primary database.
On YouTube, we have a good introduction to using Flashback Database as fallback. You can also flip through the slides.
How To Flashback With AutoUpgrade
The following assumes:
You manually created a restore point on the standby database.
AutoUpgrade created a restore point on the primary database (default, controlled by restoration).
AutoUpgrade was configured to keep the restore point after upgrade (default, controlled by drop_grp_after_upgrade).
$NEW_ORACLE_HOME refers to the release you were upgrading to (e.g. 19c) and $OLD_ORACLE_HOME refers to the release you upgraded from (e.g. 12.1.0.2).
The procedure:
The environment in your session is set to the new Oracle Home.
Stop Data Guard broker on all databases:
alter system set dg_broker_start=false scope=both sid='*'
Stop standby database (all instances, if RAC).
Flashback primary database using AutoUpgrade. nn is the AutoUpgrade job id that executed the upgrade:
java -jar autoupgrade.jar -config ... -restore -jobs nn
AutoUpgrade handles everything on primary database, like
/etc/oratab
Grid Infrastructure downgrade
SPFile
Etc.
Start standby database in mount mode (only one instance, if RAC).
Flashback the standby database:
flashback database to restore point ...
Shut down the standby database.
Downgrade the standby database clusterware configuration. Grid Infrastructure will now start the database in the old Oracle Home (in this example it is 12.1.0.2):
Start Data Guard broker on primary and standby database
Either restore broker config files from old release and start Data Guard broker.
Or, start Data Guard broker and recreate the configuration.
: Ensure that your Data Guard configuration works. Use validate database command in Data Guard broker on all databases and ensure they are ready for switchover.
Optionally, test your Data Guard by doing a switchover.
Remember to drop the guaranteed restore points on all databases.
That’s it!
Demo
Flashback of a CDB running RAC and Data Guard environment:
You can upgrade your Oracle Database to a new release and keep the Data Guard setup intact. There is no need to rebuild a physical standby database after the upgrade.
When you upgrade the primary database, many changes go into the data dictionary. These changes are recorded in the redo stream and sent to the standby database. When the standby database applies the redo, it is implicitly upgraded.
You can do it in the same maintenance window as the database upgrade, but I recommend that you perform the GI upgrade in an earlier maintenance window. A newer version of GI can run earlier versions of Oracle Database, so you can safely upgrade GI in advance. Doing so will give you time to adapt to the new GI release.
Also, in advance, you should install the new Oracle Home on both primary and standby hosts. The two Oracle Homes must have the same patches applied, and I recommend that you always apply the latest Release Update and have a look at 555.1 for important one-offs.
How To
When upgrading with Data Guard, there are two approaches:
Before the upgrade starts on the primary database, you shut down the standby database. You keep it shut down until the upgrade has completed on the primary database and you have finished your tests. When you are sure you will stay on the new release, the standby database is restarted and synchronized with the primary database. It will take some time before you can go live because the standby database must apply all the redo generated during the upgrade.
If you need to fall back, you can use Flashback Database on the primary database. In addition, no matter what happens to the primary database, you still have the standby database immediately ready in the pre-upgrade state.
My team recommends this method. We prefer to sacrifice a little downtime to achieve even better protection.
MAA Method
The standby database is open and applies redo while the primary database is upgraded. This means that the standby database is closely following the primary database. You can go live very soon after the upgrade completes because there is little or very little apply lag.
The downside is when you must fall back. In that case, you have two databases to bring back in time with Flashback Database. In the very unlikely event that something happens during flashback on both databases, you may need to restore your backup.
The MAA team recommends this method as it guarantees the lowest downtime.
Which One To Choose?
If you have two or more standby databases, you can combine the two methods and get the best of both worlds. Otherwise, rest assured that both methods work fine and are supported.
Standby Offline
MAA
Maximum protection
Minimum downtime
Upgrade team recommendation
MAA recommendation
Redo transport deferred
Redo transport enabled
Redo apply stopped
Redo apply active
Protected by offline standby and guaranteed restore point
Protected by guaranteed restore point
AutoUpgrade default
Of course, AutoUpgrade supports both methods. You can check the other blog post in the series for detailed instructions.
If you are running Oracle Database on Exadata, you should read the dedicated procedure created by the Maximum Availability Architecture (MAA) team.
Multiple Standby Databases
Not much changes if you have many standby databases in your Data Guard configuration. The procedure is basically the same, except that you must execute commands on all the standby databases. The order of the standby databases does not matter (unless you have cascaded standby databases – see below).
Data Guard Broker
If you have configured your Data Guard setup using Data Guard broker, then you can leave it running during the upgrade. There used to be some problems with Data Guard broker during upgrade to previous releases, but it works fine when you upgrade to Oracle Database 19c.
However, you must disable Fast-Start Failover before the upgrade. After a successful upgrade, you can enable it again.
Cascaded Standby Databases
If you have cascaded standby databases, the following applies according to the documentation:
If there are cascaded standbys in your configuration, then those cascaded standbys must follow the same rules as any other standby, but should be shut down last, and restarted in the new home first.
You must treat cascaded standby databases like any other standby database. However, the order is now important. Imagine this scenario:
Primary database: BOSTON
Standby database: CHICAGO
Cascaded standby database: NEWYORK
When the procedure tells you to stop standby databases: First CHICAGO, then NEWYORK
When the procedure tells you to start standby databases: First NEWYORK, then CHICAGO
Far Sync
A far sync database should be treated like any other standby database. Like cascaded standby databases the order of the shutdown is important to ensure that all redo from primary reaches the standby database connected via the far sync.
Logical Standby
When you have logical standby databases in your Data Guard configuration, things are slightly different. In that case, look in the documentation.
Short answer: If the data was validated originally, it must be validated (again) during import. If you are short on time, you can add the constraints as NOT VALIDATED instead. But be aware of the drawbacks.
Update 3 October 2024: Data Pump now supports transforming constraints into NOVALIDATE constraints. Check blog post for details.
The Problem
I got a question from a colleague importing customer data as part of a migration. Data Pump was spending a lot of time in TABLE_EXPORT/TABLE/CONSTRAINT/CONSTRAINT.
We attached to the Data Pump session and used the status command:
Data Pump is adding a check constraint and enables it with the ENABLE clause. But there is a missing detail – the constraint is also validated even though there is no VALIDATE clause. It is the default.
What Happens
In the source database, the check constraint was enabled and validated. During import, Data Pump adds the constraint with the same attributes. The only way to add a validated constraint – is to validate it.
But if the constraint was validated during export, then we know data in the dump file is validated as well. When importing data that we know is validated, why do we need to validate it again?
Because we know, but the database doesn’t know it. In order for a check constraint to be marked as validated, the database must ensure that it is truly the case. It trusts no one and insists on validating the data.
And when you import data from a dump file, can you actually be sure all data is good? What if …
someone tampered with the dump file
data was changed during export using the remap option
data was changed as part of character set conversion
data was changed as part of timezone file conversion
Why Does It Takes So Long To Validate A Constraint
To answer that, let’s trace:
SQL> ALTER SESSION SET TRACEFILE_IDENTIFIER = "CONST";
SQL> ALTER SESSION SET EVENTS '10046 trace name context forever, level 4';
SQL> ALTER TABLE sh.customers2 ADD CONSTRAINT c_cust2_valid
     CHECK (cust_valid in ('I', 'A'))
     ENABLE VALIDATE;
Run the trace file through tkprof and have a look at the first recursive statement after the ALTER TABLE ... ADD CONSTRAINT statement:
select /*+ all_rows ordered dynamic_sampling(2) */ A.rowid, :1, :2, :3
from "SH"."CUSTOMERS2" A
where not ( cust_email like '%@%')

call     count       cpu    elapsed       disk      query    current        rows
------- ------  -------- ---------- ---------- ---------- ----------  ----------
Parse        1      0.00       0.00          0          0          0           0
Execute      1      0.00       0.00          0          0          0           0
Fetch        1     49.03      66.61    3103448    3103510          1           0
------- ------  -------- ---------- ---------- ---------- ----------  ----------
total        3     49.03      66.62    3103448    3103510          1           0

Misses in library cache during parse: 1
Misses in library cache during execute: 1
Optimizer mode: ALL_ROWS
Parsing user id: 100     (recursive depth: 3)
Number of plan statistics captured: 1

Rows (1st) Rows (avg) Rows (max)  Row Source Operation
---------- ---------- ----------  ---------------------------------------------------
         0          0          0  TABLE ACCESS FULL CUSTOMERS2 (cr=3103510 pr=3103448 pw=0 time=66618486 us starts=1 cost=2 size=39 card=1)


Elapsed times include waiting on following events:
  Event waited on                             Times   Max. Wait  Total Waited
  ----------------------------------------   Waited  ----------  ------------
  db file scattered read                      24274        0.20         22.45
  PGA memory operation                            1        0.00          0.00
The database checks the table for any existing data that violates the constraint. It does so by issuing a SELECT using the inverse function of the check constraint. This results in a full table scan, and that is what takes so long.
If you have multiple check constraints on the same table, Data Pump adds them one by one, and that results in multiple full table scans.
Since full table scans rarely populate the buffer cache, you end up with a lot of disk reading as well. You can verify that in the example above in the row source part. Physical reads (pr) are almost the same as consistent gets (cr). Almost every read requires a physical read.
But I Know Data Is Good
If you are sure that the data is good and you want to avoid the validation of data, you can create the check constraints as enabled but not validated. Existing data is not checked, but new data will be validated.
There are two three ways of doing that:
1. Change Constraints in Source
Before exporting the data, in the source database, change all validated check constraints to NOVALIDATE:
ALTER TABLE "SH"."CUSTOMERS2"
MODIFY CONSTRAINT "C_CUST2_EMAIL"
ENABLE NOVALIDATE;
But be aware that you are changing the source database. If you need to use it for other purposes or as fallback, this might not be a good idea.
2. Change Constraints During Import
First, import the data, but exclude the constraints. This will be much faster because no time is spent on validating constraints:
$ impdp ... exclude=constraint
Next, extract the definition of all constraints from the Data Pump dump file and into a SQL file:
$ impdp ... include=constraint sqlfile=ddl.sql
Now, add the NOVALIDATE clause to all the statements:
ALTER TABLE "SH"."CUSTOMERS2"
ADD CONSTRAINT "C_CUST2_EMAIL"
CHECK (cust_email like '%@%')
ENABLE NOVALIDATE;
Regardless of which method you choose, there is a catch. Validated constraints are very useful to the database because it enables the optimizer to perform query rewrite and potentially improve query performance. Also, index access method might become available instead of full table scans.
You want to get those constraints validated. But you don’t have to do it during the import. Validating an enabled, not validated constraint does not require a lock on the table, so you can do it while the database is open for business.
What About Rely
If you follow option 2 and create the constraints after import as enabled and not validated, you could also add the rely clause:
ALTER TABLE "SH"."CUSTOMERS2"
ADD CONSTRAINT "C_CUST2_EMAIL"
CHECK (cust_email like '%@%')
RELY ENABLE NOVALIDATE;
Rely tells the database that you know the data is good. The optimizer still doesn’t trust you until you set the parameter QUERY_REWRITE_INTEGRITY to TRUSTED. Now, the optimizer can now benefit from some query rewrite options, but not all of them.
Nothing beats a truly validated constraint!
Conclusion
Importing validated check constraints takes time. If you want to save time in your maintenance window, instruct Data Pump to exclude the constraints, and add them yourself as enabled and not validated. This will save a lot of time that Data Pump otherwise would have to spend on validating the constraints.
The database benefits from validated constraints, so you should validate them. The database can validate constraints without a lock on the table if the constraints are already enabled. Thus, you can postpone the validation to a later time in your maintenance window, and you can perform other activities at the same time. Perhaps you can validate constraints while users are testing the database. Or wait until the next maintenance window. Just be aware that you might see some SQLs degrade until all constraints are validated.
When migrating Oracle Databases, you often transport the statistics using dbms_stats. Our team got involved in an interesting case the other day, and I would like to share the solution with you.
Problem
A customer migrated to Oracle Database 19c and decided to move the statistics using dbms_stats.import_schema_stats. They noticed that the procedure started to burn a lot of CPU, and after 38 hours, they gave up.
A SQL Monitor report showed one statement which spent almost all the time. An insert statement into sys.dbms_stats_id_map_tab with a subselect referencing the staging table. The staging table is the one you specify in the argument stattab in the call to dbms_stats.import_schema_stats. The staging holds the optimizer statistics in a portable format. From the staging table, the procedure can insert it into the data dictionary in the proper format.
Obviously, they could see already that the procedure would use far too much time.
Diagnosing
The first shot was to look at the code behind dbms_stats. But this specific code hadn’t changed since its introduction many releases ago.
Recursive statements that touch the data dictionary immediately brought our attention to dictionary statistics. But the customer told us that they were not stale.
The customer ran SQL Tuning Advisor on the offending statement, and one of the findings was about stale statistics. SQL Tuning Advisor recommended gathering statistics on the staging table and corresponding indexes.
One of our performance experts looked at the execution plan and found a pattern he had seen before. He tried to disable Join Predicate Push Down in the session. It helped, but this was just a workaround. We wanted to find the root cause.
Solution
The SQL Tuning advisor came up with the real problem. Stale statistics on the staging table and corresponding indexes. Once the customer gathered statistics on the staging table and indexes, the import of statistics finished in 2 hours and 27 minutes which was acceptable.
We also discovered that the dictionary statistics were not as accurate as the customer had initially concluded. In fact, by mistake, they had misinformed us. A fresh run of dbms_stats.gather_dictionary_stats gave a slight performance improvement as well.
Recommendations
These recommendations are now part of our best practices for migrations.
Before importing statistics using dbms_stats.import_schema_stats, gather stats on the staging table.
Immediately after importing a lot of data, and before you import statistics with dbms_stats or anything else, you should gather dictionary statistics. This applies to regular Data Pump imports and transportable tablespace metadata imports.
In the above example, the staging table is called SYSTEM.MY_STG_TAB_1.
The recommendation applies as well if you are using the procedures dbms_stats.import_database_stats or dbms_stats.import_table_stats.
Dictionary Statistics
Why is it important to gather dictionary statistics immediately after the import?
When you import data or use transportable tablespaces, you often have a brand new, empty database. Then you import a lot of objects. Those objects are represented as rows in the data dictionary.
For instance, the tables you import now appear as rows in SYS.TAB$, the partitions in SYS.TABPART$, the indexes in SYS.IND$, and so forth.
Those internal tables were almost empty before – there were not a lot of tables. Now they have a lot of rows. This means that the statistics are stale. When you start to use functionality in the database, like importing statistics, recursive queries using the internal tables will be executed. With stale statistics on the dictionary, you can have suboptimal execution plans and bad performance. Gathering dictionary statistics can fix this for you.
Conclusion
Statistics are always vital, whether optimizer statistics on user data or internally in the data dictionary. Be sure to verify the accuracy of your statistics when you have problems.
Also, SQL Tuning Advisor is a great tool. It can quickly come up with suggestions for fixing problems. Use the recommendations as input to your troubleshooting. SQL Tuning Advisor also works on internal tables.
Additional Information
We have a few videos on our YouTube channel which have more information about transporting statistics with dbms_stats.
When upgrading an Oracle Database, do we need to disable the scheduler (DBMS_SCHEDULER)?
The short answer is: No …. or perhaps.
What Happens During Analyze
When you use AutoUpgrade in Analyze mode (java -jar autoupgrade.jar -mode analyze), it will check your database. It is a non-intrusive check, and normal operations can continue, including use of the scheduler.
What Happens During Deploy
When downtime starts, and you are ready to upgrade your database, you start AutoUpgrade in Deploy mode (java -jar autoupgrade.jar -mode deploy).
Analyze And Fixups
First, AutoUpgrade will re-analyze the database, and based on the findings; it will run pre-upgrade fixups. The fixups make changes to the database, like gathering dictionary statistics, emptying recycle bin and other administrative tasks. The scheduler remains active during this period, so if you have any jobs that do administrative things on the database, like gathering statistics, there is a chance that they will collide. But typically not a problem.
Upgrade
Then the actual upgrade of the database can start. This happens while the database is started in upgrade mode (STARTUP UPGRADE)
When the database is started in upgrade mode, many things are disabled automatically. The scheduler being one of them.
Examples of other changes that happen in upgrade mode:
System triggers are disabled
Certain parameters are changed
Resource Manager is disabled
You can check the alert log for more information. Here is a snippet:
2022-05-17T11:56:54.585122+02:00
AQ Processes can not start in restrict mode
Post-Upgrade
After the actual upgrade, the database is restarted in normal mode. The scheduler becomes enabled again.
In this phase, AutoUpgrade is recompiling invalid objects and performing post-upgrade fixups. Changes will be made to the database, like re-gathering dictionary statistics. Similar to the pre-upgrade fixups, depending on the nature of your scheduler jobs, there is a risk of things colliding. That can cause waits or concurrency issues.
Finally, the time zone file is upgraded. This process requires the database to be started in upgrade mode again. Again, the scheduler will be automatically disabled.
What Is The Answer?
From a functional point of view the scheduler is enabled and working during some parts of an upgrade. Only during the most critical parts is it automatically disabled.
So, the answer is: No, you do not need to disable the scheduler during upgrade. The database will automatically disable it when needed.
But the database is restarted multiple times which of course will affect any running scheduler jobs.
Depending on the nature of your scheduler jobs, you might decide to disable it completely during the entire database upgrade. For instance, if you have long-running jobs or jobs that are sensitive to being interrupted.
On the other hand, if your jobs are short-running, restart easily, or you basically don’t care, then it is perfectly fine to leave it all running during a database upgrade.
Manually Disable The Scheduler
If you decide to disable the scheduler manually, you should temporarily change job_queue_processes:
SQL> alter system set job_queue_processes=0 scope=both;
Don’t forget to set it to the original value after the upgrade.
When you start Oracle Database in upgrade mode, you can only run queries on fixed views. If you attempt to run other views or PL/SQL, then you receive errors.
When the database is started in upgrade mode, only queries on fixed views execute without errors. This restriction applies until you either run the Parallel Upgrade Utility (catctl.pl) directly, or indirectly by using the dbupgrade script). Before running an upgrade script, using PL/SQL on any other view, or running queries on any other view returns an error.
Starts the database in OPEN UPGRADE mode and sets system initialization parameters to specific values required to enable database upgrade scripts to be run. UPGRADE should only be used when a database is first started with a new version of the Oracle Database Server.
When run, upgrade scripts transform an installed version or release of an Oracle database into a later version, for example, to upgrade an Oracle9i database to Oracle Database 10g. Once the upgrade completes, the database should be shut down and restarted normally.
In a multitenant environment where you want to use Transparent Data Encryption (TDE), you can do it in two ways:
United keystore mode. The default option. The CDB has a keystore, and all PDBs use that keystore. The encryption keys belong to each individual PDB, but the one keystore contains all the encryption keys.
Isolated keystore mode. Became available with 19.11.0 and in later versions. The CDB has a keystore that all PDBs can use, but you can configure a PDB to use its own keystore. If a PDB uses TDE in isolated mode, that PDB will physically have its own keystore, where only the TDE encryption keys get stored. PDBs that are not configured to use isolated mode, will put the encryption keys into the keystore of the CDB.
Isolated mode is fairly new and is not fully supported yet by AutoUpgrade, OCI tooling, and other tools.
United mode is the easy way of doing things. You configure one keystore and then all PDBs can use that keystore.
Isolated mode is suitable when you want to completely isolate the PDBs and even keep the encryption keys separate. Moreover, you can have different passwords protecting the keystores. Isolated mode strengthens security but adds maintenance overhead; more keystores to backup and protect). Additionally, in isolated mode, each PDB can use a different kind of keystore. The CDB can use a software keystore (a file in the OS), PDB1 can use its own software keystore (another file in the OS), and PDB2 can store its encryption keys in Oracle Key Vault. More security and more flexibility.
Regardless of which keystore mode you plan to use, you always start by configuring TDE in united mode in the CDB. Afterward you can enable isolated mode in individual PDBs, if you want that.
How To Configure TDE
This procedure enables TDE in united mode. I will use a software keystore (a file in the OS):
Create a directory where I will place the keystore. You can change $ORA_KEYBASE to another location.
Configure WALLET_ROOT to tell the database where I want to create the keystore files, and TDE_CONFIGURATION to tell the database to use a software keystore:
alter session set container=cdb$root;
alter system set wallet_root='$ORA_KEYBASE' scope=spfile;
shutdown immediate
startup
alter system set tde_configuration='KEYSTORE_CONFIGURATION=FILE' scope=both;
Now create the keystore and a TDE encryption key for CDB$ROOT. My TDE keystore password is oracle_4U; you should pick a better password:
administer key management create keystore '$ORA_KEYSTORE' identified by "oracle_4U";
administer key management set keystore open force keystore identified by "oracle_4U";
administer key management set key identified by "oracle_4U" with backup;
You can optionally use the CONTAINERS=ALL clause to set a TDE encryption key in all PDBs. Don’t do this if you plan on using isolated keystore later on:
administer key management create keystore '$ORA_KEYSTORE' identified by "oracle_4U";
administer key management set keystore open force keystore identified by "oracle_4U" container=all;
administer key management set key identified by "oracle_4U" with backup container=all;
Optionally, create an auto-login keystore. If you don’t, you must manually input the TDE keystore password every time the database starts.
administer key management create local auto_login keystore from keystore '$ORA_KEYSTORE' identified by "oracle_4U";
That’s it. You can now start to create encrypted tablespaces:
create tablespace ... encryption encrypt;
I have now created the root keystore in the location defined by WALLET_ROOT. The database automatically adds a subfolder called tde. In that folder you find ewallet.p12 which is the actual software keystore of the CDB, and cwallet.sso which is the auto-login keystore:
$ pwd
/u01/app/oracle/admin/CDB2/wallet/tde
$ ll
total 8
-rw-------. 1 oracle dba 4040 May 16 09:35 cwallet.sso
-rw-------. 1 oracle dba 3995 May 16 09:35 ewallet.p12
Configure Isolated Keystore
You can enable isolated mode in a PDB after you configure the CDB for united mode (the above procedure). The following assumes that TDE has not been configured yet in PDB1:
Switch to the PDB and configure TDE_CONFIGURATION:
ALTER SESSION SET CONTAINER=PDB1;
ALTER SYSTEM SET TDE_CONFIGURATION='KEYSTORE_CONFIGURATION=FILE' SCOPE=BOTH;
Create the keystore and a TDE encryption key for the PDB. Notice I am giving my PDB keystore a different password:
ADMINISTER KEY MANAGEMENT CREATE KEYSTORE IDENTIFIED BY "oracle_4U2";
ADMINISTER KEY MANAGEMENT SET KEYSTORE OPEN FORCE KEYSTORE IDENTIFIED BY "oracle_4U2";
ADMINISTER KEY MANAGEMENT SET KEY IDENTIFIED BY "oracle_4U2" WITH BACKUP;
Optionally, create an auto-login keystore of the PDB keystore. If not, you need to manually input the TDE keystore password in the PDB every time it starts:
ADMINISTER KEY MANAGEMENT CREATE LOCAL AUTO_LOGIN KEYSTORE FROM KEYSTORE IDENTIFIED BY "oracle_4U2";
The PDB keystore is now placed in a subfolder of WALLET_ROOT matching the PDB GUID (D6A29777EC214B6FE055000000000001). You find similar files, ewallet.p12 and cwallet.sso in the dedicated folder for the isloated PDB keystore:
$ pwd
/u01/app/oracle/admin/CDB2/wallet/D6A29777EC214B6FE055000000000001/tde
$ ll
total 8
-rw-------. 1 oracle dba 2120 May 16 09:37 cwallet.sso
-rw-------. 1 oracle dba 2059 May 16 09:35 ewallet.p12
To get the GUID of a PDB:
select name, guid from v$containers;
The database will automatically create the directories needed for the PDB keystore.
Migrating Between Keystore Modes
If you need to migrate between the two keystore modes, there are two commands you can use. oracle_4U is the keystore password of the root keystore; oracle_4U2 is the keystore password of the PDB keystore.
To migrate a PDB from united to isolated mode, i.e., to isolate a keystore:
alter session set container=PDB1;
administer key management
   force isolate keystore identified by "oracle_4U2"
   from root keystore force keystore identified by "oracle_4U"
   with backup;
To migrate a PDB from isolated to united mode, i.e., to unite a PDB keystore into a root keystore:
alter session set container=PDB1;
administer key management
   unite keystore identified by "oracle_4U2"
   with root keystore force keystore identified by "oracle_4U"
   with backup;
To determine which keystore mode is in use:
select con_id, wrl_parameter, keystore_mode
   from v$encryption_wallet;
Final Notes
If you want to use isolated keystore mode in 19.11, 19.12 or 19.13 you need to apply patch 32235513 as well. From 19.14 and onwards this is not needed.
Isolated mode used to be a cloud-only feature. But since 19.11 it has been made available to everyone.