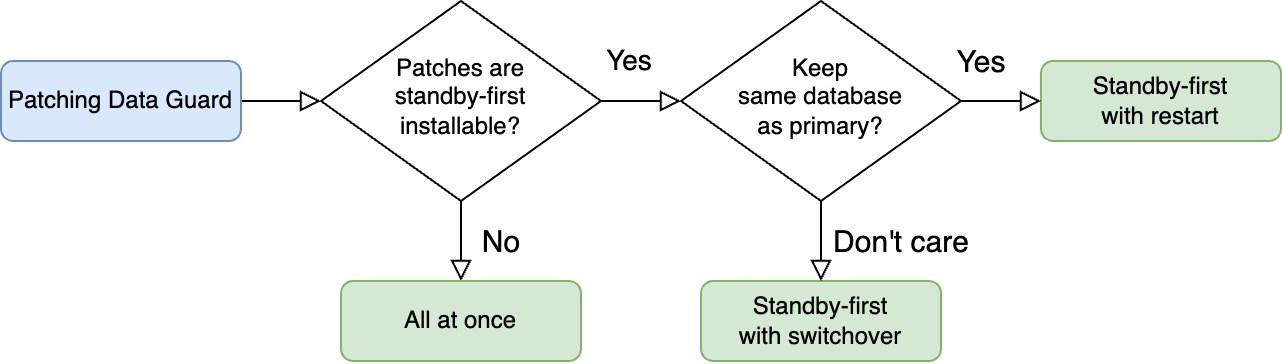

How To Patch Oracle Data Guard Using AutoUpgrade And Standby-First Patch Apply With Switchover

Let me show you how I patch my Oracle Data Guard configuration. I make it as easy as possible using Oracle AutoUpgrade. I reduce the interruption by doing standby-first patch apply with a switchover.

  • My Data Guard configuration consists of two databases:
    • SID: SALES
    • Databases: SALES_COPENHAGEN and SALES_AARHUS
    • Hosts: copenhagen and aarhus
    • Primary database: SALES_COPENHAGEN running on copenhagen

Preparations

You should do these preparations in advance of your maintenance window. They don’t interupt operations on your databases.

  • I download the patches using AutoUpgrade.

    • I can download the patches from any computer. It doesn’t have to be one of the database hosts, which typically don’t have internet access.
  • I verify all patches are standby-first installable and my configuration meets the requirements for standby-first patch apply.

  • I create a new Oracle home on all hosts.

    • Create a config file called sales.cfg:
      global.global_log_dir=/home/oracle/autoupgrade-patching/sales
      patch1.source_home=/u01/app/oracle/product/19.3.0.0/dbhome_1
      patch1.target_home=/u01/app/oracle/product/19/dbhome_19_26_0
      patch1.sid=SALES
      patch1.folder=/home/oracle/autoupgrade-patching/patch
      patch1.patch=RECOMMENDED,MRP
      patch1.download=no
      
      • Start AutoUpgrade in create_home mode:
      java -jar autoupgrade.jar -config sales.cfg -patch -mode create_home
      
      • AutoUpgrade also runs root.sh if oracle user has sudo privileges. Else, I must manually execute root.sh.
  • Optionally, but recommended, I run an analysis on the primary database:

    [oracle@copenhagen] java -jar autoupgrade.jar -config sales.cfg -patch -mode analyze
    
    • Check the findings in the summary report.

Patching

Proceed with the following when your maintenance window starts.

  • Update listener.ora on the standby host (see appendix). I change the ORACLE_HOME parameter in the static listener entry (suffixed _DGMGRL) so it matches my target Oracle home.

  • I reload the listener:

    [oracle@aarhus] lsnrctl reload
    
  • Patch the standby database:

    [oracle@aarhus] java -jar autoupgrade.jar -config sales.cfg -mode deploy
    
    • I don’t disable redo transport/apply.
  • Optionally, test the application of patches using a snapshot standby database.

  • interruption starts!

  • Switch over to SALES_AARHUS:

    DGMGRL> switchover to sales_aarhus;
    
    • Perform draining in advance according to your practices.
    • Depending on how your application is configured, the users will experience this interruption as a brown-out or downtime.
  • Update listener.ora on the new standby host (copenhagen). I change the ORACLE_HOME parameter in the static listener entry (suffixed _DGMGRL) so it matches my target Oracle home.

  • I reload the listener:

    [oracle@copenhagen] lsnrctl reload
    
  • Patch the new standby database (see appendix):

    [oracle@copenhagen] java -jar autoupgrade.jar -config sales.cfg -mode deploy
    
  • Verify the Data Guard configuration and ensure the standby database is receiving and applying redo:

    DGMGRL> show database SALES_COPENHAGEN;
    DGMGRL> show database SALES_AARHUS;
    DGMGRL> validate database SALES_COPENHAGEN;
    DGMGRL> validate database SALES_AARHUS;
    

Post-Patching

  • Connect to the new primary database and execute Datapatch. You do that by calling AutoUpgrade in upgrade mode:
    [oracle@aarhus] java -jar autoupgrade.jar -config sales.cfg -mode upgrade -clear_recovery_data
    
    • Since I’m reusing the same config file, I must add the -clear_recovery_data flag. Otherwise, AutoUpgrade gets a little confused.

Happy Patching!

Appendix

Static Listener Entry

In this blog post, I update the static listener entries required by Data Guard broker (suffixed DGMGRL). My demo environment doesn’t use Oracle Restart or Oracle Grid Infrastructure, so this entry is mandatory.

If you use Oracle Restart or Oracle Grid Infrastructure, such entry is no longer needed.

Further Reading

Other Blog Posts in the Series

Avoid Problems on the Primary Database by Testing on a Snapshot Standby

One of the advantages of standby-first patch apply, is that I can test the patches in a production-like environment (the standby) before applying them to the primary. Should I find any issues with the patches, I can stop the process and avoid impacting the primary database.

Here’s an overview of the process.

For demo purposes, my Data Guard configuration consists of two databases:

  • SID: SALES
  • Databases: SALES_COPENHAGEN and SALES_AARHUS
  • Hosts: copenhagen and aarhus
  • Primary database: SALES_COPENHAGEN running on copenhagen

How To

This procedure starts right after I’ve patched the standby (SALES_AARHUS). It runs out of the target Oracle home, whereas the primary database (SALES_COPENHAGEN) still runs on the source Oracle home.

  • Convert the patched standby to a snapshot standby:

    DGMGRL> convert database SALES_AARHUS to snapshot standby;
    
  • Test the patch apply by running Datapatch on the standby:

    [oracle@aarhus] $ORACLE_HOME/OPatch/datapatch
    
    • One always runs Datapatch on the primary database and the changes made by the patches goes into redo to the standby.
    • But, since I converted to a snapshot standby, it is now opened like a normal database and I can run Datapatch on it.
    • If Datapatch completes without problems on the standby, I can be pretty sure it will do so on the primary as well. The standby is after all an exact copy of the primary database.
  • Optionally, perform additional testing on the standby.

    • I can connect any application and perform additional tests.
    • I can use SQL Performance Analyzer to check for regressing SQL statements.
    • I can make changes to any data in the standby. It is protected by a restore point.
  • When done, convert the snapshot standby back to a physical standby:

    DGMGRL> convert database SALES_AARHUS to physical standby;
    
    • This implicitly shuts down the standby, flashes back to the restore point and re-opens the database as a physical standby.
    • All changes made when it was a snapshot standby, including the Datapatch run, are undone.

Continue the patching procedure on the primary database as described elsewhere.

Is It Safe?

Sometimes, when I suggest using the standby for testing, people are like: Huh! Seriously?

What Happens If I Need to Switch Over or Fail Over?

I can still perform a switchover or a failover. However, they will take a little bit longer.

When I convert to snapshot standby:

  • Redo transport is still active.
  • Redo apply is turned off.

So, the standby receives all redo from the primary but doesn’t apply it. Since you normally test for 10-20 minutes, this would be the maximum apply lag. On a well-oiled standby, it shouldn’t take more than a minute or two to catch up.

When performing a switchover or failover on a snapshot standby, you should expect an increase with the time it takes to:

  • Shut down
  • Flashback
  • Apply redo

I’d be surprised if that would be more than 5 minutes. If your RTO doesn’t allow for a longer period:

  • Get a second standby.
  • Consider the reduction in risk you get when you test on the standby. Perhaps a short increase in RTO could be allowed after all.

What Happens If Datapatch Fails

If Datapatch fails on my snapshot standby, I should be proud of myself. I just prevented the same problem from hitting production.

  • I grab all the diagnostic information I need, so I can work with Oracle Support on the issue.
  • Convert back to physical standby, which will undo the failed Datapatch run.
  • If I expect to solve the issue quickly, leave the standby running in the target Oracle home. Otherwise, put it back into the source Oracle home.

So, yes, it’s safe to use!

Happy testing

Appendix

Other Blog Posts in the Series

How To Patch Oracle Data Guard Using AutoUpgrade For Non-Standby-First Installable Patches

Let me show you how I patch my Oracle Data Guard configuration. I make it easy using Oracle AutoUpgrade. I patch all at once – all databases at the same time – which means a short downtime. I can use this approach for all patches – even those that are not standby-first installable.

I recommend this approach only when you have patches that are not standby-first installable.

  • My Data Guard configuration consists of two databases:
    • SID: SALES
    • Databases: SALES_COPENHAGEN and SALES_AARHUS
    • Hosts: copenhagen and aarhus
    • Primary database: SALES_COPENHAGEN running on copenhagen

Preparations

You should do these preparations in advance of your maintenance window. They don’t interupt operations on your databases.

  • I download the patches using AutoUpgrade.

    • I can download the patches from any computer. It doesn’t have to be one of the database hosts, which typically don’t have internet access.
  • I create a new Oracle home on all hosts.

    • Create a config file called sales.cfg:
      global.global_log_dir=/home/oracle/autoupgrade-patching/sales
      patch1.source_home=/u01/app/oracle/product/19.3.0.0/dbhome_1
      patch1.target_home=/u01/app/oracle/product/19/dbhome_19_26_0
      patch1.sid=SALES
      patch1.folder=/home/oracle/autoupgrade-patching/patch
      patch1.patch=RECOMMENDED,MRP
      patch1.download=no
      
      • Start AutoUpgrade in create_home mode:
      java -jar autoupgrade.jar -config sales.cfg -patch -mode create_home
      
      • AutoUpgrade also runs root.sh if oracle user has sudo privileges. Else, I must manually execute root.sh.
  • Optionally, but recommended, I run an analysis on the primary database:

    [oracle@copenhagen] java -jar autoupgrade.jar -config sales.cfg -patch -mode analyze
    
    • Check the findings in the summary report.

Patching

Proceed with the following when your maintenance window starts.

  • I connect to the primary database using Data Guard broker and disable redo transport from the primary database:

    DGMGRL> edit database sales_copenhagen set state='TRANSPORT-OFF';
    
  • I update listener.ora on both hosts (see appendix). I change the ORACLE_HOME parameter in the static listener entry (suffixed _DGMGRL) so it matches my target Oracle home.

  • I reload the listener on both hosts:

    lsnrctl reload
    
  • Downtime starts!

    • Perform draining in advance according to your practices.
    • Shut down your application.
  • Patch the primary database:

    [oracle@copenhagen] java -jar autoupgrade.jar -config sales.cfg -patch -mode deploy
    
  • Simultaneously, I patch the standby database:

    [oracle@aarhus] java -jar autoupgrade.jar -config sales.cfg -mode deploy
    
  • I update my profile and scripts so they point to the target Oracle home.

  • When patching completes in both hosts, I re-enable redo transport:

    DGMGRL> edit database sales_copenhagen set state='TRANSPORT-ON';
    
  • Verify the Data Guard configuration and ensure the standby database is receiving and applying redo:

    DGMGRL> show database SALES_COPENHAGEN;
    DGMGRL> show database SALES_AARHUS;
    DGMGRL> validate database SALES_COPENHAGEN;
    DGMGRL> validate database SALES_AARHUS;
    

That’s it.

Happy Patching!

Appendix

Static Listener Entry

In this blog post, I update the static listener entries required by Data Guard broker (suffixed DGMGRL). My demo environment doesn’t use Oracle Restart or Oracle Grid Infrastructure, so this entry is mandatory.

If you use Oracle Restart or Oracle Grid Infrastructure, such entry is no longer needed.

Further Reading

Other Blog Posts in the Series

How To Patch Oracle Data Guard Using AutoUpgrade And Standby-First Patch Apply With Restart

Let me show you how I patch my Oracle Data Guard configuration. I make it as easy as possible using Oracle AutoUpgrade. I reduce the interuption by doing standby-first patch apply with a primary database restart.

  • My Data Guard configuration consists of two databases:
    • SID: SALES
    • Databases: SALES_COPENHAGEN and SALES_AARHUS
    • Hosts: copenhagen and aarhus
    • Primary database: SALES_COPENHAGEN running on copenhagen

Preparations

You should do these preparations in advance of your maintenance window. They don’t interupt operations on your databases.

  • I download the patches using AutoUpgrade.

    • I can download the patches from any computer. It doesn’t have to be one of the database hosts, which typically don’t have internet access.
  • I verify all patches are standby-first installable and my configuration meets the requirements for standby-first patch apply.

  • I create a new Oracle home on all hosts.

    • Create a config file called sales.cfg:
      global.global_log_dir=/home/oracle/autoupgrade-patching/sales
      patch1.source_home=/u01/app/oracle/product/19.3.0.0/dbhome_1
      patch1.target_home=/u01/app/oracle/product/19/dbhome_19_26_0
      patch1.sid=SALES
      patch1.folder=/home/oracle/autoupgrade-patching/patch
      patch1.patch=RECOMMENDED,MRP
      patch1.download=no
      
      • Start AutoUpgrade in create_home mode:
      java -jar autoupgrade.jar -config sales.cfg -patch -mode create_home
      
      • AutoUpgrade also runs root.sh if oracle user has sudo privileges. Else, I must manually execute root.sh.
  • Optionally, but recommended, I run an analysis on the primary database:

    [oracle@copenhagen] java -jar autoupgrade.jar -config sales.cfg -patch -mode analyze
    
    • Check the findings in the summary report.

Patching

Proceed with the following when your maintenance window starts.

  • Update listener.ora on the standby host (see appendix). I change the ORACLE_HOME parameter in the static listener entry (suffixed _DGMGRL) so it matches my target Oracle home.

  • I reload the listener:

    [oracle@aarhus] lsnrctl reload
    
  • Patch the standby database:

    [oracle@aarhus] java -jar autoupgrade.jar -config sales.cfg -mode deploy
    
    • I don’t disable redo transport/apply.
  • Optionally, test the application of patches using a snapshot standby database.

  • Downtime starts!

    • Perform draining in advance according to your practices.
    • Shut down your application.
  • Update listener.ora on the primary host (see appendix). I change the ORACLE_HOME parameter in the static listener entry (suffixed _DGMGRL) so it matches my target Oracle home.

  • I reload the listener:

    [oracle@copenhagen] lsnrctl reload
    
  • Patch the primary database (see appendix):

    [oracle@copenhagen] java -jar autoupgrade.jar -config sales.cfg -patch -mode deploy
    
    • I use the sales.cfg config file.
    • AutoUpgrade detects it’s running against the primary database, and executes Datapatch and all the post-upgrade tasks.
  • Verify the Data Guard configuration and ensure the standby database is receiving and applying redo:

    DGMGRL> show database SALES_COPENHAGEN;
    DGMGRL> show database SALES_AARHUS;
    DGMGRL> validate database SALES_COPENHAGEN;
    DGMGRL> validate database SALES_AARHUS;
    

That’s it.

Happy Patching!

Appendix

Static Listener Entry

In this blog post, I update the static listener entries required by Data Guard broker (suffixed DGMGRL). My demo environment doesn’t use Oracle Restart or Oracle Grid Infrastructure, so this entry is mandatory.

If you use Oracle Restart or Oracle Grid Infrastructure, such entry is no longer needed.

Further Reading

Other Blog Posts in the Series

AutoUpgrade New Features: Extended Platform Support

From the inception of Oracle AutoUpgrade, our clear ambition has been to support all platforms where you can run Oracle Database.

We still work with this ambition in mind, and the latest version of AutoUpgrade lifts additional platform restrictions. Now, you can enjoy AutoUpgrade’s true awesomeness on even more platforms.

Old computer

Photo by Museums Victoria on Unsplash

Patching

You can now use one-button patching on the following platforms:

  • Linux x86-64
  • LINUX ARM
  • Microsoft Windows x64
  • Oracle Solaris on SPARC
  • Oracle Solaris on x86-64
  • IBM AIX on POWER Systems

How to Patch a Database

  1. Ensure that you have the latest version of AutoUpgrade:
    wget https://download.oracle.com/otn-pub/otn_software/autoupgrade.jar
    
  2. Patch your database using the instructions from my previous blog post or our webinar.

How to Download Patches for Other Platforms

You can also use AutoUpgrade to just download patches from My Oracle Support and you can download for multiple platforms.

  1. Ensure that you have the latest version of AutoUpgrade:

    wget https://download.oracle.com/otn-pub/otn_software/autoupgrade.jar
    
  2. Create a config file. Note there are two prefixes – one for Linux and one for Windows.

    global.global_log_dir=/home/oracle/autoupgrade-patching/log
    global.keystore=/home/oracle/autoupgrade-patching/keystore
    
    patch1.folder=/home/oracle/autoupgrade-patching/patch
    patch1.patch=RECOMMENDED
    patch1.target_version=19
    patch1.platform=LINUX.X64
    
    patch2.folder=/home/oracle/autoupgrade-patching/patch
    patch2.patch=RECOMMENDED
    patch2.target_version=19
    patch2.platform=WINDOWS.X64
    
  3. Download the latest Release Update and other recommended patches for Linux and Windows:

    java -jar autoupgrade.jar -config download.cfg -patch -mode download
    

You can tweak it even further:

  • Download for additional platforms by adding more prefixes. Check the documentation for supported platform names.
  • Download one-off patches or other patches by adding them to the patch parameter.

Some useful information:

  • If you omit platform it defaults to your current platform. If AutoUpgrade doesn’t support your current platform (like when you run AutoUpgrade on a Mac), it defaults to LINUX.X64.
  • Rodrigo Jorge from my team has a good blog post showing how to use download mode.

Windows

AutoUpgrade has supported upgrading on Windows right since the beginning – with the exception of Oracle RAC. But now, this restriction is lifted, so you can upgrade your Oracle RAC as well.

For patching, AutoUpgrade also supports Oracle RAC on Windows. But for now, it doesn’t perform rolling patching (nor does it do so on any platform). You still need opatchauto for that.

Instead, AutoUpgrade performs an all-node patching. It brings down all nodes at once, which means database downtime.

Linux 9

The latest release also includes a few bugs related to Oracle Linux 9. You should be able to use AutoUpgrade on this platform without problems.

Happy patching

AutoUpgrade New Features: List All Checks

Oracle AutoUpgrade was made to make upgrading and patching easier. When doing so, there is a risk that we hide too much information and turn AutoUpgrade into a black box.

It has always been the intention that AutoUpgrade is fully transparent and enables you to see exactly what’s going on.

This new feature increases transparency by allowing you to get a list of all the checks that are performed before and after upgrading or patching.

How Does It Work?

  1. Ensure that you have the latest version of AutoUpgrade:
    wget https://download.oracle.com/otn-pub/otn_software/autoupgrade.jar
    
  2. Start AutoUpgrade and list all checks. Pipe the output into a file for easier reading:
    java -jar autoupgrade.jar -listchecks > autoupgrade_checks.txt
    
  3. You can shorten the output to just one of the checks:
    java -jar autoupgrade.jar -listchecks ORACLE_RESERVED_USERS
    

Here’s the output from one of the checks:

Check : ORACLE_RESERVED_USERS
        Description : Oracle occasionally adds new internal USERs and ROLEs as the database evolves. To avoid a name conflict in the upgraded version, a source database must not contain any USER or ROLE with a name that matches one reserved by Oracle in the target release.
        Fixup Action : You must drop the following USERs or ROLEs from the database: {1}
        Severity : ERROR
        Fixup Stage : PRE
        Min Version(inclusive) Check applies : NONE
        Max Version(exclusive) Check applies : NONE
        Check Introduced Version : NONE
        Check Removed Version : NONE
        Manual Fixup or Automatic : MANUAL
        AutoUpgrade Only : NO
        Run for Datapatch : NO
  • Severity may take one of the following values: INFO, WARNING, RECOMMEND, ERROR.
  • Fixup Stage tells you when AutoUpgrade executes the check: PRE (before), POST (after)
  • If Manual Fixup or Automatic is AUTO it means AutoUpgrade will fix any issues for you during fixups or deploy mode. Otherwise, it is something that the user must fix. Depending on the severity a fix is mandatory.
  • If AutoUpgrade also executes the check during patching, then Run for Datapatch is set to YES.

How Can I Use the Information?

First, this feature adds transparency. We don’t want AutoUpgrade to become a black box.

Second, it allows you to correlate the information with your own runbook. Perhaps you are performing some of the same checks and that’s an opportunity to trim your runbook. I have seen this countless times when I talk to customers. Their runbook has evolved over many years and often contain checks that are no longer needed or executed by AutoUpgrade.

Final Words

At the time of writing, there are more than 200 checks in AutoUpgrade:

java -jar autoupgrade.jar -listchecks | grep "Check : " | wc -l

201

Happy upgrading!

Further Reading

How To Roll Back After Patching

Here’s a question I received from a customer:

I’ve patched my database to 19.25 using AutoUpgrade and out-of-place patching. How do I roll back, if needed?

Basically, a rollback is the same as patching the database. You just do it the other way around – from the higher to the lower Oracle home. But let’s look at the details.

AutoUpgrade

I’m glad to hear that the customer uses AutoUpgrade for patching. It’s my recommended method, and it has many benefits.

If you use AutoUpgrade to patch your Oracle Database, you can also use it to roll back, but only before going live:

java -jar autoupgrade.jar -restore -jobs <n>
  • n is the job ID of the patching job.
  • AutoUpgrade undoes everything it did.

AutoUpgrade relies on Flashback Database as its rollback mechanism. So, it’s no good if users have already connected to the database and added/changed data.

Allow me to repeat: Only use AutoUpgrade to roll back before go-live!

After go-live, you must roll back manually.

Manually

You can manually roll back at any time – even after go-live.

Imagine you want to roll back from 19.25 (the new Oracle home) to 19.24 (the old Oracle home). Here’s how to do it.

  • You start by setting the environment.
    export OLD_ORACLE_HOME=/u01/app/oracle/product/dbhome_19_24
    export NEW_ORACLE_HOME=/u01/app/oracle/product/dbhome_19_25
    export ORACLE_HOME=$NEW_ORACLE_HOME
    export PATH=$ORACLE_HOME/bin:$PATH
    
  • Optionally, you run Datapatch sanity check in the new Oracle home (thanks Erik for pointing that out).
    $ORACLE_HOME/OPatch/datapatch -sanity_checks
    
  • You shut down the database running in the new Oracle home.
    sqlplus / as sysdba<<EOF
       shutdown immediate
    EOF
    
  • You move the following files back to the old Oracle home:
    • PFile
    • SPFile
    • Password file
    • Network files (like tnsnames.ora and sqlnet.ora)
    • Some of the files might not be present at all or be placed outside the Oracle home
    • Check this blog post for other files that might be stored in the Oracle home
    mv $NEW_ORACLE_HOME/dbs/init$ORACLE_SID.ora $OLD_ORACLE_HOME/dbs
    mv $NEW_ORACLE_HOME/dbs/spfile$ORACLE_SID.ora $OLD_ORACLE_HOME/dbs
    mv $NEW_ORACLE_HOME/dbs/orapw$ORACLE_SID $OLD_ORACLE_HOME/dbs
    mv $NEW_ORACLE_HOME/network/admin/sqlnet.ora $OLD_ORACLE_HOME/network/admin
    mv $NEW_ORACLE_HOME/network/admin/tnsnames.ora $OLD_ORACLE_HOME/network/admin
    
  • Update /etc/oratab and set the Oracle home to the old one.
  • Update your profile scripts to reflect the old Oracle home. It could be .bashrc.
  • Start the database in the old Oracle home.
    export ORACLE_HOME=$OLD_ORACLE_HOME
    export PATH=$ORACLE_HOME/bin:$PATH
    sqlplus / as sysdba<<EOF
       startup
    EOF
    
  • Run Datapatch.
    $ORACLE_HOME/OPatch/datapatch
    
  • Finally, you fix internal directories that point to paths inside the Oracle home:
    @?/rdbms/admin/utlfixdirs.sql
    

Datapatch

When you roll back, you must execute Datapatch. It will automatically detect that you are rolling back and perform the necessary actions.

For each patch there is an apply script that brings changes into the database. Datapatch executes the apply script during patching.

For each apply script, there is always a rollback script. It will reverse the actions of the apply script. Datapatch executes the rollback script when you roll back.

You can learn much more about Datapatch in this video.

Normally, you would roll back to the Oracle home from where you came, but that’s not a requirement. This scenario is fully supported:

  • Patch from 19.23 to 19.25
  • Roll back to 19.24

How To Practice?

We have a hands-on lab in which you can try rollbacks – using AutoUpgrade and manually.

Patch Me If You Can

The lab runs in Oracle Live Labs.

  • It’s completely free
  • It runs in just a browser

Happy patching!

Further Reading

Grid Infrastructure 19c Out-Of-Place Patching Fails on AIX

I’m a strong advocate for out-of-place patching, and I can see that many of my blog readers are interested in that topic as well. Thank you for that!

But a reader notified me about a specific issue that occurs during out-of-place patching of Oracle Grid Infrastructure 19c. The issue occurs when using OPatchAuto as well as SwitchGridHome.

Normally, I recommend creating a new Oracle home using the base release (so 19.3.0) and then applying the latest Release Update on top:

# Unzipping base release, 19.3.0
unzip -oq /u01/software/LINUX.X64_193000_grid_home.zip
# Install and patch Oracle home
./gridSetup.sh -ignorePrereq -waitforcompletion -silent \
   -applyRU ...

However, that fails on AIX:

Preparing the home to patch...
Applying the patch /u01/software/36916690/36916690/36917416...
OPatch command failed while applying the patch. For details look at the logs 
from /u01/app/19.25.0/grid/cfgtoollogs/opatchauto/.

The log file has a little more detail:

DeleteAction : Destination File ''/u01/app/19.25.0/grid/perl/bin/perl'' is not writeable.
Copy Action: Destination File ''/u01/app/19.25.0/grid/perl/bin/perl'' is not writeable.

The Solution

There is already a MOS note that describes a potential workaround:

Out of place (OOP) patching of 19c Release Update (RU) fails on AIX (Doc ID 2948468.1)

But the reader leaving the comment asked for a few more words.

My Words

First, you should continue to use out-of-place patching despite the above issue.

Second, instead of using the base release (19.3.0) as the basis for any new Oracle home, you must create a new base release. One that doesn’t contain the error that leads to the above issue.

  1. On a non-prod system, create a brand-new Grid Infrastructure installation using the base release (19.3.0).
  2. Use in-place patching to patch it to the latest Release Update (currently 19.25.0). You need to add a few parameters to the opatchauto command:
    <path_to_temp_home>/OPatch/opatchauto \
       apply <path-to-patch> \
       -binary \
       -oh <path_to_temp_home> \
       -target_type cluster
    
  3. Create a gold image of this 19.25.0 Oracle home.
    export NEW_GRID_HOME=/u01/app/19.25.0/grid
    $NEW_GRID_HOME/gridSetup.sh -createGoldImage \
       -destinationLocation $GOLDIMAGEDIR \
       -name gi_gold_image.zip \
       -silent
    
  4. You now have a new base release. It is almost as pristine as the 19.3.0 base release. It just contains the additional Release Update (19.3.0 + 19.25.0).
  5. When you need to patch another system, use out-of-place patching using SwitchGridHome. But instead of using the base release 19.3.0, you use your new gold image that is already patched to 19.25.0.
    #Don't do this
    #unzip -oq /u01/software/LINUX.X64_193000_grid_home.zip
    #Do this
    unzip -oq /u01/software/gi_gold_image.zip
    
  6. When you install the using gridSetup.sh you don’t have to apply the Release Update because the gold image contains it already. You can still apply any one-offs you need.
    ./gridSetup.sh -ignorePrereq -waitforcompletion -silent \
       -applyOneOffs <path_to_one_offs> \
       ...
    
  • There are no other changes to the procedure.

The issue is fixed in bug 34962446. However, I doesn’t seem to be available in 19c, so you have to repeat the above process for every Release Update.

If you still run into patching the Perl component, take a look at this MOS note:

Final Words

  • Is it a viable workaround? Yes, I believe so. There’s a little more work to, on the other hard, you’ve now started to use gold images, which is a huge advantage.

  • If you continue patching in-place or out-of-place using OPatchAuto, be sure to clean up the Oracle home from time to time.

  • The issue occurs starting with Release Update 19.18 because that’s where Oracle started to add patches to Perl in the Oracle home.

  • Thanks to Axel Dellin for helping me with some details.

You should not let this little bump on the road prevent you from using out-of-place patching.

Happy Patching

AutoUpgrade New Features: Upgrade RMAN Catalog Schema

With the latest version, 24.8, AutoUpgrade can upgrade the RMAN catalog schema after patching and upgrading. This is useful to those who take RMAN backups and duplicate their RMAN metadata to a catalog database.

If you don’t upgrade the catalog schema after patching and upgrading, you’ll see this message in the RMAN output:

PL/SQL package RCO.DBMS_RCVCAT version 19.24.00.00. in RCVCAT database is not current
PL/SQL package RCO.DBMS_RCVMAN version 19.24.00.00 in RCVCAT database is not current

Details

  • After patching or upgrading, AutoUpgrade upgrades the RMAN catalog schema in the postupgrade stage.
  • AutoUpgrade connects with RMAN to the recovery catalog and issues the upgrade catalog command.
  • AutoUpgrade does not execute dbmsrmansys.sql. Normally, this is only needed for the upgrade of the first catalog schema of a given release (like for the first database on Oracle Database 23ai), and even then, it might not be needed.

How To

  • Specify the connect string to the catalog database in the AutoUpgrade config file:

    <prefix>.rman_catalog_connect_string=catalogdb
    
    • catalogdb is a TNS alias to the catalog database.
  • Start AutoUpgrade to load the username and password for the recovery catalog:

    java -jar autoupgrade.jar -config ... -load_password
    
  • Switch to the password group RMAN:

    group rman
    
  • Add the username and password for a specific database:

    add <ORACLE_SID> -user <catalog_schema_name>
    
    • AutoUpgrade prompts for the password
  • Save the changes and exit the load password console.

    save
    exit
    
  • Start AutoUpgrade in deploy mode:

    java -jar autoupgrade.jar -config ... -mode deploy
    

Happy Upgrading, Happy Patching

  • You can enhance the solution using an after_action script that starts a level 1 backup after the job. The after_action script takes place after the postupgrade stage, where AutoUpgrade upgrades the catalog schema.

  • Version 24.8 of AutoUpgrade does not support this feature when you use the -patch command line option. This is coming in a later version.

Appendix

Further Reading

Invalid credentials

  • When you enter the catalog credentials into the AutoUpgrade keystore, AutoUpgrade validates the credentials. Any errors result in AutoUpgrade returning the following message:

    Invalid credentials, please try again.
    
  • To debug, run the following command:

    $ORACLE_HOME/bin/rman TARGET / rcvcat <catalog_user>@<rman_catalog_connect_string>
    
  • Check the log files in:

    <global_log_dir>/log/cfgtoollogs/upgrade/auto
    

AutoUpgrade New Features: Update Enterprise Manager Configuration

With the latest version, 24.8, AutoUpgrade can interact with Oracle Enterprise Manager:

  • Blackout the database
  • Modify target configuration

Details

  • AutoUpgrade interacts with Enterprise Manager through the command line interface, EM CLI.
  • In the DRAIN phase, AutoUpgrade creates a blackout of the target. It will also remove the blackout again after the job.
  • The blackout is named blackout_<SID>.
  • AutoUpgrade updates the target configuration in Enterprise Manager to reflect the new Oracle home if the job succeeds.
  • If you restore the job (returning to the pre-upgrade state with Flashback Database), AutoUpgrade restores the original target configuration.

How To

  • Install and configure EM CLI on the database host.

  • Persist the credentials on the database host using the autologin feature.

  • Get the latest version of AutoUpgrade:

    wget https://download.oracle.com/otn-pub/otn_software/autoupgrade.jar
    
  • Specify the path to EM CLI in the AutoUpgrade config file:

    upg1.emcli_path=/u01/app/oracle/oem
    
  • Specify the target name from Enterprise Manager:

    upg1.em_target_name=ORCL_myhost.domain.int
    

Happy Upgrading

You can use the functionality when you patch and upgrade your Oracle Database.

If you use Oracle Enterprise Manager, AutoUpgrade can handle even more tasks in your runbook.

What are the next tasks that AutoUpgrade should do for you? Leave a comment, and we’ll consider it.