We can all agree 2020 was a bad year. Let’s hope 2021 will be much better.
Over the last months I have made a lot of videos, which is really hard work. Especially since I am not a native English speaker, I often need to re-take a video several times. I saved all my bad recordings and I decided to create a bloopers video. I hope it can help you leave 2020 with a smile.
In case you are taking some time off in the coming days and you get a little bored, I suggest you head over to our YouTube channel and catch up on some tech-stuff.
This is a deprecated blog post. It is kept for reference only. Please visit the updated blog post series.
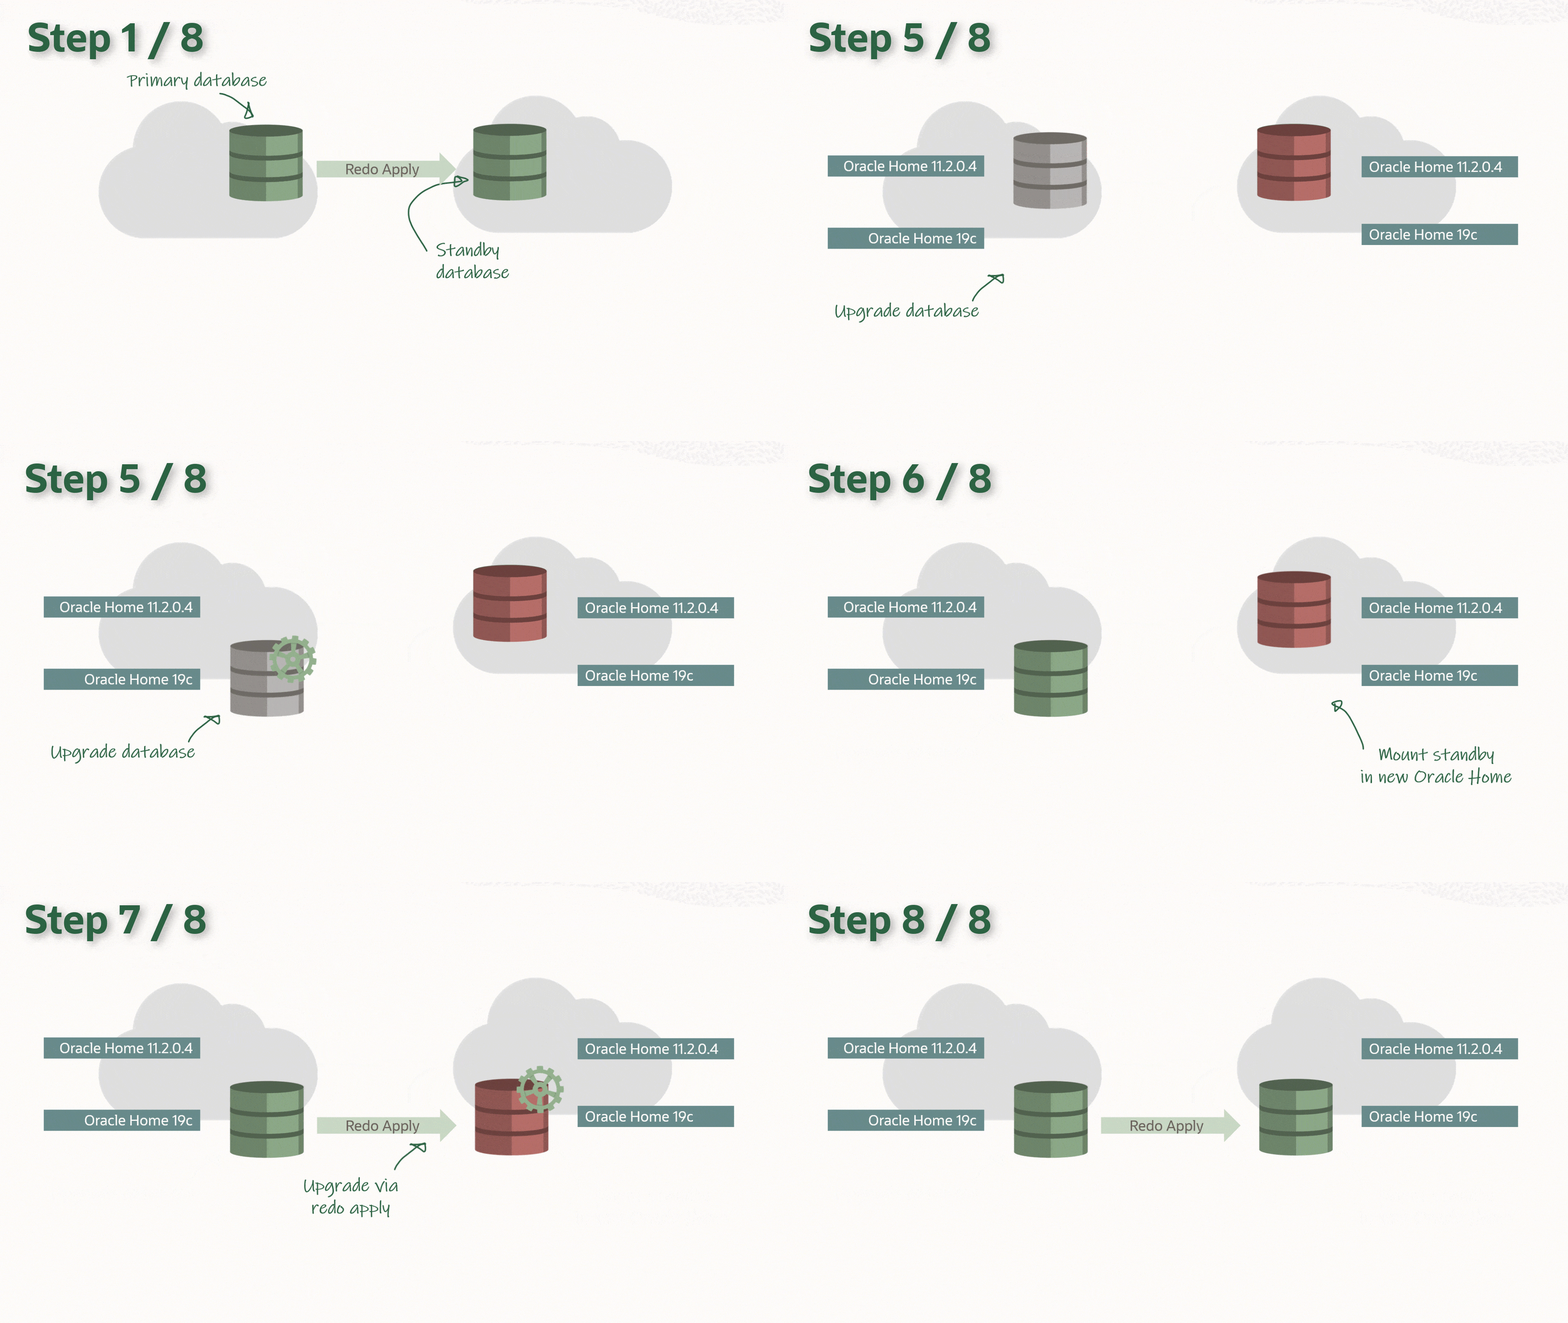
You can upgrade your database to a new release, and keep the data guard setup intact. The standby database(s) can be upgraded implicitly via the redo from the primary database, and there is no need to rebuild the standby database after upgrade.
The process:
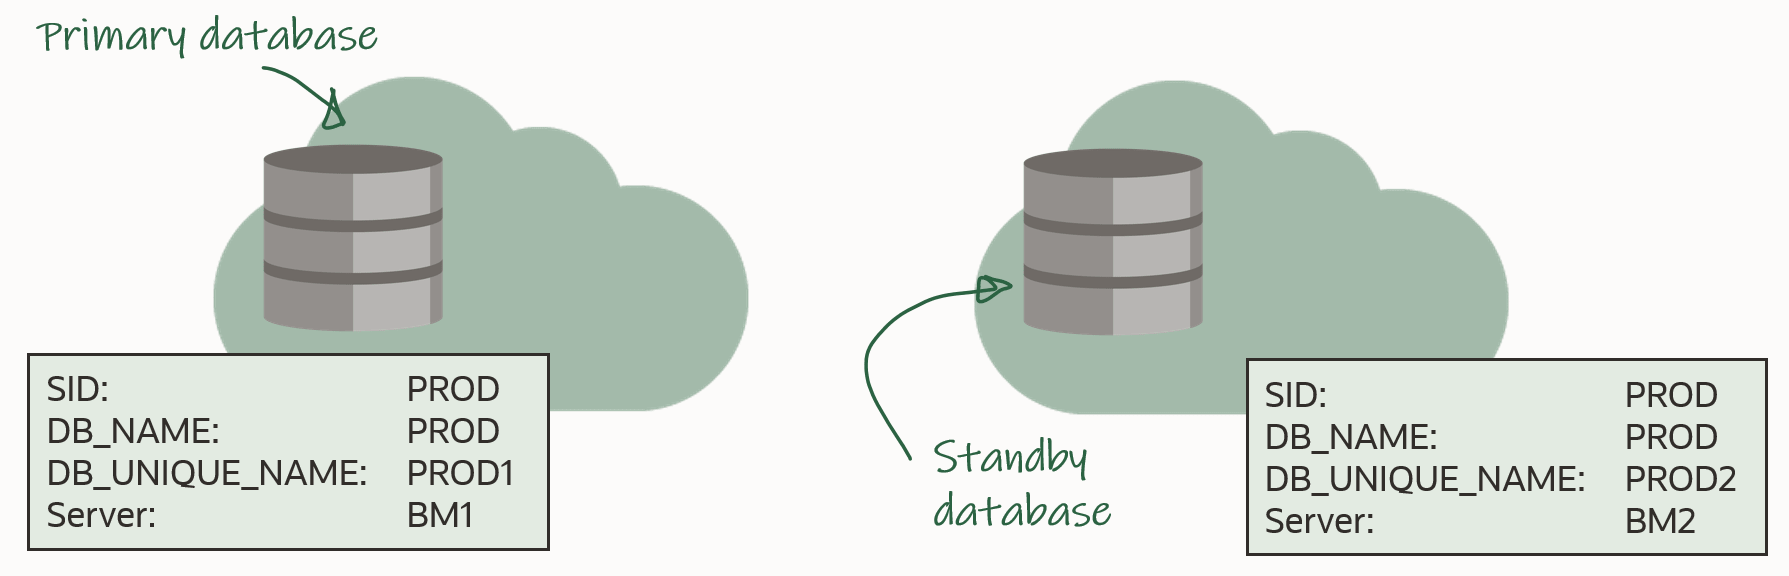
In the following I will be using this setup:
In advance, you should install the new Oracle Home on both primary and standby host. The two Oracle Homes should have the same patches applied, and I recommend that you always apply the latest Release Update.
Before Upgrade
The procedure starts right before you run the preupgrade fixups. Downtime has started and users are no logged connected to the database.
Disable Data Guard Broker
If you don’t use Data Guard Broker, you can skip this chapter and go to the chapter Stop Data Guard. Connect to the broker and disable Fast Start Failover:
DGMGRL SYS@PROD1> disable fast_start failover
Next, you disable the broker configuration:
DGMGRL SYS@PROD1> disable configuration
Then, you can shut down the broker in the primary. Make a copy of the broker configuration files. Use the below SQL to generate commands to copy the files. Remember to execute the commands generated:
PROD1 SQL> alter system set dg_broker_start=false scope=both;
PROD1 SQL> select 'host cp ' || value || ' /tmp' as cmd from v$parameter where name like 'dg_broker_config_file%';
PROD1 SQL> --Now, execute the commands
PROD1 SQL> host ls /tmp/dr*.dat
Finally, you do the same for the standby database:
PROD2 SQL> alter system set dg_broker_start=false scope=both;
PROD2 SQL> select 'host cp ' || value || ' /tmp' as cmd from v$parameter where name like 'dg_broker_config_file%';
PROD1 SQL> --Now, execute the commands
PROD2 SQL> host ls /tmp/dr*.dat
Stop Data Guard
On the primary database, defer the redo log transport to the standby database. Strictly speaking, this is not necessary, but I do it from a "better-safe-than-sorry" aspect. Be sure to verify that log_archive_dest_state_2 is the actual archive destination for your standby database:
PROD1 SQL> show parameter log_archive_dest_2
PROD1 SQL> alter system set log_archive_dest_state_2='defer' scope=both;
Next, you cancel redo apply on the standby database:
PROD2 SQL> alter database recover managed standby database cancel;
Finally, you shut down the database:
PROD2 SQL> shutdown immediate
If you are using Grid Infrastructure (GI) to manage the database, you should stop and disable the database. Disabling the database is strictly speaking not necessary, but again a "better-safe-than-sorry" approach:
Now you can upgrade the primary database using the method you prefer. Complete all the post-upgrade tasks and perform the necessary tests to validate the new database release.
If something happens during upgrade and you want to revert, you can flash back the database (or restore on Standard Edition) and simply undo the before upgrade steps (start by enabling database, starting database, starting redo apply and so forth).
Remember that the standby databases was left behind before we started touching anything, so if all other fails, simply restart the standby database, and connect your users to it.
After Upgrade
Restart Data Guard
When you are happy with the upgrade, and your tests validate the new database release, you can proceed.
Update the listener on the standby host. Be sure to update the Oracle Home information in the listener.ora entry. Note, that your listener.ora might be stored in a non-default location, so use lsnrctl status to get the location. Finally, reload the listener:
[grid@bm2]$ $GRID_HOME/bin/lsnrctl status
[grid@bm2]$ vi $GRID_HOME/network/admin/listener.ora
[grid@bm2]$ $GRID_HOME/bin/lsnrctl reload
For the next commands, I will be used the same prompt, and I will need the following environment variables:
Next, if the standby database is using TNS_ADMIN in the default location ($ORACLE_HOME/network/admin), then be sure to copy the relevant TNS aliases into the new tnsnames.ora. There should be TNS aliases to the primary and standby database. Or, if there are no other databases in the same Oracle Home, you can simply copy the files:
[oracle@bm2]$ #Back up files
[oracle@bm2]$ cp $NEW_HOME/network/admin/sqlnet.ora $NEW_HOME/network/admin/sqlnet.ora.backup
[oracle@bm2]$ cp $NEW_HOME/network/admin/tnsnames.ora $NEW_HOME/network/admin/tnsnames.ora.backup
[oracle@bm2]$ #Copy from old to new home
[oracle@bm2]$ cp $OLD_HOME/network/admin/sqlnet.ora $NEW_HOME/network/admin
[oracle@bm2]$ cp $OLD_HOME/network/admin/tnsnames.ora $NEW_HOME/network/admin
Now, you can edit /etc/oratab and update the information about the Oracle Home to match the new Oracle Home:
[oracle@bm2]$ vi /etc/oratab
Copy SPFile and password file to the new Oracle Home:
If you are using GI to manage the database, you must upgrade the database, meaning updating the Oracle Home information, so GI will start the database in the correct Oracle Home. Next, re-enable and start the database:
Or, if you are not using GI, simply start the database:
PROD2 SQL> startup mount
Re-enable Redo Log Transport and Apply
On the primary database re-enable redo log transport to standby database:
PROD1 SQL> alter system set log_archive_dest_state_2='enable' scope=both;
On the standby database restart redo apply
PROD2 SQL> alter database recover managed standby database disconnect from session;
Re-enable Data Guard Broker
First, we need to copy the broker config files into the new Oracle Home. If you store your broker config files outside of the Oracle Home this might not be necessary to you:
DGMGRL SYS@PROD1> show configuration
DGMGRL SYS@PROD1> show database prod1
DGMGRL SYS@PROD1> show database prod2
You should have SUCCESS listed for both databases
Let’s try to make a switchover:
DGMGRL SYS@PROD1> switchover to prod2
If you don’t use Data Guard Broker, you use regular SQLs and SQLPlus to verify the data guard environment.
Conclusion
It is actually not that complicated to upgrade your database, even if it is part of a data guard setup. A little extra legwork is needed to take care of the standby database. But the good thing is that your DR setup is maintained althroughout the process.
I made a video on YouTube that shows the procedure. And while you are there, I suggest that you subscribe to our channel.
Keep an eye out for coming versions of AutoUpgrade. At time of writing our developers are working on streamlining the process. We want upgrade with data guard to be 100 % automated (or as close to as possible).
Danish Oracle User Group is hosting a talk tomorrow on Upgrade
Your Databases to 19c. I will be presenting and talk about:
Oracle Database 19c is the long term release and this talk is about how to get there. The emphasis is on the AutoUpgrade tool which is the new, recommended way for upgrades. There will be demos that describe how you can get started and the options, you have. In addition, we will cover upgrade best practices and deep insights into the process.
You need to upgrade to Oracle Database 19c and this talk will prepare you.
Time: 25 November 2020 15:00 CET/Copenhagen
The session is open to anyone, so if you are interested simply go their webpage and get the connection details. There is an English version of the text a little down the page. I will give the talk in English.
If you want to have a sneak peek on the slides, there are already published.
If you need to migrate a database to the cloud or anywhere else for that matter, you should consider using cross-platform transportable tablespaces and incremental backup (XTTS). Even for really large databases – 10s or 100s of TB – you can still migrate with minimal downtime. And it works across different endian formats. In fact, for the majority of cross-endian projects this method is used.
In addition to minimal downtime, XTTS has the following benefits:
You can implicitly upgrade the database by migrating directly into a higher release
You can migrate from a non-CDB and into a PDB
You can keep downtime at a minimum by using frequent incremental backups
You can migrate across endianness – e.g. from AIX or Solaris to Oracle Linux
Endian-what?
Endianness is determined by the operating system. Simplified, it determines in which order bytes are stored in memory:
Big endian: stores the most significant byte of a word at the smallest memory address.
Little endian: stores the least-significant byte at the smallest address.
Wikipedia has an article for the interested reader.
Which platform uses which endian format? There is a query for that:
SQL> select platform_name, endian_format from v$transportable_platform;
If your source and target platform does not use the same endian format, then you need a cross-endian migration.
How Does It Work
To concept is explained in this video on our YouTube Channel:
Basically, you need to migrate two things:
Data
Metadata
Data
The data itself is stored in data files and you will be using transportable tablespaces for this. Since the source and target platform are not the same, the data files must be converted to the new format. Only the data files that make up user tablespaces are transported. The system tablespaces, like SYSTEM and SYSAUX, are not transported.
If you have a big database, it will take a lot of time to copy the data files. Often this is a problem because the downtime window is short. To overcome this you can use a combination of RMAN full backups (backup set or image copies) and incremental backups.
There are a few ways to do this which is covered in the following MOS notes:
The first two methods are using version 3 of a Perl script (xttdriver.pl), whereas the last method uses version 4 of the same Perl script. Version 4 offers a much simplified method and I will use that version for this blog post series.
Version 4 of the Perl script has a list of requirements. If your project can’t meet these requirements, check if the previous version 3 can be used.
Metadata
Transferring the data files is just part of the project. Information on what is inside the data files, the metadata, is missing because the system tablespaces were not transferred. The metadata is needed by the target database, otherwise, the data files are useless. The Transportable Tablespace concept as a whole does not work for system tablespaces, but instead we can use Data Pump.
You can use either:
Traditional transportable tablespace
Or, the newer full transportable export/import (FTEX)
For this blog post series, I am only focusing on FTEX. But if you run into problems with FTEX, or if you can’t meet any of the FTEX requirements, you should look into the traditional transportable tablespace method.
Here are a few examples of metadata that Data Pump must transfer:
Users
Privileges
Packages, procedudes and functions
Table and index defintions (the actual rows and index blocks are in the data files)
Temporary tables
Views
Synonyms
Directories
Database links
And so forth
Conclusion
By using a combination of cross-platform transportable tablespaces and incremental backups, you can migrate even huge databases to the cloud. And it even works for cross-endian migrations, like AIX or Solaris to Oracle Linux.
You can watch our YouTube playlist and watch videos on cross-platform transportable tablespaces.
Now it’s time for us to dig deeper. We’d like to offer you further insights and a deep dive from a technical point of view, starting with Data Pump and Transportable Tablespaces, then Full Transportable Export Import, and adding RMAN Incremental Backups to decrease the downtime. Best practices and real-world experience will round up this two-hour webinar.
Move to the Cloud (for techies)
Date:
Thursday 15 October 2020
Start Time:
13:00 GST – 12:00 EEST – 11:00 CEST – 10:00 BST
Duration:
120 mins
Whether you have databases in a cloud environment, or you plan to lift databases soon, this webinar is for you. We won’t cover cloud solution benefits but will show you how you can migrate your database(s) into the Oracle Cloud. We’ll start with Autonomous and also cover migration into VMs, Bare Metal, OCI, ExaCS and ExaCC. And we’ll look at minimizing downtime strategy, where ZDM can help. This two-hour webinar is not strictly for technical geeks ‒ but our focus will be on practical migration approaches.
Debut on the Big Stage
These two webinars will be my debut on the big stage. The previous webinars had a huge interest and, unfortunately, some people couldn’t join because the webinar had reached its maximum number of attendees. If you register, I recommend to join early to get your seat.
I have been presenting in person and virtually for some years now. Also, since I joined Oracle in January, I have been doing quite a few presentations. However, this is my first time for such big crowd. I am excited and look forward to it – but also a little intimidated. Luckily, I have super-star Mike Dietrich there to (virtually) hold my hand.
And, finally, I promise you: No marketing slides – just demos and details.
All over Linux you can use arrow up to get the latest command and edit it. But not in SQL*Plus! Something I used to forget many times a day…
I was recently in a presentation where the presenter had a really bad day – typing-wise, that is. He kept making typos all the time and he always ended up copying the text over in an editor, do the changes, and paste back. In the end you could really feel his frustrations (even though it was a virtual presentation). I really felt with that guy, probably because it could just as well be me. Oh, that feeling you get after typing a lengthy SQL only to find a stupid typo!!!
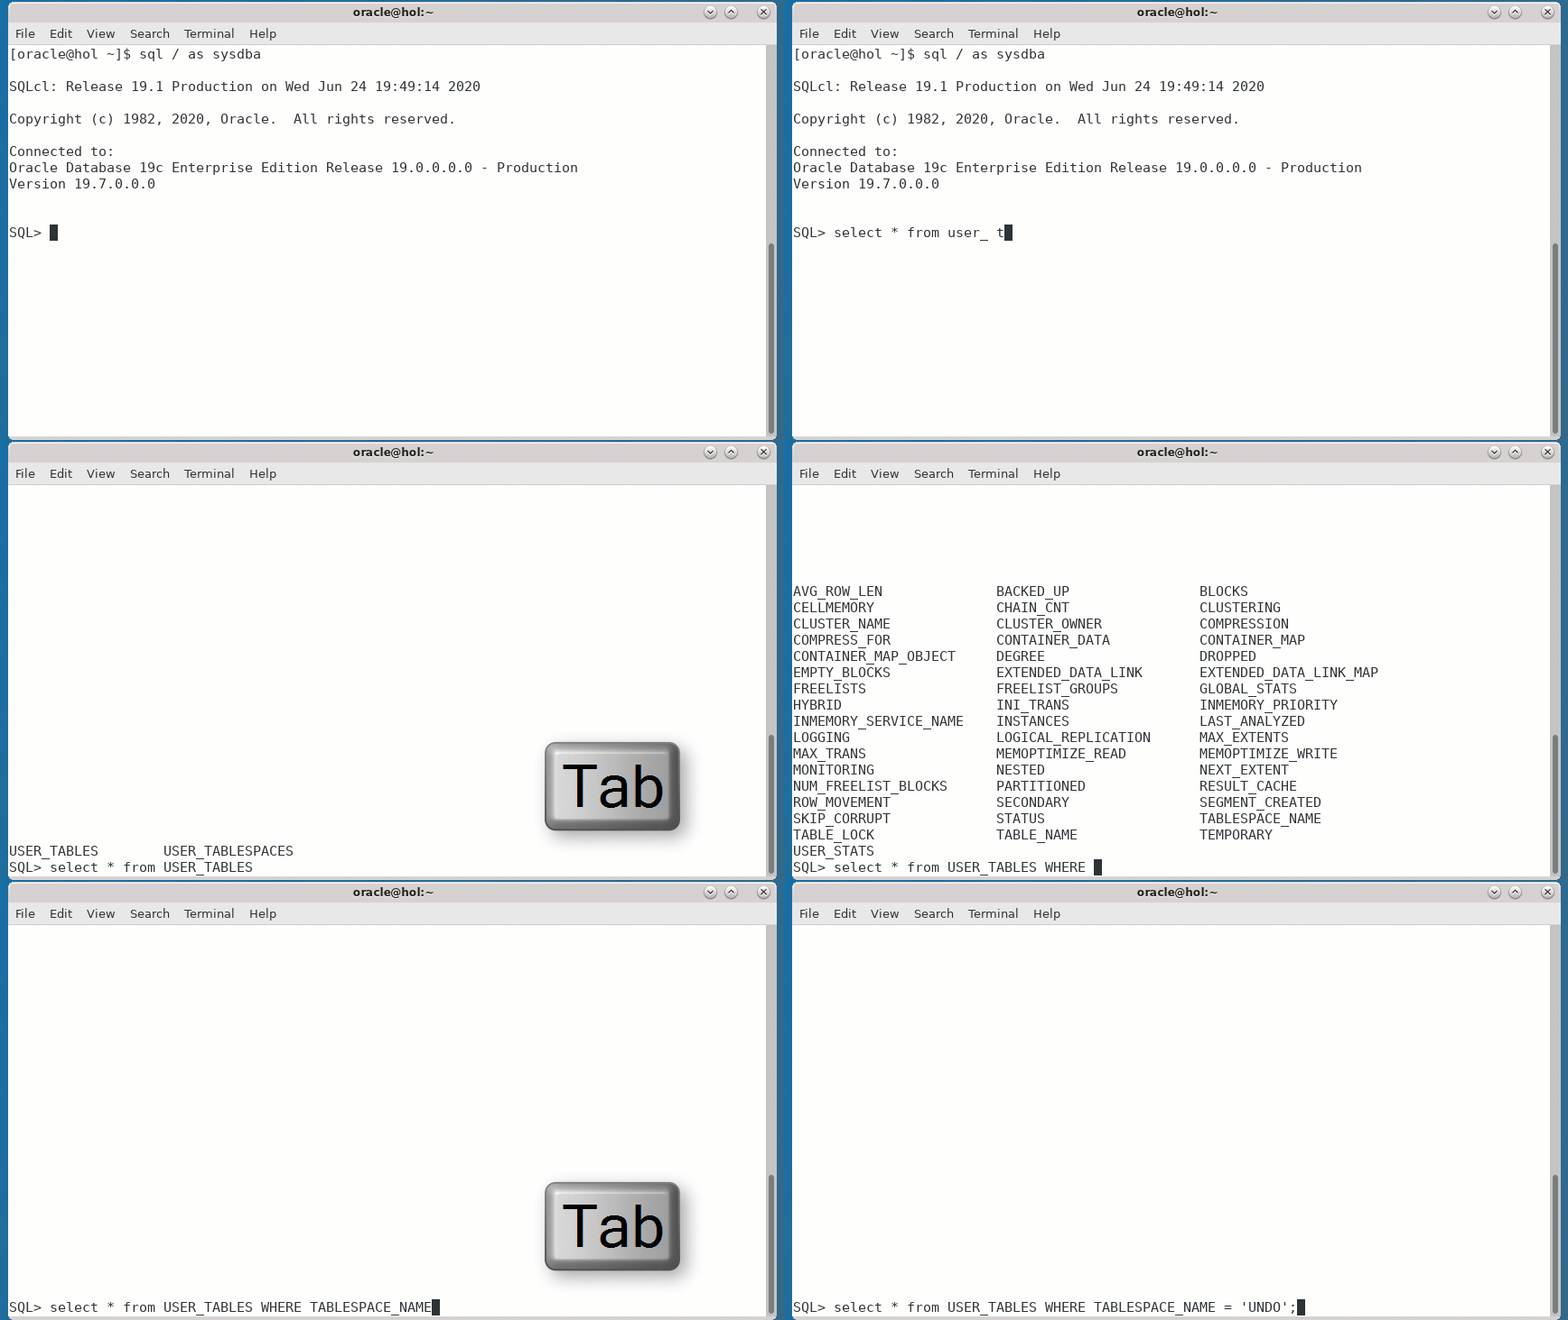
I gave up on my typing skills a long time ago and I am now happy user of SQLcl. So when I make a typo I just do this:
But I still meet a lot of people that are stuck in the last millenium aka SQL*Plus. So, the big question is:
Still not convinced? Check out this post from fellow Product Manager Jeff Smith in which he sells you SQLcl in 1 minute.
May this be the day where you did your last SQL*Plus typo!
My Aliases
For your reference here are the aliases that I used in the demo:
pdbs = select con_id, name, open_mode, restricted from v$pdbs order by con_id
sc = exec execute immediate 'alter session set container='||:one
scr = alter session set container=CDB$ROOT
ts = select p.con_id, p.name, vt.name, ct.encrypted, ct.status, ct.contents, ct.compress_for from v$tablespace vt, v$pdbs p, cdb_tablespaces ct where vt.con_id=p.con_id(+)  and vt.name = ct.tablespace_name(+) and vt.con_id = ct.con_id (+) order by vt.con_id, vt.name














 Databases Are Fun