When you upgrade your Oracle Database, you should also decide how to raise the COMPATIBLE parameter. The considerations are the same when you use Data Guard, but the procedure is different.
Why
The main reason for raising COMPATIBLE is to enable new features.
Some new features are not backward compatible, e.g., blockchain tables. When someone introduces such features, the database:
is no longer backward compatible
can no longer be downgraded
When you upgrade, COMPATIBLE stays at the old setting. You need to actively raise it and allow the use of these new features. You are in total control.
Here is a video with more details about COMPATIBLE.
When
I recommend that you raise COMPATIBLE one or two weeks after the upgrade.
When you have seen that the new release works fine in production.
When you are confident that a database downgrade won’t be needed.
Raising COMPATIBLE requires a database restart, i.e., an outage. If such is unacceptable, you must raise COMPATIBLE as part of the upgrade. But be advised, it severely limits your fallback options.
AutoUpgrade does not change COMPATIBLE, unless you explicitly state it in the config file:
I recommend that you always set COMPATIBLE to the default of a database release:
19.0.0
21.0.0
If you only have non-CDBs then it might not matter much. But in a multitenant environment, having a uniform, COMPATIBLE setting is very beneficial. This allows PDBs to move between CDBs without problems.
How
You need to raise COMPATIBLE on all databases in your Data Guard configuration. The order is important:
First, standby databases (individual order is not important)
STANDBY SQL> --Ensure redo apply is running
STANDBY SQL> alter database recover managed standby database disconnect from session;
STANDBY SQL> alter system set compatible='19.0.0' scope=spfile sid='*';
STANDBY SQL> alter database recover managed standby database cancel;

[oracle@standby]$ srvctl stop database -d $ORACLE_UNQNAME
[oracle@standby]$ srvctl start database -d $ORACLE_UNQNAME -o mount

STANDBY SQL> alter database recover managed standby database disconnect from session;
Last, primary database
PRIMARY SQL> alter system set compatible='19.0.0' scope=spfile sid='*';

[oracle@primary]$ srvctl stop database -d $ORACLE_UNQNAME
[oracle@primary]$ srvctl start database -d $ORACLE_UNQNAME
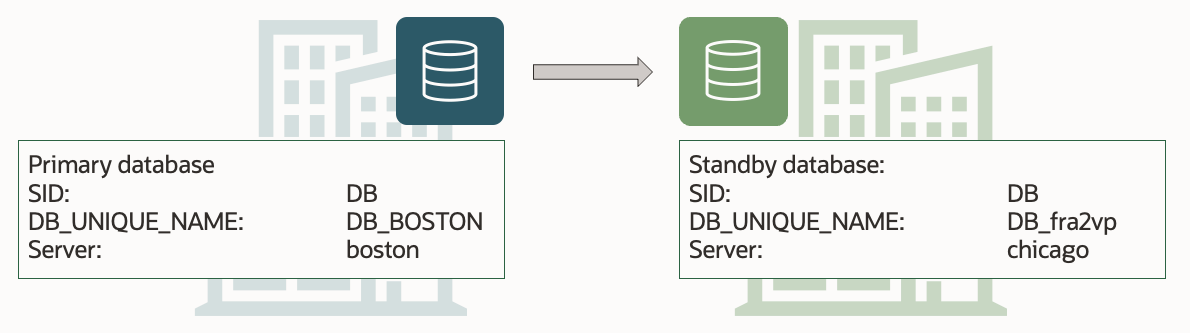
Let me show you how to upgrade your database to Oracle Database 19c when it is protected by Data Guard. I will use AutoUpgrade and follow the MAA method.
This is my demo environment:
Grid Infrastructure is managing the database.
Data Guard is configured using Data Guard broker.
Overall, the process looks like this:
This procedure starts right before I start AutoUpgrade in DEPLOY mode. Downtime has begun, and no users are connected to the database.
Before Upgrade
I always use the latest version of AutoUpgrade. Download it and put it into $ORACLE_HOME/rdbms/admin.
A newer version of AutoUpgrade can also upgrade to older database releases, so don’t worry if the AutoUpgrade version doesn’t match the Oracle Database release that you are upgrading to.
Disable Fast-Start Failover (FSFO)
Fast-Start Failover must be disabled during upgrade. I connect to Data Guard CLI (dgmgrl) and disable it:
DGMGRL> disable fast_start failover;
Restore Point
I need to protect the standby database against errors during the upgrade. I create a guaranteed restore point on the standby database:
STANDBY SQL> alter database recover managed standby database cancel;
STANDBY SQL> create restore point stdby_before_upg guarantee flashback database;
STANDBY SQL> alter database recover managed standby database disconnect from session;
Set Parameters
If I plan on making changes to the database initialization parameters as part of the upgrade of the primary database, I probably also want to make the same changes on the standby database.
I can make changes to database initialization parameters using these AutoUpgrade config file parameters:
remove_underscore_parameters
add_after_upgrade_pfile
add_during_upgrade_pfile
del_after_upgrade_pfile
del_during_upgrade_pfile
I can also review the Preupgrade Summary Report for suggested changes to the database initialization parameters.
Save the changes to the SPFile only:
STANDBY SQL> alter system set ... scope=spfile;
Restart Standby Database In New Oracle Home
The standby database must be started in the new Oracle Home; the Oracle Home I upgrade to.
Ideally, I have stored these files outside the Oracle Home; like ASM. In that case, I don’t need to do anything:
SPFile
Password file
Data Guard broker config files
Network files (sqlnet.ora, tnsnames.ora etc.)
If I stored the files inside the Oracle Home, I must move them to the new Oracle Home (see appendix).
Next, I restart the database in the new Oracle Home. I must restart in mount mode:
[oracle@standby]$ #Set environment to new Oracle Home
[oracle@standby]$ export ORACLE_HOME=/u01/app/oracle/product/19.0.0.0/dbhome_1
[oracle@standby]$ export PATH=$ORACLE_HOME/bin:$PATH
[oracle@standby]$ srvctl upgrade database -d $ORACLE_UNQNAME -oraclehome $ORACLE_HOME
[oracle@standby]$ srvctl start database -d $ORACLE_UNQNAME -o mount
I don’t need to explicitly start redo apply. My Data Guard broker configuration has APPLY-ON for the standby database. Since the broker is still enabled, it will ensure that redo apply is started.
Finally, be sure also to change my profiles and /etc/oratab (see appendix).
Upgrade
Upgrade the primary database by starting AutoUpgrade in DEPLOY mode:
As the upgrade progresses, it makes a lot of changes to the database data dictionary. Those changes are written to redo, which the standby database will apply. Thus, the upgrade happens implicitly on the standby database via the redo.
After Upgrade
Check Standby Database
Ensure that the standby database has caught up and applied all the redo generated during the upgrade.
I use Data Guard CLI (dgmgrl) to check it. First, the configuration:
DGMGRL> show database "DB_BOSTON"
DGMGRL> show database "DB_fra2vp"
Both databases should have status SUCCESS, and the standby database must report no apply lag.
If Data Guard broker reports an erroror the standby database is not applying logs, I can try to enable the configuration again:
DGMGRL> enable configuration;
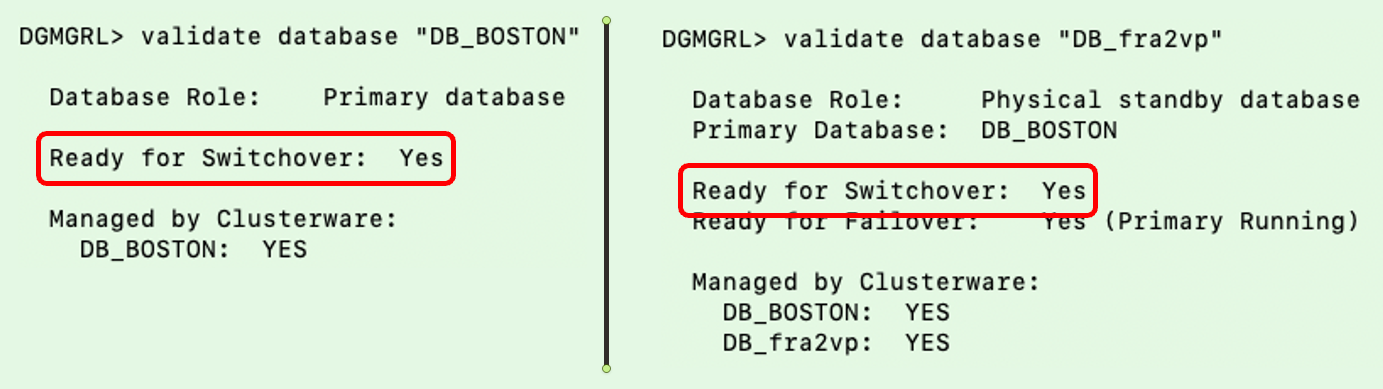
Validate Data Guard
I validate the setup and ensure both databases are ready for a switchover. The database will not allow a switchover if there are any problems in the Data Guard setup. It is a good way of checking things are fine:
If the database is licensed to use Active Data Guard, I can now open the standby database in READ ONLY mode.
Remove Restore Points
After the upgrade, I should perform the necessary tests to validate the new database release. Only when I am convinced to go live on the new release, should I remove the restore points on both databases.
Miscellaneous
Check the database registration in listener.ora. I must update the Oracle Home information if there is a static configuration.
What If
What if your Oracle Database is not managed by Grid Infrastructure?
You can still use the above procedure, but you must change the commands accordingly.
What if you don’t use Data Guard broker?
Manually configured Data Guard environments are fully supported by AutoUpgrade, but you must change some commands accordingly.
Conclusion
It is not that complicated to upgrade your database, even if it is part of a Data Guard setup. Using AutoUpgrade is fully supported and highly recommended. A little extra legwork is needed to take care of the standby database. But the good thing is that your Data Guard setup is maintained throughout the process.
Here is a query to determine the location of the Data Guard broker config files. In this example, the files are stored outside the Oracle Home; in ASM:
SQL> select name, value from v$parameter where name like 'dg_broker_config_file%';

NAME                   VALUES
---------------------- --------------------------------
dg_broker_config_file1 +DATA/DB_FRA2PR/dr1db_fra2pr.dat
dg_broker_config_file2 +DATA/DB_FRA2PR/dr2db_fra2pr.dat
Database Files
Here is a command to see where the SPFile and password file are located. In this example, the SPFile is stored outside the Oracle Home. However, the password file is in the default location inside the Oracle Home. The latter must be moved when you restart a database in the new Oracle Home:
Here is a little snippit to update /etc/oratab to match the new release Oracle Home. Since I am using Grid Infrastructure to manage my database, I don’t set the database to start automatically:
export NEW_ORACLE_HOME=/u01/app/oracle/product/19.0.0.0/dbhome_1
export ORACLE_SID=DB
#Backup file
cp /etc/oratab /tmp/oratab
#Use sed to remove the line that starts with ORACLE_SID
sed '/^'"$ORACLE_SID"':/d' /tmp/oratab > /etc/oratab
#Add new entry
echo "$ORACLE_SID:$NEW_ORACLE_HOME:N" >> /etc/oratab
Updating .bashrc
Here is a little snippit to update .bashrc replacing the old Oracle Home with the new Oracle Home:
When I run AutoUpgrade in ANALYZE mode and check the preupgrade summary report, I find this information message:
Synchronize your standby databases before database upgrade.
The standby database is not currently synchronized with its associated primary database.
To keep data in the source primary database synchronized with its associated standby databases, all standby databases must be synchronized before database upgrade. See My Oracle Support Note 2064281.1 for details.
Don’t worry about it. It tells me to ensure that all redo gets applied
What does it say? Basically, it says that all redo generated on the primary database before the downtime window started, should be sent to and applied on the standby database. This way, my standby database is ready to replace your primary database at any time, if something goes really wrong.
Strictly speaking it is not necessary to ensure that, but it is strongly recommended.
Oracle Database is capable of downgrading, and it is a cool fallback mechanism. You can use it even after go-live. Plus, Data Guard plays nicely together with downgrade. You don’t have to rebuild the standby database following a downgrade if you follow the correct procedure.
When To Use Downgrade
You should only consider downgrading after go-live. When users have made changes to your Oracle Database. In that case, you can downgrade to the previous release without any data loss. Before go-live, Flashback Database is our preferred fallback mechanism.
A comparison between the two:
Flashback Database
Downgrade
Data loss
No data loss
Use before go-live
Use after go-live
After flashback, database is identical with before-upgrade state
After downgrade, database is compatible with before-upgrade state, but not identical
Requires Enterprise Edition
Works in all editions
Preferred method
General Considerations
It is a requirement that you have not changed the COMPATIBLE parameter. As soon as you change COMPATIBLE after upgrade, you can no longer downgrade your Oracle Database. If you have already changed the COMPATIBLE parameter, you must use other fallback methods like Data Pump or RMAN restore.
The old release Oracle Home must still exist on primary and standby hosts. I recommend that you keep them until you are absolutely sure you will not downgrade your Oracle Database.
When you downgrade your database, I recommend leaving your Grid Infrastructure at the new release. Don’t downgrade Grid Infrastructure as well. Ideally, you upgraded Grid Infrastructure to the new release in advance in a previous maintenance window. Thus, you know it can handle the old release of the database. Save yourself the added complexity of also downgrading Grid Infrastructure.
Data Guard broker does not support going back to a previous version. You must disable the broker before downgrade and afterward create a new configuration or restore broker configuration files from the old release.
The following works for Data Guard configuration with a physical standby database. Other considerations and a different procedure apply if you have a logical standby database.
Downgrade
To downgrade an Oracle Database protected by Data Guard the following applies:
You can downgrade hours, days, or even months after the upgrade. As long as you haven’t changed the COMPATIBLE parameter.
You must mount the standby database and start redo apply in real-time apply mode. Keep it running during the entire process.
You must not open the standby database until the end of the process.
The downgrade happens on the primary database. A downgrade will make changes to the data dictionary. Those changes are applied on the standby via redo.
A downgrade with a standby database generally follows the same procedure as a regular database. However, at the end of each step, you must ensure that the standby database has applied all the redo generated by the primary database during that step. I usually issue a few log switches and check the current sequence (SEQUENCE#) on the primary database. Then I wait for that sequence to be applied on the standby database.
AutoUpgrade can’t perform downgrades. You need to do this manually.
In the following, $NEW_ORACLE_HOME refers to the release you were upgrading to (e.g., 19c), and $OLD_ORACLE_HOME refers to the release you upgraded from (e.g., 12.1.0.2).
Set the environment in your session to the new Oracle Home.
For RAC, set CLUSTER_DATABASE parameter:
alter system set cluster_database=false scope=spfile sid='*'
Stop the primary database:
srvctl stop database -d $ORACLE_UNQNAME
Start the primary database (if RAC, just one instance) in downgrade mode:
startup downgrade
Set the executable flag on downgrade script in the new Oracle Home:
chmod +x $ORACLE_HOME/bin/dbdowngrade
Start downgrade script on primary database. The environment is still set to the new release Oracle Home.
$ORACLE_HOME/bin/dbdowngrade
Important: Ensure that the standby database has applied all redo from the downgrade operation. Perform a few log switches and note the sequence number. Ensure the standby database has applied that sequence.
Shut down primary database and standby database (if RAC, all instances).
Downgrade the standby database in Grid Infrastructure. This tells Grid Infrastructure to start the database in the old Oracle Home (in this example, it is 12.1.0.2):
Important: Switch the environment in your session to the old Oracle Home.
Start the standby database (if RAC, all instances).
Start redo apply:
alter database recover managed standby database disconnect from session
Start primary database in upgrade mode (if RAC, only one instance):
startup upgrade
Finish the downgrade:
set echo on termout on serveroutput on timing on
spool catrelod.log
@?/rdbms/admin/catrelod.sql
Recompile:
@?/rdbms/admin/utlrp.sql
Set CLUSTER_DATABASE parameter and shut down:
alter system set cluster_database=true scope=spfile sid='*'
shutdown immediate
Downgrade the primary database in Grid Infrastructure. Grid Infrastructure will now start the database in the old Oracle Home (in this example it is 12.1.0.2):
select comp_id, status
from   dba_registry
where  status not in ('VALID', 'OPTION OFF')
Important: Ensure that the standby database has applied all redo from the downgrade operation. Perform a few log switches and note the sequence number. Ensure the standby database has applied that sequence.
Start Data Guard broker on primary and standby database
Either restore broker config files from old release, and start Data Guard broker.
Or, start Data Guard broker and recreate the configuration.
: Ensure that your Data Guard configuration works. Use validate database command in Data Guard broker on all databases and ensure they are ready for switchover.
Optionally, test your Data Guard by doing a switchover.
No specific Data Guard-related changes. The above procedure is written for a non-CDB database. The procedure is slightly different for a CDB; check the documentation or the demo below.
RAC
On the standby database, you can leave all instances running, and you don’t need to change CLUSTER_DATABASE.
Demo
Downgrade of a CDB running RAC and Data Guard environment:
When you upgrade your Oracle Database, you should also prepare for fallback. Data Guard plays nicely together with Flashback Database. You don’t have to rebuild the standby database following a Flashback Database if you follow the correct procedure.
When To Use Flashback Database
Flashback Database is easy to use, and it is our preferred fallback mechanism. However, Flashback Database also means data loss because the database is rewinded. So, Flashback Database is only useful before you go live on the new release.
A comparison between Flashback Database and downgrade.
Flashback Database
Downgrade
Data loss
No data loss
Use before go-live
Use after go-live
After flashback, database is identical with before-upgrade state
After downgrade, database is compatible with before-upgrade state, but not identical
It is a requirement that you have not changed the COMPATIBLE parameter. As soon as you change COMPATIBLE after upgrade, you can no longer use Flashback Database. If you have already changed the COMPATIBLE parameter, you must use other fallback methods like Data Pump or RMAN restore.
The old release Oracle Home must still exist on primary and standby hosts. I recommend that you keep them until you are absolutely sure you will not flashback (nor downgrade) your Oracle Database.
When you flashback your database, I recommend that you leave your Grid Infrastructure at the new release. Don’t downgrade Grid Infrastructure as well. Ideally, in a previous maintenance window, you upgraded Grid Infrastructure to the new release in advance. Thus, you know it can handle the old release of the database. Save yourself the added complexity of also downgrading Grid Infrastructure.
Data Guard broker does not support going back to a previous version. You must disable the broker during flashback and afterward create a new configuration or restore broker configuration files from the old release.
The following works for Data Guard configuration with a physical standby database. Other considerations and a different procedure apply if you have a logical standby database.
You must have a restore point on primary and all standby databases.
First, create restore points on standby database, then on primary database. The SCN of the restore points on the standby database must be lower than the SCN of the restore point on the primary database.
I recommend using guaranteed restore points when upgrading.
Don’t rely on restore point propagation. Manually create the restore points on the standby database.
The order of the operation is important: First, handle standby databases (order of standby databases is not important), then primary database.
On YouTube, we have a good introduction to using Flashback Database as fallback. You can also flip through the slides.
How To Flashback With AutoUpgrade
The following assumes:
You manually created a restore point on the standby database.
AutoUpgrade created a restore point on the primary database (default, controlled by restoration).
AutoUpgrade was configured to keep the restore point after upgrade (default, controlled by drop_grp_after_upgrade).
$NEW_ORACLE_HOME refers to the release you were upgrading to (e.g. 19c) and $OLD_ORACLE_HOME refers to the release you upgraded from (e.g. 12.1.0.2).
The procedure:
The environment in your session is set to the new Oracle Home.
Stop Data Guard broker on all databases:
alter system set dg_broker_start=false scope=both sid='*'
Stop standby database (all instances, if RAC).
Flashback primary database using AutoUpgrade. nn is the AutoUpgrade job id that executed the upgrade:
java -jar autoupgrade.jar -config ... -restore -jobs nn
AutoUpgrade handles everything on primary database, like
/etc/oratab
Grid Infrastructure downgrade
SPFile
Etc.
Start standby database in mount mode (only one instance, if RAC).
Flashback the standby database:
flashback database to restore point ...
Shut down the standby database.
Downgrade the standby database clusterware configuration. Grid Infrastructure will now start the database in the old Oracle Home (in this example it is 12.1.0.2):
Start Data Guard broker on primary and standby database
Either restore broker config files from old release and start Data Guard broker.
Or, start Data Guard broker and recreate the configuration.
: Ensure that your Data Guard configuration works. Use validate database command in Data Guard broker on all databases and ensure they are ready for switchover.
Optionally, test your Data Guard by doing a switchover.
Remember to drop the guaranteed restore points on all databases.
That’s it!
Demo
Flashback of a CDB running RAC and Data Guard environment:
You can upgrade your Oracle Database to a new release and keep the Data Guard setup intact. There is no need to rebuild a physical standby database after the upgrade.
When you upgrade the primary database, many changes go into the data dictionary. These changes are recorded in the redo stream and sent to the standby database. When the standby database applies the redo, it is implicitly upgraded.
You can do it in the same maintenance window as the database upgrade, but I recommend that you perform the GI upgrade in an earlier maintenance window. A newer version of GI can run earlier versions of Oracle Database, so you can safely upgrade GI in advance. Doing so will give you time to adapt to the new GI release.
Also, in advance, you should install the new Oracle Home on both primary and standby hosts. The two Oracle Homes must have the same patches applied, and I recommend that you always apply the latest Release Update and have a look at 555.1 for important one-offs.
How To
When upgrading with Data Guard, there are two approaches:
Before the upgrade starts on the primary database, you shut down the standby database. You keep it shut down until the upgrade has completed on the primary database and you have finished your tests. When you are sure you will stay on the new release, the standby database is restarted and synchronized with the primary database. It will take some time before you can go live because the standby database must apply all the redo generated during the upgrade.
If you need to fall back, you can use Flashback Database on the primary database. In addition, no matter what happens to the primary database, you still have the standby database immediately ready in the pre-upgrade state.
My team recommends this method. We prefer to sacrifice a little downtime to achieve even better protection.
MAA Method
The standby database is open and applies redo while the primary database is upgraded. This means that the standby database is closely following the primary database. You can go live very soon after the upgrade completes because there is little or very little apply lag.
The downside is when you must fall back. In that case, you have two databases to bring back in time with Flashback Database. In the very unlikely event that something happens during flashback on both databases, you may need to restore your backup.
The MAA team recommends this method as it guarantees the lowest downtime.
Which One To Choose?
If you have two or more standby databases, you can combine the two methods and get the best of both worlds. Otherwise, rest assured that both methods work fine and are supported.
Standby Offline
MAA
Maximum protection
Minimum downtime
Upgrade team recommendation
MAA recommendation
Redo transport deferred
Redo transport enabled
Redo apply stopped
Redo apply active
Protected by offline standby and guaranteed restore point
Protected by guaranteed restore point
AutoUpgrade default
Of course, AutoUpgrade supports both methods. You can check the other blog post in the series for detailed instructions.
If you are running Oracle Database on Exadata, you should read the dedicated procedure created by the Maximum Availability Architecture (MAA) team.
Multiple Standby Databases
Not much changes if you have many standby databases in your Data Guard configuration. The procedure is basically the same, except that you must execute commands on all the standby databases. The order of the standby databases does not matter (unless you have cascaded standby databases – see below).
Data Guard Broker
If you have configured your Data Guard setup using Data Guard broker, then you can leave it running during the upgrade. There used to be some problems with Data Guard broker during upgrade to previous releases, but it works fine when you upgrade to Oracle Database 19c.
However, you must disable Fast-Start Failover before the upgrade. After a successful upgrade, you can enable it again.
Cascaded Standby Databases
If you have cascaded standby databases, the following applies according to the documentation:
If there are cascaded standbys in your configuration, then those cascaded standbys must follow the same rules as any other standby, but should be shut down last, and restarted in the new home first.
You must treat cascaded standby databases like any other standby database. However, the order is now important. Imagine this scenario:
Primary database: BOSTON
Standby database: CHICAGO
Cascaded standby database: NEWYORK
When the procedure tells you to stop standby databases: First CHICAGO, then NEWYORK
When the procedure tells you to start standby databases: First NEWYORK, then CHICAGO
Far Sync
A far sync database should be treated like any other standby database. Like cascaded standby databases the order of the shutdown is important to ensure that all redo from primary reaches the standby database connected via the far sync.
Logical Standby
When you have logical standby databases in your Data Guard configuration, things are slightly different. In that case, look in the documentation.
I always fear the worst when I get a TNS error. It’s not my expertise. A TNS error was exactly what I got while I configured a Data Guard environment. Redo Transport didn’t work; the redo logs never made it to the standby database.
The Error
I took a look in the alert log on the primary database and found this error:
2022-05-10T08:25:28.739917+00:00
"alert_SALES2.log" 5136L, 255034C
        TCP/IP NT Protocol Adapter for Linux: Version 12.2.0.1.0 - Production
  Time: 10-MAY-2022 18:09:02
  Tracing not turned on.
  Tns error struct:
    ns main err code: 12650

TNS-12650: No common encryption or data integrity algorithm
    ns secondary err code: 0
    nt main err code: 0
    nt secondary err code: 0
    nt OS err code: 0
A little further in the alert log, I found proof that the primary database could not connect to the standby database:
2022-05-10T18:09:02.991061+00:00
Error 12650 received logging on to the standby
TT04: Attempting destination LOG_ARCHIVE_DEST_2 network reconnect (12650)
TT04: Destination LOG_ARCHIVE_DEST_2 network reconnect abandoned
2022-05-10T18:09:02.991482+00:00
Errors in file /u01/app/oracle/diag/rdbms/sales2_fra3cx/SALES2/trace/SALES2_tt04_75629.trc:
ORA-12650: No common encryption or data integrity algorithm
Error 12650 for archive log file 1 to '...'
The Investigation
As always, Google it! Although I have used DuckDuckGo for privacy reasons instead of Google for many years, I still say google it, which is fairly annoying.
The above means that any connection made to or from this database must use data integrity checks. CRYPTO_CHECKSUM_SERVER and CRYPTO_CHECKSUM_CLIENT defines that. Also, the database will only accept connections using the SHA1 algorithm.
Then I looked in sqlnet.ora on the standby database:
This database does not require data integrity checks. But if the other party requests or requires it, then the server is fine with it. That’s the meaning of ACCEPTED. But look at the allowed algorithms. When acting as server (i.e. receiving connections from someone else), it does not allow SHA1 algorithm, the only one allowed by the counterpart.
The Solution
I decided to remove all instances of SHA1 because:
Data modification attack
An unauthorized party intercepting data in transit, altering it, and retransmitting it is a data modification attack. For example, intercepting a $100 bank deposit, changing the amount to $10,000, and retransmitting the higher amount is a data modification attack.
Replay attack
Repetitively retransmitting an entire set of valid data is a replay attack, such as intercepting a $100 bank withdrawal and retransmitting it ten times, thereby receiving $1,000.
Can I do more to strengthen security in sqlnet.ora?
It’s old and has been made insecure by computer evolution. From Wikipedia:
In cryptography, SHA-1 (Secure Hash Algorithm 1) is a cryptographically broken but still widely used hash function which takes an input and produces a 160-bit (20-byte) hash value known as a message digest – typically rendered as a hexadecimal number, 40 digits long. It was designed by the United States National Security Agency, and is a U.S. Federal Information Processing Standard.
Since 2005, SHA-1 has not been considered secure against well-funded opponents; as of 2010 many organizations have recommended its replacement. NIST formally deprecated use of SHA-1 in 2011 and disallowed its use for digital signatures in 2013. As of 2020, chosen-prefix attacks against SHA-1 are practical. As such, it is recommended to remove SHA-1 from products as soon as possible and instead use SHA-2 or SHA-3. Replacing SHA-1 is urgent where it is used for digital signatures.
It is often impossible to get a full copy of the production database or a comparable test system. If you still want to test the migration procedure, you need to take the backups on the production database. That might have an impact on your production database.
You could offload the backups to a standby database but periodically must set tablespaces in read only mode to perform the Data Pump exports. This means downtime for your application.
But there is a way to do all the work on the standby database. This will allow you to test the migration procedure without affecting the primary production database.
You should use the procedure described in a previous blog post about backups on a standby database. When you reach the final incremental backups you need to follow the information below.
I assume you have conducted a level 0 and a number of incremental backups on the standby database. Now it is time for the final incremental backup. We will do this on the standby database as well. You don’t need to touch the primary database except for a few minor changes (archive current log and defer redo log transport).
Now you have a consistent backup of the data files and a corresponding Data Pump export; both components were taken from a standby database. Transfer the files to your target database and test the procedure.
Production Migration
The heading says you can use this procedure for testing. How about the production migration?
Well, it could work, but I would not recommend it.
When you use this approach, you leave the primary database open for business. At the same time, you take the final incremental backup. This opens for a potential catastrophe. Users entering data into the open, primary database while you have taken the last incremental backup. That would mean data loss!
Using the other standby database approach, you are sure that no more data is entered into the source database, when you perform the final migration. You ensure this by setting the tablespaces read only in the primary database.
This is why I do not recommend that you use the approach with an activated standby database for your production migration.
Conclusion
You should test your migration procedure and get comfortable with your runbook. You can use a temporarily activated standby database if you don’t have a dedicated test environment. This allows you to perform realistic testing without interrupting the primary database and your users.
Often when you migrate an Oracle Database using cross-platform transportable tablespace (XTTS) and incremental backups, it is a big database. Big databases must often be protected by Data Guard.
How do you ensure that Data Guard protects the target database at the end of the migration?
Build After Migration
A simple solution is to build the standby database after the migration. There are some downsides to this approach:
It takes time. In many situations, the business requires that the database can’t go live until a standby database is in place. Having to build a standby database will prolong the downtime.
It puts a load on the primary database. Right after the migration, you don’t have your backups in place yet, so you will need to build the standby databases directly from the primary database. That requires a lot of I/O and network traffic. You might want to use those resources for other activities, like taking a level 0 backup or regathering statistics.
It can become even more complicated if you migrate into multitenant architecture. Rebuilding the standby database of an already running, active CDB might not be an option. The other PDBs in the CDB are compromised while the standby is rebuilt.
Restore Data Files to Standby Host
Here is an approach that offers much less downtime. Restore the data files onto the standby host as well as part of the migration. During the Data Pump import, the plug-in propagates to the standby database via redo apply.
When migrating with XTTS and the Perl script you are familiar with running the backup on the source database (xttdriver.pl --backup). Also, you know how to restore and recover the data files on the target system (xttdriver.pl --restore).
Now, the idea is you restore and recover the data files on the primary host and also on the standby host. During the Data Pump import, the data files are plugged into the primary database. The plug-in commands are propagated to the standby database via redo apply. Then, the standby database can plug-in the data files if they are located in the same place as on the primary database. The rest of the Data Pump import will propagate as well, and in the end you will have a working Data Guard environment.
You must recover the data files on the primary and standby database to the exact same SCN. Be sure to restore all backups to both the primary and standby database.
Prepare the target database and build a standby database before starting the migration.
In xtt.properties set destconnstr to point to the target primary database.
Copy xtt.properties to the target primary host and target standby host.
On target standby host, change xtt.properties and set destconnstr to point to the target standby database.
Create the cross-platform backups on the source database using xttdriver.pl --backup in the usual way
Now copy the file res.txt to both the target primary and target standby database.
The backups in the scratch location should also be available to both the target primary and standby databases.
Now restore or recover the backups on the target primary and target standby database using xttdriver.pl --restore.
Repeat the backup/restore/recover process as many times as needed. Keep recovering the target primary and target standby database. It is very important that the data files on both the target primary and target standby database are recovered to the exact same SCN.
On the target databases the data files will be restored into ASM. The data file itself is created with an OMF file name:
The disk group is what you specified in xtt.properties in dest_datafile_location
DB_UNIQUE_NAME is not the same on the primary and standby database. It will differ.
To comply with OMF standard the database must restore the data files into a folder corresponding to the PDB it belongs to. However, currently, the data files do not belong to a PDB. We haven’t done the Data Pump import plug-in operation yet. The database will create a folder with the GUID of the source database. If you are interested, you can get the GUID from the source database using select guid from v$containers.
The last part of the OMF file name is the tablespace name, and some numbers representing the file ID and a number to ensure uniqueness. This part will differ on the primary and standby database as well.
We now know that the data file name is different on the primary and standby database. Previously, it was stated that it is important that the data files are stored in the same location and has the same name. This is a problem! But the Perl script solves that by creating ASM aliases.
The aliases will be created in the location specified by dest_datafile_location in xtt.properties. Use asmcmd to verify it. The column SYS (System-generated) is N, meaning this is not a proper OMF file. Also, we can see in the Name column that it is an alias:
ASMCMD> ls -l +DATA
Type      Redund  Striped  Time             Sys  Name
DATAFILE  UNPROT  COARSE   MAR 16 08:00:00  N    account_25.dbf => +DATA/CDB1_FRA2KR/86D5DC2587337002E0532AB2A8C0A57C/DATAFILE/ACCOUNT.282.1099469855
DATAFILE  UNPROT  COARSE   MAR 16 08:00:00  N    accountidx_26.dbf => +DATA/CDB1_FRA2KR/86D5DC2587337002E0532AB2A8C0A57C/DATAFILE/ACCOUNTIDX.280.1099469855
...
If you look at the directory where the alias is pointing to, you can see that the files are proper OMF files – real data files. Column SYS is Y, and Name does not contain the alias pointer=>:
ASMCMD> cd +DATA/CDB1_FRA2KR/86D5DC2587337002E0532AB2A8C0A57C/DATAFILE
ASMCMD> ls -l
Type      Redund  Striped  Time             Sys  Name
DATAFILE  UNPROT  COARSE   MAR 16 08:00:00  Y    ACCOUNT.282.1099469855
DATAFILE  UNPROT  COARSE   MAR 16 08:00:00  Y    ACCOUNTIDX.280.1099469855
...
Thus, the aliases are hiding the fact that the data files have different name on the target primary and target standby database.
When you prepare the parameter file for the Data Pump import, be sure to reference the aliases – not the OMF named data files. The aliases have the same name on both the target primary and target standby database:
Then start the Data Pump import. The data files are plugged into the primary database during DATABASE_EXPORT/PLUGTS_FULL/PLUGTS_BLK. When the redo containing that information is applied on the standby database, the standby database will plug in the data files as well.
When the Data Pump import completes, you can verify that the standby database survived and is still applying redo. A switch-over is also a good way of testing it.
Conclusion
You can prepare the target standby database in advance. This enables the target database to be protected by Data Guard as soon as the Data Pump import completes.
Restore and recover the data files to the target primary and target standby database. If they are recovered to the exact same SCN the plug-in of the data files propagates to the standby database via redo apply. After the Data Pump import, your target database has a fully functional standby database.
When doing a cross-platform migration with transportable tablespaces and incremental backup, is it possible to perform backups on a standby database? If so, you could offload the work from a primary database.
The short answer is yes. You can use a physical standby database but not a snapshot standby database.
Using a standby database for the backups is an advantage in some situations:
The primary database does not have the capacity to perform the extra backups (CPU, disk space, or I/O).
You want the primary database to be completely unaffected by the migration.
Perform the Data Pump export on the primary database:
[oracle@src-pri]$ expdp system ... full=y transportable=always ...
Active Data Guard
If you have a license for Active Data Guard, you can simply keep the physical standby database in OPEN WITH REDO APPLY mode. You don’t need to switch from OPEN mode to MOUNT mode.
Conclusion
Being able to perform the backups on a standby database is a huge advantage. But it makes the process slightly more complicated, so I would recommend it only if really needed. In addition, if you don’t follow the procedure strictly, you might accidentally use a feature that requires Active Data Guard.
If you want to minimize the downtime needed to upgrade your Oracle Database 19c on Exadata Cloud Service, one of the options is to use rolling upgrades. Our good friends in the Maximum Availability Architecture (MAA) team recently posted a very good MOS note with step-by-step instructions.
A rolling upgrade uses a standby database called a logical standby database.
A logical standby database is initially created as an identical copy of the primary database, but it later can be altered to have a different structure.
The logical standby database is updated by executing SQL statements. The flexibility of a logical standby database lets you upgrade Oracle Database software (patch sets and new Oracle Database releases) and perform other database maintenance in rolling fashion with almost no downtime.
With almost no downtime means the time it takes to perform a Data Guard switchover. Typically, that is a few minutes. If your application is configured properly, the downtime can be hidden from the end-user. The downtime will appear as a brown-out where the session will be waiting for the database to complete the switchover before continuing.
Other Options for Minimizing Downtime During Upgrades
If your database is not capable of performing rolling upgrades, you can still do something to minimize downtime. You can try to tune the upgrade itself or use Oracle GoldenGate. Both options are described in detail in our webinar How Low Can You Go? Zero Downtime Operations. You can flip through the slides or watch the complete recording.
If you decide to go with Oracle GoldenGate, and since your database is in OCI, you can benefit from the OCI GoldenGate service. Now, you may think: GoldenGate, that sounds expensive! But it is not.
The new OCI GoldenGate service comes at a completely new price model, which is very attractive for shorter use cases like upgrades and migrations. You don’t pay a license for the source and target CPUs but instead for usage of CPUs on the GoldenGate hub itself. And you only pay by the hour.
Conclusion
Finally, just a kudos to my colleague Sebastian Alasino for putting together a very good, easy-to-follow MOS note.
Here is a demo of rolling upgrades (not on ExaCS – but a lot is identical)