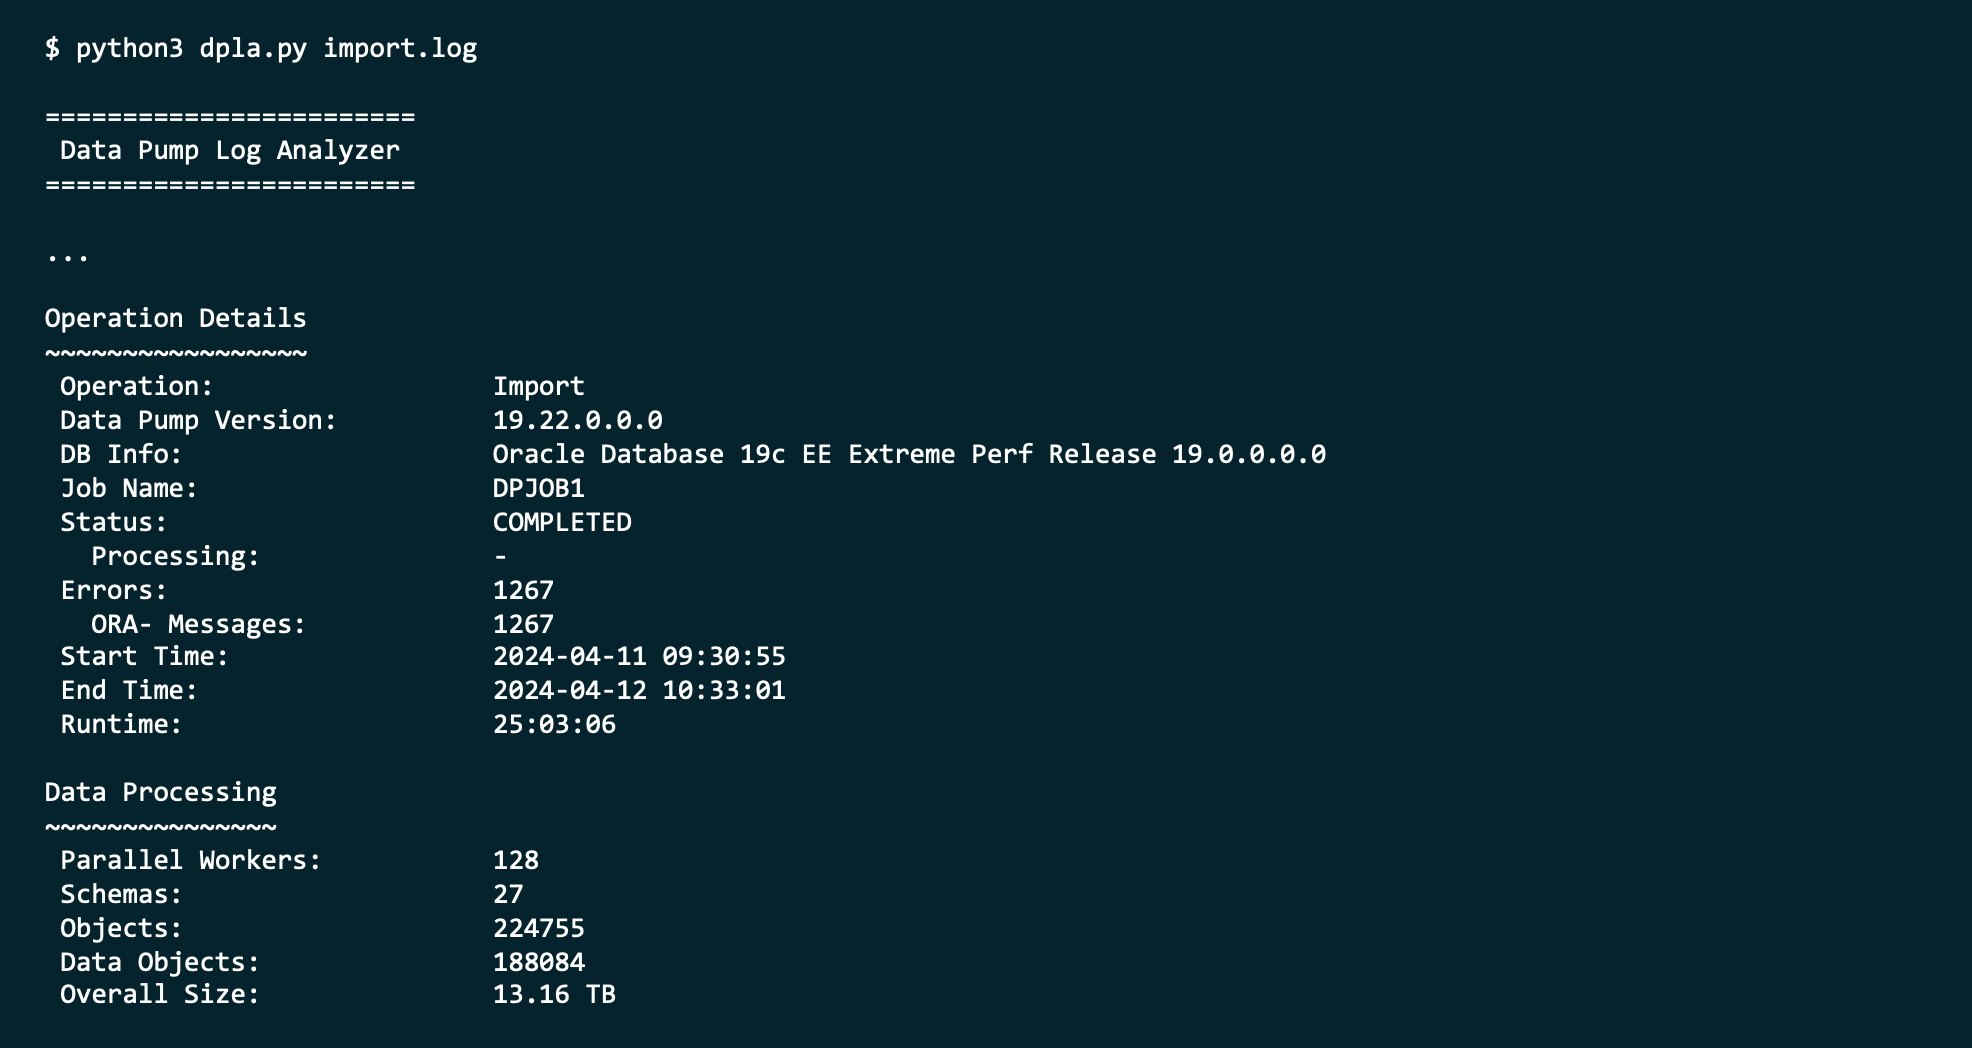
Imagine importing a large database using Oracle Data Pump. In the end, Data Pump tells you success/failure and the number of errors/warnings encountered. You decide to have a look at the log file. How big is it?
$ du -h import.log
 29M   import.log
29 MB! How many lines?
$ wc -l import.log
  189931 import.log
Almost 200.000 lines!
How on earth can you digest that information and determine whether you can safely ignore the errors/warnings recorded by Data Pump?
DPLA can summarize the log file into a simple report.
It can give you an overview of each type of error.
It can tell you where Data Pump spent the most time.
It can produce an interactive HTML report.
And so much more. It’s a valuable companion when you use Oracle Data Pump.
Tell Me More
DPLA is not an official Oracle tool.
It is a tool created by Marcus Doeringer. Marcus works for Oracle and is one of our migration superstars. He’s been involved in the biggest and most complicated migrations and knows the pain of digesting a 200.000-line log file.
He decided to create a tool to assist in the analysis of Data Pump log files. He made it available for free on his GitHub repo.
Give It a Try
Next time you have a Data Pump log file, try to use the tool. It’s easy, and instructions come with good examples.
If you like it, be sure to star his repo. ⭐
If you can make it better, I’m sure Marcus would appreciate a pull request.
In the last days of May, I had the absolute pleasure of attending the MakeIT 2024 conference. Once again, the conference was held in the beautiful seaside city of Portorož, Slovenia.
The conference is a joint venture with the JCON conference, so you can catch one or two sessions on Java as well. I really value learning about related technologies as well. This year I listened in on caching options in Java and the use of JDBC driver.
You should come next year. There is also a good selection of English speakers, so even for foreigners, there is a reason to travel.
The Slides
Workshop – Patching Oracle Database
This is a full workshop on patching Oracle Database. It includes a hands-on lab, so you can try it on your own.
You should flip through the slides if you want a deep dive on patching.
Best Practices for Upgrade to Oracle Database 23ai
This session and the slides help you prepare for the next long-term support release of Oracle Database.
Patch Me If You Can
This session and the slides give a quick fly-over of the essentials of patching.
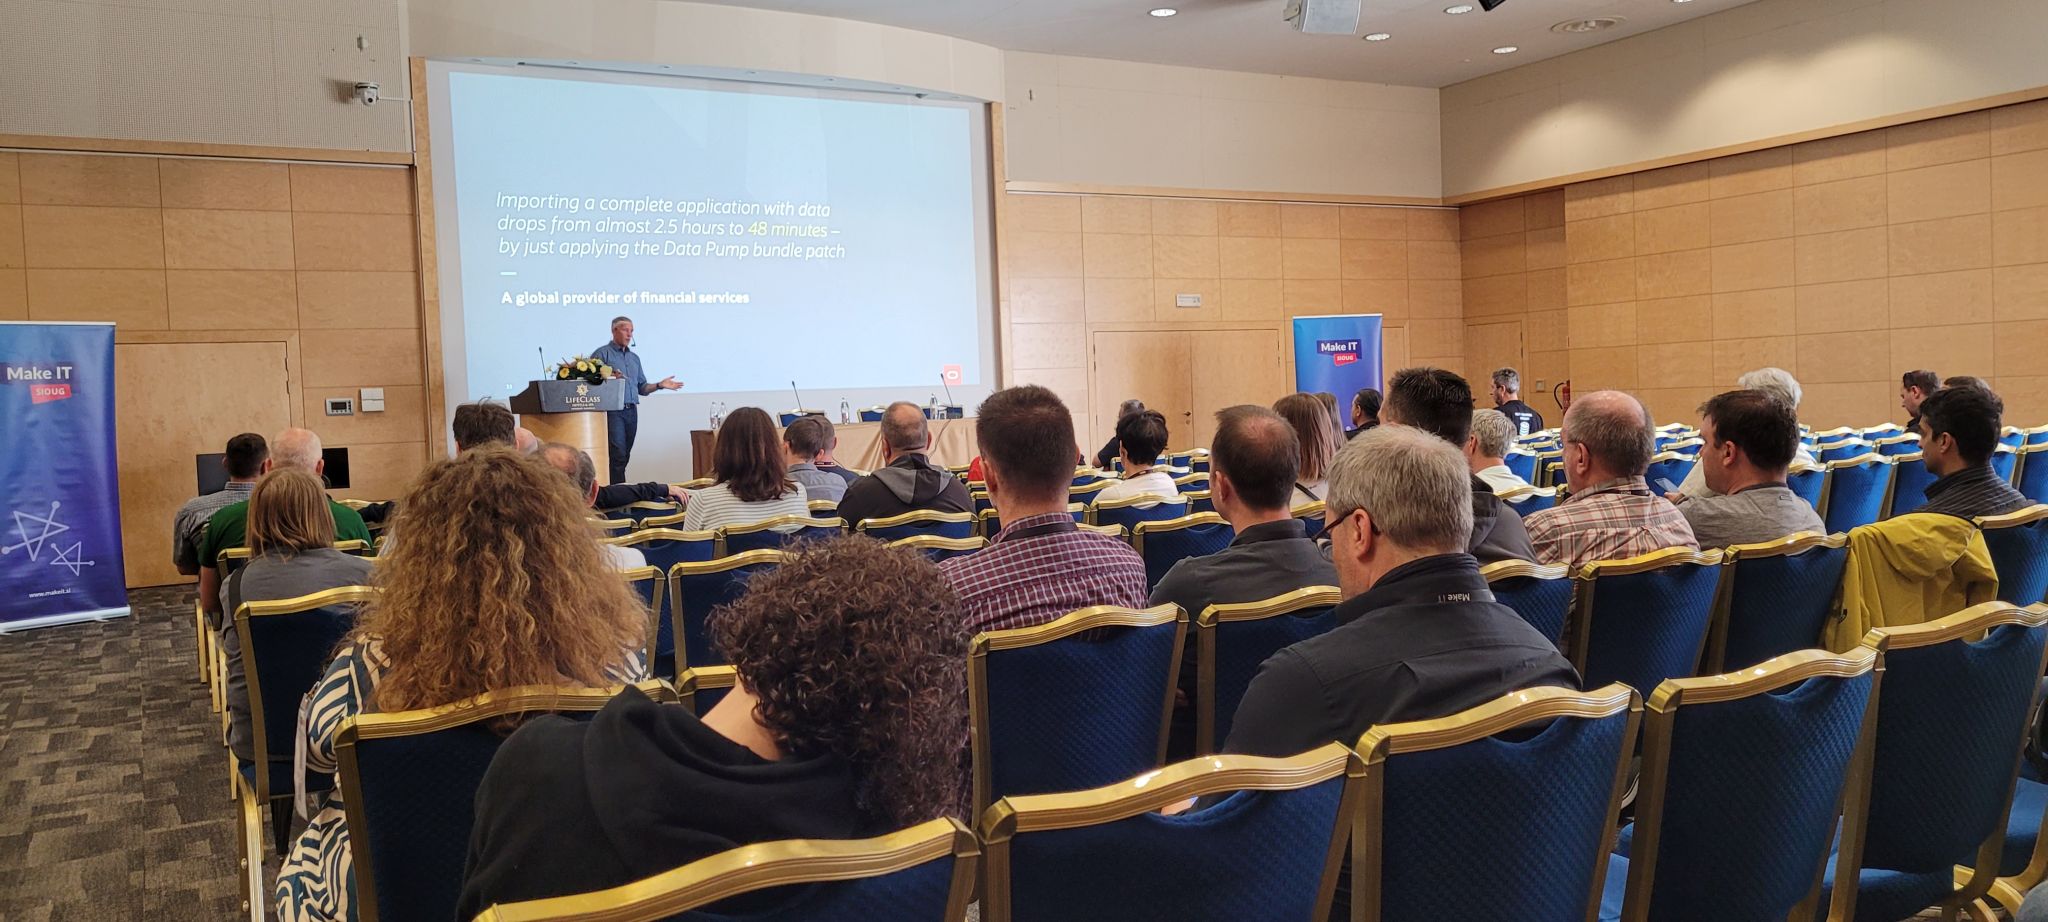
Oracle Data Pump – News, Internals, Tips and Tricks
I had the pleasure of talking about Oracle Data Pump and presenting some new features. If you’re curious about a faster way of creating indexes and adding constraints, you can flip through the slides.
Thanks
Thanks to the organizer of MakeIT 2024 for pulling off yet another successful conference, to the sponsors for making it all possible, and to everyone who attended my sessions or the conference in general.
… provides data access tracking at the segment-level and data modification tracking at the segment and row level.
In other words,
You might have slower and faster storage.
You define ADO policies on tables and indexes (including partitions and subpartitions).
The policies define in which storage the database stores the rows.
The heat maps tell which objects you access.
Based on heat maps, a job automatically moves rows between storage depending on the use and/or compress it.
What Happens in Data Pump
There are three pieces of essential information:
ADO policies. Defined on objects and governs how the database should store data.
Heat map information. The database records your usage of the data and stores the information in heat maps. Later on, the database uses the heat maps to determine what to do with your data.
ILM settings. Tells the database how to perform the ILM (Information Lifecycle Management) maintenance. For example, you can define the parallel degree that the database uses during maintenance or the number of concurrent maintenance jobs.
You can find a test case at the end of the blog post. I’m using test data and queries from oracle-base.com.
ADO Policies
Data Pump transfers the ADO policies in all modes:
Full transportable
Full
Schema
Tablespace
Table
You can verify it:
SELECT   policy_name,
         object_owner,
         object_name,
         object_type,
         inherited_from,
         enabled,
         deleted
FROM     dba_ilmobjects
ORDER BY 1;
Heat Map Information
Data Pump does not transfer any heat map information. I didn’t find any way to move the heat map information to the new database.
ILM Settings
Data Pump does not transfer ILM settings – not even in full modes. You must manually move the settings.
You must translate the name of the setting to the corresponding PL/SQL constant. You change the setting DEGREE OF PARALLELISM by using DBMS_ILM_ADMIN.DEG_PARALLEL.
CONN / AS SYSDBA
--Turn on heat map tracking
ALTER SYSTEM SET HEAT_MAP=ON SCOPE=BOTH;

--Customize ILM settings
BEGIN
  DBMS_ILM_ADMIN.CUSTOMIZE_ILM(DBMS_ILM_ADMIN.RETENTION_TIME, 42);
  DBMS_ILM_ADMIN.CUSTOMIZE_ILM(DBMS_ILM_ADMIN.JOBLIMIT, 42);
  DBMS_ILM_ADMIN.CUSTOMIZE_ILM(DBMS_ILM_ADMIN.ABS_JOBLIMIT, 42);
  DBMS_ILM_ADMIN.CUSTOMIZE_ILM(DBMS_ILM_ADMIN.DEG_PARALLEL , 4);
END;
/
SELECT * FROM DBA_ILMPARAMETERS;

--Create tablespaces for ILM policy
CREATE TABLESPACE FAST_STORAGE_TS DATAFILE SIZE 1M AUTOEXTEND ON NEXT 1M;
CREATE TABLESPACE MEDIUM_STORAGE_TS DATAFILE SIZE 1M AUTOEXTEND ON NEXT 1M;
CREATE TABLESPACE SLOW_STORAGE_TS DATAFILE SIZE 1M AUTOEXTEND ON NEXT 1M;
CREATE USER TEST IDENTIFIED BY TEST QUOTA UNLIMITED ON USERS;
GRANT CREATE SESSION, CREATE TABLE TO TEST;
ALTER USER TEST QUOTA UNLIMITED ON FAST_STORAGE_TS;
ALTER USER TEST QUOTA UNLIMITED ON MEDIUM_STORAGE_TS;
ALTER USER TEST QUOTA UNLIMITED ON SLOW_STORAGE_TS;

CONN TEST/TEST

--Create table where we can track usage
CREATE TABLE t1 (
  id          NUMBER,
  description VARCHAR2(50),
  CONSTRAINT t1_pk PRIMARY KEY (id)
);
INSERT INTO t1
SELECT level,
       'Description for ' || level
FROM   dual
CONNECT BY level <= 10;
COMMIT;

--Generate "usage"
SELECT *
FROM   t1;
SELECT *
FROM   t1
WHERE  id = 1;

--Create table for ILM policy
CREATE TABLE invoices (
  invoice_no    NUMBER NOT NULL,
  invoice_date  DATE   NOT NULL,
  comments      VARCHAR2(500)
)
PARTITION BY RANGE (invoice_date)
(
  PARTITION invoices_2016_q1 VALUES LESS THAN (TO_DATE('01/04/2016', 'DD/MM/YYYY')) TABLESPACE slow_storage_ts,
  PARTITION invoices_2016_q2 VALUES LESS THAN (TO_DATE('01/07/2016', 'DD/MM/YYYY')) TABLESPACE slow_storage_ts,
  PARTITION invoices_2016_q3 VALUES LESS THAN (TO_DATE('01/09/2016', 'DD/MM/YYYY')) TABLESPACE medium_storage_ts
    ILM ADD POLICY TIER TO slow_storage_ts READ ONLY SEGMENT AFTER 6 MONTHS OF NO ACCESS,
  PARTITION invoices_2016_q4 VALUES LESS THAN (TO_DATE('01/01/2017', 'DD/MM/YYYY')) TABLESPACE medium_storage_ts
    ILM ADD POLICY TIER TO slow_storage_ts READ ONLY SEGMENT AFTER 6 MONTHS OF NO ACCESS,
  PARTITION invoices_2017_q1 VALUES LESS THAN (TO_DATE('01/04/2017', 'DD/MM/YYYY')) TABLESPACE fast_storage_ts
    ILM ADD POLICY TIER TO medium_storage_ts READ ONLY SEGMENT AFTER 3 MONTHS OF NO ACCESS,
  PARTITION invoices_2017_q2 VALUES LESS THAN (TO_DATE('01/07/2017', 'DD/MM/YYYY')) TABLESPACE fast_storage_ts
    ILM ADD POLICY TIER TO medium_storage_ts READ ONLY SEGMENT AFTER 3 MONTHS OF NO ACCESS
)
ILM ADD POLICY ROW STORE COMPRESS BASIC SEGMENT AFTER 3 MONTHS OF NO ACCESS;
Test Case
###############
# FULL EXPORT #
###############

export ORAENV_ASK=NO
export ORACLE_SID=UP19
. oraenv
export ORAENV_ASK=YES
rm /tmp/expdat.dmp
sql / as sysdba<<EOF
   create or replace directory expdir as '/tmp';
EOF
expdp system/oracle full=y directory=expdir job_name=fullexp

export ORAENV_ASK=NO
export ORACLE_SID=CDB2
. oraenv
export ORAENV_ASK=YES
sql / as sysdba<<EOF
    startup
    alter pluggable database pdb1 close immediate;
    drop pluggable database pdb1 including datafiles;
    create pluggable database pdb1 admin user admin identified by admin;
    alter pluggable database all open;
    alter session set container=pdb1;
    create tablespace users DATAFILE SIZE 1M AUTOEXTEND ON NEXT 1M;
    CREATE TABLESPACE fast_storage_ts DATAFILE SIZE 1M AUTOEXTEND ON NEXT 1M;
    CREATE TABLESPACE medium_storage_ts DATAFILE SIZE 1M AUTOEXTEND ON NEXT 1M;
    CREATE TABLESPACE slow_storage_ts DATAFILE SIZE 1M AUTOEXTEND ON NEXT 1M;
    create or replace directory expdir as '/tmp';
EOF

impdp system/oracle@pdb1 directory=expdir

sql / as sysdba<<EOF
    alter session set container=pdb1;
    select * from DBA_ILMPARAMETERS;
    SELECT policy_name,
       object_owner,
       object_name,
       object_type,
       inherited_from,
       enabled,
       deleted
    FROM   dba_ilmobjects
    ORDER BY 1;
    SELECT track_time,
        owner,
        object_name,
        segment_write,
        full_scan,
        lookup_scan
    FROM   dba_heat_map_seg_histogram
    ORDER BY 1, 2, 3;
EOF

#################
# SCHEMA EXPORT #
#################

export ORAENV_ASK=NO
export ORACLE_SID=UP19
. oraenv
export ORAENV_ASK=YES
rm /tmp/expdat.dmp
sql / as sysdba<<EOF
   create or replace directory expdir as '/tmp';
EOF
expdp system/oracle schemas=test directory=expdir job_name=schemaexp

export ORAENV_ASK=NO
export ORACLE_SID=CDB2
. oraenv
export ORAENV_ASK=YES
sql / as sysdba<<EOF
    startup
    alter pluggable database pdb1 close immediate;
    drop pluggable database pdb1 including datafiles;
    create pluggable database pdb1 admin user admin identified by admin;
    alter pluggable database all open;
    alter session set container=pdb1;
    create tablespace users DATAFILE SIZE 1M AUTOEXTEND ON NEXT 1M;
    CREATE TABLESPACE fast_storage_ts DATAFILE SIZE 1M AUTOEXTEND ON NEXT 1M;
    CREATE TABLESPACE medium_storage_ts DATAFILE SIZE 1M AUTOEXTEND ON NEXT 1M;
    CREATE TABLESPACE slow_storage_ts DATAFILE SIZE 1M AUTOEXTEND ON NEXT 1M;
    create or replace directory expdir as '/tmp';
EOF

impdp system/oracle@pdb1 directory=expdir

sql / as sysdba<<EOF
    alter session set container=pdb1;
    select * from DBA_ILMPARAMETERS;
    SELECT policy_name,
       object_owner,
       object_name,
       object_type,
       inherited_from,
       enabled,
       deleted
    FROM   dba_ilmobjects
    ORDER BY 1;
    SELECT track_time,
        owner,
        object_name,
        segment_write,
        full_scan,
        lookup_scan
    FROM   dba_heat_map_seg_histogram
    ORDER BY 1, 2, 3;
EOF

################
# TABLE EXPORT #
################

export ORAENV_ASK=NO
export ORACLE_SID=UP19
. oraenv
export ORAENV_ASK=YES
rm /tmp/expdat.dmp
sql / as sysdba<<EOF
   create or replace directory expdir as '/tmp';
EOF
expdp system/oracle tables=test.t1,test.invoices directory=expdir job_name=tabexp

export ORAENV_ASK=NO
export ORACLE_SID=CDB2
. oraenv
export ORAENV_ASK=YES
sql / as sysdba<<EOF
    startup
    alter pluggable database pdb1 close immediate;
    drop pluggable database pdb1 including datafiles;
    create pluggable database pdb1 admin user admin identified by admin;
    alter pluggable database all open;
    alter session set container=pdb1;
    create tablespace users DATAFILE SIZE 1M AUTOEXTEND ON NEXT 1M;
    CREATE TABLESPACE fast_storage_ts DATAFILE SIZE 1M AUTOEXTEND ON NEXT 1M;
    CREATE TABLESPACE medium_storage_ts DATAFILE SIZE 1M AUTOEXTEND ON NEXT 1M;
    CREATE TABLESPACE slow_storage_ts DATAFILE SIZE 1M AUTOEXTEND ON NEXT 1M;
    create or replace directory expdir as '/tmp';
    CREATE USER TEST IDENTIFIED BY TEST QUOTA UNLIMITED ON USERS;
    GRANT CREATE SESSION, CREATE TABLE TO TEST;
    ALTER USER TEST QUOTA UNLIMITED ON FAST_STORAGE_TS;
    ALTER USER TEST QUOTA UNLIMITED ON MEDIUM_STORAGE_TS;
    ALTER USER TEST QUOTA UNLIMITED ON SLOW_STORAGE_TS;
EOF

impdp system/oracle@pdb1 directory=expdir

sql / as sysdba<<EOF
    alter session set container=pdb1;
    select * from DBA_ILMPARAMETERS;
    SELECT policy_name,
       object_owner,
       object_name,
       object_type,
       inherited_from,
       enabled,
       deleted
    FROM   dba_ilmobjects
    ORDER BY 1;
    SELECT track_time,
        owner,
        object_name,
        segment_write,
        full_scan,
        lookup_scan
    FROM   dba_heat_map_seg_histogram
    ORDER BY 1, 2, 3;
EOF
begin
   dbms_stats.gather_schema_stats('SYS');
   dbms_stats.gather_schema_stats('SYSTEM');
   dbms_stats.gather_fixed_objects_stats;
end;
/
I usually don’t use gather_dictionary_stats. I prefer gathering schema stats instead. I’ve seen a few edge cases with gather_dictionary_stats over the years, but mostly it works fine. But you know, old dog and new tricks…
You should always follow this advice even if you are not tracing a specific problem.
I change the AWR snapshot interval to 15 minutes to get better granularity and manually create an AWR snapshot:
begin
   dbms_workload_repository.modify_snapshot_settings(null, 15);
   dbms_workload_repository.create_snapshot;
end;
/
Optionally, if I need to diagnose a performance problem, I enable SQL trace for Data Pump processes:
alter system set events 'sql_trace {process: pname = dw | process: pname = dm} level=8';
Or a specific SQL ID:
alter system set events 'sql_trace[SQL: ]';
Starting Data Pump
I add diagnostic information (metrics and logtime) to the log file and turn on tracing:
1FF0300 turns on tracing for more or less everything in Data Pump, but there are other trace levels.
After Data Pump
I create a new AWR snapshot:
begin
   dbms_workload_repository.create_snapshot;
end;
/
You might also want to reset the AWR snap interval to the previous setting.
Plus, an AWR report spanning the entire period.
@?/rdbms/admin/awrrpt
Data Pump writes the tracing into the process trace files. You can find them in the database trace directory:
Control process trace files named *dm*.trc.
Worker process trace files named *dw*.trc.
Happy Debugging
Normally, the above information is enough to figure out the underlying problem. If you supply the above to Oracle Support when you open the next case, they’ll be super excited.
One of the benefits of the multitenant architecture in Oracle Database is the concept of common objects. If you want to move data around with Oracle Data Pump, is there anything you must know?
A common phenomenon defined in a root is the same in all containers plugged in to this root.
…
For example, if you create a common user account while connected to CDB$ROOT, then this user account is common to all PDBs and application roots in the CDB.
A simpler explanation:
The stuff you create as C##.... in the root container (CDB$ROOT).
The principles of commonality are:
A common phenomenon is the same in every existing and future container.
…
Only a common user can alter the existence of common phenomena.
More precisely, only a common user logged in to either the CDB root or an application root can create, destroy, or modify attributes of a user, role, or object that is common to the current container.
For illustration purposes, imagine a common profile used by a local user. You would create such as:
alter session set container=CDB$ROOT;
create profile c##commonprofile1 ... ;
alter session set container=pdb1;
create user localuser1 ... profile c##commonprofile1;
With other object types, you can make it even more complex, but the principles remain the same.
What Happens In Oracle Data Pump
On Export
Data Pump
Connects to the PDB.
Extracts the relevant data and metadata.
Using the above example, Data Pump extracts the user DDL. The user DDL specifies the use of a common profile.
On Import
Data Pump
Connects to the PDB.
Assumes that you have already created the common objects.
Creates the local user localuser1 and specifies the use of the common profile c##commonprofile1.
If the common profile does not exist already, the creation of the user fails:
Processing object type DATABASE_EXPORT/SCHEMA/USER
ORA-39083: Object type USER:"LOCALUSER1" failed to create with error:
ORA-02380: profile C##COMMONPROFILE1 does not exist

Failing sql is:
 CREATE USER "LOCAL1" ... PROFILE "C##COMMONPROFILE1"
Why Don’t Data Pump Create The Common Objects?
First, Data Pump connects to the PDB itself to perform the import. Since you must create common objects in the root container, that’s obviously a problem. The importing user might not have access to the root container, so switching containers and creating common objects is impossible.
Also, it would break the contract in the multitenant architecture that each PDB is isolated. If one PDB were allowed to create common objects, those objects would also be available in other PDBs, and the isolation would no longer exist.
Finally, it would open for all sorts of security issues if a user connected to a PDB could create common objects.
What Can You Do?
A CDB Blueprint
Ideally, you should have some CDB blueprint; A definition of the common objects used in your databases. When you create a new CDB, you have an afterburner that creates those common objects according to your company guidelines.
Examine the Dump File
You can also examine the DDLs in the Data Pump file and create a list of common objects.
Extract the DDL:
impdp ... sqlfile=import_ddls.sql
Search for C## and build a list of common objects needed:
grep -n -i "C##" import_ddls.sql
This is a crude search, and I imagine awk aficionados can improve it.
Extract the DDL for the common objects from the source CDB:
SecureFile LOBs are the best LOB type, partly because it allows parallel access to and from the LOB. The parallel access allows Data Pump to unload and load data faster.
The following applies to SecureFile LOBs:
select owner, table_name, column_name
from   dba_lobs
where  securefile='YES';
First of all, you must allow Data Pump to work in parallel. Only when so, Data Pump assigns one worker – and only one worker – per table data object. That is a table, partition or subpartition.
Suppose the table data object is big enough, that one worker uses parallel query (PQ) to unload the data. The PQ worker will hand over the data to the worker, who will write it to the dump file.
How much is big enough? By default, Data Pump examines the object statistics, and if the segment is larger than 250 MB, it will use parallel query. You can change this threshold using the parallel_threshold parameter.
To export a SecureFile LOB in parallel:
You must allow Data Pump to do parallel work using the parallel parameter.
Why doesn’t Data Pump use parallel query on all objects? Because it takes time to start a PQ worker and keep track of them. It is a waste on small table data objects and will often be slower. Parallel query makes sense only when a table data object reaches a certain size.
How the Database Stores LOBs
With LOBs you can potentially store a lot of data.
If a LOB (in a single row) is less than 4000 bytes, it is stored in-row together with the rest of the data. Having small LOBs as part of the table is efficient.
However, if a LOB is larger than 4000 bytes, it is inefficient to store it in-row. Instead, the database stores the entire LOB in a separate LOB segment. This is called out-of-row.
In Oracle Database 23ai, you can optionally store up to 8000 bytes in-row.
When Statistics Are Not Enough
Update, 6 May 2024: The below mentioned issue is solved in the 19.23.0 Data Pump Bundle Patch
If a LOB is stored in-row, the space it uses, is added to the total segment space of the table. However, if the LOB is stored out-of-row, the LOB space is added to the LOB segment space usage.
The table statistics (dba_tab_statistics) show only the blocks (i.e., space) used by the table. The size of the LOB segment does not affect the size of the table in the optimizer statistics. This is by design, because the purpose of statistics is to enable the optimizer to come up with good plans, and the size of the LOB segment is irrelevant in that situation.
In other words, you can have a table with 100 rows and 1 TB of LOB data. If all that LOB data is stored out-of-row, the table looks really small.
If Data Pump determines the size of the table based on the statistics, that table with 1 TB LOBs looks really small. As a result, Data Pump will not use parallel query on it.
This applies also to partitioned tables. In this case, Data Pump looks at the partition statistics instead of the table statistics.
Faster Exports
Bundle Patch
The patch to fix the above issue is included in the 19.23.0 Data Pump Bundle Patch.
Don’t Estimate By Statistics
You can change the way Data Pump determines the size of a table from statistics to a proper calculation:
expdp ... estimate=blocks
Estimating by blocks is slower than using statistics. You will see that the startup phase in Data Pump takes longer.
Due to a bug in Data Pump, this will not work unless your database is on 19.18.0 with the Data Pump bundle patch.
Fake Statistics
Since Data Pump only looks at the table data object statistics, you can fake the statistics. Trick Data Pump into believing the table itself is huge by setting statistics to high values:
The fake statistics will influence the choices made by the optimizer, so only do this in your maintenance window. Also, note that setting statistics invalidates cursors in the library cache.
Ensure that the statistics gathering job doesn’t overwrite your fake stats.
Use Partitioning
If you partition a table, Data Pump uses one worker per partition or subpartition. Data Pump might also use parallel query on a single partition/subpartition depending on the number of partitions and subpartitions and available parallel processes. But only if the partition statistics reflect that it is significant in size. Otherwise, you run into the same problem as described above.
An advantage of having multiple Data Pump workers on the same partitioned table, is that more workers can write to dump files simultaneously. Not only can Data Pump read faster from the database, it can also store it faster into dump files.
Final Words
Our developers solved the issue in the 19.23.0 Data Pump Bundle Patch. The best solution is of course to stay current and apply the Data Pump Bundle Patch.
Finally, as a reminder, always convert your LOBs to SecureFile LOBs on import:
Oracle Data Pump supports moving Advanced Queues (AQ) using export/import and full transportable export/import. But there are some things to be aware of.
Data Pump Does Not Start Queues
Data Pump creates the queues during import but does not start the queues. At the end of the import, you must manually start the queues:
exec dbms_aqadm.start_queue(queue_name => ... );
Be sure to start all queue:
select owner, name, queue_table, enqueue_enabled, dequeue_enabled
from   dba_queues;
This behavior is intentional. During a migration, you typically don’t want to use the queues. Depending on your use case, it can have unintended side effects. After the migration, when you confirm a successful migration and are ready to go live, you can manually start the queues.
If you forget to start the queues, your application will start to receive the following error:
ORA-25207: enqueue failed, queue string.string is disabled from enqueueing
ORA-25226: dequeue failed, queue string.string is not enabled for dequeue
The Database Does Not Create All Queue Objects
Data Pump creates the queues using the Advanced Queuing administration API DBMS_AQADM:
exec dbms_aqadm.create_queue_table( ...
The database then creates the essential parts of the underlying queue infrastructure: tables, views, IOTs, etc. This should include:
<queue_table_name>
AQ$_<queue_table_name>_E
AQ$_<queue_table_name>_I
AQ$_<queue_table_name>_T
AQ$_<queue_table_name>_F
In the source database, depending on your configuration and use of Advanced Queueing, you might also see the following objects:
AQ$_<queue_table_name>_C
AQ$_<queue_table_name>_D
AQ$_<queue_table_name>_G
AQ$_<queue_table_name>_H
AQ$_<queue_table_name>_L
AQ$_<queue_table_name>_P
AQ$_<queue_table_name>_S
AQ$_<queue_table_name>_V
This is intentional. The database creates those objects when needed. You should never create them or otherwise touch the underlying queue objects.
Typically, as part of a migration, you compare the count of objects in the source and target database to ensure nothing is lost. This comparison must consider the above.
For queue tables, it is sufficient to compare using the following query:
SQL> select count(*)
     from dba_objects
     where owner='<schema>'
           and object_type = 'QUEUE';
Definition Of Queue Tables Might Change
As stated, you should not worry about the underlying queue objects. However, if you compare the underlying queue objects, you might see that the definition of the object changes. I describe this situation in a different blog post.
Migrate Old Queues
If the queues are REALLY old, the queue compatibility setting might also be old. If so, I strongly recommend migrating the old queues to the newest version. You can learn more about that in this blog post.
The other day I had to export data using Data Pump and ran into an error:
expdp appuser/appuser ...

ORA-31626: job does not exist
ORA-31633: unable to create master table "APPUSER.SYS_EXPORT_SCHEMA_01"
ORA-06512: at "SYS.DBMS_SYS_ERROR", line 95
ORA-06512: at "SYS.KUPV$FT", line 1163
ORA-01647: tablespace 'APPTS' is read-only, cannot allocate space in it
ORA-06512: at "SYS.KUPV$FT", line 1056
ORA-06512: at "SYS.KUPV$FT", line 1044
APPTS is the name of the default tablespace of the exporting user, APPUSER. It appears that Data Pump requires that the default tablespace of the exporting user has its default tablespace in read write mode. Why is that?
The Control Table
To keep track of an export or import job, Data Pump writes information to a so-called control table. The control table is a regular table stored in the database.
Data Pump creates the control table in the default tablespace of the user executing the Data Pump job. It is not possible to store the control table in a different tablespace.
At the end of an export, as the very last thing, Data Pump exports the control table to the dump file. Similarly, at the start of an import, as the very first thing, Data Pump imports the control table.
Normally, you don’t see the control table in the database because Data Pump drops it when a job ends. You can change that by setting KEEP_MASTER=YES. This allows you to query the control table. The name of the control table is the same as the Data Pump job:
SQL> select *
     from <executing_user>.<name_of_data_pump_job>
If you change the name of the Data Pump job using JOB_NAME, you can alter the name of the control table.
Previously, the control table was called the master table. That’s why the parameter KEEP_MASTER is named as it is.
Learn more about the control table in the webinar Data Pump Extreme – Deep Dive with Development.
Other Requirements
So, if Data Pump must create a table in the database, does that mean there are other requirements?
Executing user must have a quota on its default tablespace
Exporting From a Standby Database
Since there is a requirement that the database must be open in READ WRITE mode, it means that you can’t use Data Pump to export from a standby database. A standby database is always either MOUNTED or OPEN READ ONLY.
Transportable Tablespaces is a great way of migrating data from one Oracle Database to another. However, if your database uses object types and those object types have evolved over time, you might hit an error during import:
W-1 Processing object type DATABASE_EXPORT/SCHEMA/TABLE/TABLE
ORA-39083: Object type TABLE:"APPUSER"."CARS" failed to create with error:
ORA-39218: type check on object type "APPUSER"."CAR_TYPE" failed
ORA-39216: object type "APPUSER"."CAR_TYPE" hashcode or version number mismatch

Failing sql is:
BEGIN SYS.DBMS_METADATA.CHECK_TYPE('APPUSER','CAR_TYPE','4','613350A0E37618A6108C500936D0C6162C',''); END;
Typically, there will be a number of dependent objects that fails with ORA-39112.
Let me explain the problem and what you can do about it.
Object Types and Evolution
The term object types refers to database objects that you create using the CREATE TYPE statement.
Object types are also known as user-defined types (UDT) and abstract data types (ADT).
When Oracle Database introduced object types many releases ago, they could not evolve. In simple words, you only had CREATE TYPE available. If you needed to change the type, you had to drop and recreate it. Later on, Oracle Database allowed type evolution, and you could also do ALTER TYPE.
An Example of Evolution
Let me illustrate object types and evolution using an example:
I create a supertype called VEHICLE_TYPE
I create another type called CAR_INFO_TYPE
I create a subtype called CAR_TYPE which inherits VEHICLE_TYPE and includes an attribute based on CAR_INFO_TYPE
I add the three types:
CREATE TYPE "APPUSER"."VEHICLE_TYPE"
   IS OBJECT (
      make VARCHAR2 (40)
) NOT FINAL;
/
CREATE TYPE "APPUSER"."CAR_INFO_TYPE"
   IS OBJECT (
      model VARCHAR2(40)
);
/
CREATE TYPE "APPUSER"."CAR_TYPE"
   UNDER VEHICLE_TYPE (
      car_info CAR_INFO_TYPE
);
/
I query the data dictionary to find the types and verify that their version is 1. I expect this because the types are brand-new.
select o.name, t.version#
from obj$ o, user$ u,type$ t
where o.owner# = u.user# and o.oid$ = t.toid and u.name='APPUSER'
order by o.name, t.version#;

NAME             VERSION#
-------------------------
CAR_INFO_TYPE           1
CAR_TYPE                1
VEHICLE_TYPE            1
Now I want to add two additional attributes to CAR_INFO_TYPE:
horsepower
color
ALTER TYPE "APPUSER"."CAR_INFO_TYPE" ADD ATTRIBUTE horsepower NUMBER CASCADE
/
ALTER TYPE "APPUSER"."CAR_INFO_TYPE" ADD ATTRIBUTE color VARCHAR2(20) CASCADE
/
Now, I check the data dictionary again. CAR_INFO_TYPE has now advanced two versions to version 3. Two ALTER TYPE statements mean two new versions. But notice CAR_TYPE. It advances as well.
select o.name, t.version#
from obj$ o, user$ u,type$ t
where o.owner# = u.user# and o.oid$ = t.toid and u.name='APPUSER'
order by o.name, t.version#;

NAME             VERSION#
-------------------------
CAR_INFO_TYPE           1
CAR_INFO_TYPE           2
CAR_INFO_TYPE           3
CAR_TYPE                1
CAR_TYPE                2
CAR_TYPE                3
VEHICLE_TYPE            1
If you alter a type that another type uses, both types evolve. No ALTER TYPE was issued on CAR_TYPE, yet it still evolve. This becomes a problem later on.
Same Objects but Different Evolution
If I use the example above but change the order of statements, the types will evolve in a different way. They will still be the same objects, but they evolve differently.
Let me illustrate how the types can evolve differently. I execute the ALTER TYPE statements on CAR_INFO_TYPE immediately after its CREATE TYPE statement:
CREATE TYPE "APPUSER"."VEHICLE_TYPE"
   IS OBJECT (
      make VARCHAR2 (40)
) NOT FINAL;
/
CREATE TYPE "APPUSER"."CAR_INFO_TYPE"
   IS OBJECT (
      model VARCHAR2(40)
);
/
ALTER TYPE "APPUSER"."CAR_INFO_TYPE" ADD ATTRIBUTE horsepower NUMBER CASCADE
/
ALTER TYPE "APPUSER"."CAR_INFO_TYPE" ADD ATTRIBUTE color VARCHAR2(20) CASCADE
/
CREATE TYPE "APPUSER"."CAR_TYPE"
   UNDER VEHICLE_TYPE (
      car_info CAR_INFO_TYPE
);
/
Here you can see the two approaches compared to each other
First approach
Second approach
CREATE TYPE "APPUSER"."VEHICLE_TYPE"
CREATE TYPE "APPUSER"."VEHICLE_TYPE"
CREATE TYPE "APPUSER"."CAR_INFO_TYPE"
CREATE TYPE "APPUSER"."CAR_INFO_TYPE"
CREATE TYPE "APPUSER"."CAR_TYPE"
ALTER TYPE "APPUSER"."CAR_INFO_TYPE"
ALTER TYPE "APPUSER"."CAR_INFO_TYPE"
ALTER TYPE "APPUSER"."CAR_INFO_TYPE"
ALTER TYPE "APPUSER"."CAR_INFO_TYPE"
CREATE TYPE "APPUSER"."CAR_TYPE"
When I check the version of the types, I see that CAR_TYPE doesn’t evolve together with CAR_INFO_TYPE:
select o.name, t.version#
from obj$ o, user$ u,type$ t
where o.owner# = u.user# and o.oid$ = t.toid and u.name='APPUSER'
order by o.name, t.version#;

NAME             VERSION#
-------------------------
CAR_INFO_TYPE           1
CAR_INFO_TYPE           2
CAR_INFO_TYPE           3
CAR_TYPE                1
VEHICLE_TYPE            1
In contrast to the previous example, because I changed the order of the statements, CAR_TYPE is now still on version 1 (not 3 as previously).
If you choose to update the corresponding table data, it can take quite some time on a big table.
If you choose to skip the update, the alteration will be fast. However, when you need to read the data, the database needs to use the evolution information to determine how to read the data.
What Data Pump Does
Data Pump can recreate the types during a regular import and transportable tablespaces. But it will handle the types one-by-one:
Create VEHICLE_TYPE (and all alterations if there were any)
Then create CAR_INFO_TYPE and all alterations
Then create CAR_TYPE (and all alterations if there were any)
Now, the definition of the types is correct (it has the correct attributes and stuff). But the evolution of the types does not necessarily match that of the source database. Unless the types in the source database were created in the same order as Data Pump does, then the versions of the types might be different.
What Happens During a Regular Import
During a regular (not transportable) export, Data Pump always use external table as access method when there is an evolved type involved. This access method causes a CREATE TABLE <external table> ... AS SELECT which converts each row’s version of a type to the highest version. All rows in the dump file is now of the highest version of the type.
On import, Data Pump creates the types, and perhaps the versions of the types are different. When Data Pump loads the data into the table, all rows are on the same version because they were converted during export. The data access layer underneath Data Pump is now more lenient. If one type version is found with a matching hash code, then data can be imported safely.
Data Pump then checks for a matching object type using a hash code only. The version does not have to match. Here’s a query to get the hash code:
select o.name, t.version#, t.hashcode
from obj$ o, user$ u, type$ t
where o.owner# = u.user# and o.oid$ = t.toid and u.name='APPUSER'
order by o.name, t.version#;
What Happens During a Transportable Tablespace Import
In transportable tablespace mode, things are different. Data Pump does not load the data into a dump file. Instead, it is kept in the data files. To read the data correctly, you must have the correct type definitions and information on how they evolve.
If the type evolution doesn’t match those of the source database, then Data Pump can’t be sure the data is accurate and will issue an error. Using the above query, the type evolution must match on versionandhash code.
Solution
This is not a bug in Data Pump. Data Pump ensures that your data is not corrupted during import. Due to a restriction in the implementation of type evolution, Data Pump is not able to completely recreate a type’s evolution and this might cause problems.
These are your options:
Option 1: Use Regular Data Pump Import
As described above, during a regular import Data Pump handles the types and dependent objects differently.
Perform transportable tablespace import.
Find types and dependent objects that Data Pump can’t import.
Import the affected types and objects using a regular Data Pump import.
Option 2: Recreate Types and Dependent Objects Without Data
In one case I worked on, a queue table used the evolved type. Before migration, the application team would ensure that the application processed all messages in the queue. Thus, at the time of migration, the queue was empty.
The transportable tablespace import failed to create the queue table due to evolved type.
After import, the DBA recreated the queue using DBMS_AQADMIN.
Also, the DBA granted permissions on the queue.
If a regular table used the evolved type, you would need to recreate the table using CREATE TABLE syntax instead.
Option 3: Recreate Types Without Evolution Before Export
Recreate the types in the source database in the same way as Data Pump will create it on the target database. One type at a time. First, the CREATE TYPE statement and any ALTER TYPE statements on the same type. Then next type, and the next, and the next…
If a dependent table or queue uses the evolved type, it can be quite cumbersome and time consuming to recreate the type in the source database.
Option 4: Create Type in Target Using Same Evolution Before Import
If you know the evolution history of the types in the source database (i.e. in which order the CREATE TYPE and ALTER TYPE statements were issued), then you can create the types manually in the target database and ensure they evolve in the same way. You must creat the types exactly in the same way (including number of attributes, the order they were added and so forth).
In target database, you create and alter types in the correct order. In order to do that you must also create the schema.
You verify that types are of the same version in source and target database. The hash code must be identical as well:
select o.name, t.version#, t.hashcode
from obj$ o, user$ u, type$ t
where o.owner# = u.user# and o.oid$ = t.toid and u.name='APPUSER'
order by o.name, t.version#;
You perform the transportable tablespace import.
Data Pump reports an error for the types that already exist. You ignore those errors. You can also exclude types from the import (previous step) using EXCLUDE=TYPES.
Ensure that dependent objects that use the affected types are valid. It could be other types, tables, or queues.
Conclusion
Evolved types can hit ORA-39218 or ORA-39216 during a transportable tablespace import. Implementation restrictions in object types cause these errors. Data Pump can’t evolve the types in the same way, and issues an error. You must find a different way of moving the types and dependent objects.
export ORAENV_ASK=NO
export ORACLE_SID=UP19
. oraenv
export ORAENV_ASK=YES

CONN / AS SYSDBA

DROP USER APPUSER CASCADE;
DROP TABLESPACE APPS INCLUDING CONTENTS AND DATAFILES;

CREATE TABLESPACE APPS;
CREATE USER APPUSER IDENTIFIED BY APPUSER DEFAULT TABLESPACE APPS;
ALTER USER APPUSER QUOTA UNLIMITED ON APPS;
GRANT CONNECT TO APPUSER;
GRANT CREATE TYPE TO APPUSER;
GRANT CREATE TABLE TO APPUSER;
GRANT AQ_ADMINISTRATOR_ROLE TO APPUSER;

CONN APPUSER/APPUSER

CREATE TYPE "APPUSER"."VEHICLE_TYPE"
   IS OBJECT (
      make VARCHAR2 (40)
) NOT FINAL;
/

CREATE TYPE "APPUSER"."CAR_INFO_TYPE"
   IS OBJECT (
      model VARCHAR2(40)
);
/

CREATE TYPE "APPUSER"."CAR_TYPE"
   UNDER VEHICLE_TYPE (
      car_info CAR_INFO_TYPE
);
/

ALTER TYPE "APPUSER"."CAR_INFO_TYPE" ADD ATTRIBUTE horsepower NUMBER CASCADE
/
ALTER TYPE "APPUSER"."CAR_INFO_TYPE" ADD ATTRIBUTE color VARCHAR2(20) CASCADE
/

CREATE TABLE "APPUSER"."CARS" (
   id number,
   car_info car_type
);

INSERT INTO "APPUSER"."CARS"
VALUES (1, APPUSER.CAR_TYPE('FORD', APPUSER.CAR_INFO_TYPE('FIESTA', 200, 'BLUE')));
COMMIT;

BEGIN
   DBMS_AQADM.CREATE_QUEUE_TABLE (
      queue_table        => 'APPUSER.CAR_QUEUE_TABLE',
      queue_payload_type => 'APPUSER.CAR_TYPE');

   DBMS_AQADM.CREATE_QUEUE (
      queue_name  => 'APPUSER.CAR_QUEUE',
      queue_table => 'APPUSER.CAR_QUEUE_TABLE');

   DBMS_AQADM.START_QUEUE (
      queue_name => 'APPUSER.CAR_QUEUE',
      enqueue    => TRUE);
END;
/

DECLARE
  l_enqueue_options     DBMS_AQ.enqueue_options_t;
  l_message_properties  DBMS_AQ.message_properties_t;
  l_message_handle      RAW(16);
  l_event_msg           APPUSER.CAR_TYPE;
BEGIN
  l_event_msg := APPUSER.CAR_TYPE('VOLVO', APPUSER.CAR_INFO_TYPE('V90', 400, 'GREY'));

  DBMS_AQ.enqueue(queue_name          => 'APPUSER.CAR_QUEUE',
                  enqueue_options     => l_enqueue_options,
                  message_properties  => l_message_properties,
                  payload             => l_event_msg,
                  msgid               => l_message_handle);

  COMMIT;
END;
/

conn / as sysdba
select o.name, o.oid$, t.hashcode, t.version#
from obj$ o, user$ u,type$ t
where o.owner# = u.user# and o.oid$ = t.toid and u.name='APPUSER'
order by o.name, t.version#;
2. Transportable Tablespace Using FTEX
mkdir /tmp/dpdir
rm /tmp/dpdir/*
mkdir /u02/oradata/CDB2/pdb2

sqlplus / as sysdba<<EOF
ALTER TABLESPACE USERS READ ONLY;
ALTER TABLESPACE APPS READ ONLY;
create or replace directory dpdir as '/tmp/dpdir';
grant read, write on directory dpdir to system;
EOF

export ORAENV_ASK=NO
export ORACLE_SID=CDB2
. oraenv
export ORAENV_ASK=YES
sqlplus / as sysdba<<EOF
   startup
   alter pluggable database PDB2 close;
   drop pluggable database PDB2 including datafiles;
   create pluggable database PDB2 admin user adm identified by adm file_name_convert=('pdbseed', 'pdb2');
   alter pluggable database PDB2 open;
   alter pluggable database PDB2 save state;
   alter session set container=PDB2;
   create directory mydir as '/tmp/dpdir';
   grant read, write on directory mydir to system;
   create public database link SOURCEDB connect to system identified by oracle using 'UP19';
EOF

export ORAENV_ASK=NO
export ORACLE_SID=UP19
. oraenv
export ORAENV_ASK=YES
sqlplus / as sysdba<<EOF
set line 300
select 'cp ' || file_name || ' /u02/oradata/CDB2/pdb2/df' || file_id as c1 from dba_data_files where tablespace_name in ('USERS', 'APPS');
EOF

#Copy the files

export ORAENV_ASK=NO
export ORACLE_SID=CDB2
. oraenv
export ORAENV_ASK=YES
impdp system/oracle@pdb2 network_link=sourcedb full=y \
transportable=always metrics=y exclude=statistics directory=mydir \
logfile=pdb2.log \
transport_datafiles='/u02/oradata/CDB2/pdb2/df4' \
transport_datafiles='/u02/oradata/CDB2/pdb2/df5'

sqlplus appuser/APPUSER@PDB2<<EOF
  select * from appuser.cars;
  select * from APPUSER.CAR_QUEUE_TABLE;
EOF
When you migrate your data using Oracle Data Pump, you can transform your data as part of the import. One of the popular transformations is applying compression.
Check the License Guide and ensure your licenses are in place. Most compression options require a separate license.
$ impdp ... transform=table_compression_clause:\"compress for oltp\"
It works for table partitions and subpartitions as well.
How about Tablespace Default Compression Clause?
You can create a tablespace with a default compression clause. Any new tables, table partitions or table subpartitions will inherit this compression clause:
SQL> create tablespace demo1 ... default table compress for oltp;
If you import your tables into such a tablespace, it will not change the compression type for the tables. The tables will preserve the compression type from the source database.
Unless you instruct Data Pump to remove any compression clause from the DDL. Then the tables inherit the tablespace compression clause:
Using the SQLFILE command line parameter, you can extract the DDL from a dump file. If you have uncompressed tables, you can see that the CREATE TABLE statements have a dedicated NOCOMPRESS clause. This will override the tablespace setting unless you instruct Data Pump to remove it.
Index Compression
In Oracle Database 21c, you can use the TRANSFORM parameter to apply compression on indexes during import:
sqlplus / as sysdba<<EOF
create or replace directory dpdir as '/u01/app/oracle/admin/UP19/dpdump';
drop tablespace apps including contents and datafiles;
drop user appuser cascade;

create tablespace apps;
create user appuser identified by APPUSER;
grant dba to APPUSER;
alter user APPUSER default tablespace APPS;
connect appuser/APPUSER
create table t1 as select * from dba_objects;

ALTER TABLE t1 MODIFY
PARTITION BY HASH (object_id)
PARTITIONS 2
STORE IN (apps, apps, apps, apps);

CREATE INDEX i1local ON t1 (last_ddl_time) LOCAL;
CREATE INDEX i1global ON t1 (owner) global;

create table t3 as select * from dba_objects;
ALTER TABLE t3 MODIFY
PARTITION BY HASH (object_id)
SUBPARTITION BY HASH (object_name)
SUBPARTITIONS 2 PARTITIONS 2;
CREATE INDEX i3local ON t3 (last_ddl_time) LOCAL;
CREATE INDEX i3global ON t3 (owner) global;
CREATE INDEX i3globalpart ON t3 (object_id) global partition by hash (object_id) partitions 2;

EOF

rm /u01/app/oracle/admin/UP19/dpdump/*
expdp system/oracle schemas=appuser directory=dpdir

sqlplus / as sysdba<<EOF
drop user appuser cascade;
drop tablespace apps including contents and datafiles;
create tablespace apps default table compress for oltp index compress advanced low;
alter system set db_index_compression_inheritance=tablespace scope=both;
EOF

impdp system/oracle directory=dpdir transform=table_compression_clause:\"none\"

sqlplus / as sysdba<<EOF
prompt "TABLES"
select table_name, compression, compress_for from all_tables where owner='APPUSER';
prompt "TAB PARTITIONS"
select table_name,partition_name, compression, compress_for from all_tab_partitions where table_owner='APPUSER';
prompt "TAB SUBPARTITIONS"
select table_name,subpartition_name, compression, compress_for from all_tab_subpartitions where table_owner='APPUSER';

prompt "INDEXES"
select index_name, compression from all_indexes where table_owner='APPUSER';
prompt "IND PARTITIONS"
select index_name, compression from all_ind_partitions where index_owner='APPUSER';
prompt "IND SUBPARTITIONS"
select index_name, compression from all_ind_subpartitions where index_owner='APPUSER';
EOF