
This is a deprecated blog post. It is kept for reference only. Please visit the updated blog post series.
You can upgrade your database to a new release with AutoUpgrade and keep the Data Guard setup intact. The standby database(s) can be upgraded implicitly via the redo from the primary database, and there is no need to rebuild the standby database after upgrade.
The process:
In the following I will be using this setup:
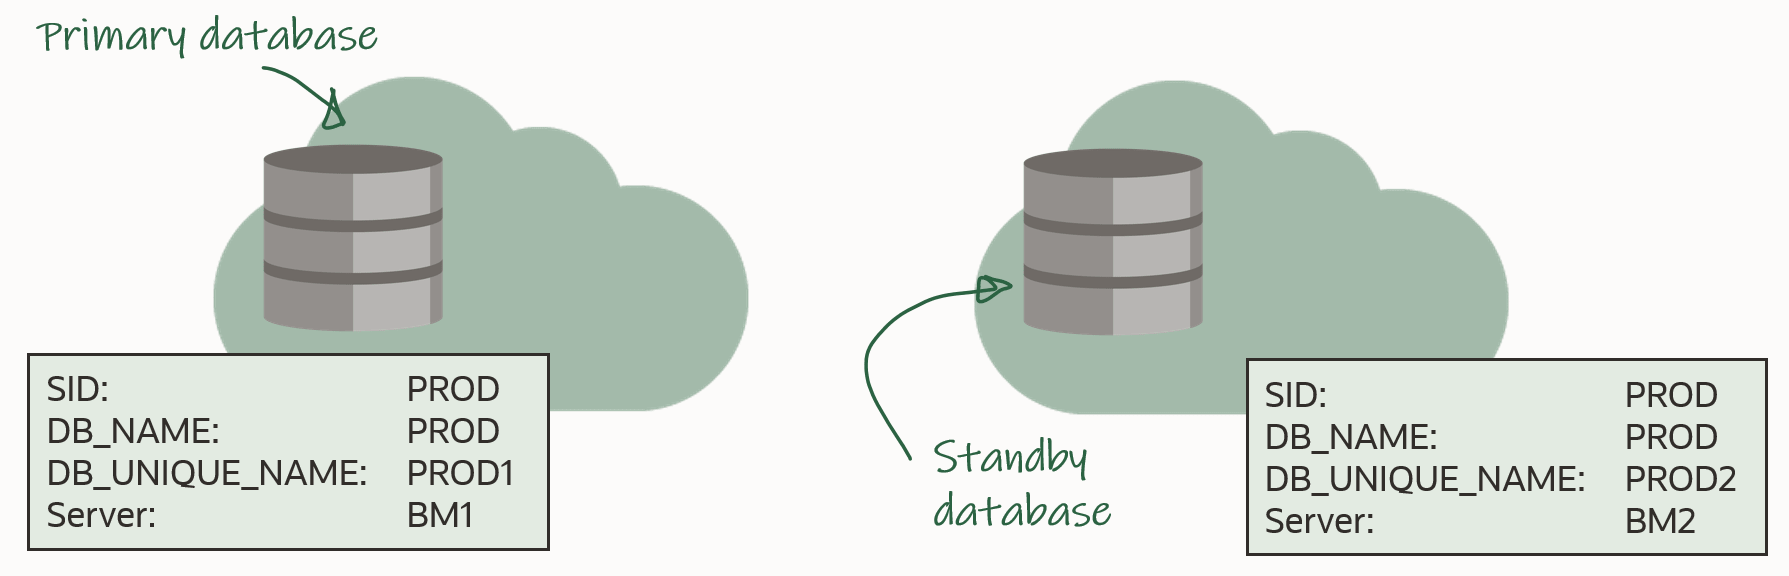
In advance, you should install the new Oracle Home on both primary and standby host. The two Oracle Homes should have the same patches applied, and I recommend that you always apply the latest Release Update.
Before Upgrade
You must use AutoUpgrade version 21.1.1 or newer. A newer version of AutoUpgrade can upgrade to older database releases as well, so don’t worry if the AutoUpgrade version doesn’t match the Oracle Database release that you are upgrading to.
AutoUpgrade can handle a Data Guard environment that is manually configured or via Data Guard Broker.
The procedure starts right before you start AutoUpgrade in DEPLOY mode (or alternatively in FIXUPS mode). Downtime has started and users are no logged connected to the database.
Stop Data Guard
On the standby database, generate commands to copy the Data Guard broker config files. Don’t execute them yet:
PROD2 SQL> select 'cp ' || value || ' /tmp' as cmd from v$parameter where name like 'dg_broker_config_file%';
Shut down the standby database. Disabling the database is strictly speaking not necessary, but a better-safe-than-sorry approach:
[oracle@bm2]$ $ORACLE_HOME/bin/srvctl stop database -d PROD2 -stopoption immediate
[oracle@bm2]$ $ORACLE_HOME/bin/srvctl disable database -d PROD2
If you are not managing the database with Grid Infrastructure (GI), just do a regular shutdown:
PROD2 SQL> shutdown immediate
Now, copy the broker config files into a temporary location. Use the cp commands that was executed earlier
[oracle@bm2]$ cp <broker_config_1> /tmp
[oracle@bm2]$ cp <broker_config_2> /tmp
Since redo transport has not been deferred yet in the primary database, it will complain about losing connection to the standby database. The alert log will contain an entry similar to this:
2020-12-03T06:30:12.751693+00:00
TT03 (PID:47477): Attempting LAD:2 network reconnect (3113)
TT03 (PID:47477): LAD:2 network reconnect abandoned
2020-12-03T06:30:12.752104+00:00
Errors in file /u01/app/oracle/diag/rdbms/prod1/PROD/trace/PROD_tt03_47477.trc:
ORA-03113: end-of-file on communication channel
TT03 (PID:47477): Error 3113 for LNO:3 to 'prod2'
It can be safely ignored, because it is after all a maintenance window and the database is about to be upgraded. Your monitoring system might detect this and start to complain.
Upgrade
Upgrade the database by starting AutoUpgrade in DEPLOY mode. AutoUpgrade will defer redo transport and stop Data Guard broker (if in use) automatically:
java -jar autoupgrade.jar -config PROD.cfg -mode deploy
After the upgrade you should perform the necessary tests to validate the new database release. Only when you are convinced to go live on the new release, you should continue.
Remember that the standby database was left behind before we started touching anything, so if all other fails, simply restart the standby database, and connect your users to it.
After Upgrade
Restart Data Guard
Update the listener on the standby host. Be sure to update the Oracle Home information in the listener.ora entry. Note, that your listener.ora might be stored in a non-default location, so use lsnrctl status to get the location. Finally, reload the listener:
[grid@bm2]$ $GRID_HOME/bin/lsnrctl status
[grid@bm2]$ vi $GRID_HOME/network/admin/listener.ora
[grid@bm2]$ $GRID_HOME/bin/lsnrctl reload
For the next commands, I will be using the same prompt, and I will need the following environment variables:
[oracle@bm2]$ export OLD_HOME=/u01/app/oracle/product/18.0.0.0/dbhome_1
[oracle@bm2]$ export NEW_HOME=/u01/app/oracle/product/19.0.0.0/dbhome_1
[oracle@bm2]$ export ORACLE_HOME=$NEW_HOME
[oracle@bm2]$ export ORACLE_SID=PROD
[oracle@bm2]$ #Set ORACLE_UNQNAME to DB_UNIQUE_NAME
[oracle@bm2]$ export ORACLE_UNQNAME=PROD2
Next, if the standby database is using TNS_ADMIN in the default location ($ORACLE_HOME/network/admin), then be sure to copy the relevant TNS aliases into the new tnsnames.ora. There should be TNS aliases to the primary and standby database. Or, if there are no other databases in the same Oracle Home, you can simply copy the files:
[oracle@bm2]$ #Back up files
[oracle@bm2]$ cp $NEW_HOME/network/admin/sqlnet.ora $NEW_HOME/network/admin/sqlnet.ora.backup
[oracle@bm2]$ cp $NEW_HOME/network/admin/tnsnames.ora $NEW_HOME/network/admin/tnsnames.ora.backup
[oracle@bm2]$ #Copy from old to new home
[oracle@bm2]$ cp $OLD_HOME/network/admin/sqlnet.ora $NEW_HOME/network/admin
[oracle@bm2]$ cp $OLD_HOME/network/admin/tnsnames.ora $NEW_HOME/network/admin
Now, you can edit /etc/oratab and update the information about the Oracle Home to match the new Oracle Home. In my example, the database is managed by GI, so I should not configure auto-start in /etc/oratab. If you are not managing your databases with GI, you probably want to configure the standby database to start automatically (see appendix):
[oracle@bm2]$ #Backup file
[oracle@bm2]$ cp /etc/oratab /tmp/oratab
[oracle@bm2]$ #Use sed to remove the line that starts with ORACLE_SID
[oracle@bm2]$ sed '/^'"$ORACLE_SID"':/d' /tmp/oratab > /etc/oratab
[oracle@bm2]$ #Add new entry
[oracle@bm2]$ echo "$ORACLE_SID:$ORACLE_HOME:N" >> /etc/oratab
Copy SPFile and password file to the new Oracle Home:
[oracle@bm2]$ cp $OLD_HOME/dbs/orapw$ORACLE_SID $ORACLE_HOME/dbs
[oracle@bm2]$ cp $OLD_HOME/dbs/spfile$ORACLE_SID.ora $ORACLE_HOME/dbs
Copy the broker config files into the new Oracle Home. If you store your broker config files outside of the Oracle Home this might not be necessary to you:
[oracle@bm2]$ export ORACLE_HOME=/u01/app/oracle/product/19.0.0.0/dbhome_1
[oracle@bm2]$ export ORACLE_UNQNAME=PROD2
[oracle@bm2]$ cp /tmp/dr1$ORACLE_UNQNAME.dat $ORACLE_HOME/dbs
[oracle@bm2]$ cp /tmp/dr2$ORACLE_UNQNAME.dat $ORACLE_HOME/dbs
Upgrade the database in GI, which updates the Oracle Home information, so GI will start the database in the correct Oracle Home. Next, re-enable and start the database:
[oracle@bm2]$ $ORACLE_HOME/bin/srvctl upgrade database -db $ORACLE_UNQNAME -oraclehome $ORACLE_HOME
[oracle@bm2]$ $ORACLE_HOME/bin/srvctl modify database -db $ORACLE_UNQNAME -startoption MOUNT -role PHYSICAL_STANDBY
[oracle@bm2]$ $ORACLE_HOME/bin/srvctl enable database -d $ORACLE_UNQNAME
[oracle@bm2]$ $ORACLE_HOME/bin/srvctl start database -d $ORACLE_UNQNAME
Or, if you are not using GI, simply start the database in the new Oracle Home:
PROD2 SQL> startup mount
Re-enable Data Guard
To re-enable the Data Guard config use DG CLI:
[oracle@bm1]$ $ORACLE_HOME/bin/dgmgrl sys@PROD1
And re-enable redo transport:
DGMGRL SYS@PROD1> edit database prod1 set state=transport-on;
Now, redo is shipping to the standby database, and it will apply it. When the redo that was generated during the upgrade is applied on the standby database, it is implicitly upgraded. You can monitor the progress of the apply by looking at the Apply Lag information. The Apply Lag will decrease until the standby database eventually catches up and they are fully synchronized:
DGMGRL SYS@PROD1> show database prod2;

Test
Use the broker to ensure everything is fine:
DGMGRL SYS@PROD1> show configuration
DGMGRL SYS@PROD1> show database prod1
DGMGRL SYS@PROD1> show database prod2
You should have SUCCESS listed for both databases

Let’s validate the setup and try to make a switchover. The database will not allow a switchover if there are any problems in the Data Guard setup. It is a good way of checking things are fine:
DGMGRL SYS@PROD1> validate database prod1
DGMGRL SYS@PROD1> validate database prod2
DGMGRL SYS@PROD1> switchover to prod2

If you don’t use Data Guard Broker, you use regular SQLs and SQLPlus to verify the Data Guard environment.
Conclusion
It is actually not that complicated to upgrade your database, even if it is part of a Data Guard setup. And with version 21.1.1 of AutoUpgrade is has become easier. A little extra legwork is needed to take care of the standby database. But the good thing is that your Data Guard setup is maintained throughout the process.
I made a video on YouTube that shows the procedure. And while you are there, I suggest that you subscribe to our channel.
Appendix
Config File
For your reference this is the config file, that I used. It contains only the required information. All other parameters have a default value:
upg1.sid=PROD
upg1.source_home=/u01/app/oracle/product/18.0.0.0/dbhome_1
upg1.target_home=/u01/app/oracle/product/19.0.0.0/dbhome_1
Synchronize Standby Database
When you run un AutoUpgrade in ANALYZE mode and check the preupgrade report, you will find this information message:
[checkname]          SYNC_STANDBY_DB
[stage]              PRECHECKS
[fixup_available]    NO
[runfix]             N/A
[severity]           INFO
[action]             Synchronize your standby databases before database upgrade.
[broken rule]        The standby database is not currently synchronized with its associated primary database.
[rule]               To keep data in the source primary database synchronized with its associated standby databases, all standby databases must be synchronized before database upgrade.  See My Oracle Support Note 2064281.1 for details.
What does it say? Basically, it says that all redo generated on the primary database before the downtime window started, should be sent to and applied on the standby database. This way, your standby database is ready to replace your primary database at any time, if something goes really wrong. Strictly speaking it is not necessary to ensure that, but it is strongly recommended.
GI-managed Database in /etc/oratab
When the database is managed by GI, you don’t need to have it configured in /etc/oratab. Personally, I like to have it anyway, because then you have a clear overview of what databases are on the server, and you can use /etc/oratab to set your environment, like when you are using oraenv script.
But I know that die-hard GI-folks might roll their eyes when I say it, but I like it this way.
Further Reading
-
AutoUpgrade and Oracle Data Guard – Oracle Database 21c Upgrade Guide

Hi
I’m a little bit confused about changes to listener.ora.
As far as I know, no entries in the listener.ora need to be done for the database handeld DG.
Even more static listeners should not be done.
Did I get something wrong?
LikeLike
Hi Christian,
You are right. Since 12.1 (or was it 12.2) it is actually not required anymore. But I am really not an expert on Data Guard, so I rely on the notes that I made many years ago. It might be time to brush up on those skills.
Thanks for letting me know – I learned something new today. And thanks to fellow PM Pieter Van Puymbroeck for enlightening me.
Cheers,
Daniel
LikeLike
Does AutoUpgrade version 21.1.1 or newer disable DG broker? Do you know what version of AutoUpgrade where DB broker is automatically handed/ Thanks Michael.
LikeLike
Hi Michael,
The functionality was introduced in AutoUpgrade version 21.
Regards,
Daniel
LikeLike
Thanks for this article, it gives me some idea planning for one of these. Have you tried doing a rollback? That is if you’ve already upgraded both Primary and Standby but a week suddenly finds out you need to do a rollback? Will a similar approach works as well? That is, disable DataGuard, shutdown DR, rollback Primary to GRP then revert DR to its original configuration, listener, tnsnames etc enable DataGuard and all’s done?
LikeLike
Hi Edwin,
You’re welcome! Yes, I have tried to do a rollback – both with Flashback Database (data loss) and downgrade (no data loss). Both work fine with Data Guard as well. The webinar on Thursday November 11 we cover fallback scenarios in detail:
https://dohdatabase.com/webinars/
See you there?
Daniel
LikeLike
A bit lost with the SPFILE bit though. From your steps above, the SPFILE is from the older version but the AutoUpgrade has also upgraded the SPFILE in the Primary, so shouldn’t there be some changes to the SPFILE on the DR as well?
LikeLike
Hi Edwin,
AutoUpgrade does not “upgrade” the SPFile. The SPFile remains as it is unless you have specified AutoUpgrade to do something (like remove underscore parameters, or add your own parameters). That was not the case in my demo, thus I can just re-use the old SPFile.
However, you are right that in case I added parameters to the SPFile in the new version, I would need to reflect that as well on the standby database.
Regards,
Daniel
LikeLike
Daniel,
Would the autoupgrade redo from an 11.2.0.4 source database upgrade create and plug-in the PDB on a dataguard standby?
LikeLike
Hi Brett,
If you have an 11.2.0.4 database and want to convert it into a PDB, you need first an upgrade to 19c, and then a PDB conversion using the non-CDB to PDB script. The upgrade and plug-in can be handled by AutoUpgrade, but you will have a problem with the plug-in on the standby database. You can take a look at this video for further details: https://www.youtube.com/watch?v=49P9-1jqc68&list=PLIUJ4jBaPQxxqwuI9wFUfChOjUCVTYKob&index=15 and also https://www.youtube.com/watch?v=69Hx1WoJ_HE&list=PLIUJ4jBaPQxwhG78lY2nYQc_dS_N9Ao-_&index=5&t=5257s.
Another option is to use transportable tablespaces and migrate the data directly into a 19c PDB. It might be an easier option for you: https://dohdatabase.com/xtts.
Regards,
Daniel
LikeLike
Hi Daniel
I’m trying to use autoupgrade for patching. From version 19.22 to 19.24. It’s an Data Guard environment, and I’m executing the autoupgrade in analyze mode on the primary server ( the “active” database in the DG setup ).
It fails with ISRAC_SWITCHEDON_TARGETHOME. From this support note is says that RAC should be enabled. Have I missed an option to tell it’s an DG database ? Or is it a BUG.
I’m tried on 2 DG setup, same error.
https://support.oracle.com/epmos/faces/SearchDocDisplay?_adf.ctrl-state=vsqb2vx5s_366&_afrLoop=284424631150110#aref_section31
Action:[MANUAL]Info:Return status is ERRORExecutionError:NoError Message:The following checks have ERROR severity and no fixup is available orthe fixup failed to resolve the issue. Fix them manually before continuing:soac4ty12 ISRAC_SWITCHEDON_TARGETHOME
Regards Børge
LikeLike
Hi Børge,
It’s great that you use AutoUpgrade for patching.
It does seem odd that you get that error when you want to patch your Data Guard primary database. Do you have an SR with additional information? If so, please share the SR number with me on e-mail: daniel.overby.hansen@oracle.com.
I can’t access the MOS document via the link. I don’t have access to support.oracle.com like you do. Can you share the Doc ID reference with me?
Further, it would really help if you would put all files into a zip file. Use the same AutoUpgrade command line but add “-zip”. This creates a zip package that you can easily share with me (preferably in a MOS SR, so you can upload the file securely).
Thanks,
Daniel
LikeLike