
Upgrade Oracle Database 11g to 19c Using RMAN Incremental Backups

A customer wanted help upgrading and moving to new hardware:

I have an 11g database running on old hardware. I want to upgrade to 19c and move to new hardware. I can’t use Data Guard to move the database because I can’t install 11g binaries on the new hardware. What do I do?

Data Guard would be the obvious choice, but wasn’t possible here. But we can use RMAN incremental backups.

This allows us to move the database with little downtime and then perform the upgrade.

The Plan

Here’s an overview of the plan:

  1. Perform a level 0 backup of the 11g database.
  2. Restore the backup into a 19c instance on the new hardware.
  3. Prepare the database for upgrade.
  4. Perform a level 1 backup.
  5. Recover the database.
  6. Upgrade the database.

We can perform steps 1-2 in advance and save time during the outage.

Any newer version of Oracle AI Database can restore backups from a previous release. But to upgrade the database, we must be within the limitations for a direct upgrade. Oracle Database 19c supports direct upgrades from 11g.

Step 1: Initial Backup

The database is called UPGR and runs on the old hardware as an 11g database.

  1. On the old system, I start by doing a level 0 backup of the source database:
    RMAN> CONNECT TARGET /
          RUN {
          ALLOCATE CHANNEL c1 DEVICE TYPE DISK;
          ALLOCATE CHANNEL c2 DEVICE TYPE DISK;
    
          BACKUP AS COMPRESSED BACKUPSET
             INCREMENTAL LEVEL 0
             DATABASE
             FORMAT '/u01/app/oracle/backup/L0_%d_%T_%U.bkp'
             PLUS ARCHIVELOG
             FORMAT '/u01/app/oracle/backup/L0_%d_%T_%U.bkp'
             TAG 'LEVEL0';
    
          BACKUP CURRENT CONTROLFILE
             FORMAT '/u01/app/oracle/backup/CTL.bkp'
             TAG 'CONTROLFILE';
    
          RELEASE CHANNEL c1;
          RELEASE CHANNEL c2;
          }
    
    • I store the backups on an NFS share that’s accessible to the new system as well.
    • I’m doing a compressed backup. Be sure you’re licensed for that.
    • You can customize the backup script.
  2. I create a PFile:
    SQL> CREATE PFILE='/u01/app/oracle/backup/pfile.txt'
         FROM SPFILE;
    

Step 2: Configure Instance and Restore

I create a new instance on the new hardware. I must use the same name, UPGR.

  1. On the new hardware, I create a PFile for my target instance. I use the original PFile as a template and make the necessary changes. Here’s the PFile that I’ll use:
    *._cursor_obsolete_threshold=1024
    *.audit_file_dest='/u01/app/oracle/admin/UPGR/adump'
    *.audit_trail='db'
    *.compatible='11.2.0.4.0'
    *.control_files='/u02/oradata/UPGR/controlfile/control01.ctl'
    *.db_block_size=8192
    *.db_create_file_dest='/u02/oradata'
    *.db_name='UPGR'
    *.db_recovery_file_dest_size=12884901888
    *.db_recovery_file_dest='/u02/fast_recovery_area'
    *.diagnostic_dest='/u01/app/oracle'
    *.pga_aggregate_target=1G
    *.sga_target=4G
    
    • I keep the same db_name.
    • Adjust locations, like db_create_file_dest and control_files accordingly.
  2. I create the directory specified by audit_file_dest:
    mkdir -p /u01/app/oracle/admin/UPGR/adump
    
  3. I set the environment and create a new password file:
    export ORACLE_HOME=/u01/app/oracle/product/19
    export ORACLE_BASE=/u01/app/oracle
    export ORACLE_SID=UPGR
    export PATH=$ORACLE_HOME/bin:$PATH
    
    $ORACLE_HOME/bin/orapwd file=orapwUPGR password=MyS3cr3tPassw0rd!
    
  4. Next, I start the new instance in NOMOUNT mode:
    SQL> STARTUP NOMOUNT
    
  5. I restore the control file:
    RMAN> CONNECT TARGET /
          RUN {
          RESTORE CONTROLFILE
             FROM '/u01/app/oracle/backup/CTL.bkp';
          }
    
    • I restore from the NFS share.
  6. Then, I mount the database and start the restore:
    RMAN> CONNECT TARGET /
          ALTER DATABASE MOUNT;
          RUN {
          ALLOCATE CHANNEL c1 DEVICE TYPE DISK;
          ALLOCATE CHANNEL c2 DEVICE TYPE DISK;
    
          SET NEWNAME FOR DATABASE TO NEW;
    
          CATALOG START WITH '/u01/app/oracle/backup/' NOPROMPT;
    
          RESTORE DATABASE;
          SWITCH DATAFILE ALL;
          RECOVER DATABASE UNTIL AVAILABLE REDO;
    
          RELEASE CHANNEL c1;
          RELEASE CHANNEL c2;
          }
    
    • I use Oracle Managed Files (OMF), so I use SET NEWNAME accordingly.
    • I use CATALOG to tell RMAN where to find the backups.
    • I restore the database and recover until there’s no more redo.

Step 3: Prepare for Upgrade

Downtime starts now.

  1. On the source system, I create an AutoUpgrade config file, so I can check the upgrade readiness of my database.
    global.global_log_dir=/home/oracle/autoupgrade-logs
    upg1.source_home=/u01/app/oracle/product/11.2.0.4
    upg1.target_home=/tmp
    upg1.target_version=19
    upg1.sid=UPGR
    
    • I can’t set target_home to the real value because it doesn’t exist on the source server. I use a fake entry instead.
    • AutoUpgrade normally deduces the target_version from target_home, but since it doesn’t exist, I need to specify it manually.
  2. I perform the preupgrade check:
    java -jar autoupgrade.jar -config UPGR.cfg -mode analyze
    
    • Check the preupgrade summary report.
    • I use the latest version of AutoUpgrade.
  3. I run the preupgrade fixups:
    java -jar autoupgrade.jar -config UPGR.cfg -mode fixups
    
  4. Then, I run an incremental backup:
    RMAN> CONNECT TARGET /
          RUN {
          ALLOCATE CHANNEL c1 DEVICE TYPE DISK;
          ALLOCATE CHANNEL c2 DEVICE TYPE DISK;
    
          BACKUP AS COMPRESSED BACKUPSET
             INCREMENTAL LEVEL 1
             DATABASE
             FORMAT '/u01/app/oracle/backup/L1_%d_%T_%U.bkp'
             PLUS ARCHIVELOG
             FORMAT '/u01/app/oracle/backup/L1_%d_%T_%U.bkp'
             TAG 'LEVEL1';
    
          RELEASE CHANNEL c1;
          RELEASE CHANNEL c2;
          }
    
    • The incremental backup captures the last changes to my database.
  5. I shut down the database on the old system.

Step 4: Recover

  1. On the target database, I recover the incremental backup.
    RMAN> CONNECT TARGET /
          RUN {
          ALLOCATE CHANNEL c1 DEVICE TYPE DISK;
          ALLOCATE CHANNEL c2 DEVICE TYPE DISK;
    
          CATALOG START WITH '/u01/app/oracle/backup/' NOPROMPT;
    
          RECOVER DATABASE UNTIL AVAILABLE REDO;
    
          RELEASE CHANNEL c1;
          RELEASE CHANNEL c2;
          }
    
    • I use the CATALOG command to tell RMAN about the new backup.
    • I recover the database until there is no more redo.
  2. Then, I open the database in upgrade mode:
    SQL> ALTER DATABASE OPEN RESETLOGS UPGRADE;
    
    • I use the RESETLOGS clause to create redo logs.
    • I must open in upgrade mode to start the upgrade. If I try to open in normal mode, I’ll get an error ORA-00704: bootstrap process failure.

Step 5: Upgrade

The database is open in upgrade mode. I must perform the upgrade to 19c.

  1. On the target system, I create an AutoUpgrade config file:
    global.global_log_dir=/home/oracle/autoupgrade-logs
    upg1.source_home=/tmp
    upg1.target_home=/u01/app/oracle/product/19
    upg1.sid=UPGR
    
    • I can’t set source_home to the real value because it doesn’t exist on the target server. I use a fake entry instead.
  2. I perform the upgrade:
    java -jar autoupgrade.jar -config UPGR.cfg -mode upgrade
    
    • I start with -mode upgrade to complete the upgrade. Don’t use -mode deploy.
    • I use the latest version of AutoUpgrade.
  3. After a while, the upgrade completes. All done.

That’s it

RMAN incremental backup is a great feature to reduce downtime when Data Guard is not an option. You can restore to a higher release of Oracle AI Database as long as you stay within the limits for a direct upgrade.

You can enhance the procedure:

  • Run additional level 1 incremental backup/restores to minimize the time it takes to perform the last one.
  • Enable Block Change Tracking on the old database to shorten the time it takes to do incremental backups.
  • Run an additional AutoUpgrade preupgrade check days in advance to get early notice on any showstoppers.

Happy upgrading!

How To Avoid ORA-39405 During a Data Pump Import

Why did my Data Pump import fail?

Import: Release 19.0.0.0.0 - Production on Mon Jun 29 06:17:06 2025
Version 19.31.0.0.0

ORA-39002: invalid operation
ORA-39405: Oracle Data Pump does not support importing from a source database with TSTZ version 44 into a target database with TSTZ version 45.

It all comes down to the TIMESTAMP WITH TIME ZONE (TSTZ) data type.

The database uses the timezone file to translate your TSTZ data to the right time. If the Daylight Saving Time (DST) rules change, a newer timezone file ensures that you still get the right data.

Data Pump refuses to import the data because differing timezone file versions could lead to incorrect TSTZ values.

The Solution

Simple: apply at least Release Update 19.27 and install the Data Pump bundle patch.

Data Pump now converts your TSTZ values when needed. During data, loading Data Pump uses an internal function called ORA_DST_CONVERT that does all the magic. The function can convert between both older and newer timezone file versions. Because each row requires a function call during import, you should expect a small performance overhead. I expect it to be negligible.

Remember, you can install the Data Pump bundle patch online without any downtime.

But I Don’t Have Timezone Data?

If your dump file doesn’t contain any TSTZ data, it’s safe to import even if the timezone file versions differ.

Older versions of Data Pump were overly cautious. Even without TSTZ data, they immediately failed when they detected a timezone file mismatch.

Why Does This Happen?

A few years ago, Oracle started shipping newer timezone file versions with every Release Update. It’s convenient and ensures that you always have the latest files installed.

But when you create a database, it gets the latest timezone file automatically. As you create databases over time, they’ll end up using different timezone file versions.

This is when you start seeing ORA-39405 in Data Pump.

In the good, ol’ days, timezone files were separate patches. Most people didn’t install them, so all of their databases ended up using the same timezone file version.

That’s It

If you have different timezone file versions in your source and target databases, Data Pump must convert your TSTZ columns to match the target database’s timezone file version. This requires at least Release Update 19.27 and the Data Pump bundle patch.

Happy importing!

How to Create an OCI PDB with a Specific Time Zone File Version

When you provision a new database in Oracle Cloud Infrastructure (OCI), it always comes with the latest timezone file installed.

But in a recent migration, we wanted a database with a specific timezone file version.

Here’s how you can get a new PDB with a custom timezone file.

Using OCI Tooling Doesn’t Work

The OCI tooling uses a template file to provision the database faster. But the template file comes with the latest timezone file. Timezone files are part of the Release Update, so the newer Release Update you’re on, the newer the timezone file is.

Using template files for provisioning means that you don’t get to choose which version of the timezone file you want in your database. Further, the usual hacks like removing timezone files from the Oracle home or using the environment variable ORA_TZFILE won’t work.

The Solution

I’m going to create a new PDB in an on-prem database, export that PDB to OCI and use that as my new PDB.

  • I start by finding an existing CDB with the desired timezone file, or I create a new one.

    select version from v$timezone_file;
    
    VERSION
    ----------
    44
    
  • I don’t need to check

    • The patch level: I’ll sort out any patch differences with Datapatch in OCI.
    • The components: CDBs in OCI have all components installed.
  • I create a new empty PDB:

    CREATE PLUGGABLE DATABASE PDBTEMPLATE ADMIN USER ADMIN IDENTIFIED BY mys3cr3tpassw0rd!;
    
  • I close and unplug my PDB:

    ALTER PLUGGABLE DATABASE PDBTEMPLATE CLOSE;
    ALTER PLUGGABLE DATABASE PDBTEMPLATE UNPLUG INTO '/home/oracle/pdbtemplate.pdb';
    DROP PLUGGABLE DATABASE PDBTEMPLATE INCLUDING DATAFILES;
    
  • I transfer the PDB to my host in OCI. In my test, the size of the PDB was 600 MB.

  • Now, I can create a new PDB using the archive file:

    CREATE PLUGGABLE DATABASE PDBNEW USING '/home/oracle/pdbtemplate.pdb';
    ALTER PLUGGABLE DATABASE PDBNEW OPEN READ WRITE;
    
    • The PDB probably opens with plug-in violations. I ignore this for now.
  • I need to sort out any patching difference:

    $ORACLE_HOME/OPatch/datapatch -pdbs PDBNEW
    
  • After a restart I check for plug-in violations:

    ALTER PLUGGABLE DATABASE PDBNEW CLOSE IMMEDIATE;
    ALTER PLUGGABLE DATABASE PDBNEW OPEN;
    SELECT TYPE, CAUSE, MESSAGE, ACTION 
    FROM   PDB_PLUG_IN_VIOLATIONS 
    WHERE  NAME='PDBNEW' 
           AND STATUS != 'RESOLVED'
           AND NOT (CAUSE='OPTION' AND TYPE='WARNING' AND MESSAGE LIKE '%PDB installed version NULL%');
    
    TYPE                       CAUSE                                                                                           MESSAGE                     ACTION
    __________ ___________________________ _________________________________________________________________________________________________ __________________________
       WARNING    is encrypted tablespace?    Tablespace SYSTEM is not encrypted. Oracle Cloud mandates all tablespaces should be encrypted.    Encrypt the tablespace.
       WARNING    is encrypted tablespace?    Tablespace SYSAUX is not encrypted. Oracle Cloud mandates all tablespaces should be encrypted.    Encrypt the tablespace.
    
    • The query removes any warnings about components missing in my PDB.
    • I can ignore the warning about missing encryption of SYSTEM and SYSAUX
  • Finally, I create an encryption key (or rotate the key if the PDB is already encrypted):

    ALTER SESSION SET CONTAINER=PDBNEW;
    ADMINISTER KEY MANAGEMENT SET KEY
       FORCE KEYSTORE IDENTIFIED BY <keystore-password>
       WITH BACKUP;
    
  • Last, let’s check the timezone file versions in my CDB:

    ALTER SESSION SET CONTAINER=CDB$ROOT;
    SELECT   CON$NAME, VALUE$ 
    FROM     CONTAINERS(SYS.PROPS$) 
    WHERE    NAME='DST_PRIMARY_TT_VERSION' 
    ORDER BY 1;
    
       CON$NAME    VALUE$
    ___________ _________
    CDB$ROOT    45
    PDBNEW      44
    
    • The CDB uses the latest timezone file version, 45.
    • My new PDB uses an older timezone file, 44.

That’s It!

This workaround enables you to create PDBs with a custom timezone file version. I can use the same approach if I want a PDB with a specific set of components installed.

If there is network connectivity between the source and target CDB, I could also clone the PDBTEMPLATE over a network link.

Happy migrating!

Understanding ORA-02298 And Missing Parent Rows During Data Pump Import

In a recent migration, Data Pump couldn’t validate a foreign key constraint because rows were missing in the parent table.

01-JUN-26 03:12:18.148: W-8 Processing object type SCHEMA_EXPORT/TABLE/CONSTRAINT/REF_CONSTRAINT
01-JUN-26 03:18:58.517: ORA-39083: Object type REF_CONSTRAINT:"APPUSER"."FK_CHILDTABLE_C001" failed to create with error:
ORA-02298: cannot validate (APPUSER.FK_CHILDTABLE_C001) - parent keys not found
ALTER TABLE "APPUSER"."CHILDTABLE" ADD CONSTRAINT "FK_CHILDTABLE_C001"
  FOREIGN KEY ("C001") REFERENCES "APPUSER"."PARENTTABLE" ("C001") ENABLE

In the source database, the constraint was validated. How come rows are now missing?

Data Pump Export

By default, a Data Pump export is not fully consistent. Instead, each table is consistent only within that object. Here’s an example:

Object SCN
Export starts 100
Table, T1 110
Table, PARENT1 120
Table, CHILD1 130
Export finishes 140

If no users are connected to the system, the export is logically consistent even though the tables were exported as of different SCNs.

But imagine the following:

  • There is a parent/child relationship between PARENT1 and CHILD1 enforced by a foreign key constraint.
  • A user inserts data at SCN 125. So, in between the export of PARENT1 and CHILD1.
  • Parent row is not exported because PARENT1 is exported as of SCN 120.
  • Child row is exported because CHILD1 is exported as of SCN 130.

During import, Data Pump can’t create and validate the foreign key constraint because the parent rows are missing.

GoldenGate

In this specific migration, this wasn’t a real problem because Data Pump and GoldenGate work together.

  • On export, Data Pump notes the SCN at which each table were exported.
  • On import, Data Pump writes the SCNs into the target database.
  • GoldenGate uses Automatic Per Table Instantiation to start the replication from the SCN at which the export was made.
Object Replicat starts at SCN
Table, T1 110
Table, PARENT1 120
Table, CHILD1 130

Once GoldenGate has replicated the changes beyond SCN 125, we could create and validate the constraint.

Zero Downtime Migration (ZDM)

We were doing the migration using ZDM. We had to instruct ZDM to ignore the error using the response file parameter:

IGNOREIMPORTERRORS=ORA-02298,...

Other Solutions

Fully Consistent Export

You can instruct Data Pump to make a fully consistent export, so all tables are exported as of the same SCN. Using the example from above:

Object SCN
Export starts 100
Table, T1 100
Table, PARENT1 100
Table, CHILD1 100
Export finishes 140

To do so, add the following parameter:

expdp ... flashback_time=systimestamp

In ZDM, you use the response file parameter:

DATAPUMPSETTINGS_DATAPUMPPARAMETERS_FLASHBACKTIME=SYSTIMESTAMP

This requires that there’s enough UNDO in your database. If your export runs for 4 hours before it reaches CHILD1, then you potentially need a lot of undo to read the table as it looked 4 hours ago.

On an big, active database there is a risk that your export now fails with:

ORA-31693: Table data object "APPUSER"."CHILD1" failed to load/unload and is being skipped due to error:
ORA-02354: error in exporting/importing data
ORA-01555: snapshot too old: rollback segment number 1 with name "_SYSSMU15_987654321$" too small

In which case you should start the export in an off-peak period or from a standby database.

Standby Database

If exporting from your primary database gives you problems with ORA-01555, consider doing it from a snapshot standby database.

If no one is using the standby database, then you don’t even have to perform a fully consistent export using FLASHBACK_SCN or FLASHBACK_TIME.

That’s It

Normally, seeing ORA-02298 during a Data Pump import is a serious problem.

However, if you’re doing an initial load then you can probably validate the constraint once replication starts.

Happy exporting!

When You Forget To Rekey Your Encrypted Database

[The other day I was helping a customer perform an unplug-plug upgrade of an encrypted PDB using AutoUpgrade and a refreshable clone PDB.

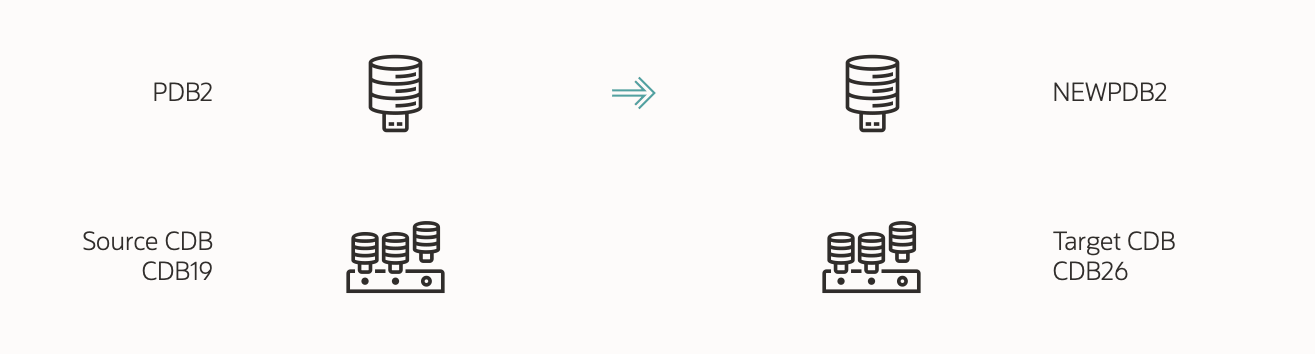
Cloning PDB2 to NEWPDB2 and upgrading it

But it kept failing during the initial copy of the PDB:

upg> Copying remote database 'PDB2' as 'NEWPDB2' for job 101

-------------------------------------------------
Errors in database [CDB19]
Stage     [CLONEPDB]
Operation [STOPPED]
Status    [ERROR]
Info    [
Error: UPG-4016
[Unexpected exception error]
Cause: There was an error during the database clone operation
For further details, see the log file located at /u01/app/oracle/cfgtoollogs/autoupgrade/CDB19/101/autoupgrade_20400101_user.log]

-------------------------------------------------
Logs: [/u01/app/oracle/cfgtoollogs/autoupgrade/CDB19/101/autoupgrade_20400101_user.log]
-------------------------------------------------

Luckily, there’s extensive logging in AutoUpgrade, so I went into the directory holding the logs from the CLONEPDB stage and found the following:

create pluggable database "NEWPDB2"  FROM PDB2@CLONEPDB   file_name_convert=none  tempfile reuse keystore identified by "*" REFRESH MODE MANUAL
*
ERROR at line 1:
ORA-17628: Oracle error 46659 returned by remote Oracle server
ORA-46659: master encryption keys for the given PDB not found
Help: https://docs.oracle.com/error-help/db/ora-17628/

Let’s dig into the error.

A Possible Solution

A search on MOS revealed a note with a possible solution:

  • Manually export/import the encryption keys, or
  • Use the undocumented INCLUDING SHARED KEYS clause on the CREATE PLUGGABLE DATABASE statement.

I didn’t like these solutions because:

  • The target CDB should be able to import the keys automatically over the database link.
  • It worked fine on other encrypted databases without the workaround.

So what was the problem?

The Root Cause

  • In the source CDB, I could see from V$ENCRYPTION_KEYS that the source PDB, PDB2, didn’t have any encryption keys.

  • There should be an encryption key activated by PDB2. But the query returned no rows.

    SELECT * FROM v$encryption_keys WHERE activating_pdbname='PDB2';
    
  • So which encryption key did PDB2 use?

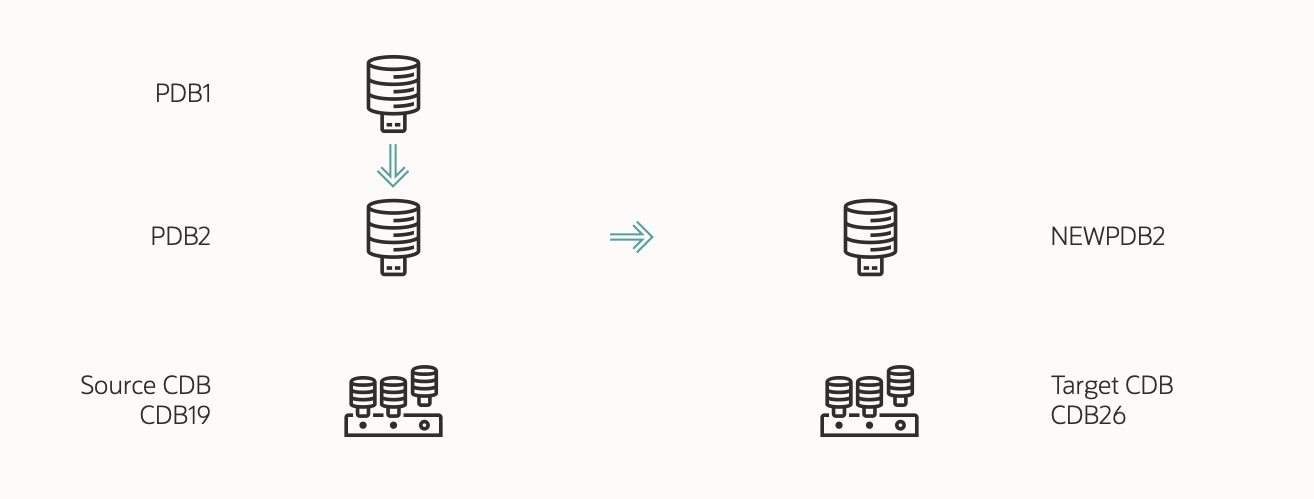
  • It turns out that PDB2 was recently created by cloning another local PDB, PDB1. PDB2 was recently cloned from PDB1

  • After cloning an encrypted PDB, the new PDB keeps using the same encryption keys as the source PDB. This is called a shared key.

  • So, PDB2 was using the same encryption key as PDB1.

  • For security reasons, if you try to clone a PDB using a shared key, the database errors out.

The Solution

  • I advise you to rekey your database after cloning. This ensures that the clone gets its own encryption keys and, thus, strengthens security.

  • After connecting to PDB2, I performed a rekey using the set key command:

    alter session set container=PDB2;
    administer key management set key
       force keystore identified by "<keystore_pwd>"
       with backup;
    
    
  • Then, I could clone PDB2 using refreshable clone PDB and upgrade it without problems.

Lesson Learned

  • Oracle recommends that you rotate your encryption keys by doing a rekey.
  • After cloning an encrypted database, you should perform a rekey, so the clone has its own encryption keys and does not share encryption keys with another database.
  • The database can operate with a shared key, but it might cause problems later.

Happy upgrading!

AutoUpgrade New Features: Download Tools (AHF, CVU, SQLcl)

Once you try downloading patches using AutoUpgrade, you’ll never do it from My Oracle Support again.

But what if you want to download:

Do you really have to do that from My Oracle Support? Of course – AutoUpgrade has you covered!

Download Tools

  1. I’ve already configured AutoUpgrade to download patches.

  2. I create a config file:

    global.global_log_dir=/home/oracle/autoupgrade/logs
    global.keystore=/home/oracle/autoupgrade/keystore
    global.folder=/home/oracle/autoupgrade/patches
    
    patch1.platform=LINUX.X64
    patch1.target_version=19
    patch1.patch=SQLCL,AHF,CVU
    
    • Notice the patch specification. It contains the three new keywords that instruct AutoUpgrade to download the tools.
  3. I start AutoUpgrade in download mode:

    AutoUpgrade Patching 26.3.260401 launched with default internal options
    Processing config file ...
    Loading AutoUpgrade Patching keystore
    AutoUpgrade Patching keystore is loaded
    
    Connected to MOS - Searching for specified patches
    
    -----------------------------------------------------
    Downloading files to /home/oracle/autoupgrade/patches
    -----------------------------------------------------
    PLACEHOLDER - DOWNLOAD LATEST AHF (TFA and ORACHK/EXACHK)
        File: AHF-LINUX_v26.3.1.zip - LOCATED
    
    Standalone CVU (OL8+, RHEL8+) January 2026
        File: cvupack_linux_ol8_x86_64.zip - LOCATED
    
    sqlcl-latest.zip 26.1.2.132.1334 (May 2026)
        File: sqlcl-latest.zip - LOCATED
    ------------------------------------------------------	
    
  • AutoUpgrade places the latest version of the tools in the download folder.

  • Nice and simple.

Multiple Platforms

  • If I have multiple platforms, I can download for all of them:

    patch1.platform=LINUX.X64
    patch1.target_version=19
    patch1.patch=SQLCL,AHF,CVU
    
    patch2.platform=WINDOWS.X64
    patch2.target_version=19
    patch2.patch=SQLCL,AHF,CVU
    
    patch3.platform=AIX.X64
    patch3.target_version=19
    patch3.patch=SQLCL,AHF,CVU
    
    • Notice how each platform has its own prefix (patch1, patch2, and patch3).
  • When I start AutoUpgrade in download mode, it downloads the tools for the three platforms.

That’s It

There are several tools that help you work with Oracle AI Database. Don’t miss out, update the tools and benefit from the latest enhancements.

Do you have a favorite tool that AutoUpgrade should download for you? Drop a comment and I’ll see what we can do.

Happy patching!

Is Your Oracle AI Database Ready For Patching?

My colleagues enhanced Datapatch so it can check your Oracle AI Database and see if it’s prone to errors we’ve seen at other customers.

This check is called a Datapatch Sanity Check.

It is a lightweight and non-intrusive check that scans an Oracle AI Database and produces a report with findings.

How to Run a Sanity Check

  • Before patching, assess the patching readiness of your Oracle AI Database:
    export ORACLE_SID=ORCL
    cd $ORACLE_HOME/OPatch
    ./datapatch -sanity_checks
    
    • You can run the check on an active database.
    • The check scans the operating system, database and all open PDBs.
  • Datapatch prints the report on the screen. Examine it:
    SQL Patching sanity checks version 19.27.0.0.0 on Fri 12 Jun 2026 03:25:42 PM GMT
    Copyright (c) 2021, 2026, Oracle.  All rights reserved.
    
    Log file for this invocation: /u01/app/oracle/cfgtoollogs/sqlpatch/sanity_checks_20260612_152542_17281/sanity_checks_20260612_152542_17281.log
    
    Running checks
    JSON report generated in /u01/app/oracle/cfgtoollogs/sqlpatch/sanity_checks_20260612_152542_17281/sqlpatch_sanity_checks_summary.json file
    Checks completed. Printing report:
    
    Check: Database component status - OK
    Check: PDB Violations - OK
    Check: Invalid System Objects - OK
    Check: Tablespace Status - OK
    Check: Backup jobs - OK
    Check: Temp file exists - OK
    Check: Temp file online - OK
    Check: Data Pump running - OK
    Check: Container status - OK
    Check: Oracle Database Keystore - OK
    Check: Dictionary statistics gathering - OK
    Check: Scheduled Jobs - OK
    Check: GoldenGate triggers - OK
    Check: Logminer DDL triggers - OK
    Check: Check sys public grants - OK
    Check: Statistics gathering running - OK
    Check: Optim dictionary upgrade parameter - OK
    Check: Symlinks on oracle home path - OK
    Check: Central Inventory - OK
    Check: Queryable Inventory dba directories - OK
    Check: Queryable Inventory locks - OK
    Check: Queryable Inventory package - OK
    Check: Queryable Inventory external table - OK
    Check: Imperva processes - OK
    Check: Guardium processes - OK
    Check: Locale - OK
    
    Refer to MOS Note 2975965.1 and debug log
    /u01/app/oracle/cfgtoollogs/sqlpatch/sanity_checks_20260612_152542_17281/sanity_checks_debug_20260612_152542_17281.log
    
    SQL Patching sanity checks completed on Fri 12 Jun 2026 03:26:18 PM GMT	
    
    • All checks passed.

Usage Notes

  • The checks may give the following result:

    • OK
    • WARNING
    • ERROR
  • Datapatch exit codes:

    • 0 – All checks passed
    • 1 – Errors found
    • 2 – Warnings found
  • If the database is an Oracle RAC Database, Datapatch also connects to the other nodes to conduct scanning. This requires passwordless SSH between the nodes.

  • The Sanity Check doesn’t check whether patches need to be applied or not. To determine whether patches need to be installed in the database, use:

    ./datapatch -prereq
    

That’s It

Checking your database upfront will help you avoid some of the common pitfalls when installing patches.

Happy patching!

Further Reading

How to Make Oracle AI Database Patching Easier

Oracle recently announced that they strongly recommend customers to apply Release Updates frequently and also announced plans to release monthly security updates.

For most of you this means that they must patch more often. Here are some ideas that can help you ease the burden of patching.

Grab a coffee with your DBA buddies and go over the list. Perhaps you’re missing out.

Patches

Oracle Home

  • Use out-of-place patching. This allows you to install the new Oracle home in advance. It reduces downtime, is less risky and makes rollbacks easier.

    • Use a brand-new home each time.
    • If you insist on in-place patching or clone Oracle homes be sure to clean up.
  • Create and use gold images. Once you’ve created your own gold image, you can deploy it to other hosts faster than installing and patching a new Oracle home.

    • Standardize on as few gold images as possible. Ideally, you have only one gold image for a specific Release Update.
  • Move files out of the Oracle home. You can find many configuration files and such inside the Oracle home. You must copy them to the new Oracle home when you use out-of-place patching – unless you use AutoUpgrade that does it for you.

    • Many of these files can be placed outside the Oracle home.

Connectivity

Patching

Datapatch

  • You can run Datapatch while users are connected. Knowing this you can minimize the outage on single instance databases by allowing users to connect as soon as you’ve restarted the database in the new Oracle home.

  • Use Datapatch sanity checks to assess the patch readiness of your database.

    • Generate the report by running datapatch -sanity_checks.
    • It’s a lightweight, non-intrusive check of the database.
  • Regularly clean up old patching metadata.

    • Limit the space used by Datapatch in the SYSTEM tablespace.
  • If you wonder what Datapatch spends time on, check the Datapatch logs in $ORACLE_BASE/cfgtoollogs/sqlpatch.

  • Ensure Datapatch patches the most important PDBs first.

    • Datapatch patches many PDBs at the same time. This depends on the database CPU_COUNT.
    • By default, Datapatch takes the PDBs in order by CON_ID.
    • But you can change the order using ALTER PLUGGABLE DATABASE <pdb_name> PRIORITY 1. The lower the priority, the sooner the PDB is processed.
  • Patch multiple databases at the same time.

    • Datapatch works on one database only. But you can start multiple instances of Datapatch to patch multiple databases simultaneously provided you have the CPU resources.
  • Speed up patching by removing unused components. Check your database using SELECT * FROM cdb_registry.

    • Generally, the more components, the longer patching/upgrading takes.

Automation

  • Automate the patching process. Including:

    • Rollback
    • Removal of old Oracle home
    • Listener patching
  • Tim Hall (ORACLE-BASE) wrote a series of blog posts about automation.

  • Use AutoUpgrade to automate the patching process.

  • Use Fleet Patching and Provisioning to automate the patching process.

    • A huge benefit for Exadata systems as FPP can patch the entire stack.
    • Separately licensed.

Grid Infrastructure

Miscellaneous

  • Familiarize yourself with the new patch level.

  • Oracle tries to avoid plan changes after patching by adding optimizer fixes as installed, but disabled. This increases plan stability.

That’s It

Did you find anything useful? Do you have other ideas to make patching easier?

Drop a comment and let’s help each other.

Happy patching!

Further Reading

Statistics and Migrations – Well-Kept Secrets Revealed

This is the title of our upcoming webinar. Join us for a zero marketing, all tech session.

When: Thursday, June 18, 14:00 CEST How: Sign up

What’s It About?

Statistics are the oil that keeps your database well-running. We all know – from bitter experience – what happens when you don’t get it right.

But what do you do with your statistics when you migrate a database? Do you bring them along or gather new ones? Does the recommendation change when you move to Oracle Autonomous AI Database?

There’s no single, universal answer. But we can equip you with the knowledge you need to make the right decision for your database. In this session, we outline the options, techniques, and best strategies. Whether you’re migrating to a new environment, a different operating system, a brand-new Exadata system, or Oracle Autonomous AI Database, we provide practical guidance, best practices, and a few well-kept secrets.

Join Us

I hope to see you there. As always, our entire team will be there and answer all your questions.

Recent Webinars on Database Patching

After a short delay, the latest Release Updates are out for Linux.

Are you wondering about the remaining platforms? Or do you want to refresh your knowledge of database patching? We recently aired two webinars that you’ll find interesting.

Webinar
Database Patching for DBAs – Patch smarter, not harder Slides Q&A Recording
Patch smarter, not harder – MS Windows Special Edition Slides Q&A Recording

If you’re still downloading patches from My Oracle Support, you must watch these webinars. Save yourself a lot of time and grab all the patches you need in one command.

If you have RAC databases and the applications are a little slow to drain or you just want more control, check out the DBA-controlled draining we recently introduced.

My Highlights

Here are a few of the topics that I find especially useful:

Next Webinar

It didn’t take long after the last one before we settled on the next webinar:

Statistics and Migrations – Well-Kept Secrets Revealed

Interested? Take a look at the abstract and sign up.

Happy patching!