This blog post is outdated!
There’s a newer blog post for upgrades to Oracle AI Database 26ai.
Upgrade Oracle Database 19c CDB to 26ai with Data Guard – Standby Offline Method
Let me show you how to upgrade your database to Oracle Database 19c when it is protected by Data Guard. I will use AutoUpgrade and follow the Standby Offline method.
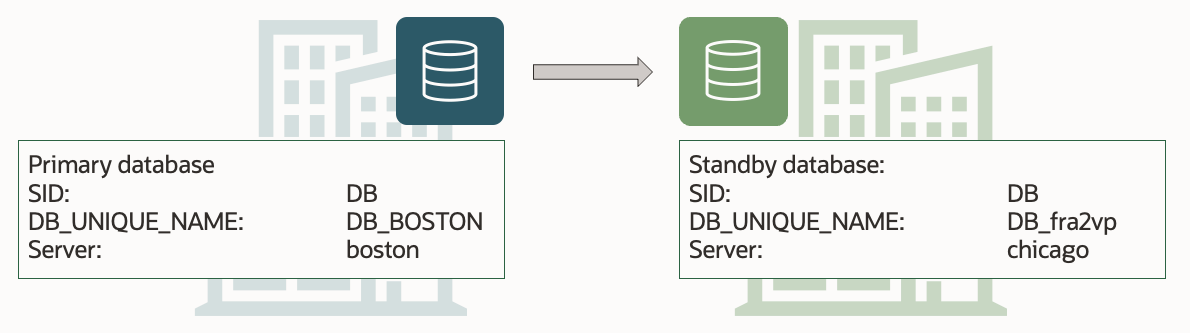
This is my demo environment:

- Grid Infrastructure is managing the database.
- Data Guard is configured using Data Guard broker.
Overall, the process looks like this:

This procedure starts right before I start AutoUpgrade in DEPLOY mode. Downtime has begun, and no users are connected to the database.
Before Upgrade
I always use the latest version of AutoUpgrade. Download it and put it into $ORACLE_HOME/rdbms/admin.
A newer version of AutoUpgrade can also upgrade to older database releases, so don’t worry if the AutoUpgrade version doesn’t match the Oracle Database release that you are upgrading to.
Disable Fast-Start Failover (FSFO)
Fast-Start Failover must be disabled during upgrade. I connect to Data Guard CLI (dgmgrl) and disable it:
DGMGRL> disable fast_start failover;
Restore Point
My standby database is protected against errors during the upgrade by keeping it offline. However, to be on the safe side, I also create a guaranteed restore point on the standby database:
STANDBY SQL> alter database recover managed standby database cancel;
STANDBY SQL> create restore point stdby_before_upg guarantee flashback database;
STANDBY SQL> alter database recover managed standby database disconnect from session;
Stop Data Guard
I shut down and disable the standby database. Disabling the database is strictly speaking not necessary, but a better-safe-than-sorry approach:
[oracle@standby]$ $ORACLE_HOME/bin/srvctl stop database -d $ORACLE_UNQNAME -stopoption immediate
[oracle@standby]$ $ORACLE_HOME/bin/srvctl disable database -d $ORACLE_UNQNAME
Upgrade
During the upgrade, I want to defer redo log shipping to the standby database. I use the AutoUpgrade config file parameter defer_standby_log_shipping (see appendix for complete config file):
upg1.defer_standby_log_shipping=yes
Next, I upgrade the primary database by starting AutoUpgrade in DEPLOY mode:
[oracle@primary]$ java -jar autoupgrade.jar -config DB.cfg -mode deploy
As the upgrade progresses, it makes a lot of changes to the database data dictionary. Those changes are written to redo, which will accumulate on the primary database. The database will not send the redo logs to the standby database (yet).
At the end of the upgrade, AutoUpgrade informs me that redo log transport has been deferred and that I must enable it again:
---- Data Guard broker configuration is disabled. Enable it once ready to sync up standby database  ----
Enable Data Guard from DB_BOSTON using the following DGMGRL command:
EDIT DATABASE DB_BOSTON SET STATE=TRANSPORT-ON;
After the upgrade, you should perform the necessary tests to validate the new database release. You should continue only when you are convinced to go live on the new release.
Remember that the standby database was left behind before we started, so if all other fails, simply restart the standby database and connect your users to it.
After Upgrade
Restart Standby Database In New Oracle Home
-
Ideally, I have stored these files outside the Oracle Home; like ASM. In that case, I don’t need to do anything:
- SPFile
- Password file
- Data Guard broker config files
- Network files (sqlnet.ora, tnsnames.ora etc.)
If I stored the files inside the Oracle Home, I must move them to the new Oracle Home (see appendix).
-
I change my profiles and /etc/oratab (see appendix).
-
I upgrade the database in Grid Infrastructure, which updates the Oracle Home information. Grid Infrastructure now starts the database in the new Oracle Home. If you are licensed for Active Data Guard, you can change the startoption from mount to read only:
[oracle@standby]$ export NEW_ORACLE_HOME=/u01/app/oracle/product/19.0.0.0/dbhome_1
[oracle@standby]$ export ORACLE_HOME=$NEW_ORACLE_HOME
[oracle@standby]$ $ORACLE_HOME/bin/srvctl upgrade database -db $ORACLE_UNQNAME -o $ORACLE_HOME
[oracle@standby]$ $ORACLE_HOME/bin/srvctl modify database -db $ORACLE_UNQNAME -s "mount" -r PHYSICAL_STANDBY
[oracle@standby]$ $ORACLE_HOME/bin/srvctl enable database -d $ORACLE_UNQNAME
[oracle@standby]$ $ORACLE_HOME/bin/srvctl start database -d $ORACLE_UNQNAME
Set Parameters
Suppose I made any changes to the database initialization parameters as part of the upgrade of the primary database. In that case, I probably also want to make the same changes on the standby database.
I can make changes to database initialization parameters using these AutoUpgrade config file parameters:
remove_underscore_parametersadd_after_upgrade_pfileadd_during_upgrade_pfiledel_after_upgrade_pfiledel_during_upgrade_pfile
I can also review the Preupgrade Summary Report for suggested changes to the database initialization parameters.
STANDBY SQL> alter system set ... scope=both;
Re-enable Data Guard
To re-enable the Data Guard config, I use Data Guard CLI (dgmgrl) and re-enable redo transport:
DGMGRL> edit database "DB_BOSTON" set state=transport-on;
Now, redo is shipping to the standby database, and it will apply it. When the redo generated during the upgrade is applied on the standby database, it is implicitly upgraded.
Wait For Redo Apply
Ensure the standby database has caught up and applied all the redo generated during the upgrade.
DGMGRL> show database "DB_fra24r"

Database - DB_fra24r

  Role:               PHYSICAL STANDBY
  Intended State:     APPLY-ON
  Transport Lag:      0 seconds (computed 1 second ago)
  Apply Lag:          1 hours 56 seconds (computed 1 second ago)
  Average Apply Rate: 3.38 MByte/s
  Real Time Query:    OFF
  Instance(s):
    DB

  Database Warning(s):
    ORA-16853: apply lag has exceeded specified threshold

Database Status:
WARNING
The database reports a WARNING because there is an apply lag. The standby database has not caught up yet.
Wait a while and repeat the show database command until status changes to SUCCESS and there is no apply lag.

If Data Guard broker reports an error the standby database is not applying logs, I can try to enable the configuration again:
DGMGRL> enable configuration;
Validate Data Guard
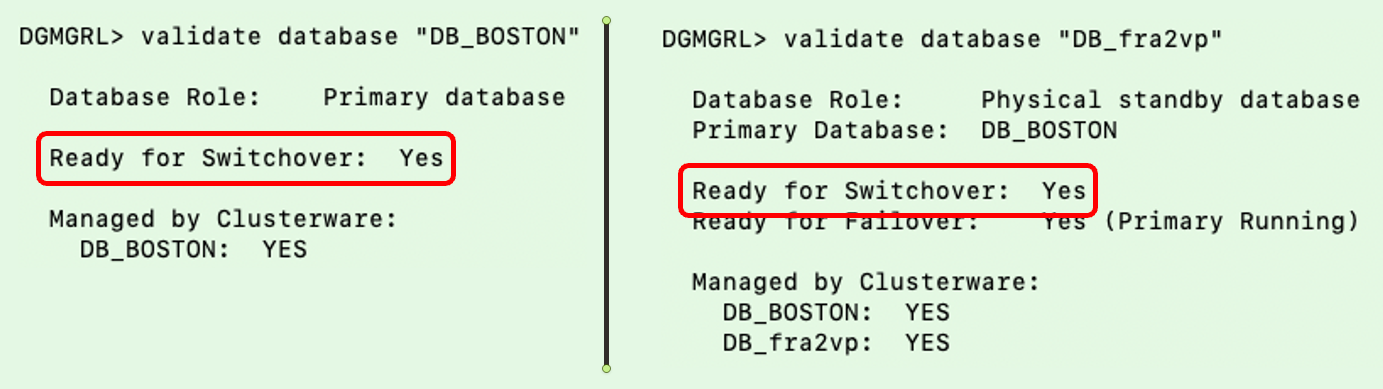
I validate the setup and ensure both databases are ready for a switchover. The database will not allow a switchover if there are any problems in the Data Guard setup. It is a good way of checking things are fine:
DGMGRL> validate database "DB_BOSTON"
DGMGRL> validate database "DB_fra24r"

Optionally, I perform a switchover as well:
DGMGRL> switchover to "DB_fra24r"
Re-enable Fast-Start Failover
I can now re-enable FSFO:
DGMGRL> enable fast_start failover;
Remove Restore Points
After the upgrade, I should perform the necessary tests to validate the new database release. I should remove the restore points on both databases when I am convinced to go live on the new release.
Miscellaneous
Check the database registration in listener.ora. I must update the Oracle Home information if there is a static configuration.
What If
-
What if your Oracle Database is not managed by Grid Infrastructure?
You can still use the above procedure, but you must change the commands accordingly.
-
What if you don’t use Data Guard broker?
Manually configured Data Guard environments are fully supported by AutoUpgrade, but you must change some commands accordingly.
Conclusion
It is not that complicated to upgrade your database, even if it is part of a Data Guard setup. Using AutoUpgrade is fully supported and highly recommended. A little extra legwork is needed to take care of the standby database. But the good thing is that your Data Guard setup is maintained throughout the process.
This procedure showed how to use the standby offline approach, which requires slightly more downtime but gives you extra protection.
Other Blog Posts in This Series
Appendix
Broker Config Files
Here is a query to determine the location of the Data Guard broker config files. In this example, the files are stored outside the Oracle Home; in ASM:
SQL> select name, value from v$parameter where name like 'dg_broker_config_file%';

NAME                   VALUES
---------------------- --------------------------------
dg_broker_config_file1 +DATA/DB_FRA2PR/dr1db_fra2pr.dat
dg_broker_config_file2 +DATA/DB_FRA2PR/dr2db_fra2pr.dat
Database Files
Here is a command to see where the SPFile and password file are located. In this example, the SPFile is stored outside the Oracle Home. However, the password file is in the default location inside the Oracle Home. The latter must be moved when you restart a database in the new Oracle Home:
[oracle@standby]$ srvctl config database -d $ORACLE_UNQNAME | grep -E "Spfile|Password"
Spfile: +DATA/<DB_UNIQUE_NAME>/PARAMETERFILE/spfileDB.ora
Password file:
Updating /etc/oratab
Here is a little snippet to update /etc/oratab to match the new release Oracle Home. Since I am using Grid Infrastructure to manage my database, I don’t set the database to start automatically:
export NEW_ORACLE_HOME=/u01/app/oracle/product/19.0.0.0/dbhome_1
export ORACLE_SID=DB
#Backup file
cp /etc/oratab /tmp/oratab
#Use sed to remove the line that starts with ORACLE_SID
sed '/^'"$ORACLE_SID"':/d' /tmp/oratab > /etc/oratab
#Add new entry
echo "$ORACLE_SID:$NEW_ORACLE_HOME:N" >> /etc/oratab
Updating .bashrc
Here is a little snippet to update .bashrc replacing the old Oracle Home with the new Oracle Home:
export OLD_ORACLE_HOME=/u01/app/oracle/product/12.2.0.1/dbhome_1
export NEW_ORACLE_HOME=/u01/app/oracle/product/19.0.0.0/dbhome_1
cp ~/.bashrc ~/.bashrc-backup
sed 's|'"$OLD_ORACLE_HOME"'|'"$NEW_ORACLE_HOME"'|g' ~/.bashrc-backup > ~/.bashrc
Alert Log Messages
Before the upgrade of the primary database, I stop the standby database. Since I didn’t defer redo transport in the primary database, it will complain about losing connection to the standby database. The primary database alert log will contain an entry similar to this:
2022-08-19T05:21:39.389976+00:00
ARCH: Attempting destination LOG_ARCHIVE_DEST_2 network reconnect (1089)
ARCH: Destination LOG_ARCHIVE_DEST_2 network reconnect abandoned
krsg_gap_ping: Error 1089 when pinging <standby> (Process:TT00) (PID:82492)
2022-08-19T05:21:46.606834+00:00
TT04: Attempting destination LOG_ARCHIVE_DEST_2 network reconnect (3113)
TT04: Destination LOG_ARCHIVE_DEST_2 network reconnect abandoned
2022-08-19T05:21:46.607255+00:00
Errors in file /u01/app/oracle/diag/rdbms/db_boston/DB/trace/DB_tt04_66302.trc:
ORA-03113: end-of-file on communication channel
Error 3113 for archive log file 3 to '<standby>'
2022-08-19T05:21:47.002610+00:00
Errors in file /u01/app/oracle/diag/rdbms/db_boston/DB/trace/DB_tt04_66302.trc:
ORA-03113: end-of-file on communication channel
I can safely ignore it. My monitoring system might detect this and start to complain.
Config File
For your reference, this is the config file I used. It contains only the required information. All other parameters have a default value:
upg1.sid=DB
upg1.source_home=/u01/app/oracle/product/12.2.0.1/dbhome_1
upg1.target_home=/u01/app/oracle/product/19.0.0.0/dbhome_1
upg1.defer_standby_log_shipping=yes
Synchronize Standby Database
When I run AutoUpgrade in ANALYZE mode and check the preupgrade summary report, I find this information message:
Synchronize your standby databases before database upgrade.
The standby database is not currently synchronized with its associated primary database.
To keep data in the source primary database synchronized with its associated standby databases, all standby databases must be synchronized before database upgrade. See My Oracle Support Note 2064281.1 for details.
Don’t worry about it. It tells me to ensure that all redo gets applied.
What does it say? Basically, it says that all redo generated on the primary database before the downtime window started, should be sent to and applied on the standby database. This way, my standby database is ready to replace your primary database at any time, if something goes really wrong.
Strictly speaking it is not necessary to ensure that, but it is strongly recommended.
Further Reading