XTTS: Target Database and Data Guard

Often when you migrate an Oracle Database using cross-platform transportable tablespace (XTTS) and incremental backups, it is a big database. Big databases must often be protected by Data Guard.

How do you ensure that Data Guard protects the target database at the end of the migration?

Build After Migration

A simple solution is to build the standby database after the migration. There are some downsides to this approach:

  • It takes time. In many situations, the business requires that the database can’t go live until a standby database is in place. Having to build a standby database will prolong the downtime.
  • It puts a load on the primary database. Right after the migration, you don’t have your backups in place yet, so you will need to build the standby databases directly from the primary database. That requires a lot of I/O and network traffic. You might want to use those resources for other activities, like taking a level 0 backup or regathering statistics.
  • It can become even more complicated if you migrate into multitenant architecture. Rebuilding the standby database of an already running, active CDB might not be an option. The other PDBs in the CDB are compromised while the standby is rebuilt.

Restore Data Files to Standby Host

Here is an approach that offers much less downtime. Restore the data files onto the standby host as well as part of the migration. During the Data Pump import, the plug-in propagates to the standby database via redo apply.

When migrating with XTTS and the Perl script you are familiar with running the backup on the source database (xttdriver.pl --backup). Also, you know how to restore and recover the data files on the target system (xttdriver.pl --restore).

Now, the idea is you restore and recover the data files on the primary host and also on the standby host. During the Data Pump import, the data files are plugged into the primary database. The plug-in commands are propagated to the standby database via redo apply. Then, the standby database can plug-in the data files if they are located in the same place as on the primary database. The rest of the Data Pump import will propagate as well, and in the end you will have a working Data Guard environment.

You must recover the data files on the primary and standby database to the exact same SCN. Be sure to restore all backups to both the primary and standby database.

Overview of the process

How To

The following assumes that your target databases are using ASM. Also, I am migrating directly into a PDB. But the procedure is similar for migrations into a non-CDB database. Use the procedure described in my previous blog post or MOS note V4 Reduce Transportable Tablespace Downtime using Cross Platform Incremental Backup (Doc ID 2471245.1). Adjust the procedure according to the following.

  • Prepare the target database and build a standby database before starting the migration.
  • In xtt.properties set destconnstr to point to the target primary database.
  • Copy xtt.properties to the target primary host and target standby host.
  • On target standby host, change xtt.properties and set destconnstr to point to the target standby database.
  • Create the cross-platform backups on the source database using xttdriver.pl --backup in the usual way
  • Now copy the file res.txt to both the target primary and target standby database.
  • The backups in the scratch location should also be available to both the target primary and standby databases.
  • Now restore or recover the backups on the target primary and target standby database using xttdriver.pl --restore.
  • Repeat the backup/restore/recover process as many times as needed. Keep recovering the target primary and target standby database. It is very important that the data files on both the target primary and target standby database are recovered to the exact same SCN.
  • On the target databases the data files will be restored into ASM. The data file itself is created with an OMF file name:
    +<disk_group>/<db_unique_name>/<source_guid>/DATAFILE/<omf_name>
    
    It could be something like this:
    +DATA/CDB1_FRA356/86D5DC2587337002E0532AB2A8C0A57C/DATAFILE/ACCOUNT.281.1099469863
    
    • The disk group is what you specified in xtt.properties in dest_datafile_location
    • DB_UNIQUE_NAME is not the same on the primary and standby database. It will differ.
    • To comply with OMF standard the database must restore the data files into a folder corresponding to the PDB it belongs to. However, currently, the data files do not belong to a PDB. We haven’t done the Data Pump import plug-in operation yet. The database will create a folder with the GUID of the source database. If you are interested, you can get the GUID from the source database using select guid from v$containers.
    • The last part of the OMF file name is the tablespace name, and some numbers representing the file ID and a number to ensure uniqueness. This part will differ on the primary and standby database as well.
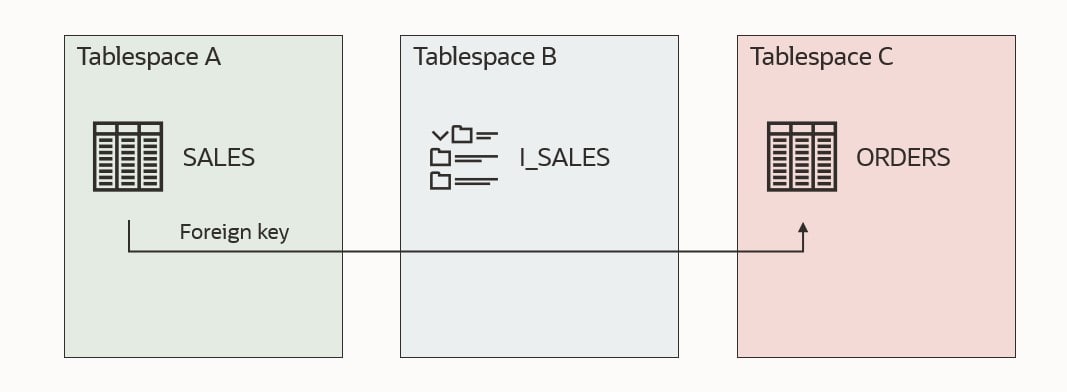
  • We now know that the data file name is different on the primary and standby database. Previously, it was stated that it is important that the data files are stored in the same location and has the same name. This is a problem! But the Perl script solves that by creating ASM aliases.
  • The aliases will be created in the location specified by dest_datafile_location in xtt.properties. Use asmcmd to verify it. The column SYS (System-generated) is N, meaning this is not a proper OMF file. Also, we can see in the Name column that it is an alias:
    ASMCMD> ls -l +DATA
    Type      Redund  Striped  Time             Sys  Name
    DATAFILE  UNPROT  COARSE   MAR 16 08:00:00  N    account_25.dbf => +DATA/CDB1_FRA2KR/86D5DC2587337002E0532AB2A8C0A57C/DATAFILE/ACCOUNT.282.1099469855
    DATAFILE  UNPROT  COARSE   MAR 16 08:00:00  N    accountidx_26.dbf => +DATA/CDB1_FRA2KR/86D5DC2587337002E0532AB2A8C0A57C/DATAFILE/ACCOUNTIDX.280.1099469855
    ...
    
  • If you look at the directory where the alias is pointing to, you can see that the files are proper OMF files – real data files. Column SYS is Y, and Name does not contain the alias pointer =>:
    ASMCMD> cd +DATA/CDB1_FRA2KR/86D5DC2587337002E0532AB2A8C0A57C/DATAFILE
    ASMCMD> ls -l 
    Type      Redund  Striped  Time             Sys  Name
    DATAFILE  UNPROT  COARSE   MAR 16 08:00:00  Y    ACCOUNT.282.1099469855
    DATAFILE  UNPROT  COARSE   MAR 16 08:00:00  Y    ACCOUNTIDX.280.1099469855
    ...
    
  • Thus, the aliases are hiding the fact that the data files have different name on the target primary and target standby database.
  • When you prepare the parameter file for the Data Pump import, be sure to reference the aliases – not the OMF named data files. The aliases have the same name on both the target primary and target standby database:
    $ cat import.par
    
    transport_datafiles=+DATA/account_25.dbf
    transport_datafiles=+DATA/accountidx_26.dbf
    transport_datafiles=...
    
  • Then start the Data Pump import. The data files are plugged into the primary database during DATABASE_EXPORT/PLUGTS_FULL/PLUGTS_BLK. When the redo containing that information is applied on the standby database, the standby database will plug in the data files as well.
  • When the Data Pump import completes, you can verify that the standby database survived and is still applying redo. A switch-over is also a good way of testing it.

Conclusion

You can prepare the target standby database in advance. This enables the target database to be protected by Data Guard as soon as the Data Pump import completes.

Restore and recover the data files to the target primary and target standby database. If they are recovered to the exact same SCN the plug-in of the data files propagates to the standby database via redo apply. After the Data Pump import, your target database has a fully functional standby database.

Further Reading

Other Blog Posts in This Series

XTTS: Bigfile Tablespaces

What if the database you want to migrate has bigfile tablespaces? Bigfile tablespaces are very often used in very large databases. Do they influence on the migration using cross-platform transportable tablespaces and incremental backups?

What Is It?

First, let’s briefly recap what a bigfile tablespace is:

A bigfile tablespace is a tablespace with a single, but potentially very large (up to 4G blocks) data file. Traditional smallfile tablespaces, in contrast, can contain multiple data files, but the files cannot be as large.

The benefits of bigfile tablespaces are the following:

  • A bigfile tablespace with 8K blocks can contain a 32 terabyte data file…

Important to note is that a bigfile tablespace contains one big data file. That file can be huge.

What Do You Normally Do?

When RMAN backs up a database or a tablespace it will parallelize by using several channels – each channel will process one or more data files. Imagine a 32 TB data file (from a bigfile tablespace). One RMAN channel will be allocated and needs to process that data file alone. That will take a while!

To solve that multisection backup was implemented. That allows multiple channels to work on the same data file. You can enable multisection backup by using the clause section size.

Backup

The initial, level 0 backup of the source database is executed by the Perl script during the migration. The Perl script generates the RMAN backup commands on-the-fly, and it does not specify a section size. In addition, it is not possible to specify section size as a default channel configuration (see RMAN show all command).

So there is no way to enable the use of multisection backup. Currently, multisection backup is simply not supported by the Perl script.

Now What

If multisection backup is essential to your migration, I suggest you create a Service Request and ask for an enhancement. The more customers request it, the more likely it is that the feature will be added.

If you have bigfile tablespaces you have only one option. Use multiple Perl scripts. It is a good workaround if you have many bigfile tablespaces. The workaround probably won’t add much value if you only have one.

I have another blog post describing the use of multiple Perl scripts.

Other Blog Posts in This Series

XTTS: Backup on Standby Database

When doing a cross-platform migration with transportable tablespaces and incremental backup, is it possible to perform backups on a standby database? If so, you could offload the work from a primary database.

The short answer is yes. You can use a physical standby database but not a snapshot standby database.

Using a standby database for the backups is an advantage in some situations:

  • The primary database does not have the capacity to perform the extra backups (CPU, disk space, or I/O).
  • You want the primary database to be completely unaffected by the migration.

How To

You follow the regular procedure described in the MOS note V4 Reduce Transportable Tablespace Downtime using Cross Platform Incremental Backup (Doc ID 2471245.1) with a few changes. The changes are described in Using XTTs in a Data Guard Environment.

Be Careful

You must have an Active Data Guard license, if you:

  • Open a physical standby database and enable redo apply.
  • Enable block change tracking on the standby database (for faster incremental backups).

Procedure

The primary database is called SRCPRI and runs on the host src-pri. The standby is called SRCSTDBY and runs on the host src-stdby.

  • Ensure allowstandby=1 in xtt.properties.

  • Whenever you need to perform a backup on the physical standby database – level 0 or incremental:

    • Cancel redo apply and open the physical standby database:
    SRCSTDBY SQL> alter database recover managed standby database cancel;
    SRCSTDBY SQL> alter database open;
    
    • Perform the backup
    [oracle@src-stdby]$ $ORACLE_HOME/perl/bin/perl xttdriver.pl --backup
    
    • Bring the standby database back in MOUNT mode and re-enable redo apply:
    SRCSTDBY SQL> shutdown immediate
    SRCSTDBY SQL> startup mount
    SRCSTDBY SQL> alter database recover managed standby database disconnect from session;
    
  • When it is time to perform the final incremental backup:

    • Set tablespaces in READ ONLY mode on the primary database:
    SRCPRI SQL> alter tablespace ... read only;
    
    • Archive current log and ensure it is applied on the standby database:
    SRCPRI SQL> alter system archive log current;
    
    • When you have confirmed the redo is applied on the standby database, cancel redo apply and open it:
    SRCSTDBY SQL> alter database recover managed standby database cancel;
    SRCSTDBY SQL> alter database open;
    
    • Verify tablespaces are READ ONLY:
    SRCSTDBY SQL> select tablespace_name, status from dba_tablespaces;
    
    • Perform the final incremental backup
    [oracle@src-stdby]$ $ORACLE_HOME/perl/bin/perl xttdriver.pl --backup
    
    • Perform the Data Pump export on the primary database:
    [oracle@src-pri]$ expdp system ... full=y transportable=always ...
    

Active Data Guard

If you have a license for Active Data Guard, you can simply keep the physical standby database in OPEN WITH REDO APPLY mode. You don’t need to switch from OPEN mode to MOUNT mode.

Conclusion

Being able to perform the backups on a standby database is a huge advantage. But it makes the process slightly more complicated, so I would recommend it only if really needed. In addition, if you don’t follow the procedure strictly, you might accidentally use a feature that requires Active Data Guard.

The MOS note V4 Reduce Transportable Tablespace Downtime using Cross Platform Incremental Backup (Doc ID 2471245.1) has some additional details about using a standby database. You can get those details by opening a Service Request and asking for it.

Other Blog Posts in This Series

XTTS: Slow Network Between Source and Target

When you migrate an Oracle Database using cross-platform transportable tablespaces (XTTS) and incremental backups, you will need to transfer a large amount of data to the target host. In some situations, especially if the target host is in a remote data center or the cloud, you are restricted by the network throughput, and it can be a limiting factor.

One approach to speed up the data transfer is to compress it before it leaves the source host. Compressing and decompressing takes time and CPU. But if your network connection is slow enough, it may pay off in the end.

The Approach

Like all other posts in this series, I am using the Perl scripts found in MOS note V4 PERL Scripts to reduce Transportable Tablespace Downtime using Cross Platform Incremental Backup.

First, you start the initial level 0 backup of the source database:

$ORACLE_HOME/perl/bin/perl xttdriver.pl --backup

The backups will be stored in the directory defined by src_scratch_location. In my case, the directory is /u01/app/oracle/xtts_src_scratch. Now you can simple compress the entire directory:

gzip -r /u01/app/oracle/xtts_src_scratch

This should significantly reduce the size of the files. Transfer the compressed files to your target host, and put them into the directory defined by dest_scratch_location. Then, uncompress the files:

gunzip -r /u01/app/oracle/xtts_dest_scratch

Continue the procedure described in the above MOS note and start the restore:

$ORACLE_HOME/perl/bin/perl xttdriver.pl --restore

Some Figures

I made a little test to give you an idea of how much there is to save.

Size
Data files total size 197 GB
Backup set size 197 GB
After gzip compression 12 GB

Because I don’t have any free space in my data files, the backup sets have almost the same size as the actual data files – 197 GB. By gzipping the files I could reduce the file size to 12 GB. So there is a significant amount to save – from 197 GB to 12 GB. It makes a huge difference whether you have to transfer 197 or 12 GB. But you must consider the time it takes to compress and decompress.

Elapsed time
Compression 13 min 52 sec
Decompression 8 min 7 sec

I made the same test but with image file backups and the numbers were almost the same. Generally, you should always try to use backup sets over image file backups. Backup sets use unused block compression which will skip all the unused blocks in your data files. That can make quite a difference for database with a lot of free space.

What About RMAN Compression

RMAN does have the option of compressing the backup set, but that is currently not supported by the Perl scripts. If the Perl scripts would be able to do that, you could get a good compression ratio with RMAN compression as well (of course provided you have a license for Advanced Compression Option) and avoid the gzip trick. Using the example above, by using RMAN compressed backup sets (medium compression) the backup files would be 0,3 GB which is very good as well.

But for now, you are "stuck" with the gzip trick.

Final Words

A few things to consider:

  • You should only consider this approach if you have a slow network.
  • You will need extra disk space during the compression/decompression operation.
  • You should only compress the initial, level 0 backup. The subsequent level 1 incremental backups will be much smaller in size, and it is unlikely to pay off.
  • You should test on your own database and hardware to know the actual compression ratio. Add the network throughput to the equation, and you can do the math to see if it is a good idea for your specific project.

Other Blog Posts in This Series

What Is a Self-contained Transportable Tablespace Set

Yesterday a comment was made on a video on our YouTube channel. The question was, what happens when you try to transport a tablespace that is not self-contained. Let’s find out.

The Error

First, some test data:

create tablespace a;
create tablespace b;
create tablespace c;
create user daniel identified by oracle;
grant dba to daniel;
create table daniel.sales (c1 number) tablespace a;
create table daniel.orders (c1 number) tablespace c;
create index daniel.i_orders on daniel.orders (c1) tablespace b;

Then, let’s run the Data Pump command to start the process

alter tablespace a read only;
alter tablespace b read only;

host expdp daniel/oracle transport_tablespaces=a,b
Export: Release 19.0.0.0.0 - Production on Fri Feb 4 12:32:14 2022
Version 19.14.0.0.0

...

Processing object type TRANSPORTABLE_EXPORT/STATISTICS/TABLE_STATISTICS
ORA-39123: Data Pump transportable tablespace job aborted
ORA-39187: The transportable set is not self-contained, violation list is

ORA-39907: Index DANIEL.I_ORDERS in tablespace B points to table DANIEL.ORDERS in tablespace C.
Job "DANIEL"."SYS_EXPORT_TRANSPORTABLE_01" stopped due to fatal error at Fri Feb 4 12:32:33 2022 elapsed 0 00:00:17

The answer is: Data Pump will check the set of tablespaces and ensure they are self-contained, when you perform the export.

Self-Contained

In the documentation it lists the following as one of the tasks for transporting tablespaces:

  1. Pick a self-contained set of tablespaces.

What does that mean exactly? Later on, in the documentation there are some examples of violations:

  • An index inside the set of tablespaces is for a table outside of the set of tablespaces.
  • A partitioned table is partially contained in the set of tablespaces.
  • A referential integrity constraint points to a table across a set boundary.

Let me illustrate it. Imagine I want to transport tablespaces A and B.

This first illustration shows a self-contained tablespace set. Table SALES is in tablespace A and a corresponding index I_SALES in tablespace B. Both tablespaces are part of the set that I want to transport. All good!

An example of a self-contained tablespace set

The next example is no good. Tablespace B now contains an index I_ORDERS, which refers to a table ORDERS which is not placed in the tablespaces that I want to transport. Either I have to drop the index I_ORDERS or move the table ORDERS into one of the tablespaces I am transporting.

An example of a tablespace set that is not self-contained

This example is also no good. Table SALES has three partitions. One of the partitions is in a tablespace that I am not transporting. I need to either drop the partition in tablespace C or move it to one of the other tablespaces.

An example of a tablespace set that is not self-contained

This last example is also no good. Table SALES has a foreign key constraint that refers table ORDERS, but ORDERS is located outside the tablespace set. There is a solution to this which will be discussed shortly.

An example of a tablespace set that is not self-contained

Checking

You can use DBMS_TTS to check whether a given set of tablespaces are self-contained. Using my previous example. I would run:

execute dbms_tts.transport_set_check('A,B');

Next, I could check the result:

SQL> select * from transport_set_violations;

By default, the procedure transport_set_check doesn’t check for foreign keys that refer to something outside the tablespace set. This means that my last illustration above would not be found by transport_set_check, and you would end up with an error when you try to transport the tablespaces.

To also check for bad foreign key constraints:

execute dbms_tts.transport_set_check('A,B', true);

Foreign Key Constraints

If you have foreign key constraints that refer to a table outside of the tablespace set, it is one of the issues which can be ignored. You can instruct Data Pump to exclude constraints, and this issue will be ignored:

$ expdp ... transport_tablespaces=A,B exclude=constraint

When you import the tablespaces into another database, there won’t be any constraints. Even those foreign key constraints that were valid are gone. And even check constaints. All of them! You should consider whether you want to create them again manually.

Indexes

If you can exclude constraints, can you also exclude indexes? If possible, you could avoid dropping or moving an offending index. Let’s try! I am using the same test data as the first example.

Check for violations:

execute dbms_tts.transport_set_check('A,B');
select * from transport_set_violations;

VIOLATIONS
-----------------------------------------------------------------
ORA-39907: Index DANIEL.I_ORDERS in tablespace B points to table DANIEL.ORDERS in tablespace C.

As expected, index I_ORDERS is a problem. Let’s try to export and exclude indexes (exclude=index):

alter tablespace a read only;
alter tablespace b read only;
host expdp daniel/oracle transport_tablespaces=a,b exclude=index
Export: Release 19.0.0.0.0 - Production on Fri Feb 4 12:32:14 2022
Version 19.14.0.0.0

Copyright (c) 1982, 2019, Oracle and/or its affiliates.  All rights reserved.

Connected to: Oracle Database 19c Enterprise Edition Release 19.0.0.0.0 - Production
Starting "DANIEL"."SYS_EXPORT_TRANSPORTABLE_01":  daniel/******** transport_tablespaces=a,b exclude=index 
Processing object type TRANSPORTABLE_EXPORT/STATISTICS/TABLE_STATISTICS
ORA-39123: Data Pump transportable tablespace job aborted
ORA-39187: The transportable set is not self-contained, violation list is

ORA-39907: Index DANIEL.I_ORDERS in tablespace B points to table DANIEL.ORDERS in tablespace C.
Job "DANIEL"."SYS_EXPORT_TRANSPORTABLE_01" stopped due to fatal error at Fri Feb 4 12:32:33 2022 elapsed 0 00:00:17

It is not possible to exclude indexes in the same way as constraints. However, I think it makes sense. A constraint is just metadata; something that is recorded in the dictionary. We can easily ignore that when doing the Data Pump export. An index is an object with segments; data in the tablespace. Imagine we could somehow exclude the index. All those blocks belonging to the index would now be zombie blocks belonging to nothing.

Standby Database

If you need to move data out of a running database and your tablespaces are not self-contained, you need to fix the issues. Some of the solutions involve dropping or moving data, but you might not want to do that in a running database.

Imagine the example above where there is an index that refers to a table outside of the tablespace set (I_ORDERS). You probably need that index in your running database, so not a good idea to drop the index.

But you can use your standby database if you have one.

  • Convert your physical standby into a snapshot standby.
  • On your snapshot standby, do the required changes to make your tablespace set self-contained.
  • Still, on the snapshot standby, copy the data files and perform the Data Pump export to generate your transportable tablespace set and corresponding Data Pump dump file.
  • Revert the snapshot standby back into a physical standby. This will automatically revert all the temporary changes you made and re-sync with the primary database.

If you don’t have a standby database, you could achieve the same with Flashback Database, but that would require an outage on the running database.

Conclusion

If you try to transport tablespaces that are not self-contained, you will get an error. There is no way around the issues except for foreign key constraints. If you need to make changes to your database to have self-contained tablespaces, you can do it on a snapshot standby database to avoid interfering with a running database.

Other Blog Posts in This Series

Rolling Upgrades of Oracle Database on Exadata Cloud Service

If you want to minimize the downtime needed to upgrade your Oracle Database 19c on Exadata Cloud Service, one of the options is to use rolling upgrades. Our good friends in the Maximum Availability Architecture (MAA) team recently posted a very good MOS note with step-by-step instructions.

Exadata Cloud Database 19c Rolling Upgrade With DBMS_ROLLING (Doc ID 2832235.1)

What Is Rolling Upgrade?

A rolling upgrade uses a standby database called a logical standby database.

A logical standby database is initially created as an identical copy of the primary database, but it later can be altered to have a different structure. The logical standby database is updated by executing SQL statements. The flexibility of a logical standby database lets you upgrade Oracle Database software (patch sets and new Oracle Database releases) and perform other database maintenance in rolling fashion with almost no downtime.

Logical Standby Databases, Data Guard Concepts and Administration 21c

With almost no downtime means the time it takes to perform a Data Guard switchover. Typically, that is a few minutes. If your application is configured properly, the downtime can be hidden from the end-user. The downtime will appear as a brown-out where the session will be waiting for the database to complete the switchover before continuing.

Rodrigo explains how the process works in this video from our webinar How Low Can You Go? Zero Downtime Operations

Pro tip: The process uses a so-called Transient Logical Standby or TLS, so you can find additional information by searching for that term as well.

Can I use rolling upgrade on my database?

Rolling upgrades using DBMS_ROLLING requires the Active Data Guard Option which is included in your ExaCS license.

In addition, there are requirements to the data types in your database and a few other prerequisites. Check the documentation for details.

In this video, Roy explains how to determine the readiness of your Oracle Database. The video is also from our webinar How Low Can You Go? Zero Downtime Operations.

Other Options for Minimizing Downtime During Upgrades

If your database is not capable of performing rolling upgrades, you can still do something to minimize downtime. You can try to tune the upgrade itself or use Oracle GoldenGate. Both options are described in detail in our webinar How Low Can You Go? Zero Downtime Operations. You can flip through the slides or watch the complete recording.

If you decide to go with Oracle GoldenGate, and since your database is in OCI, you can benefit from the OCI GoldenGate service. Now, you may think: GoldenGate, that sounds expensive! But it is not. The new OCI GoldenGate service comes at a completely new price model, which is very attractive for shorter use cases like upgrades and migrations. You don’t pay a license for the source and target CPUs but instead for usage of CPUs on the GoldenGate hub itself. And you only pay by the hour.

Conclusion

Finally, just a kudos to my colleague Sebastian Alasino for putting together a very good, easy-to-follow MOS note.

Here is a demo of rolling upgrades (not on ExaCS – but a lot is identical)

Happy upgrading!

Get Started with Autoupgrade

If you never upgraded a database or it has been a while since you did it, I suggest that you get familiar with AutoUpgrade. Other methods of upgrading still exist, but AutoUpgrade is the only recommended method!

How To

AutoUpgrade is a tool that comes in a single file named autoupgrade.jar. You find it in your Oracle Home in $ORACLE_HOME/rdbms/admin. You should always download the latest version of AutoUpgrade from My Oracle Support and put it into your Oracle Home, thus overwriting the existing file.

AutoUpgrade is fully backward compatible, and a newer version of AutoUpgrade can upgrade databases to a previous version. In this example, AutoUpgrade is version 21.3.211115, but notice the information in build.supported_target_versions:

$ java -jar autoupgrade.jar -version

build.hash 081e3f7
build.version 21.3.211115
build.date 2021/11/15 11:57:54
build.max_target_version 21
build.supported_target_versions 12.2,18,19,21
build.type production

Version 21 of AutoUpgrade can upgrade your database to Oracle Database 21c and previous releases.

Now, you are ready to analyze your Oracle Database for upgrade readiness and eventually upgrade it. This short YouTube video explains the process.

Finally, you can watch a short demo of a database upgrade.

Try It

But the best way to learn is to do it yourself. You can use our Hands-On Lab for this purpose. You can find an overview of the lab and the lab instructions on Mike Dietrich’s blog.

You can run the lab in two ways.

VirtualBox image

The Hands-On Lab comes as a self-contained VirtualBox image that you download and run on your own computer. It requires around 100 GB of disk space and a fairly modern computer. Nothing fancy, but it doesn’t run smoothly on arcane hardware. Get started here.

LiveLabs

You can run the entire lab in just a browser using Oracle LiveLabs. You can do it in our Cloud Free Tier so that it will be completely free. Our workshop on Oracle LiveLabs is called Hitchhiker’s Guide for Upgrading to Oracle Database 19c.

Watch this video and learn how to provision a lab in Oracle LiveLabs.

Guided Tour

If you get stuck in the lab or just want to watch and let Mike Dietrich do all the typing, you can watch this recorded session of the complete hands-on lab.

Further Reading

Once done with the lab, you can start on these additional ressources:

Good luck!

P.S. Remember – it is better to fail in our lab than in production…

I Never Meet Joel, But I Have Met His Spirit #JoelKallmanDay

I didn’t know Joel Kallman. I heard about his name, and I knew he had something to do with APEX. But we never had to opportunity to meet each other. After his untimely death, I became aware of his huge impact on the Oracle community. So many people shared so many great stories about him and how he influenced the Oracle community. It became apparent to me how much he meant for the Oracle community.

This post is about the Oracle community. When I started working with Oracle, I quickly found out how great the community was. People were happily sharing knowledge – on blogs, at conferences, in videos. I was blown away by the amount of help and guidance I could get. For free – and even with a huge smile on top of that. I was a rookie and all that help made a huge difference. This is what I mean – when I say I believe I have met Joel’s spirit. But still, after many years working with Oracle, I use and value the community.

Since I joined Oracle, it has been on my to-do list to do a rolling upgrade. I never tried that for real. Last week, I had time to try out rolling upgrades with DBMS_ROLLING. Provision a Data Guard environment, open the documentation, get a cup of coffee, and off we go…

At one point, I was stuck. Like in – really stuck! Friday night – even after trying Connor’s gin/tonic debugging – still stuck. Saturday morning – after a good night’s, sleep still stuck. Errors, errors, errors!

Luckily, I attended a talk at UKOUG Tech Talk in April this year about rolling upgrades. Clive and Zahid did a really good presentation on rolling upgrades with a lot of valuable technical knowledge. Flip through the slides, and then – voila – problem solved. Now I could proceed with the upgrade. Thanks Clive, thanks Zahid.

If it hadn’t been for the community – for people happily sharing knowledge and helping each other – for Joel’s spirit, I would probably still be stuck in that rolling upgrade.

Never stop sharing knowledge!

New Webinars Coming Your Way

These days there is an abundance of virtual events. I feel exhausted from it from time to time. So you might ask yourself. Is there really room for virtual events?

The answer is: Yes, there is :-)

We have added more upcoming webinars to our Virtual Classroom Series: Upgrade to Oracle Database 19c. If you enjoyed the previous ones, I am sure that you will love these as well.

Webinar Date Sign Up
10 How Low Can You Go? Zero Downtime Operations October 21, 2021 Link
11 Secure Your Job – Fallback Is Your Insurance November 11, 2021 Link
12 Migrating Very Large Databases December 9, 2021 Link
13 Data Pump Extreme – Deep Dive with Development January 27, 2022 Link

Of course, we still keep our promise to you: All tech – no marketing, no buzzwords

If you miss any of the webinars, head over to the Webinar page and find the recording and the slides. All the previous nine webinars are there as well.

I hope to see you there!

Zero Downtime Migration – Logical Offline Migration How To Minimize Downtime

With Oracle Zero Downtime Migration (ZDM) 21.2, you can now perform logical offline migrations from IBM AIX and Oracle Solaris. Since it is an offline approach, the database is unavailable during the entire migration. Let’s look at how you can minimize downtime.

Before Migration

Statistics

Ensure that dictionary statistics are up-to-date in the source database. Data Pump does a lot of querying in the data dictionary, and accurate statistics are vital for good execution plans. I recommend gathering stats on SYS and SYSTEM:

begin
   dbms_stats.gather_schema_stats('SYS');
   dbms_stats.gather_schema_stats('SYSTEM');
end;
/

You could also use dbms_stats.gather_dictionary_stats. But it gathers statistics on all internal schemas, and most often, only SYS and SYSTEM is sufficient:

begin
   dbms_stats.gather_dictionary_stats;
end;
/

Data

I think it goes without saying, but the less data, the faster the migration complete. If you have any junk data in your database, get rid of it.

Migration

Parallel

Apply a proper degree of parallelism. Rule-of-thumb:

  • On-prem: 2 x number of physical cores
  • OCI: Number of OCPUs

When you are importing in OCI, consider scaling up on CPUs. More CPUs, faster import. Bare Metal and Exadata DB Systems scales online, whereas Virtual Machines need around 10 minutes of downtime.

Import processes running in parallel can read from the same dump file. This means that the number of parallel processes for an import is not limited by the number of dump files (which is the case of an export). To illustrate with an example:

  • Export: parallel=8 – 8 dump files were created. Each parallel worker needs exclusive access to a dump file.
  • Import: parallel=16 – still only 8 dump files. Each parallel worker can read from all dump files, no locks required.

You can control Data Pump parallel in ZDM using these parameters:

Data Pump Mode

Should you go via dump file or directly over a database link? Only your tests can tell the answer, but I am pretty sure that you will find that dump file mode is the quickest.

When you export via a dump file, you also need to figure out how you can transfer it to the target database:

  • Direct Transfer – you can use either scp or rsync. At the risk of starting a religious discussion, I don’t think it makes much of a difference in this use case. If you need rsync on Exadata, you can find guidance in MOS Doc ID 1556257.1.
  • Via Object Store – you can use either curl or OCI CLI. I would expect you can get better performance with OCI CLI. But you need to test it in your environment.

Remember to ensure you have adequate disk space on the source database host to hold the dump file. Use mount points that can deliver good write performance, and ideally, they should be separated from the storage that holds the database data files.

SecureFile LOB

ZDM automatically transforms BasicFile LOBs into SecureFile LOBs – which is very good. Don’t turn it off. Imports run faster when SecureFile LOBs are in play.

After Migration

Statistics

As soon as ZDM has completed the migration, gather dictionary stats in the target database. All those new objects that came in with the import have for sure made the statistics stale.

begin
   dbms_stats.gather_schema_stats('SYS');
   dbms_stats.gather_schema_stats('SYSTEM');
end;
/

Next, you need to figure out how you want to take care of the optimizer statistics. In a previous post, I discussed why this is needed and how to do it. If you decide to import statistics via DBMS_STATS, just ensure that you have gathered dictionary stats before.

Further Reading

I recommend that you also read the following posts:

Conclusion

When migrating from IBM AIX and Oracle Solaris, you use the logical offline approach, which means a lot of downtime. You have a few options to make it run as fast as possible.

Other Blog Posts in This Series