If you’re a frequent visitor to my blog, you’ll know I’m a big AutoUpgrade fanboy – especially the download mode, which can save you hours of downloading patches on My Oracle Support.
Recently, I was preaching to another customer, and when they finally gave in, here’s what happened:
We gave it a shot, but we keep running into errors when we try the download mode.
So, let’s see how we can solve the most common problems.
My Oracle Support
You must have an Oracle SSO account.
That account must be linked to a Customer Support Identifier (CSI) that has an active support agreement.
In that CSI, you must have the privilege to download patches. The MOS administrator in your organization can help you with that.
In User Details, select the appropriate Support Identifier, set the Patches drop-down to Download.
If AutoUpgrade tells you that your username or password is incorrect:
*Connection Failed - You entered an incorrect user name or password.*
You should ensure that you’re using the latest version of AutoUpgrade. We recently fixed a bug for passwords with certain special characters.
Network Connectivity
AutoUpgrade must connect to the following servers:
Those servers are part of a Content Delivery Network (CDN), so expect changing IP addresses. Base your firewall rules on DNS names rather than IP addresses.
InsaneDBA, aka Osman, wrote a good blog post on this topic – especially for those of you on Windows.
*SSL peer shut down incorrectly*
Check firewall settings and security groups to ensure they permit SSL traffic on the required ports.
Windows
If AutoUpgrade requires that you use an elevated command prompt (the run as administrator thing) when you use download mode, you should update to the latest version of AutoUpgrade. It no longer requires this.
In the multitenant architecture in Oracle AI Database, the container database is essential. If you create it the right way, you can avoid some difficulties later on.
Here’s my recommendation for creating container databases.
3xC
The three most important things all start with “C”. Makes it easier to remember.
Character Set
The first one is straightforward: stick with the default, AL32UTF8.
If the root container is AL32UTF8, you can plug in PDBs with any character set. You can have a mix of the classic US7ASCII, old-school European without the Euro sign in WE8ISO8859P1, Japanese JA16SJIS, and original Unicode UTF8, and whatever.
But as soon as you set the root character set to anything but AL32UTF8, all PDBs are bound to the same character set.
Remain flexible and use AL32UTF8.
Components
The number of components has a direct influence on the time it takes to upgrade and patch a database.
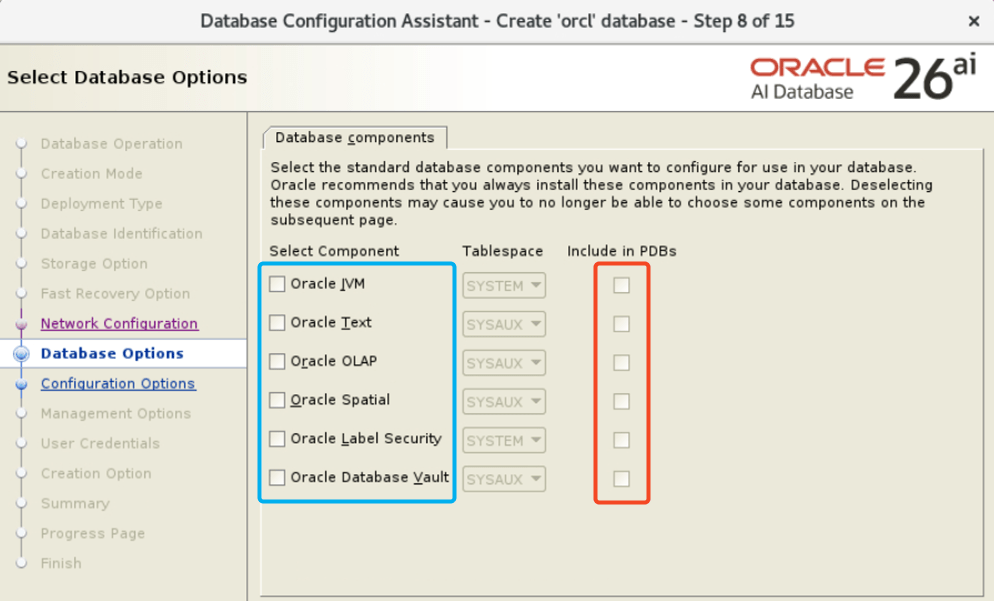
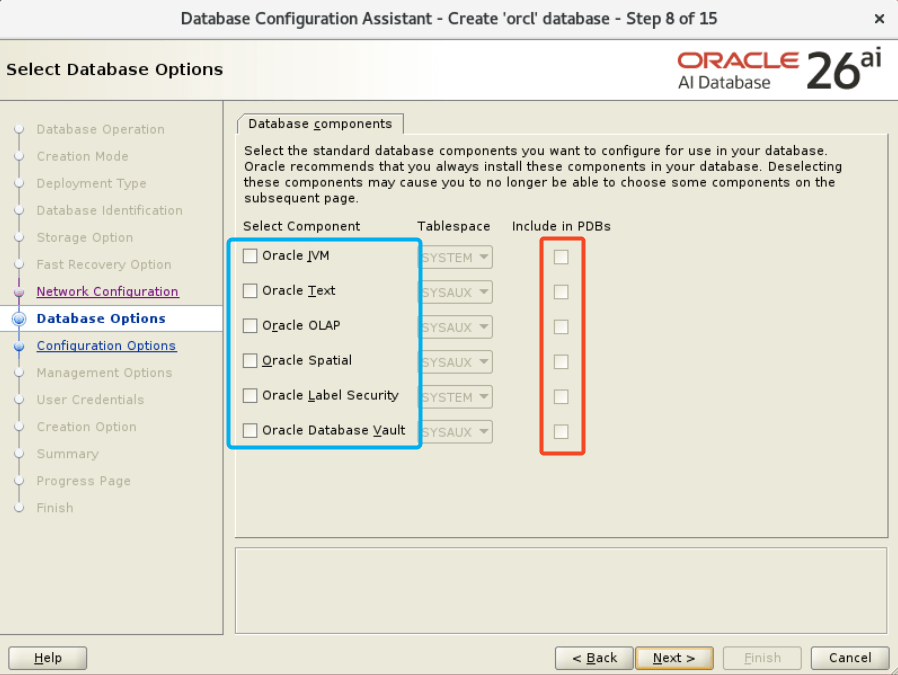
Any component used by a PDB must also be installed in the root container. So, install as many components as you need in root. No more than that (selectively tick checkboxes in the blue box).
Also, from a least privilege kind-of-perspective don’t install more than you need.
When you decide on a set of components to install, do that in root only. Ensure that new PDBs have none of the components installed (untick all checkboxes in the red box). This gives you the leanest PDBs. If a PDB requires a component, it’s easy to install afterward.
Compatible
The most important thing is that you have a uniform compatible setting in all your CDBs. This gives you the most flexibility.
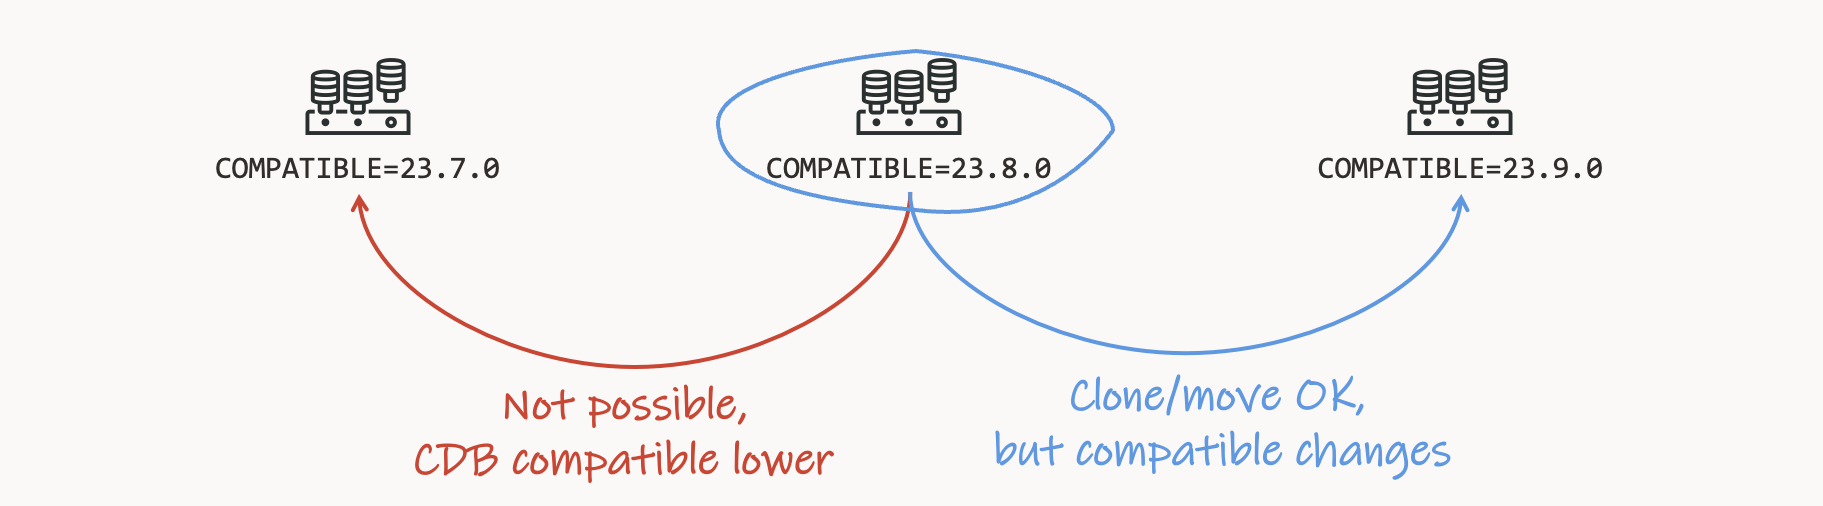
When you plug in a PDB, it must have the same compatible setting as the root container.
If the PDB has a lower compatible setting, it will automatically and silently raise the setting to that of the root container.
If the PDB has a higher compatible setting, you won’t be able to plug it in.
Important Parameters
Once you have created a CDB, I recommend setting these parameters.
The database now throws an error if you try to create a fourth PDB.
_exclude_seed_cdb_view
By default, the CDB views do not show information about PDB$SEED. I’m not too fond of this behavior. I want to know if there is a problem with it.
alter system set "_exclude_seed_cdb_view"=false scope=both;
Records from PDB$SEED now show up in the CDB views with CON_ID=2.
Create The CDB Using DBCA
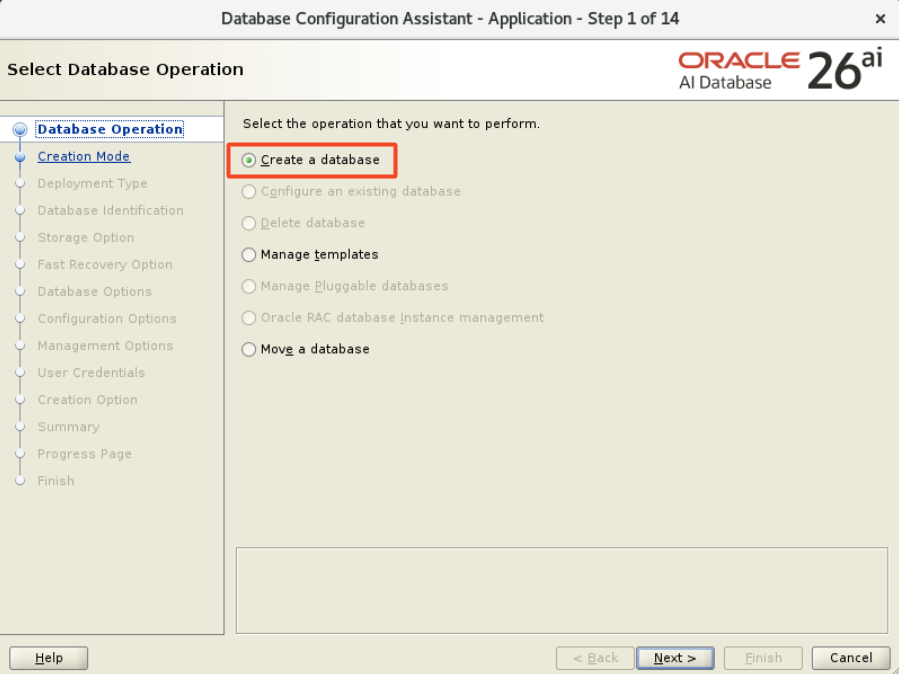
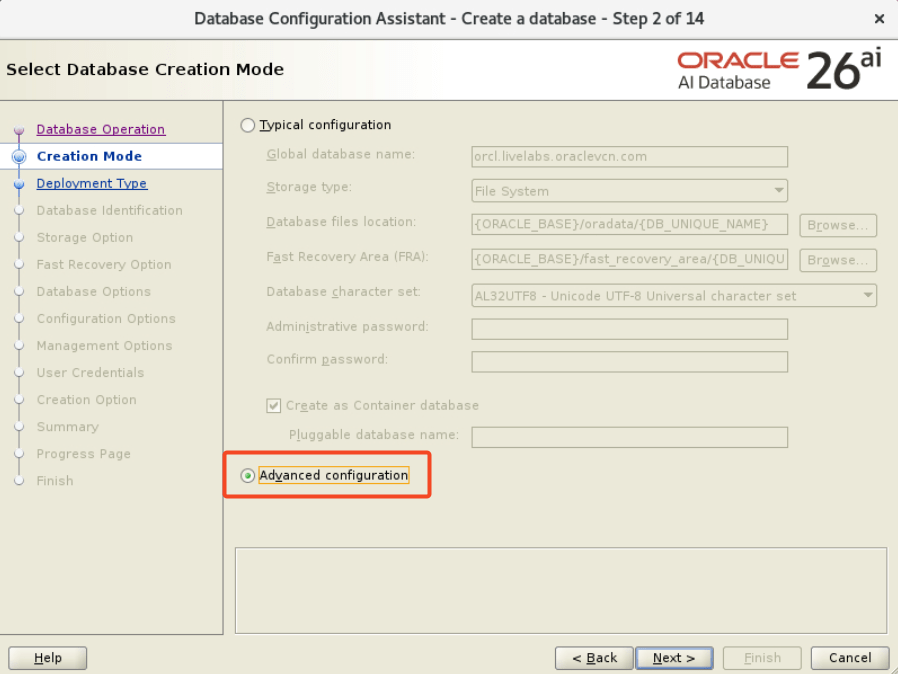
You need to use the advanced configuration in Database Configuration Assistance (DBCA) to create a CDB that matches the above recommendations.
Select Create a database.
Select Advanced configuration.
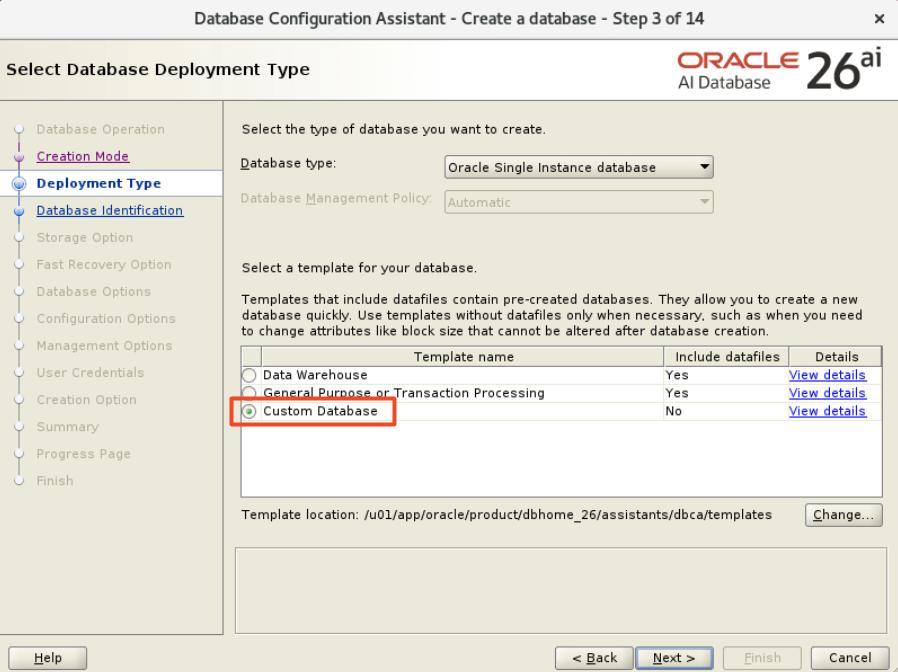
Create a Custom Database.
On the following few pages, you can make the changes you like until you reach the Database Options page.
When you reach the Database Options page, select the components you need in the root container (blue box). In the Include in PDBs list, select only the component you need in all your PDBs. Otherwise, leave them out so you get a lean PDB. You can easily add components later on.
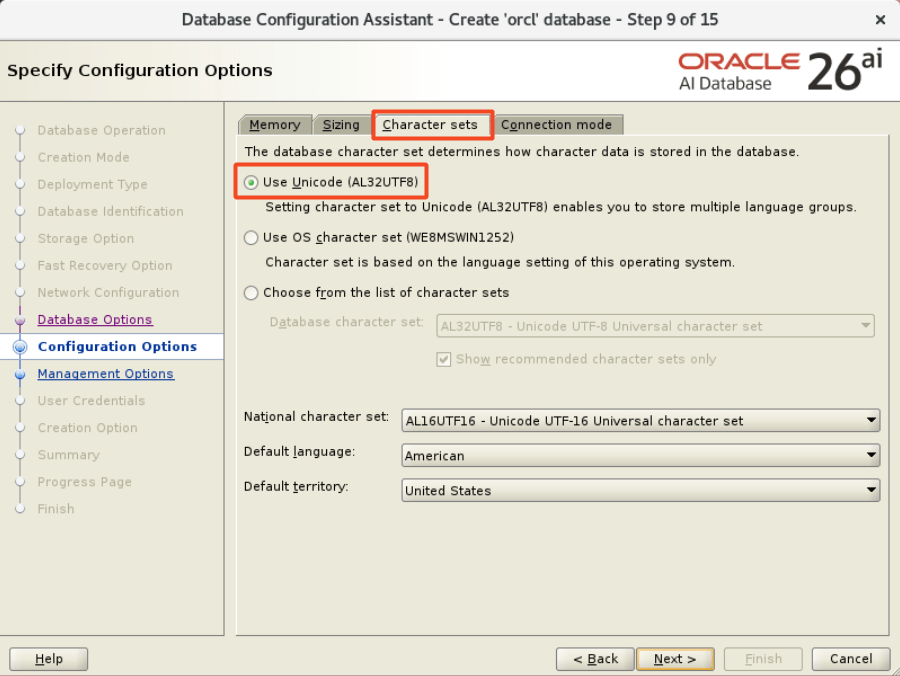
On the Configuration Options page, on the Character sets tab, ensure that you select Use Unicode (AL32UTF8).
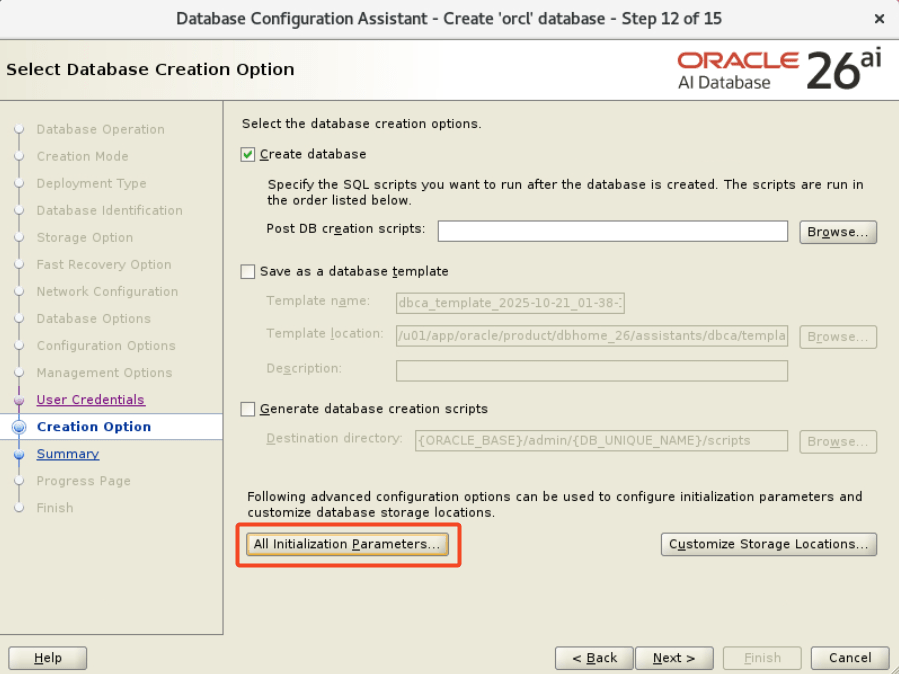
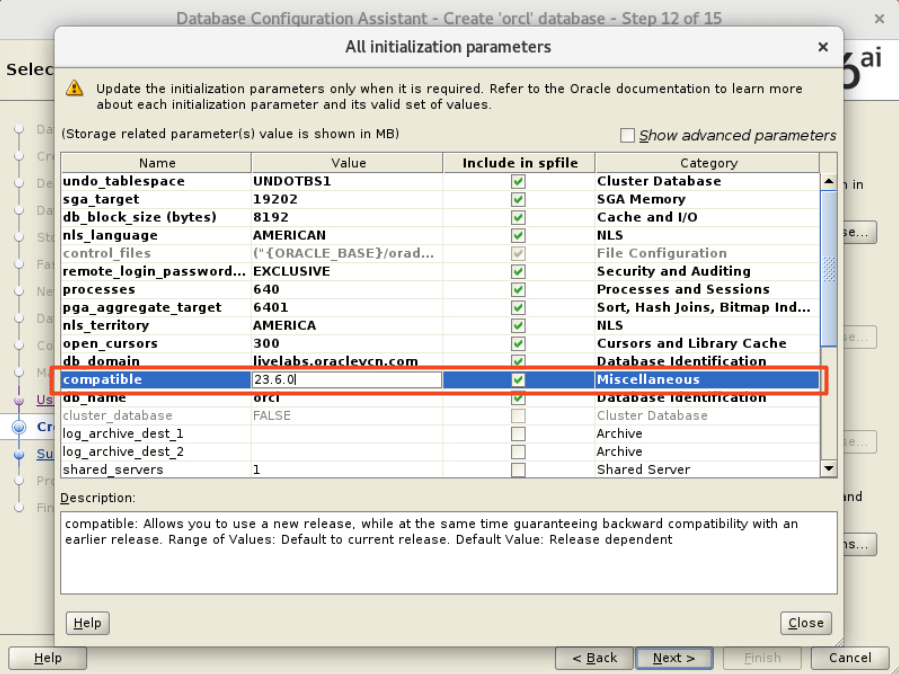
On the Creation Option page, click on All initialization Parameters, and select the compatible setting you use. I recommend using the default.
On the Summary page, you should Save Response File so you can create additional CDBs in silent mode.
Create Manually
After creating the first database using DBCA, you can create another using the response file and DBCA in silent mode.
Make the required changes to the response file.
Update the name of the database.
Verify the list of parameters.
Other settings.
For reference, in the appendix, you can find a sample response file that we use in our hands-on labs.
If you need to create the database with a non-default timezone file version, set the following parameter:
Back from Oracle AI World in Las Vegas – the conference formerly known as CloudWorld formerly known as OpenWorld. Badge now joins the others on my wall.
Oracle AI World is special, especially for someone like me who usually works from home. In a few days, I reunited with colleagues, customers, and friends—a very intense social event for someone used to meeting people on Zoom.
It’s also the time of the year when I get to spend time with my team.
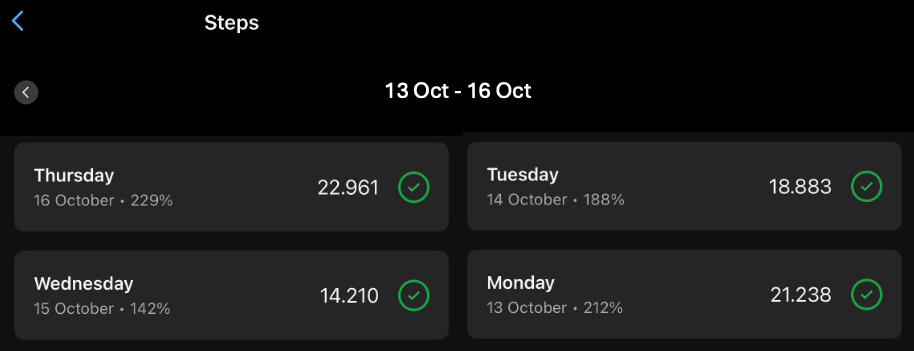
Long days left me with sore feet from extended standing and walking.
The motto of the conference: AI is changing everything! I only had time to play with AI generated pictures.
Nine-hour time difference usually causes me jetlag, but not this time. I used the Timeshifter app, drank lots of water with electrolytes (no caffeine), got sunshine and darkness at the right times, and took Melatonin (this is not a medical endorsement, always check with your doctor). I recovered quickly. If you suffer from jetlag too, give it a shot.
Fruit and a protein bar in my bag served as emergency fuel when meals were delayed—a tip for future conferences.
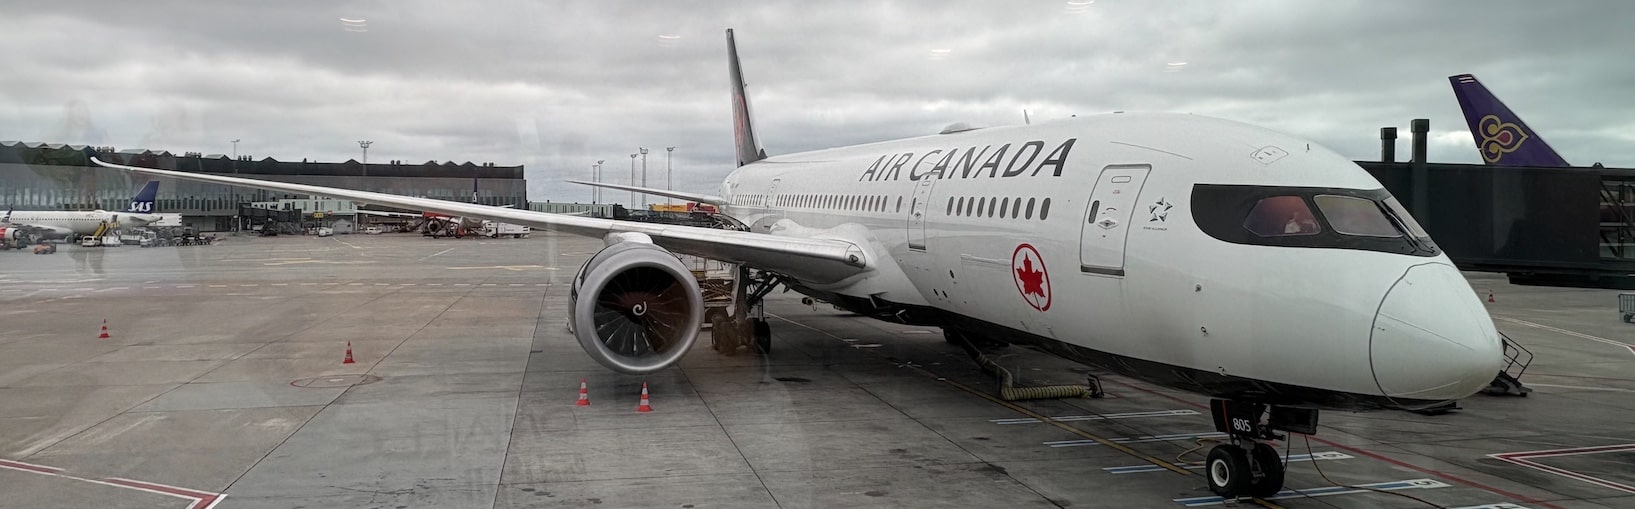
First Air Canada flight—a pleasure. Flew a Boeing Dreamliner, my second favorite after the Airbus A350. As an aviation geek, I love watching planes. What’s your favorite aircraft?
While making a layover in Toronto, I saw Canada’s vast autumn forests from above on approach—a magnificent sight. I’d love to visit Canada in autumn. Any recommendations for must-see sights?
Saw a remake of The Wizard of Oz at The Sphere. What a wild ride—unbelievable. If you visit Las Vegas, catch a show there. That’s a true big screen.
So many people were doing selfies, that we had to make a selfie-with-a-selfie.
Job Done
That’s it! Celebrated an amazing conference with the team and said our goodbyes.
Moving forward, stay tuned for news on the upcoming Oracle AI World Tour 2026—coming soon to a city near you.
Next year’s conference returns to The Venetian in late October. Hope to see you there! If you have a story to share, reach out—perhaps you can present it with us.
THANKS to everyone that took part in making Oracle AI World a big success!
There are many influencers who are not affiliated with Oracle. They are certainly worth following as well. However, the assignment was to identify Oracle employees only.
Thanks to all of you out there who share knowledge with the Oracle community.
When talking about upgrades, Oracle Database has a great fallback mechanism; a downgrade. Even after going live on Oracle Database 23ai, you can get back to Oracle Database 19c or 21c – with no data loss.
How to Downgrade From Oracle Database 23ai
My PDB, PDB1, has already been upgraded to Oracle Database 23ai. Now, I want to downgrade to Oracle Database 19c. In the downgrade process, I will unplug from CDB23 and into CDB19.
I open the PDB in downgrade mode:
alter pluggable database PDB1 close immediate;
alter pluggable database PDB1 open downgrade;
Downgrade mode is a special mode – similar to upgrade mode. It enables exclusive access to the database and disables a lot of features.
I set the environment to CDB23 and start the downgrade process:
cd $ORACLE_HOME/bin
./dbdowngrade -c 'PDB1'
The -c command line parameter starts a downgrade of a specific PDB; not the entire CDB.
After the downgrade, I close and unplug from CDB23:
alter pluggable database PDB1 close;
alter pluggable database PDB1 unplug into '/home/oracle/scripts/pdb1.xml';
Now, I connect to CDB19 running on Oracle Database 19c. I plug in and open the PDB in upgrade mode:
create pluggable database PDB1 using '/home/oracle/scripts/pdb1.xml';
alter pluggable database PDB1 open upgrade;
I switch to PDB1 and complete the downgrade by running the catrelod.sql script:
alter session set container=PDB1;
@$ORACLE_HOME/rdbms/admin/catrelod.sql
Then, I recompile all invalid objects:
@$ORACLE_HOME/rdbms/admin/utlrp.sql
A restart of the PDB. I open in normal mode:
alter pluggable database PDB1 close;
alter pluggable database PDB1 open;
I gather new dictionary statistics:
exec dbms_stats.gather_dictionary_stats;
After a while, when the database is warmed up, I also gather fixed objects statistics.
I verify that all components are VALID or OPTION OFF:
select comp_id, version, status from dba_registry;
I run Datapatch to ensure all SQL patches are properly applied:
$ORACLE_HOME/OPatch/datapatch
That’s it!
Worth Knowing About Downgrades
The downgrade is a two-step process.
The first part happens while the database is running in the new Oracle Home. Startup in a special downgrade mode and execute catdwgrd.sql to start the downgrade.
Next, restart the database in the old Oracle Home and start in upgrade mode. catrelod.sql will re-install any missing objects in the database and finish the downgrade.
If the timezone file was upgraded, the same timezone file must be present in the old Oracle Home.
Before you start the downgrade, there’s no need to roll off any patches with Datapatch. The downgrade mechanism takes care of that.
The data dictionary in a downgraded database is not identical to the pre-upgraded database. The data dictionary will be different, but compatible. Here are some examples:
Generally, dropping objects is avoided.
New tables are most likely not dropped but truncated.
New indexes are most likely kept.
Although you can downgrade a database from Oracle Database 23ai to 19c, you can’t undo the multitenant migration. To get back to a non-CDB you must use other means like Data Pump, transportable tablespaces, or GoldenGate.
Want to Try?
Hopefully, you never need to downgrade a PDB. But I bet you can resist the urge to try it. Right? RIGHT?
My ops team wants to use the Oracle Database 23ai preinstallation RPM for all our new servers. For now, the servers will host Oracle Database 19c only. In the future, we will use Oracle Database 23ai on those servers as well.
The preinstallation RPM contains instructions on which packages to install and which system settings to set. According to the Oracle Database 19c Installation Guide for Linux, this is how you run it:
dnf install oracle-database-preinstall-19c
Let’s find out whether you can use the 23ai preinstallation RPM for 19c.
Inspecting the Package
I use an Oracle Linux 8 test system. First, I install both packages:
The file oracle-database-preinstall-19c.param contains the settings, groups, and users. In the 23ai RPM, there is a similar file, oracle-database-preinstall-23ai.param. I can compare the two files to see any differences:
#Remove comments before comparing
sed '/^\(#\|kernelcomment\|usercomment\)/d' /etc/sysconfig/oracle-database-preinstall-19c/oracle-database-preinstall-19c.param > /tmp/19c.params
sed '/^\(#\|kernelcomment\|usercomment\)/d' /etc/sysconfig/oracle-database-preinstall-23ai/oracle-database-preinstall-23ai.param > /tmp/23ai.params

diff /tmp/19c.params /tmp/23ai.params
Then, I can analyze the differences. < is the 19c setting, > is the 23ai setting.
NUMA off for all architectures. Not a big deal, as this is Oracle Linux and Oracle Database runs on 64-bit architecture only.
But there is a change in the setting for transparent hugepages. Knowing how much havoc transparent hugepages have caused, this is an important change. I’ll get back to that.
63a63,64
> kernel:*:*:*:kernel.panic:10
Adding a kernel panic setting. Shouldn’t cause any concern.
Transparent Hugepage
The setting for transparent hugepages changes from never to madvise. In this setting, the kernel only assigns huge pages to application processes that explicitly request huge pages through the madvise() system call (ref. Oracle Linux 8 – Configuring Huge Pages).
For optimal performance, Oracle recommends that you set Transparent HugePages to madvise on all Oracle Database servers UEK7 and later kernels and not disable Transparent HugePages as was recommended in prior releases.
Let me check my kernel version:
uname -r

5.15.0-307.178.5.el8uek.x86_64
el8uek means my kernel is UEK8, so I can use the new setting on this system.
But I will use this server for Oracle Database 19c and 23ai, so can I use the new madvise setting?
Transparent huge page memory is enabled by default on Oracle Linux and Exadata. The ‘madvise’ parameter used in the kernel command enables transparent huge pages and assigns huge pages to memory regions explicitly requested by applications using the madvise system call. In the case that Oracle Database 19c and 23ai are running on the same server, Oracle recommends setting transparent huge pages to ‘madvise’.
So, it should be safe to run with the new setting for Oracle Database 19c. If you are concerned, you can revert to never until you install Oracle Database 23ai.
Packages
I can find the dependencies of the two preinstallation RPMs:
There are many differences because the 23ai RPM now lists minimum versions for many packages. Assuming that you automatically install the latest version of the packages, I will disregard those differences.
This brings me to this list. These dependencies are not part of the 23ai RPM:
While you wait for the big show in Las Vegas later this year, here’s something to whet your appetite.
Hit the Watch on demand button to get free access to all these sessions and get up-to-date on Oracle Database. You can watch the videos anywhere and anytime.
What’s On
Get an overview with the keynotes or dive into the details in specialized sessions.
Take a look into at crystal ball and hear about Oracle’s vision for data and AI. Our Executive Vice President, Juan Loaiza, shares how Oracle Database’s cutting-edge converged data architecture helps customers bring AI to data.
Also, there are three track keynotes giving you further details on different topics.
Mike Dietrich and I give you a head start on your upgrade to Oracle Database 23ai in our session Upgrade to Oracle Database 23ai: Best Practices and Customer Experience.
Plus, a number of other sessions that go into the details as well.
I Got Questions
If you need more information on upgrades to Oracle Database 23ai or have questions after watching our session, reach out to me and I’ll get you sorted.
You can also try upgrades in our hands-on lab. It’s free and runs in a browser – nothing to install. And – it’s better to fail in our lab, than in production.
You can use AutoUpgrade to install an Oracle home on a brand-new, empty server.
Previously, AutoUpgrade used an existing Oracle home to determine how to create a new Oracle home. Now, you can use config file parameters to instruct AutoUpgrade on installing the new Oracle home.
This allows you to use AutoUpgrade to prepare a new server for use with Oracle Database.
How To
Preparations
I start with a brand new Oracle Linux 8 system.
This is a test system, so I disable SELinux:
sed -i 's/^SELINUX=.*/SELINUX=disabled/' /etc/selinux/config
reboot
Alternatively, follow the guidelines for SELinux in your organization.
Install the preinstall package and Java (required by AutoUpgrade):
I have already downloaded the base release and required patches using AutoUpgrade download mode. The files are in an NFS file share which I specify with the folder parameter.
I use the home_settings parameters to specify how I want to install the Oracle home. There are many other settings that I can use.
It also writes the scripts into <global_log_dir>/create_home_1/<job-no>/rootsh/rootsh.log.
That’s it! I’ve now installed a new Oracle home and can move on with the creation of a listener, database, and so forth
Appendix
Installing on Microsoft Windows
You can use the same functionality on Windows.
You must use home_settings.account_type to specify the user that runs the Windows service. If you specify a user, then it must exist already. Although runInstaller can create the user for you, AutoUpgrade doesn’t support it.
You should not use home_settings.inventory_location on Windows. On Windows, the Oracle Inventory is always placed in %SYSTEM_DRIVE%\Program Files\Oracle\Inventory.
Installing Java
AutoUpgrade requires Java 8 or Java 11. It doesn’t support newer versions because the tool must be backward compatible. The latest version of AutoUpgrade still supports upgrades from Oracle Database 11g.
I recommend using Oracle Java. This is what we test and develop with, however, other Java packs should be fine as well. I tested the commands in this blog post with OpenJDK.





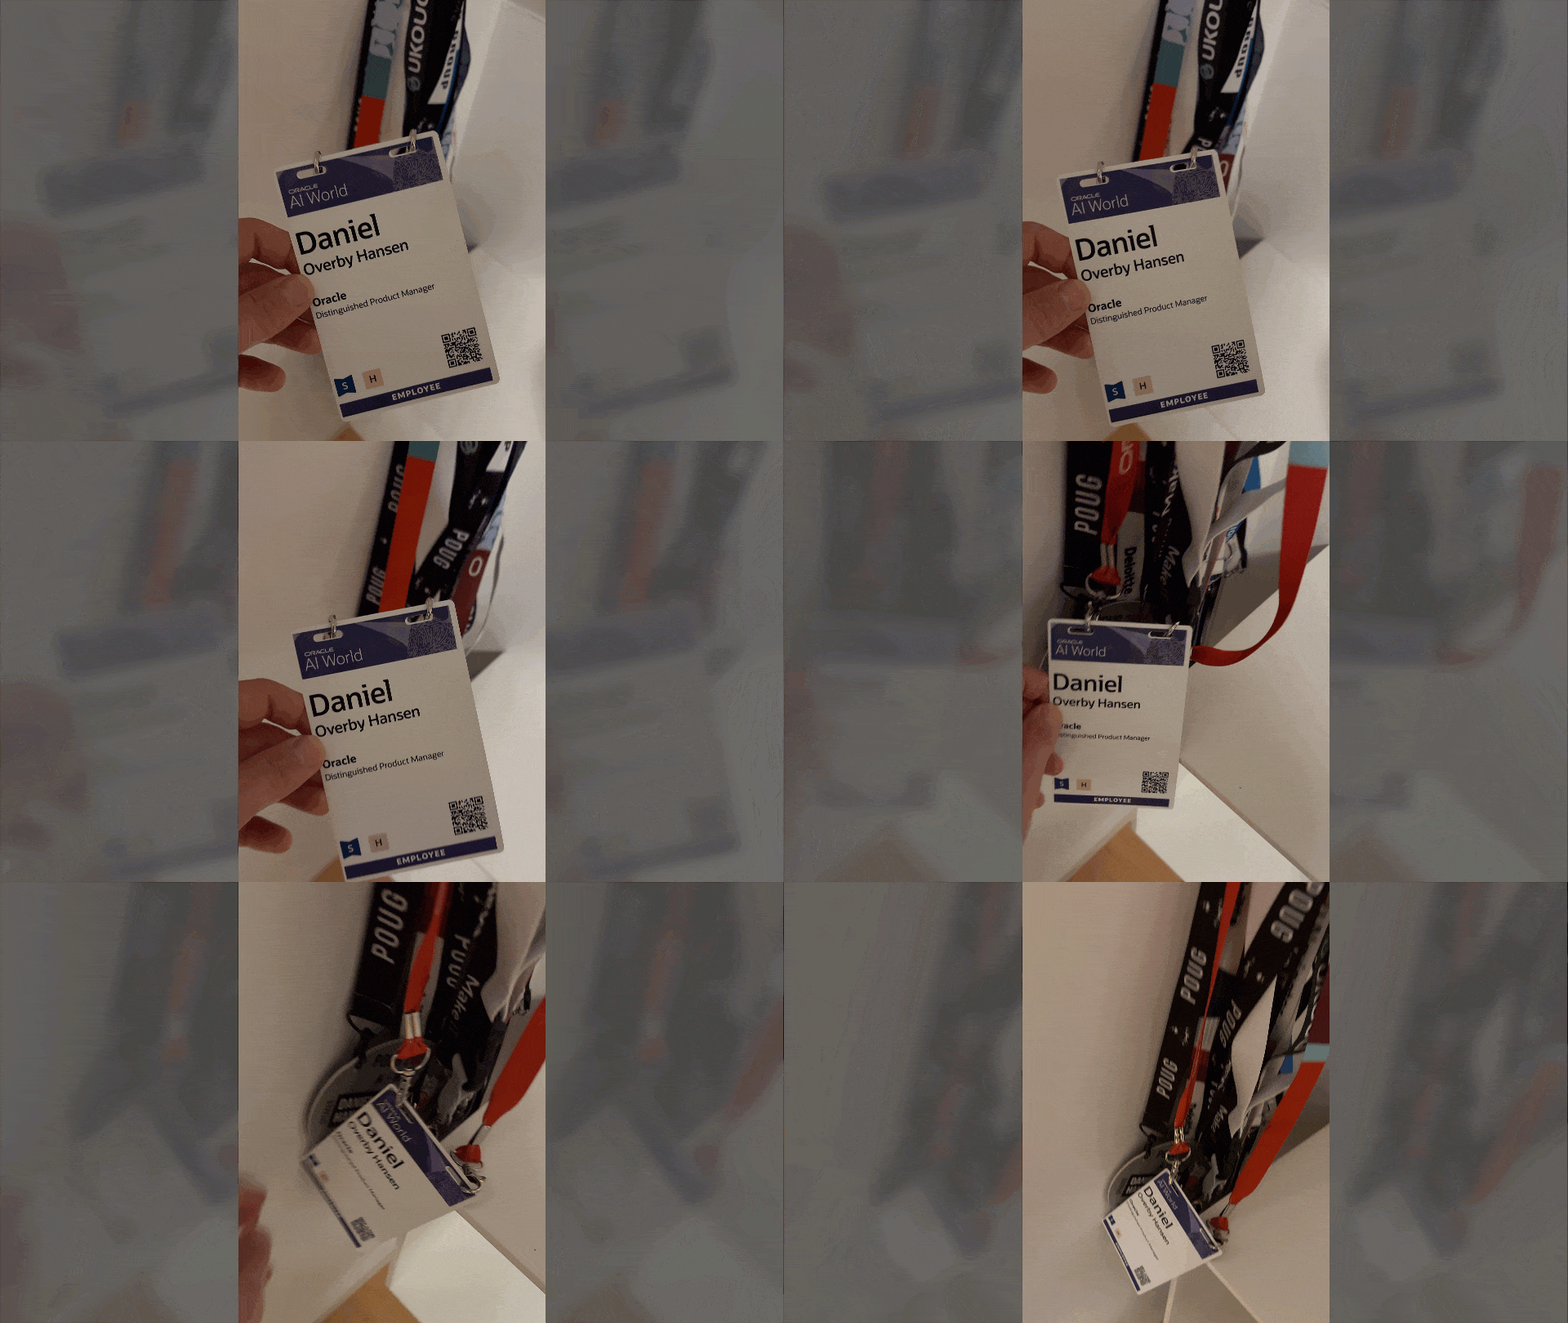


 So many people were doing selfies, that we had to make a selfie-with-a-selfie.