Why Is the Data Pump Bundle Patch Not Included in Release Updates?

The Data Pump bundle patch (DPBP) contains many handy fixes for users of Data Pump and DBMS_METADATA. In 19.26 it includes 218 fixes – most of them are functional fixes but there’s a fair share of performance fixes as well.

I often advocate for applying the DPBP, and that leads to the following question:

If the Data Pump bundle patch is that important, why isn’t it included in the Release Updates?

Touché!

Release Updates

There are a number of requirements that any patch must meet to be included in a Release Update. One of them is that the patch must be RAC Rolling Installable.

DPBP doesn’t meet this requirement meaning, it will never be part of a Release Update (unless there’s an improved way of patching, uhh, cliffhanger, read on…).

Why?

The short version:

  • Data Pump fixes generally contain PL/SQL changes (mostly to DBMS_DATAPUMP).
  • When Datapatch applies such fixes, it will issue a CREATE OR REPLACE command for the relevant packages.
  • If someone is using Data Pump, they have a pin on the packages, and Datapatch can’t replace it. Datapatch will wait for 15 minutes maximum, at which point it bails out (ORA-04021), and the patching is incomplete.
  • The PL/SQL engine is optimized for speed and such pins are held longer than you might expect. Normally, that’s good because it gives you faster PL/SQL execution, but when patching it is potentially a problem.
  • Data Pump strictly obeys the rules and since it doesn’t meet the RAC Rolling criteria, we don’t include them in Release Updates.
  • There’s a longer version, too, but that’ll have to wait for another day.

Will This Continue in Oracle Database 23ai?

Yes, so far, nothing has changed in Oracle Database 23ai. Like with Oracle Database 19c, there is a Data Pump bundle patch for Oracle Database 23ai.

What About Oracle Database 21c?

There’s no Data Pump bundle patch in Oracle Database 21c; it’s an innovation release. If you’re on that release, you need to request the individual fixes you need.

Patching With Data Pump Bundle Patch

Here are some facts about DPBP:

  • The patch is bound to one Release Update. When you move to the next Release Update, you need a newer version of DPBP.
  • If you patch with AutoUpgrade Patching (which I strongly recommend), then DPBP is automatically added when you set patch=recommended. AutoUpgrade finds the right bundle patch for your platform and adds it together with the Release Update and other patches.

Do I Need to Remove DPBP Before Applying the Next Patch?

No, if you’re using out-of-place patching (which you should). When you prepare the new Oracle home, simply install the DPBP matching the Release Update, and that’s it. Datapatch will figure it out when it runs.

If you’re using in-place patching, then you need to roll off DPBP before you can apply the newer Release Update. After that, you can apply the newer DPBP as well. This is a tedious task and proves why in-place patching is not preferable.

Non-Binary Online Installable

Although DPBP is not RAC Rolling Installable, you can still apply it easily without any database downtime.

DPBP is a non-binary online installable patch, which means that you can apply it to a running database (opatch apply + Datapatch). Just ensure that no Data Pump jobs are running, and it will apply without problems. This applies even to single instance databases.

You can read more about non-binary online installable patches in MOS note Data Pump Recommended Proactive Patches For 19.10 and Above(Doc ID 2819284.1).

Roy Swonger explains how to apply the Data Pump bundle patch as a non-binary online installable patch

It is not the same as a hot patch or an online patch:

A patch that only affects SQL scripts, PL/SQL, view definitions and XSL style sheets (i.e. non-binary components). This is different than an Online Patch, which can change binary files. Since it does not touch binaries, it can be installed while the database instance is running, provided the component it affects is not in use at the time. Unlike an Online Patch, it does not require later patching with an offline patch at the next maintenance period.

Source: Data Pump Recommended Proactive Patches For 19.10 and Above(Doc ID 2819284.1)

The Cliffhanger

We are working on improving our patching mechanism. Data Pump and Datapatch will become aware of each other and there will be ways for Datapatch to engage with Data Pump during patching that allows patching to complete.

Stay tuned for more information.

You Need More Information

Let me finish off with some additional information for you to consume if you’re interested in the inner workings of Data Pump:

Happy Patching

Full Day Workshop in London

Calling all database friends in London!

The full-day workshop Real World Database Upgrade and Migration 19c and 23ai comes to London on April 9.

If you’re interested in database tech, Mike Dietrich and I invite you to join our workshop.

During this workshop, Mike Dietrich and Daniel Overby Hansen will guide you through various examples of upgrade, migration, and consolidation techniques and strategies featuring real-world customer cases.

Real World Database Upgrade and Migration 19c and 23ai

The Agenda

Here are the topics that we will cover:

  • Release Strategy with Oracle Database 19c and 23ai
  • Oracle Database Patching
  • Upgrade to Oracle Database 19c and 23ai
  • Migration to the CDB architecture
  • Data Pump: Performance best practices and tweaks
  • Simple ADB Migrations for beginners and experts
  • Performance Stability Prescription and Secret Underscores
  • Insights into the Oracle Database Development process
  • The coolest new features in Oracle Database 23ai for DBAs and Developers

It’s all tech, no marketing!

When and Where

It takes place at the Oracle office in London on April 9. We start at 09:00 and finish at 16:30.

The workshop is an in-person event. It’s not possible to join remotely.

Sign Up

The workshop is free, but registration is required.

Sign up here.

Seats are limited, so sign up to secure your seat. If you can’t make it, please cancel your registration so a fellow geek can join instead.

I hope to see you there for a full day of fun!

How to Patch Oracle RAC Database 19c Using Manual Out-Of-Place

Let me show you how I patch an Oracle RAC Database 19c using out-of-place patching and by doing it manually – that is without using OPatchAuto.

The advantages of this solution:

  • I get more control over the process which is handy for automation
  • I can create my Oracle homes using gold images
  • Or, I can use brand-new Oracle homes instead of cloning existing Oracle homes which OPatchAuto does

My Demo System

  • 2 node Oracle RAC Database
    • Nodes: copenhagen1 and copenhagen2
    • SID: CDB1
    • Instances: CDB11 and CDB12
  • Runs Oracle Linux
  • GI home is already on 19.26
  • Database home is on 19.25

I want to:

  • Patch my database to 19.26 in a rolling manner
  • Patch just the database – GI home is already patched
  • Patch manually without using OPatchAuto

Preparation

I need to download the following to /u01/software on copenhagen1:

  1. The base release of:
    • Oracle Database (LINUX.X64_193000_db_home.zip)
  2. Latest OPatch from My Oracle Support (6880880).
  3. Patches from My Oracle Support:
    • 19.26 Release Update for Grid Infrastructure (37257886)

You can use AutoUpgrade to easily download GI patches.

I have already established SSH equivalence between the two nodes.

How to

1. Prepare a New Database Home

I can do this in advance. It doesn’t affect my current environment and doesn’t cause any downtime.

  1. I need to create a folder for the new database home. I must do this as oracle on both nodes, copenhagen1:
    [oracle@copenhagen1]$ export NEW_ORACLE_HOME=/u01/app/oracle/product/dbhome_1926
    [oracle@copenhagen1]$ mkdir -p $NEW_ORACLE_HOME
    
    copenhagen2:
    [oracle@copenhagen2]$ export NEW_ORACLE_HOME=/u01/app/oracle/product/dbhome_1926
    [oracle@copenhagen2]$ mkdir -p $NEW_ORACLE_HOME
    
  2. I extract the base release of Oracle Database into the new database home on the first node only:
    [oracle@copenhagen1]$ cd $NEW_ORACLE_HOME
    [oracle@copenhagen1]$ unzip -oq /u01/software/LINUX.X64_193000_db_home.zip
    
    Optionally, I can use a golden image. You can use a gold image from a single instance install. The Oracle home is identical.
  3. I update OPatch to the latest version:
    [oracle@copenhagen1]$ rm -rf OPatch
    [oracle@copenhagen1]$ unzip -oq /u01/software/p6880880_190000_Linux-x86-64.zip
    
  4. I want to apply the 19.26 Release Update while I install the database home. To do that, I must extract the patch file:
     [grid@copenhagen1]$ cd /u01/software
     [grid@copenhagen1]$ unzip -oq p37257886_190000_Linux-x86-64.zip -d 37257886
    
    • I must use the GI Release Update, not the database Release Update. The GI Release Update is a bundle patch consisting of the database and OCW Release Updates. I must apply both to my database home.
  5. Then, I can install the new database home and apply the patches at the same time:
    • The variable CLUSTER_NODES contains a comma separated list of all nodes in my cluster.
    • The parameter -applyRU is the path to the Database Release Update.
    • The parameter -applyOneOffs is the paths to the OCW Release Update.
    [oracle@copenhagen1]$ export CV_ASSUME_DISTID=OEL7.8
    [oracle@copenhagen1]$ export ORACLE_HOSTNAME=$(hostname)
    [oracle@copenhagen1]$ export CLUSTER_NODES=copenhagen1,copenhagen2
    [oracle@copenhagen1]$ export ORACLE_BASE=/u01/app/oracle
    [oracle@copenhagen1]$ export ORA_INVENTORY=/u01/app/oraInventory
    [oracle@copenhagen1]$ export OLD_ORACLE_HOME=$ORACLE_HOME
    [oracle@copenhagen1]$ export ORACLE_HOME=$NEW_ORACLE_HOME
    [oracle@copenhagen1]$ cd $ORACLE_HOME
    [oracle@copenhagen1]$ ./runInstaller -ignorePrereqFailure -waitforcompletion -silent \
         -responseFile $ORACLE_HOME/install/response/db_install.rsp \
         -applyRU /u01/software/37257886/37260974 \
         -applyOneOffs /u01/software/37257886/37268031 \
         oracle.install.option=INSTALL_DB_SWONLY \
         ORACLE_HOSTNAME=$ORACLE_HOSTNAME \
         UNIX_GROUP_NAME=oinstall \
         INVENTORY_LOCATION=$ORA_INVENTORY \
         SELECTED_LANGUAGES=en \
         ORACLE_HOME=$ORACLE_HOME \
         ORACLE_BASE=$ORACLE_BASE \
         oracle.install.db.InstallEdition=EE \
         oracle.install.db.OSDBA_GROUP=dba \
         oracle.install.db.OSBACKUPDBA_GROUP=dba \
         oracle.install.db.OSDGDBA_GROUP=dba \
         oracle.install.db.OSKMDBA_GROUP=dba \
         oracle.install.db.OSRACDBA_GROUP=dba \
         oracle.install.db.CLUSTER_NODES=$CLUSTER_NODES \
         oracle.install.db.isRACOneInstall=false \
         oracle.install.db.rac.serverpoolCardinality=0 \
         SECURITY_UPDATES_VIA_MYORACLESUPPORT=false \
         DECLINE_SECURITY_UPDATES=true
    
    • I install it in silent mode, but I could use the wizard instead.
    • You need to install the new database home in a way that matches your environment.
    • For inspiration, you can check the response file used in the previous database home on setting the various parameters.
    • If I have additional one-off patches to install, I add them to the comma-separated list.
  6. I run the root script on all nodes, copenhagen1:
    [root@copenhagen1]$ export NEW_ORACLE_HOME=/u01/app/oracle/product/dbhome_1926
    [root@copenhagen1]$ NEW_ORACLE_HOME/root.sh
    
    copenhagen2:
    [root@copenhagen2]$ export NEW_ORACLE_HOME=/u01/app/oracle/product/dbhome_1926
    [root@copenhagen2]$ $NEW_ORACLE_HOME/root.sh
    

2. Prepare Database

I can do this in advance. It doesn’t affect my current environment and doesn’t cause any downtime.

I will move the database into a new Oracle home, so I need to ensure the database configuration files are either outside the Oracle home or move them to the new Oracle home.

  1. I verify that my SP file and password file are stored in ASM – or at least outside the Oracle home:
    [oracle@copenhagen1]$ export ORACLE_HOME=$OLD_ORACLE_HOME
    [oracle@copenhagen1]$ srvctl config database -db $ORACLE_UNQNAME | grep file  
    
    • If the files are stored in the dbs folder, I copy them to new Oracle home on both nodes.
  2. I copy tnsnames.ora and sqlnet.ora to the new Oracle home on both nodes, copenhagen1:
    [oracle@copenhagen1]$ cp $OLD_ORACLE_HOME/network/admin/sqlnet.ora $NEW_ORACLE_HOME/network/admin
    [oracle@copenhagen1]$ cp $OLD_ORACLE_HOME/network/admin/tnsnames.ora $NEW_ORACLE_HOME/network/admin
    
    copenhagen2:
    [oracle@copenhagen2]$ cp $OLD_ORACLE_HOME/network/admin/sqlnet.ora $NEW_ORACLE_HOME/network/admin
    [oracle@copenhagen2]$ cp $OLD_ORACLE_HOME/network/admin/tnsnames.ora $NEW_ORACLE_HOME/network/admin
    
  3. I take care of any other configuration files in the Oracle home.
  4. I modify the database so it starts in the new Oracle home on the next restart.
    [oracle@copenhagen1]$ srvctl modify database -d $ORACLE_UNQNAME -o $NEW_ORACLE_HOME
    

3. Restart Instances

Now, I restart each instance in a rolling manner. On restart, the database starts in the new Oracle home. There is no database outage, however, each instance needs to restart.

Maintenance window starts now!

  1. I start draining the first instance, CDB11, running on copenhagen1:
    [oracle@copenhagen1]$ export ORACLE_HOME=$OLD_ORACLE_HOME
    [oracle@copenhagen1]$ export PATH=$ORACLE_HOME/bin:$PATH
    $ORACLE_HOME/bin/srvctl stop service \
       -d $ORACLE_UNQNAME \
       -service SALESGOLD \
       -drain_timeout 60 \
       -stopoption IMMEDIATE \
       -node copenhagen1
    
    • In this example, I have just one service that I’m shutting down. You probably have other services and other drain settings. You can adjust accordingly.
  2. After draining, I can shut down the instance, CDB11, on copenhagen1:
    [oracle@copenhagen1]$ $ORACLE_HOME/bin/srvctl stop instance \
       -d $ORACLE_UNQNAME \
       -i CDB11 \
       -force
    
  3. I immediately restart the instance:
    [oracle@copenhagen1]$ $ORACLE_HOME/bin/srvctl start instance \
       -d $ORACLE_UNQNAME \
       -i CDB11
    
    • The instance now restarts in the new Oracle home.
  4. I repeat the drain and restart cycle on the second instance, CDB12, running on copenhagen2. Repeat steps 1-3 but change any reference to the node and instance:
    • Change -node to copenhagen2
    • Change -i to CDB12
  5. I have now restarted all instances and they are running in the new Oracle home.
  6. I update any profiles (e.g., .bash_profile) and other scripts referring to the database home on all nodes.
  7. If the database is added to /etc/oratab, I change the file accordingly on all nodes.

4. Complete Patching

  1. I complete patching of the database by running Datapatch (ensure the environment is set correctly):
    [oracle@copenhagen1]$ env | grep ORA
    [oracle@copenhagen1]$ $ORACLE_HOME/OPatch/datapatch
    
    • I can do this while users are connected to the database.

Most likely, there are other changes that you need to make in your own environment:

  • Update Enterprise Manager registration
  • Upgrade RMAN catalog

That’s it! I have now patched my Oracle RAC Database.

Happy Patching!

Appendix

Deinstall

In the future, I should remove the old Oracle homes. I use the deinstall tool in the respective Oracle homes.

I would recommend waiting a week or two until I’m confident the new Release Updates are fine.

Rollback

If you need to roll back, you just reverse the process. Restart the instances in the old Oracle home and let Datapatch perform the rollback of the database changes.

Combine with SwitchGridHome

You can combine this method with SwitchGridHome for Grid Infrastructure patching.

Patch with OPatchAuto

An alternative to this method is to use OPatchAuto and out-of-place patching. Check the patch readme for instructions on how to use that method.

Disable Binary Options

If you need to disable binary options using make, you can do it immediately after installing the new Oracle home. Do it on all nodes.

Other Blog Posts in This Series

Patch Me If You Can

The January 2025 Release Update is out. I assume you’ve started the patching process already. You patch databases every quarter, right?

Patching Oracle Database means downtime (unless you have a RAC database), so it’s important to get it right. I recommend that you spend an hour or two sharpening your skills in our re-vamped hands-on lab:

Patch Me If You Can

  • It’s completely free
  • Runs in just a browser
  • Nothing to pay – nothing to install

For Everyone

If you’re a beginner, you can learn how to patch your Oracle Database.

If you’re an experienced patcher, you can learn how to use gold images and some patching internals that further deepen your knowledge on patching.

Lab outline:

  • Explore patching tools
  • Patch non-CDB and container databases
  • Use AutoUpgrade to patch an Oracle Database
  • Install Oracle homes
  • Perform a rollback
  • Selectively enable optimizer fixes

Go to the lab.

Pro Tips

It’s better to fail in our lab than in production!

Upgrade Oracle Base Database Service to Oracle AI Database 26ai

Upgrading your Base Database Service consists of two things:

  • Upgrading DB System (Grid Infrastructure)
  • Upgrading Database

It is really easy. Just hit the Upgrade button twice.
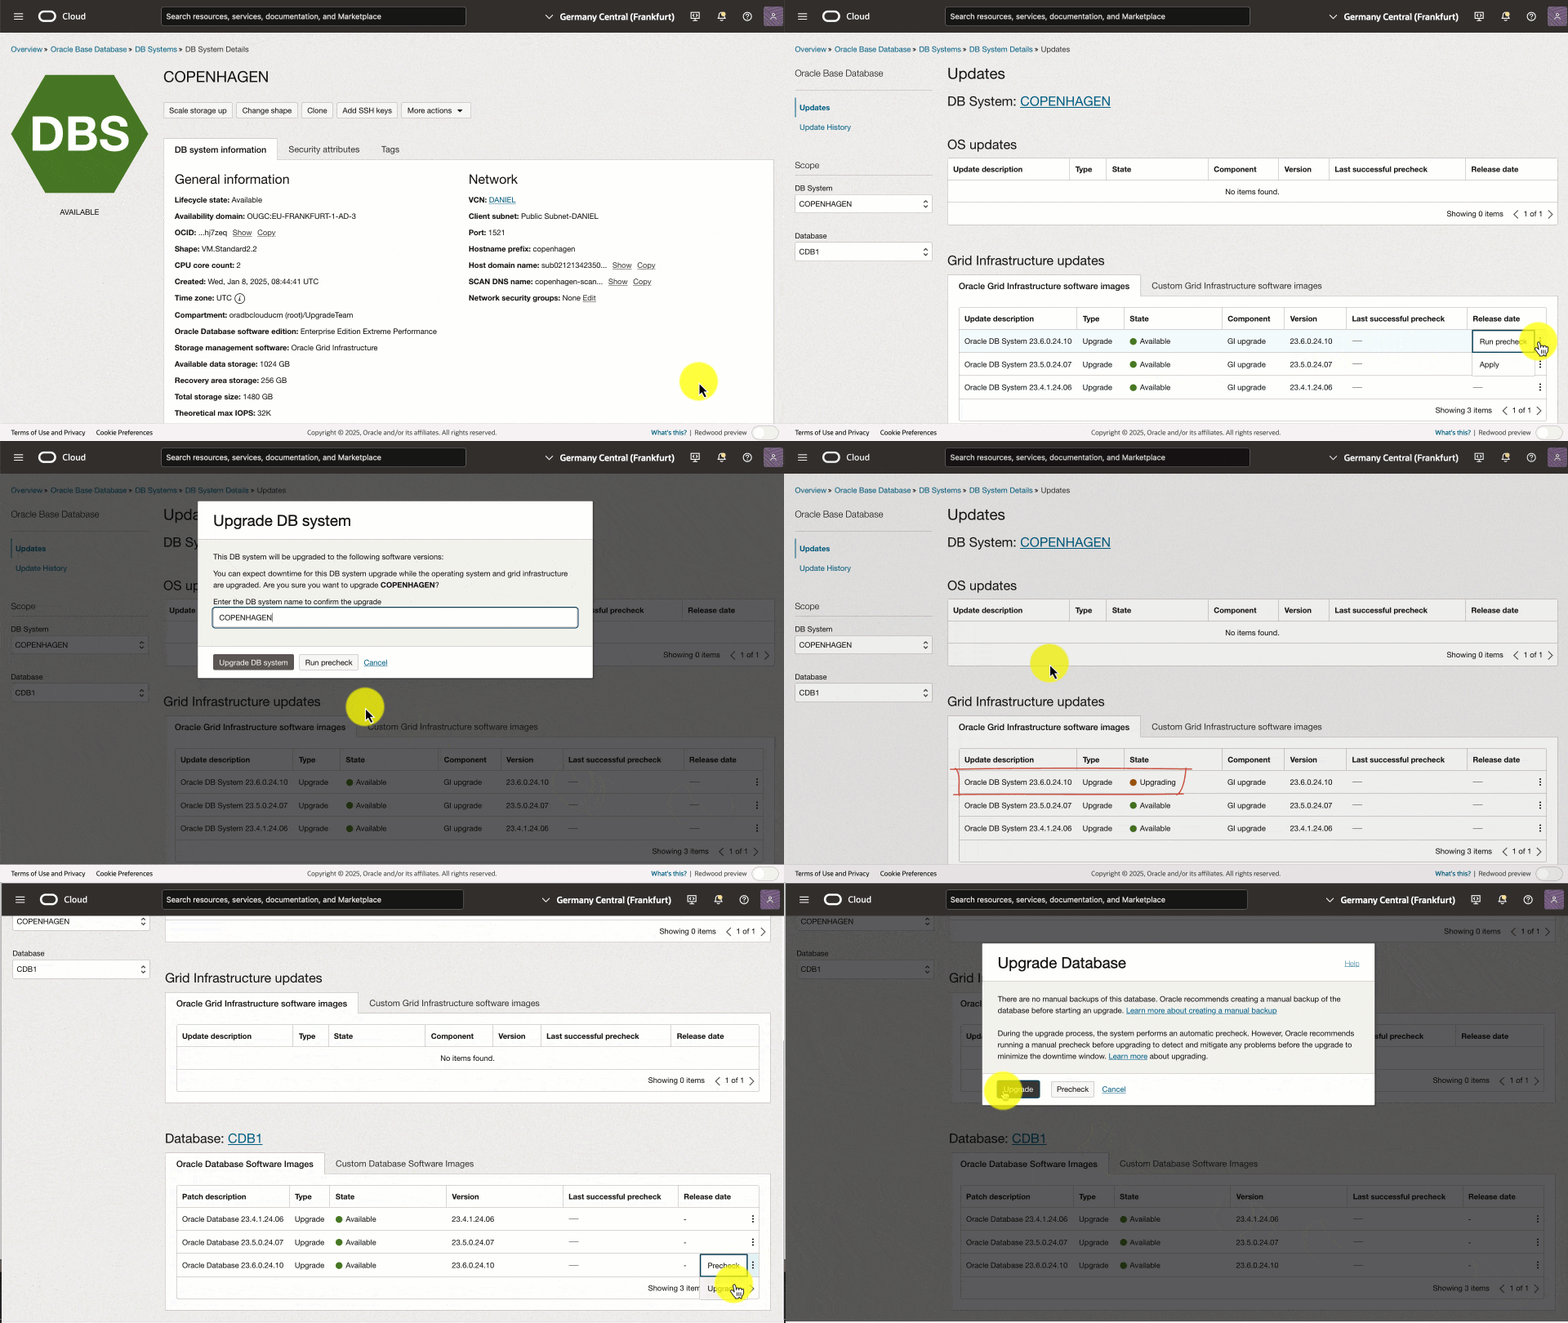
Upgrading an Oracle Base Database Service

However, underneath the hood, there’s more to it.

This post was originally written for Oracle Database 23ai, but it works the same way to Oracle AI Database 26ai.

Requirements

  • The operating system must be Oracle Linux 8 (else see appendix):
    [oracle@host]$ cat /etc/os-release
    
  • Grid Infrastructure and Database must be 19c or 21c. Check the version of the DB System in the OCI Console or:
    [grid@host]$ crsctl query crs activeversion
    
  • The database must be in archivelog mode:
    select log_mode from v$database;
    
  • The database must be a container database (else see appendix):
    select cdb from v$database;
    

How To Upgrade

Before Upgrade

  • In the OCI Console, perform a precheck of the DB System update.

  • Also, perform a precheck of the Database update.

  • Although the Database update precheck succeeds, I recommend you check the preupgrade summary. You can find that on the host:

    cd /u01/app/oracle/cfgtoollogs/dbua/$ORACLE_UNQNAME/$ORACLE_SID/100/prechecks
    cat *_preupgrade.log
    
    • The precheck halts only on critical errors. Nevertheless, there might be other issues that you want to attend to.
    • Also, the precheck report might list post-upgrade actions that you should attend to.
  • Oracle recommends that you take a manual backup before starting. For Standard Edition databases, a manual backup is the only fallback method available.

  • You must disable automatic backup during upgrade.

  • Also, gather dictionary and fixed objects statistics.

Upgrade

  • You need downtime for the upgrade – even if you use Oracle RAC!
  • First, upgrade Grid Infrastructure.
    • Your database and service configuration persists. Those settings are carried over to the new Grid Infrastructure configuration.
  • Second, upgrade the database. The tooling
    • Automatically creates a guaranteed restore point to protect your database. The name of the restore point is prefixed BEFORE#DB#UPGRADE#, and the restore point is automatically removed following a successful upgrade. This applies to Enterprise Edition only.
    • Uses Database Upgrade Assistant (DBUA) to perform the upgrade with default options. This causes DBUA to perform things like timezone file upgrade as well. This prolongs the upgrade duration, but there’s no way to disable it.

After Upgrade

  • You should take a new manual backup and re-enable automatic backups (if previously disabled).
  • The documentation states that you should manually remove the old Database Oracle home. However, the upgrade process does that automatically. The old Grid Infrastructure Oracle home still exists, and currently, there’s no way to remove it.
  • The compatible parameter is left at the original value. Oracle recommends raising it a week or two after the upgrade when you are sure a downgrade won’t be needed.
    alter system set compatible='23.6.0' scope=spfile;
    shutdown immediate
    startup
    
    • As you can see changing compatible requires a restart. If you can’t afford additional downtime after the upgrade, then be sure to raise compatible immediately after the upgrade.
    • Also note that for some specific enhancements (vector database related) to work, you need to set compatible to 23.6.0.
    • Finally, check this advice on compatible parameter in general.
  • The tooling updates .bashrc automatically, but if you have other scripts, be sure to change those.

Monitoring and Troubleshooting

Grid Infrastructure

  • You can find the logs from the Grid Infrastructure upgrade here:
    /u01/app/grid/crsdata/<hostname>/crsconfig
    
  • The log file is really verbose, so here’s a way to show just the important parts:
    grep "CLSRSC-" crsupgrade_*.log
    
  • The parameter file used during the upgrade:
    /u01/app/23.0.0.0/grid/crs/install/crsconfig_params
    

Database

  • Although the upgrade is made with DBUA, it will call AutoUpgrade underneath the hood to perform the preupgrade analysis. You can find their log files here:
    /u01/app/oracle/cfgtoollogs/dbua/$ORACLE_UNQNAME/$ORACLE_SID/100/prechecks
    
  • Once the upgrade starts, you can list the jobs running by the DCS agent (as root):
    dbcli list-jobs
    
    ID                                       Description                                                                 Created                             Status
    ---------------------------------------- --------------------------------------------------------------------------- ----------------------------------- ----------
    ...
    bf255c15-a4d5-4f3c-a532-2f0b8c567ad9     Database upgrade precheck with dbResId : d5a7000a-35c8-46a5-9a21-09d522d8a654 Thursday, January 09, 2025, 06:14:01 UTC Success
    f6fac17a-3871-4cb1-b8f0-281ac6313c6a     Database upgrade with resource Id : d5a7000a-35c8-46a5-9a21-09d522d8a654    Thursday, January 09, 2025, 07:13:54 UTC Running
    
    • Notice the ID for the upgrade job. You need it later.
  • Get details about the job (as root):
    dbcli describe-job -i <job-id>
    
    Job details
    ----------------------------------------------------------------
                      ID:  f6fac17a-3871-4cb1-b8f0-281ac6313c6a
             Description:  Database upgrade with resource Id : d5a7000a-35c8-46a5-9a21-09d522d8a654
                  Status:  Running
                 Created:  January 9, 2025 at 7:13:54 AM UTC
                Progress:  13%
                 Message:
              Error Code:
    
    Task Name                                                                Start Time                          End Time                            Status
    ------------------------------------------------------------------------ ----------------------------------- ----------------------------------- ----------
    Database home creation                                                   January 9, 2025 at 7:14:05 AM UTC   January 9, 2025 at 7:19:14 AM UTC   Success
    PreCheck executePreReqs                                                  January 9, 2025 at 7:19:14 AM UTC   January 9, 2025 at 7:24:31 AM UTC   Success
    Database Upgrade                                                         January 9, 2025 at 7:24:32 AM UTC   January 9, 2025 at 7:24:32 AM UTC   Running
    
    • Get more details by addid -l Verbose to the command.
  • Progress about the actual database upgrade:
    cd /u01/app/oracle/cfgtoollogs/dbua/<job-id>
    tail -100f silent.log
    
  • Database upgrade log files
    /u01/app/oracle/cfgtoollogs/dbua/<job-id>/$ORACLE_UNQNAME
    

How Long Does It Take?

Although upgrading is easy, it does require a substantial amount of downtime.

Here are the timings from a test upgrade of a basic system with just one PDB and 4 OCPUs:

Component Stage Time
Oracle DB System 23.6.0.24.10 Precheck 2m
Oracle DB System 23.6.0.24.10 Upgrade 1h 26m
Oracle Database 23.6.0.24.10 Precheck 19m
Oracle Database 23.6.0.24.10 Upgrade 3h 28m
Total 5h 15m

The database might be accessible at some point during the upgrade. But since you can’t tell when you should consider the entire period as downtime.

Why Does It Take So Long?

Typically, when you upgrade a database you have already – outside of the maintenance window – deployed a new Oracle Home. When you use the tooling, this happens inside the maintenance window. The tooling can’t deploy an Oracle Home prior to the upgrade. In addition, the upgrade is executed with DBUA using default options, which for instance means that the time zone file is upgraded as well.

What else matters? Check this video.

Can I Make It Faster?

The biggest chance of reducing the upgrade time, is to remove unused components. Databases in OCI comes with all available components, which is nice on one hand, but it adds a lot of extra work to the upgrade. Mike Dietrich has a good blog post series on removing components.

If you scale up on OCPUs for the upgrade, you will also see a benefit. The more PDBs you have in your system, the greater the potential benefit. The databases uses parallel upgrade to process each PDB but also to process multiple PDBs at the same time, so parallel with parallel. When you add more OCPUs to your system, the cloud tooling automatically raises CPU_COUNT which is the parameter the upgrade engine uses to determine the parallel degree. For CDBs with many PDBs you can overload the upgrade process and assign more CPUs than you have in reality. This can give quite a benefit, but since the cloud tooling doesn’t allow you to control the upgrade, this is unfortunately not an option.

An upgrade is not dependent on I/O, so scaling up to faster storage doesn’t bring any benefit.

So, there is some tweaking potential, but probably not as much as you hope for. If you are concerned about downtime, your best option is to switch approach from upgrading the entire CDB to indivual PDBs using refreshable clones. Depending on the circumstances, you should easily be able to get below 1 hour.

Rollback

If either part of the upgrade fails, the OCI Console will present you with a Rollback button that you can use.

Data Guard

If you use Data Guard, you must upgrade the standby database first, then the primary database. The Data Guard configuration persists. Check the documentation for details.

Final Words

I’ve shown how to perform the entire upgrade in one maintenance window. If you want, you can split the process into two pieces. First, upgrade Grid Infrastructure and then the database. But that would require several duplicate tasks and two separate maintenance windows.

Since this method incurs many hours of downtime, I encourage you to upgrade individual PDBs using refreshable clone PDBs. Using this method you should be able to get under 1 hour for an upgrade.

Be sure to check the other blog posts in this series.

Happy Upgrading!

Appendix

My Database Is A Non-CDB

You must convert a non-CDB database to a pluggable database as part of the upgrade. You can convert convert it in-place.

Alternatively (and my favorite), you can use refreshable clones and move the non-CDB into a new Base Database Service that is already using a container database. You can perform the non-CDB to PDB migration and the upgrade in one operation with very little downtime—much less than an in-place upgrade and conversion.

You can read about it here and here.

My System Is Running Oracle Linux 7

You must upgrade the operating system first, a separate process requiring additional downtime. Consider using refreshable clones.

Further Reading

Reflections On 2024

2024 is coming close to an end, and what a year!

What Happened In 2024?

  • 7 releases of AutoUpgrade which included many new features. The one I’m most proud of is AutoUpgrade Patching. Being able to patch a database with just one command is a great help.

  • My team started the Oracle DBAs run the world appreciation campaign. The biggest and most important systems have an Oracle Database underneath and a DBA next to it. A lot happens in tech these days, and I think DBAs need more appreciation. If we meet at a conference, say hello and get a sticker with the slogan. Put the sticker on your bosses’ door, so they are constantly reminded.

    Oracle DBAs run the world

  • My most popular blog post was How to Patch Oracle Grid Infrastructure 19c Using In-Place OPatchAuto. But did you know there’s a much better way to patch Oracle Grid Infrastructure?

  • The most popular video on our YouTube channel was Virtual Classroom Seminar #19: Move to Oracle 23ai – Everything about Multitenant – PART 1. You spent more than 1.000 hours watching it. If you need more tech content, check out the other webinars. All tech, no marketing!

  • What’s your wish for 2025? Leave a comment to make it happen.

My Wishes For Next Year

  • I wish for even more customer feedback. If you have a good idea, please don’t hesitate to reach out. This enhancement and this one come from customer feedback. Your Feedback Matters!

  • I wish you try AutoUpgrade Patching when you patch your database in January next year (you do that, right?). At least use it to download patches. It’s so much easier than going through My Oracle Support.

  • I wish the world would be inspired by the Oracle community. Despite all our differences, we meet each other with an open mind and a smile. We share knowledge and work together towards the greater good. A big shout-out to the many volunteers that make our community thrive!

Get Ready By Stopping

When this blog post is out, I’ll already be on Christmas holiday (I started early this year). 😎🎄

I love working in tech, but you need time off to recharge your batteries. Especially as a DBA, you get frequent adrenalin kicks when making changes in production. 🪫🔌🔋

Wind down, spend time with family and friends, work on your hobby, listen to music, read a book, and learn something new. 🤗🎶📖

I’m sure 2025 will be just as awesome!

Fast Refresh Materialized Views and Migrations Using GoldenGate

Following the blog post about fast materialized views during transportable tablespace migrations, here’s a similar one for migrations using Oracle GoldenGate.

You can migrate using Oracle GoldenGate and avoid a complete refresh during downtime. Recent versions of Oracle GoldenGate can replicate materialized views and materialized view logs and in some cases a simple GoldenGate configuration will work fine.

However, if you are faced with a complex migration and the extract or replicat processes become a bottleneck, the below approach offers a fairly simple way to reduce the load on extract and replicat without having to perform a complete refresh during downtime.

The Basics

Like in the previous blog post, I will use an example based on a master table named SALES. If you need to catch up on materialized views, you can also check the previous blog post.

Overview of materialized view refresh process

Remote Master Table, Local Materialized View

In this example, you are migrating a database from source to target. This database holds the materialized view, and a remote database acts as the master database, where the master table and materialized view log reside.

Migrating a database which holds a materialized view that uses a remote master database

  1. In the source database, register the extract process and exclude the materialized view:
    TABLEEXCLUDE <schema>.SALES_MV
    
  2. If you configure DDL replication, I recommend excluding the materialized view and handling such changes in a different way:
    DDL EXCLUDE objtype 'snapshot'
    
  3. Perform the initial load on the target database.
    • This creates the materialized view and the database link to the remote database.
    • Start the replicat process.
  4. In the target database, perform a complete refresh of the materialized view:
    exec dbms_mview.refresh ('sales_mv','c');
    
    • This is before downtime, so who cares how long it takes to perform the complete refresh.
    • Although a fast refresh might be enough, it is better to be safe and avoid any problems with missing data.
    • You can configure a period fast refresh of the materialized view.
  5. In the remote database, both source and target databases have registered as materialized views.
    select owner, mview_site
    from dba_registered_mviews
    where name='SALES_MV';
    
  6. Downtime starts.
  7. Complete the migration tasks needed to move over to the target database. This is out of scope of this blog post.
  8. Shut down the source database.
  9. In the remote database, purge materialized view log entries that are related to the materialized view in the source database:
    exec dbms_mview.purge_mview_from_log('<mview-owner>', 'SALES_MV', '<source-db>');
    
  10. Unregister the materialized view in the source database:
    exec dbms_mview.unregister_mview('<mview-owner>', 'SALES_MV', '<source-db>');
    

If you want to reverse the application after moving to the target database and preserve the source database as a fallback, you postpone tasks 8-10.

Local Master Table, Remote Materialized View

In this example, you are migrating a database from source to target. This database holds the master table and materialized view log, while a remote database contains the materialized view.

Migrating a database which acts as master database holding a master table and materialized view log

  1. In the source database, register the extract process and include the master table, but exclude the materialized view log:
    TABLE <schema>.SALES
    TABLEEXCLUDE <schema>.MLOG$_SALES
    
  2. If you configure DDL replication, Oracle GoldenGate should automatically exclude the materialized view log. However, you can explicitly exclude it to be safe:
    DDL EXCLUDE objtype 'snapshot log'
    
  3. Perform the initial load on the target database.
    • This creates the master table and the materialized view log.
  4. In the target database, no remote database is using the master table yet. But replicat is keeping it up-to-date. However, the materialized view log might have orphan rows from the source database.
    • Drop and recreate the materialized view log.
  5. In the remote database, create a new database link to the target database and a new materialized view based on the master table in the target database.
    create database link ... using '<target-tns-alias>';
    create materialized view sales_mv2 ... ;
    
    • SALES_MV2 should look exactly like SALES_MV except that it fetches from the target database instead of the source database.
  6. Perform an initial complete refresh of SALES_MV2:
    exec dbms_mview.refresh ('sales_mv2','c');
    
    • The materialized view is not used by queries yet, so who cares how long it takes to perform the complete refresh.
    • You can configure a periodic refresh of the materialized view.
  7. Create a synonym that initially points to SALES_MV – the materialized view based on the source database. You will change it later on.
    create synonym sales_syn for sales_mv;
    
  8. Change your queries to reference SALES_SYN instead of SALES_MV directly.
    • You do this in a controlled manner ahead of the downtime window.
    • You can use auditing to detect usages of the materialized view (SALES_MV) and change all of them to use the synonym (SALES_SYN). Displaying the use of synonyms
  9. Downtime starts.
  10. Complete the migration tasks needed to move over to the target database. This is out of scope of this blog post.
  11. In the remote database, change the synonym to point to the materialized view that accesses the target database.
    create or replace synonym sales_syn for sales_mv2;
    
    • No application changes are needed because you made the applications use the synonym instead.
    • When you change the synonym to point to the new materialized view, this change is completely transparent to the application. Displaying the use of synonyms
  12. Drop the materialized view that accesses the source database.
    drop materialized view sales_mv;
    
  13. Shut down the source database.

If you want to reverse the application after moving to the target database and preserve the source database as a fallback, you postpone tasks 12-13.

If you can’t change the application to use the synonym (with a different name), then there’s another approach:

  • Keep accessing the SALES_MV until the downtime window. Don’t create the synonym yet.
  • Drop the original materialized view: drop materialized view sales_mv.
  • Create the synonym: create synonym sales_mv for sales_mv2.

Local Master Table, Local Materialized View

In this example, you are migrating a database from source to target. This database holds the master table, the materialized view log, and the materialized view. There is no remote database involved.

Migrating a database which acts as master database holding a master table and materialized view log

  1. In the source database, register the extract process and include the master table, but exclude the materialized view and materialized view log:
    TABLE <schema>.SALES
    TABLEEXCLUDE <schema>.SALES_MV
    TABLEEXCLUDE <schema>.MLOG$_SALES
    
  2. If you configure DDL replication, I recommend excluding the materialized view and materialized view log and handling such changes in a different way:
    DDL EXCLUDE objtype 'snapshot', EXCLUDE objtype 'snapshot log'
    
  3. Perform the initial load on the target database.
    • This creates the master table, the materialized view, and the materialized view log.
  4. In the target database, the replicat process replicates changes to the master table. No replication takes place on the materialized view or the materialized view log.
  5. Perform an initial complete refresh of SALES_MV:
    exec dbms_mview.refresh ('sales_mv','c');
    
    • The refresh uses the master table in the target database. The replicat process is keeping the master table up-to-date.
    • The materialized view is not used by queries yet, so who cares how long it takes to perform the complete refresh.
    • You can configure a periodic refresh of the materialized view.
  6. Downtime starts.
  7. Complete the migration tasks needed to move over to the target database. This is out of scope of this blog post.
  8. Shut down the source database.
  9. Keep an eye on the materialized view log (MLOG$_SALES) and ensure it doesn’t grow beyond reason.

If you want to reverse the application after moving to the target database and preserve the source database as a fallback, you postpone task 8.

Further Reading

How to Patch Oracle Restart 19c and Oracle Data Guard Using Out-Of-Place Switch Home

I strongly recommend that you always patch out-of-place. Here’s an example of how to do it on Oracle Restart and Oracle Data Guard.

This procedure is very similar to patching without Oracle Data Guard, so I’ll often refer to a previous blog post.

My demo system

  • Data Guard setup with two single instance databases in Oracle Restart configuration
  • GI and database home are currently on 19.24

I want to:

  • patch to 19.25
  • patch both the GI and database home in one operation

Preparation

  • I download the same patches are mentioned in the Preparations.

  • I place the software in /u01/software which is an NFS share accessible to both servers.

How to Patch Oracle Restart 19c and Oracle Database

1. Prepare a New GI Home

I can do this in advance. It doesn’t affect my current environment and doesn’t cause any downtime.

2. Prepare a New Database Home

I can do this in advance. It doesn’t affect my current environment and doesn’t cause any downtime.

3. Prepare Database

I can do this in advance. It doesn’t affect my current environment and doesn’t cause any downtime.

4. Standby Database: Switch to the New GI and Database Homes

Now, I can complete the patching process on the standby database by switching to the new Oracle homes.

  • I perform 4. Switch to the New GI and Database Homes on the standby host.

  • There is no downtime on the primary database. But the standby database will be shortly down which might mean something to you if you use Active Data Guard.

  • I make sure the standby database is brought back to the desired mode (mount or open). I check redo apply is running.

5. Primary Database: Switch to the New GI and Database Homes

Next, I can complete the patching process on the primary database by switching to the new Oracle homes.

6. Complete Patching

Now, both databases in my Data Guard configuration run out of the new Oracle Homes.

Only proceed with this step once all databases run out of the new Oracle Home.

That’s it! I have now patched my Oracle Restart and Data Guard deployment.

Happy Patching!

Appendix

Check the appendix in the related blog post for additional information and troubleshooting.

Further Reading

Other Blog Posts in This Series

Goodbye X, Hello Bluesky

Do you remember the good, ol’ days when we could discuss tech on Twitter? Without all the ads and the craziness that X turned into?

I miss those days.

But I hope to experience them again on Bluesky. Find me on Bluesky and let’s start talking tech again.

https://bsky.app/profile/dohdatabase.com

Bluesky

So far, Bluesky appears like Twitter did in the old days. It’s free and without all the ads and bots that are on X these days.

There is a growing Oracle community on Bluesky. A good number of Product Managers from Oracle, Oracle ACEs, and other significant voices in the community have joined already.

Gerald Venzl has made a starter pack with people you could follow. That should get you started on Bluesky quickly:

Give it a try!

I hope to see you on Bluesky

An Important Milestone

This is the 200th blog post on dohdatabase.com.

Take that, Sinan. Here’s my blog post number 200!

For a while, my good friend Sinan and I have been racing to the 200th blog post.

He has more page hits than me, but luckily the bet was on number of posts. Sinan, you owe me one.

My prize

The History

I started at Oracle almost five years ago, and I was encouraged by my boss, Mike Dietrich, to start a blog.

With 200 blog posts and almost five years at Oracle, that’s almost a blog post a week. I’m proud of that. Page hits doubled last year and this year will see some good growth as well.

What does that mean? I’m helping people!

I like helping people and it is my job. But blogging is some times hard – so I need fuel. That fuel is feedback.

No More Navel-gazing

For a content creator like me, feedback is essential for many reasons:

  • It is my fuel. Knowing that my blog posts help you is what helps me to put in the extra effort it takes to blog.
  • Your comments make my blog posts even better. Often, I’ve re-written blog posts based on your feedback.
  • Your tricky questions make me learn new learn new things. I’m above to deep-dive into Oracle Restart because you’re asking for it.
  • Your ideas help me shape the requirements for the next features in Oracle Database. The next version of AutoUpgrade can upgrade the RMAN catalog as part of a database upgrade – because a user gave me that good idea.
  • Your complaints help me understand how we can improve our product. Today, a user reported an error to us, which led to a new pre-check in AutoUpgrade.
  • Your likes are a quick (but sometimes needed) dosis feel-good.
  • Your re-posts and comments on social media boost my reach and enable me to help even more people in the Oracle community.

Your Feedback Matters!

I first got in touch with my current boss, Mike, through a comment I left on his blog. This led to cooperation between my former employer and Oracle. Our cooperation turned into beta and reference projects and peaked – for me personally – when I presented with Mike and Roy at Oracle OpenWorld.

Oracle OpenWorld presentation with Mike and Roy

You never know what your feedback will end up with.

Thanks for staying with me for the first 200 blog posts. Here’s to the next 200 blog posts!

Your Feedback Matters!