How to Solve DCS-12300:Failed to Clone PDB During Remote Clone (DBT-19407)

A customer reached out to me:

I want upgrade a PDB from Oracle Database 19c to 23ai. It’s in a Base Database Service in OCI. I use the Remote clone feature in the OCI console but it fails with DCS-12300 because IMEDIA component is installed.

The task:

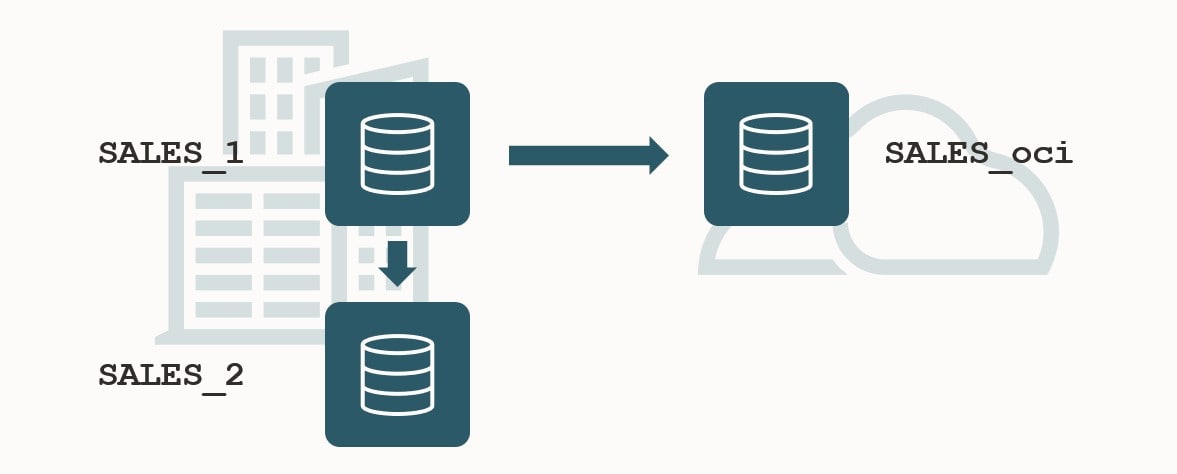
  • Clone a PDB using the OCI Console Remote clone feature
  • From a CDB on Oracle Database 19c to another CDB on Oracle Database 23ai
  • Upgrade the PDB to Oracle Database 23ai

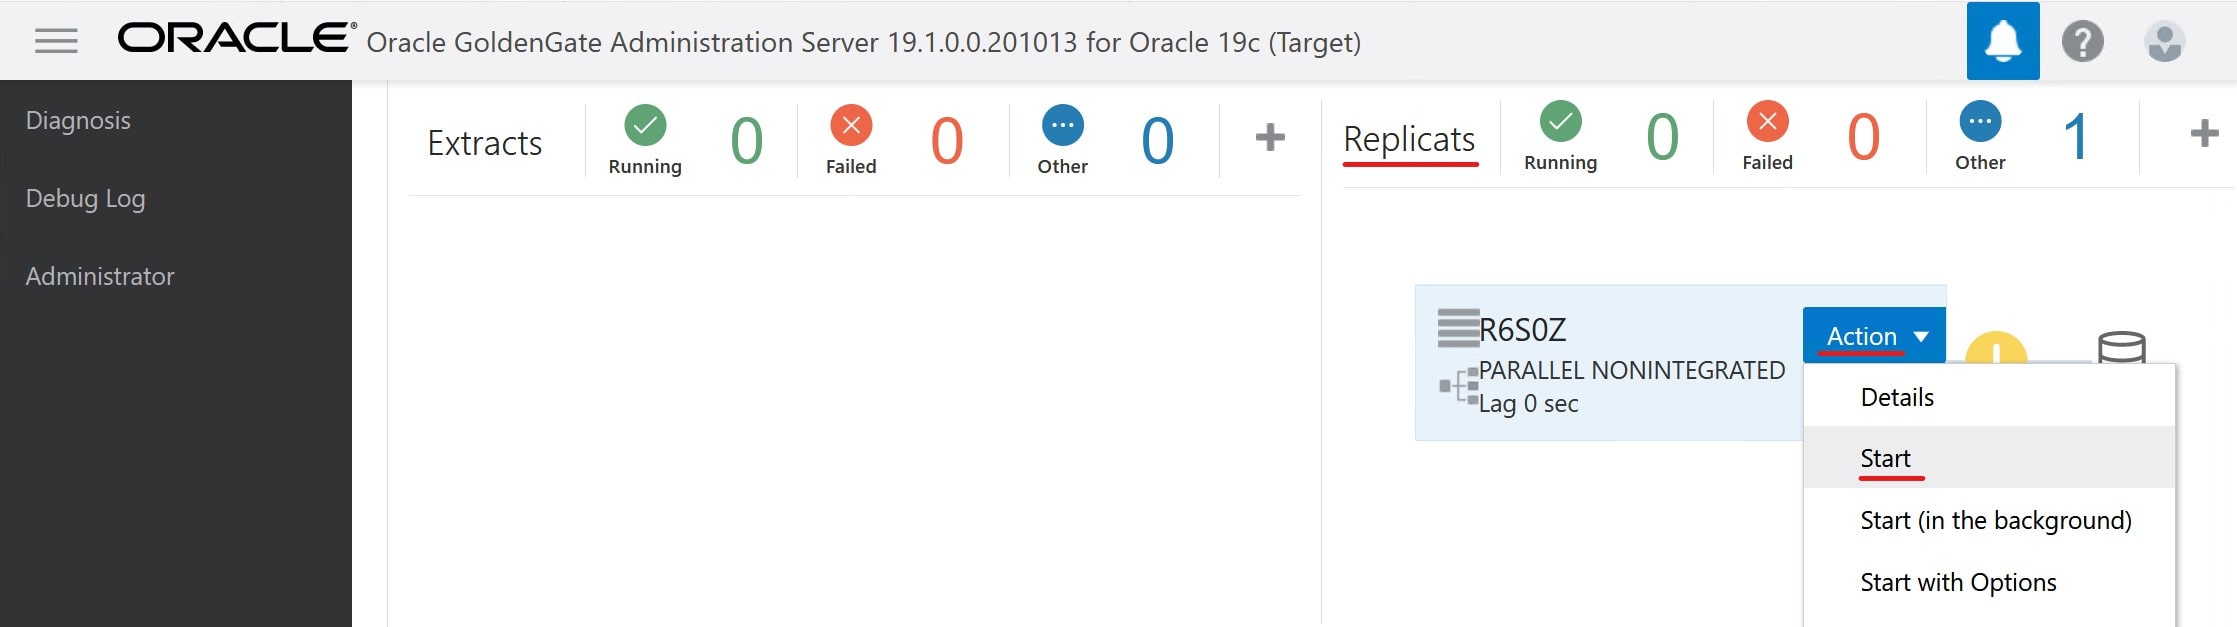
Let’s see what happens when you clone a PDB:

Error message from OCI console when remote cloning a PDB to 23ai using cloud tooling

It fails, as explained by the customer.

Let’s dig a little deeper. Connect as root to the target system and check the DCS agent.

$ dbcli list-jobs

ID                                       Description                                                                 Created                             Status
---------------------------------------- --------------------------------------------------------------------------- ----------------------------------- ----------
...
6e1fa60c-8572-4e08-ba30-cafb705c195e     Remote Pluggable Database:SALES from SALES in db:CDB23                      Tuesday, September 24, 2024, 05:04:13 UTC Failure

$ dbcli describe-job -i 6e1fa60c-8572-4e08-ba30-cafb705c195e

Job details
----------------------------------------------------------------
                     ID:  6e1fa60c-8572-4e08-ba30-cafb705c195e
            Description:  Remote Pluggable Database:SALES from SALES in db:CDB23
                 Status:  Failure
                Created:  September 24, 2024 at 5:04:13 AM UTC
               Progress:  35%
                Message:  DCS-12300:Failed to clone PDB SALES from remote PDB SALES. [[FATAL] [DBT-19407] Database option (IMEDIA) is not installed in Local CDB (CDB23).,
 CAUSE: The database options installed on the Remote CDB(CDB19_979_fra.sub02121342350.daniel.oraclevcn.com) m
             Error Code:  DCS-12300
                  Cause:  Error occurred during cloning the remote PDB.
                 Action:  Refer to DCS agent log, DBCA log for more information.

...

What’s Going on?

First, IMEDIA stands for interMedia and is an old name for the Multimedia component. The ID of Multimedia is ORDIM.

Oracle desupported the Multimedia component:

Desupport of Oracle Multimedia Oracle Multimedia is desupported in Oracle Database 19c, and the implementation is removed. … Oracle Multimedia objects and packages remain in the database. However, these objects and packages no longer function, and raise exceptions if there is an attempt made to use them.

In the customer’s and my case, the Multimedia component is installed in the source PDB, but not present in the target CDB. The target CDB is on Oracle Database 23ai where this component is completely removed.

If you plug in a PDB that has more components than the CDB, you get a plug-in violation, and that’s causing the error.

Here’s how you can check whether Multimedia is installed:

select   con_id, status 
from     cdb_registry 
where    comp_id='ORDIM' 
order by 1;

Solution 1: AutoUpgrade

The best solution is to use AutoUpgrade. Here’s a blog post with all the details.

AutoUpgrade detects that multimedia is already present in the preupgrade phase. Here’s an extract from the preupgrade log file:

INFORMATION ONLY
  ================
    7.  Follow the instructions in the Oracle Multimedia README.txt file in <23
      ORACLE_HOME>/ord/im/admin/README.txt, or MOS note 2555923.1 to determine
      if Oracle Multimedia is being used. If Oracle Multimedia is being used,
      refer to MOS note 2347372.1 for suggestions on replacing Oracle
      Multimedia.

      Oracle Multimedia component (ORDIM) is installed.

      Starting in release 19c, Oracle Multimedia is desupported. Object types
      still exist, but methods and procedures will raise an exception. Refer to
      23 Oracle Database Upgrade Guide, the Oracle Multimedia README.txt file
      in <23 ORACLE_HOME>/ord/im/admin/README.txt, or MOS note 2555923.1 for
      more information.

When AutoUpgrade plugs in the PDB with Multimedia, it’ll see the plug-in violation. But AutoUpgrade is smart and knows that Multimedia is special. It knows that during the upgrade, it will execute the Multimedia removal script. So, it disregards the plug-in violation until the situation is resolved.

AutoUpgrade also handles the upgrade, so it’s a done deal. Easy!

Solution 2: Remove Multimedia

You can also manually remove the Multimedia component in the source PDB before cloning.

I grabbed these instructions from Mike Dietrich’s blog. They work for a 19c CDB:

cd $ORACLE_HOME/rdbms/admin
#First, remove ORDIM in all containers, except root
$ORACLE_HOME/perl/bin/perl catcon.pl -n 1 -C 'CDB$ROOT' -e -b imremdo_pdbs -d $ORACLE_HOME/ord/im/admin imremdo.sql
#Recompile
$ORACLE_HOME/perl/bin/perl catcon.pl -n 1 -e -b utlrp -d '''.''' utlrp.sql
#Last, remove ORDIM in root
$ORACLE_HOME/perl/bin/perl catcon.pl -n 1 -c 'CDB$ROOT' -e -b imremdo_cdb -d $ORACLE_HOME/ord/im/admin imremdo.sql
#Recompile
$ORACLE_HOME/perl/bin/perl catcon.pl -n 1 -e -b utlrp -d '''.''' utlrp.sql
#Remove leftover package in all containers
echo "drop package SYS.ORDIMDPCALLOUTS;" > vi dropim.sql
$ $ORACLE_HOME/perl/bin/perl $ORACLE_HOME/rdbms/admin/catcon.pl -n 1 -e -b dropim -d '''.''' dropim.sql

Without the Multimedia component cloning via the cloud tooling works, but you are still left with a PDB that you attend to.

If you’re not using AutoUpgrade, you will use a new feature called replay upgrade. The CDB will see that the PDB is a lower-version and start an automatic upgrade. However, you still have some manual pre- and post-upgrade tasks to do.

One of the reasons I prefer using AutoUpgrade.

Further Reading

For those interested, here are a few links to Mike Dietrich’s blog on components and Multimedia in particular:

How to Upgrade Oracle Database and Replace the Operating System

A reader asked me for advice on upgrading Oracle Database and replacing the underlying operating system.

  • Currently on Oracle Database 12.1.0.2
  • Currently on Windows Server 2012
  • Upgrade to Oracle Database 19c
  • Move to new servers with Microsoft Windows Server 2022

What’s the recommended approach for transitioning to Oracle 19c on Windows 2022?

Oracle Data Guard

My first option is always Oracle Data Guard. It is often a superior option. You move the entire database, and the only interruption is a Data Guard switchover.

In this case, where the reader needs to replace the operating system, the first thing to check is platform certifications. Always check platform certifications on My Oracle Support. It has the most up-to-date information.

Here is an overview of the platform certification for Oracle Database 12.1.0.2 and 19c.

Oracle Database 12.1.0.2 Oracle Database 19c
Windows Server 2008
Windows Server 2008 R2
Windows Server 2012
Windows Server 2012 R2 Windows Server 2012 R2
Windows Server 2016
Windows Server 2019
Windows Server 2022

Oracle Database 19c does not support the current platform, Windows Server 2012. Thus, the reader can’t set up a standby database on the new servers and transition via a regular switchover.

Windows Server 2012 R2

Let’s imagine the current servers were using Windows Server 2012 R2. Both database releases support this platform. I would recommend this approach:

  1. Upgrade to Oracle Database 19c on current servers.
  2. Set up new servers with Windows Server 2022.
  3. Create standby database on new server.
  4. Transition to new servers with a regular Data Guard switchver.

This approach requires two maintenance windows. Yet, it is still my favorite because it is very simple.

RMAN Backups

You could also use RMAN and incremental backups. You don’t need much downtime – just the time necessary for a final incremental backup and restore. Like with Data Guard, you bring over the entire database.

RMAN can restore backups from a previous version, and you can use that to your advantage.

  1. Provision new servers with just Oracle Database 19c.
  2. Backup on 12.1.0.2.
  3. Restore and recover the database on the new servers with Oracle Database 19c binaries.
  4. After the final incremental backup, open the new database in upgrade mode and perform the upgrade.

We covered this approach in one of our webinars; you can also find details in this blog post.

Move Storage

You can also unmount the storage from the old server, and attach it to the new server.

  1. Run AutoUpgrade in analyze mode to determine upgrade readiness.
  2. Down time starts.
  3. Run AutoUpgrade in fixup mode to fix any issues preventing the upgrade from starting.
  4. Cleanly shut down the source database.
  5. Move the storage to the new server.
  6. Start the database on the new server in upgrade mode.
  7. Start AutoUpgrade in upgrade mode to complete the upgrade.

This is just a high-level overview. For a real move, there are many more intermediate steps.

Be sure to have a proper rollback plan. You are re-using the data files and AutoUprade in upgrade mode does not create a guaranteed restore point.

Data Pump

Data Pump is also a viable option, especially for smaller, less complex databases. It also enables you to restructure your database, for example:

  • Transform old BasicFile LOBs to SecureFile
  • Implement partitioning
  • Exclude data (for archival)
  • You can import directly into a higher release and even directly into a PDB.

But – the larger the database, the longer downtime (generally speaking).

When you use Data Pump for upgrades, I recommend using a full database export.

Full Transportable Export/Import

You can also use transportable tablespaces for upgrades. You can even migrate directly into a PDB on Oracle Database 19c.

The downside of transportable tablespace is that you must copy the data files to the new system.

But often, you can unmount the storage and mount the storage on the new servers. This avoids the cumbersome process of copying the data files to the new system.

Another approach is to combine transportable tablespaces with incremental backups, if you want to lower the downtime needed. This approach leaves the original database untouched, leaving you with a perfect rollback option.

Oracle GoldenGate

You could also use Oracle GoldenGate. But for most upgrades, it is overkill, partly because of the restrictions and considerations. I see this as a sensible option only if you have very strict downtime or fallback requirements.

Conclusion

What is the best option?

It depends…

This post helps you make the best decision for your organization.

How to Connect SQL Developer to a Base Database Service Using SSH Tunnel

Here is a quick guide showing you how to connect SQL Developer running on your computer to a Base Database Service in Oracle Cloud Infrastructure. The Base Database Service does not allow connections from the outside except SSH. So, you can use an SSH tunnel.

Create SSH Connection

  1. First, you start SQL Developer on your computer (of course, the latest version). Go to the View menu, and select SSH.
  2. To the left you now find the SSH Hosts panel, right-click and choose New SSH Host.
  3. Enter the following information and click OK:
    • Name: Give it a meaningful name.
    • Host: The public IP address of your Base Database Service.
    • Username: Set it to oracle.
    • Use key file: Tick it off and select your private key file.
    • Add a Local Port Forward: Tick it off.

Configure SSH host connection in SQL Developer

Create Database Connection

  1. In the Connections panel, click on the plus icon to create a new connection.
  2. Enter the following information:
    • Name: Give the database connection a meaningful name.
    • Supply a set of user credentials (Username, Password, Role).
    • Connection Type: Set it to SSH.
    • Port Forward: Select the SSH connection you just created.
    • Service name: The fully qualified service name (use lsnrctl status to find it).
  3. Click Test to ensure the connection works. If you get an error, jump to the troubleshooting part.
  4. Click Save and Connect.

Define connection in SQL Developer to connect using SSH tunnel

That’s it!

Now you can connect to your OCI instance from SQL Developer on your own computer.

Remember to use the latest version of SQL Developer to get access to all the goodies.

For Production?

It’s very unusual for a production database to have a public IP address. In a more secure environment, this is a safer approach.

Troubleshooting

IO Error: Got minus one from read call

IO Error: Connection reset by peer

Vendor code 17002

I have run into this a few times. I haven’t found the root cause (yet), but this usually works for me:

  1. Stop the listener and take a backup of listener.ora:
    lsnrctl stop
    cp $ORACLE_HOME/network/admin/listener.ora $ORACLE_HOME/network/admin/listener.ora2
    
  2. Remove all references in listener.ora to the listener called LISTENER:
    vi $ORACLE_HOME/network/admin/listener.ora
    
    • LISTENER=(DESCRIPTION=(ADDRESS_LIST=(ADDRESS=(PROTOCOL=IPC)(KEY=LISTENER))))
    • ENABLE_GLOBAL_DYNAMIC_ENDPOINT_LISTENER=ON
    • VALID_NODE_CHECKING_REGISTRATION_LISTENER=SUBNET
  3. Restart the listener:
    lsnrctl start
    
  4. Connection from SQL Developer should work now.
  5. Now comes the odd part. Add the parameters back into listener.ora and restart:
    vi $ORACLE_HOME/network/admin/listener.ora
    
    lsnrctl stop
    lsnrctl start
    
  6. The connections should still work.

How to Migrate to Autonomous Database Using Database Migration Service and OCI CLI

You can migrate your Oracle Database to Autonomous Database using Database Migration Service (DMS). You can use the GUI or one of the many interfaces:

  • REST API
  • OCI CLI
  • PL/SQL
  • SDK for various programming languages (Java, Python, and others)

In this blog post, I use OCI CLI. You can install it on your computer or use the cloud shell.

The Scenario

This is my setup:

  • Source database: Oracle Database 11.2.0.4 running on a Base Database System in OCI.
  • Target database: Autonomous Database (transaction processing).

For simplicity, I will migrate all schemas in the database using Data Pump. You can cherrypick individual schemas or exclude/include specific objects if needed.

I have already created a Vault. DMS needs one to store sensitive information.

How to

I must execute all commands in the same shell. I need to specify a lot of information that I use later on:

#Specify a base name of the migration. All-migration related objects are prefixed with the name
export MIGRNAME=SALES

#Specify the OCID of the compartment where all the resources are running. This procedure assumes all resources are placed in the same compartment
export COMPARTMENTOCID="ocid1.compartment.oc1...."

#Vault details
export VAULTOCID="ocid1.vault.oc1...."
export VAULTKEYOCID="ocid1.key.oc1...."

Next, I specify information about the source database:

#Source database OCID
export SRCDBOCID="ocid1.database.oc1...."

#Network stuff
#Private IP address of the source DB System
export SRCHOSTIP=10.0.1.186
#Subnet OCID that the source DB System uses
export SRCSUBNETOCID="ocid1.subnet.oc1...."
#VCN OCID that the DB System uses
export SRCVCNOCID="ocid1.vcn.oc1...."
#Location of the private key file that can be used to communicate over SSH to the source host
export SRCHOSTKEYFILE=/Users/daniel/Documents/ssh/my-private-key

#Name and path of the database directory object. Remember to create the directory in the file system
export SRCDBDIRNAME=EXPDIR
export SRCDBDIRPATH=/u01/app/oracle/$SRCDBDIRNAME

#Connection details
#Details for non-CDB or PDB
export SRCPDBUSERNAME=SYSTEM
export SRCPDBPASSWORD=*****
export SRCPDBSVCNAME=SALESDB_fra1b4....oraclevcn.com
#If source is a PDB, fill in details for CDB. For non-CDB leave them blank
export SRCCDBUSERNAME=
export SRCCDBPASSWORD=
export SRCCDBSVCNAME=

Finally, I specify information about the target database – the autonomous database:

#Target ADB OCID
export TGTADBOCID="ocid1.autonomousdatabase.oc1...."
#Username and password - typically the ADMIN user
export TGTDBUSERNAME=ADMIN
export TGTDBPASSWORD=*****

Now, let the fun begin. I first create an object storage bucket which DMS uses to store dump files, log files, CPAT output and the like:

export BUCKETNAME=$MIGRNAME
export OSNAMESPACE=$(oci os bucket create \
  --compartment-id $COMPARTMENTOCID \
  --name $BUCKETNAME \
  --query "data.namespace" \
  --raw-output)

Then, I create a connection to the source database (non-CDB or PDB). If the source database is a PDB, I also create a connection to the source CDB:

#Create connection to source PDB/non-CDB
export SRCSUDOLOCATION=/usr/bin/sudo
export SRCSSHUSER=opc
export SRCPDBCONNNAME=$MIGRNAME"-SRC-PDB-CONN"

#The 'ssh-details' parameters include the contents of the private key file as a single-line string. Newlines from the file are converted to \n by the 'awk' command
export SRCPDBCONNOCID=$(oci database-migration connection create \
   --compartment-id $COMPARTMENTOCID \
   --database-type USER_MANAGED_OCI \
   --admin-credentials '{"password":"'$SRCPDBPASSWORD'","username":"'$SRCPDBUSERNAME'"}' \
   --vault-details '{"keyId":"'$VAULTKEYOCID'","vaultId":"'$VAULTOCID'","compartmentId":"'$COMPARTMENTOCID'"}' \
   --database-id $SRCDBOCID \
   --display-name $SRCPDBCONNNAME \
   --connect-descriptor '{"connectString": "'$SRCHOSTIP':1521/'$SRCPDBSVCNAME'"}' \
   --ssh-details '{"host":"'$SRCHOSTIP'","sudoLocation": "'$SRCSUDOLOCATION'","user":"'$SRCSSHUSER'","sshkey":"'"$(awk '{printf "%s\\n", $0}' $SRCHOSTKEYFILE)"'"}' \
   --private-endpoint '{"subnetId":"'$SRCSUBNETOCID'","vcnId":"'$SRCVCNOCID'","compartmentId":"'$COMPARTMENTOCID'"}' \
   --wait-for-state SUCCEEDED \
   --max-wait-seconds 120 \
   --query "data.resources[0].identifier" \
   --raw-output)

#Create connection to source CDB, if needed
if [[ -n $SRCCDBUSERNAME ]];then
	export SRCCDBCONNNAME=$MIGRNAME"-SRC-CDB-CONN"
	export SRCCDBCONNOCID=$(oci database-migration connection create \
	   --compartment-id $COMPARTMENTOCID \
	   --database-type USER_MANAGED_OCI \
	   --admin-credentials '{"password":"'$SRCCDBPASSWORD'","username":"'$SRCCDBUSERNAME'"}' \
	   --vault-details '{"keyId":"'$VAULTKEYOCID'","vaultId":"'$VAULTOCID'","compartmentId":"'$COMPARTMENTOCID'"}' \
	   --database-id $SRCDBOCID \
	   --display-name $SRCCDBCONNNAME \
	   --connect-descriptor '{"connectString":"'$SRCHOSTIP':1521/'$SRCCDBSVCNAME'"}' \
	   --ssh-details '{"host":"'$SRCHOSTIP'","sudoLocation": "'$SRCSUDOLOCATION'","user":"'$SRCSSHUSER'","sshkey":"'"$(awk '{printf "%s\\n", $0}' $SRCHOSTKEYFILE)"'"}' \
	   --private-endpoint '{"subnetId":"'$SRCSUBNETOCID'","vcnId":"'$SRCVCNOCID'","compartmentId":"'$COMPARTMENTOCID'"}' \
	   --wait-for-state SUCCEEDED \
	   --max-wait-seconds 120 \
	   --query "data.resources[0].identifier" \
	   --raw-output)
fi

Next, I create a connection to the target autonomous database:

export TGTCONNNAME=$MIGRNAME"-TGT-CONN"
export TGTCONNOCID=$(oci database-migration connection create \
   --compartment-id $COMPARTMENTOCID \
   --admin-credentials '{"password":"'$TGTDBPASSWORD'","username":"'$TGTDBUSERNAME'"}' \
   --database-type AUTONOMOUS \
   --vault-details '{"keyId":"'$VAULTKEYOCID'","vaultId":"'$VAULTOCID'","compartmentId":"'$COMPARTMENTOCID'"}' \
   --database-id $TGTADBOCID \
   --display-name $TGTCONNNAME \
   --wait-for-state SUCCEEDED \
   --max-wait-seconds 120 \
   --query "data.resources[0].identifier" \
   --raw-output)

Now, I will create a migration object which describes the migration. No changes are made to the database yet:

#Create the migration
export MIGROBJNAME=$MIGRNAME
if [[ -n $SRCCDBCONNOCID ]];then
   export $MIGRSRCCDBPARAM="--source-container-database-connection-id $SRCCDBCONNOCID"
else
   export MIGRSRCCDBPARAM=""
fi
export MIGROBJOCID=$(oci database-migration migration create \
   --compartment-id $COMPARTMENTOCID \
   --vault-details '{"keyId":"'$VAULTKEYOCID'","vaultId":"'$VAULTOCID'","compartmentId":"'$COMPARTMENTOCID'"}' \
   --source-database-connection-id $SRCPDBCONNOCID $MIGRSRCCDBPARAM \
   --target-database-connection-id $TGTCONNOCID \
   --type OFFLINE \
   --display-name $MIGROBJNAME \
   --data-transfer-medium-details '{"databaseLinkDetails": null,"objectStorageDetails": {"namespaceName": "'$OSNAMESPACE'","bucketName": "'$BUCKETNAME'"},"awsS3Details": null}' \
   --datapump-settings '{"exportDirectoryObject": {"name": "'$SRCDBDIRNAME'","path": "'$SRCDBDIRPATH'"}}' \
   --wait-for-state SUCCEEDED \
   --max-wait-seconds 120 \
   --query "data.resources[0].identifier" \
   --raw-output
)

Now, I can perform an evaluation. This is a sanity check which performs a lot of checks upfront. The command runs until the evaluation finishes.

#Evaluate
oci database-migration migration evaluate \
   --migration-id $MIGROBJOCID \
   --wait-for-state SUCCEEDED \
   --wait-for-state FAILED \
   --max-wait-seconds 3600

I can check the evaluation outcome, including the Cloud Premigration Advisor Tool (CPAT) report. You can find this information in the object storage bucket as well. You can run the evaluation as many times as needed:

#Get the last job and the details about it
export MIGRLASTJOBOCID=$(oci database-migration job list \
   --migration-id $MIGROBJOCID \
   --limit 1 \
   --sort-by timeCreated \
   --sort-order desc \
   --query "data.items[0].id" \
   --raw-output
)
oci database-migration job get-job-output-content \
   --job-id $MIGRLASTJOBOCID \
   --file -
#Get the CPAT report  
oci database-migration job get-advisor-report \
   --job-id $MIGRLASTJOBOCID 

Once I have cleared any issues preventing the migration, I can start the actual migration. The command will return control immediately when the migration is started. Optionally, I use the parameters --wait-for-state and --max-wait-seconds to keep it running until the command completes:

#Start the real migration
export MIGRSTARTJOBID=$(oci database-migration migration start \
   --migration-id $MIGROBJOCID \
   --query "data.id" \
   --raw-output
)

I use the below two commands to monitor the migration. The first command gives me an overall status. The second command returns a log file with additional details.

#Get the current status
oci database-migration job get \
   --job-id $MIGRSTARTJOBID 
oci database-migration job get-job-output-content \
   --job-id $MIGRSTARTJOBID \
   --file -

That’s it!

I have migrated my database to an autonomous database.

Appendix

Additional Resources

Using GUI to find REST API calls

Although the OCI CLI commands are documented, it can be hard to figure out exactly which parameters to add and the exact syntax. My colleague, Alex Kotopoulis, gave me rock-star advice.

Switch to the GUI and configure the migration as you want. Turn on "Web developer tools" (might have a different name in your browser) and investigate the network traffic. You can see the REST API calls made by the GUI and easily translate those into OCI CLI parameters.

Thanks Alex!

Rolling Upgrades of Oracle Database on Exadata Cloud Service

If you want to minimize the downtime needed to upgrade your Oracle Database 19c on Exadata Cloud Service, one of the options is to use rolling upgrades. Our good friends in the Maximum Availability Architecture (MAA) team recently posted a very good MOS note with step-by-step instructions.

Exadata Cloud Database 19c Rolling Upgrade With DBMS_ROLLING (Doc ID 2832235.1)

What Is Rolling Upgrade?

A rolling upgrade uses a standby database called a logical standby database.

A logical standby database is initially created as an identical copy of the primary database, but it later can be altered to have a different structure. The logical standby database is updated by executing SQL statements. The flexibility of a logical standby database lets you upgrade Oracle Database software (patch sets and new Oracle Database releases) and perform other database maintenance in rolling fashion with almost no downtime.

Logical Standby Databases, Data Guard Concepts and Administration 21c

With almost no downtime means the time it takes to perform a Data Guard switchover. Typically, that is a few minutes. If your application is configured properly, the downtime can be hidden from the end-user. The downtime will appear as a brown-out where the session will be waiting for the database to complete the switchover before continuing.

Rodrigo explains how the process works in this video from our webinar How Low Can You Go? Zero Downtime Operations

Pro tip: The process uses a so-called Transient Logical Standby or TLS, so you can find additional information by searching for that term as well.

Can I use rolling upgrade on my database?

Rolling upgrades using DBMS_ROLLING requires the Active Data Guard Option which is included in your ExaCS license.

In addition, there are requirements to the data types in your database and a few other prerequisites. Check the documentation for details.

In this video, Roy explains how to determine the readiness of your Oracle Database. The video is also from our webinar How Low Can You Go? Zero Downtime Operations.

Other Options for Minimizing Downtime During Upgrades

If your database is not capable of performing rolling upgrades, you can still do something to minimize downtime. You can try to tune the upgrade itself or use Oracle GoldenGate. Both options are described in detail in our webinar How Low Can You Go? Zero Downtime Operations. You can flip through the slides or watch the complete recording.

If you decide to go with Oracle GoldenGate, and since your database is in OCI, you can benefit from the OCI GoldenGate service. Now, you may think: GoldenGate, that sounds expensive! But it is not. The new OCI GoldenGate service comes at a completely new price model, which is very attractive for shorter use cases like upgrades and migrations. You don’t pay a license for the source and target CPUs but instead for usage of CPUs on the GoldenGate hub itself. And you only pay by the hour.

Conclusion

Finally, just a kudos to my colleague Sebastian Alasino for putting together a very good, easy-to-follow MOS note.

Here is a demo of rolling upgrades (not on ExaCS – but a lot is identical)

Happy upgrading!

Zero Downtime Migration – Logical Migration and Statistics

If you decided to do a logical migration of your Oracle Database with Zero Downtime Migration (ZDM), here is something important about optimizer statistics. You must manually take care of the optimizer statistics on the target database after the Data Pump import. Either by recreating the statistics or transporting the statistics from the source database.

Background

Whenever I talk about migration of Oracle Database with Data Pump, I always mention that it is best practice to exclude optimizer statistics from the Data Pump export. Here is how you do it:

$ expdp ... exclude=statistics

Why is that recommended? Data Pump is not very good at extracting the optimizer statistics. There is nothing wrong with the statistics when they are imported. But it can take a very long time to do the export of statistics.

ZDM and Data Pump

The development team behind ZDM wanted the tool to be easy to use. Also, they wanted ZDM to use all the best practices that come with the various other tools that ZDM uses. When they talked to us about Data Pump, we told them to exclude statistics.

BUT – this also leaves you in a situation where you have a database completely without optimizer statistics. It goes without saying that it is a disaster waiting to happen. You must ensure that optimizer statistics are present on the target database before allowing the users to connect to it.

Regather

One option is to regather optimizer statistics on the target database after the Data Pump import. When the Data Pump import completes, and before you proceed with the switchover, it is time to regather the statistics. Typically, you would start ZDM something like this:

$ zdmcli migrate database .... -pauseafter ZDM_MONITOR_GG_LAG

It will start by performing the initial load of the database with Data Pump. Then it will configure GoldenGate before it pauses – waiting for your signal to complete the migration. At this time, use DBMS_STATS to gather statistics:

SQL> exec dbms_stats.gather_database_stats;

This has some drawbacks:

  • It requires time and resources – which might not be the biggest problem. The source database is still open for business. We haven’t performed the switchover yet.
  • Column usage information (table COL_USAGE$) is not populated, so in some cases, no histograms will be created. This will happen if the database is supposed to automatically determine whether histograms are needed (method_opt includes size auto). In that case, you can merge the column usage information from another database via a database link, which can be a good idea if your application is depending on histograms.
  • The table, schema, or database statistics preferences are not present. It could be degree, method_opt, stale_pct or any other preferences that you can set with DBMS_STATS.SET_TABLE_PREFS (or schema or database-wide preferences). These preferences can be transferred to the new system, which is what I will talk about next.

Transferring Statistics

Another option is to transfer the statistics using DBMS_STATS. We have covered this in detail in a webinar, so I suggest you watch Performance Stability, Tips and Tricks and Underscores for all the details.

In short,

  1. The optimizer statistics in the source database are extracted from the data dictionary and stored in a transportable format in a regular heap table (referred to as a staging table).
  2. Using Data Pump, you move that table to the target database.
  3. Then you put the statistics into the data dictionary of the target database so that optimizer can use them.

Pro tip: You should perform step #1 before you start ZDM and store the staging table in one of the schemas that you are migrating with ZDM. That way, you don’t have to move the table manually. It is moved by ZDM together with the real data.

One thing to be aware of is that the table, schema or database statistics preferences are not transferred when you use e.g. DBMS_STATS.EXPORT_TABLE_STATS. There are dedicated procedures for transferring the statistics preferences:

Conclusion

You must figure out how to move the optimizer statistics into your target database when you use ZDM to perform logical migrations. If not, your target database will be without optimizer statistics which is a disaster waiting to happen.

Appendix

You might now ask. If Data Pump is bad at exporting statistics, but there are already better ways available in the database, why don’t we change the Data Pump code? And you are right – but so far, other things have been prioritized. I would love to see this one day fully embedded in Data Pump.

Other Blog Posts in This Series

Zero Downtime Migration – Logical Online Migration and Testing

How can you test your OCI database before going live? With Logical Online migration it is possible using Flashback Database, restore or cloning. Let’s explore the options.

Flashback Database

Using Flashback Database is the easiest option and it is supported on all target platforms except Autonomous Database (shared and dedicated). In addition, your target database must be Enterprise Edition.

Does Oracle GoldenGate support Flashback Database? You can find the answer in the MOS note Does Goldengate Support Oracle RDBMS Flashback Features? (Doc ID 966212.1):

In a situation where there are only Replicats on a system, then FLASHBACK DATABASE… is fully supported if the Replicats are all using a checkpoint table and the trail files are available that go as far back as the flashback.

When you do Logical Online migrations you only have replicat process in your target database. In addition, checkpoint tables are enabled by default. All good!

Flashback Database – How To

  1. Stop replicat process by logging on to the GoldenGate hub and navigate to the Target Administration Server: How to stop replicat process in Oracle GoldenGate Microservices Architecture Hub
  2. Set a guaranteed restore point in the target PDB (named tgtpdb):
alter session set container=tgtpdb;
create restore point grp4test guarantee flashback database;
  1. Do your tests.
  2. Revert the changes by issuing a FLASHBACK PLUGGABLE DATABASE command:
alter session set container=cdb$root;
alter pluggable database tgtpdb close immediate;
flashback pluggable database tgtpdb to restore point grp4test;
alter pluggable database tgtpdb open resetlogs;
  1. Restart replicat process: How to start replicat process in Oracle GoldenGate Microservices Architecture Hub

The above procedure uses flashback of the pluggable database. This feature was introduced in Oracle Database 12.2. If your target database is 12.1 or older, you have to flashback the entire CDB. If your target database is a non-CDB database, you have to flashback back the entire database.

Restore

Backup/restore is also an option. In OCI it is easy to backup and restore, however, it does take longer than using Flashback Database. But the good thing is that you get to test your OCI backup and recovery strategy.

For Autonomous Database you can use the automatic backups which are enabled by default. In the other Database Cloud Offerings, you must enable automatic backup yourself.

Restore – How To

  1. Stop replicat process (see above)
  2. Create backup (or rely on automatic backup)
  3. Do your tests
  4. Restore backup
  5. Restart replicat process (see above)

Clone

Cloning the database or the entire DB System is also an option. A benefit is that the GoldenGate replication can continue while you are doing the tests. When you use Flashback Database and restore the replication must be stopped. Trail files will accumulate on disk and at one point the target database will be very busy catching up with the lag. For very huge and active systems it might be desirable to work on a clone. However, cloning to a new system mean that you are no longer testing in that specific database that will be your future production database. Also, cloning involves creating new DB Systems which has a cost.

Clone – How To

  1. Clone database or DB System
  2. Do your tests
  3. Discard database or DB System

Conclusion

Before going live in your new OCI database, you should test it. With Logical Online method it is easy, and you can use well-known techniques. If you combine it with the recommendations from our webinar Performance Stability, Tips and Tricks and Underscores, you are well underway towards a successful migration.

Other Blog Posts in This Series

Zero Downtime Migration – Physical Online Migration of Very Large Databases

This blog post is written based on ZDM version 21. The latest version of ZDM has significant changes. Please consult the documentation for updates.

Following the blog post on migrating Very Large Databases (VLDBs) using Logical Online method, let’s touch upon the Physical Online method as well.

Existing Data Guard

VLDBs are very often protected by Data Guard with one or more standby databases. When you start a migration with Zero Downtime Migration (ZDM) you don’t want to promise your existing Data Guard setup. If something happens during the preparation of the migration to OCI, you still want to be able to switch over to an on-prem standby database. Something like this:

Setup with on-prem Oracle Database Data Guard and standby database in OCI

I recommend that you always configure Data Guard using Data Guard broker. ZDM supports using the broker for the migration. If you don’t have Data Guard broker configured, ZDM can use a manual configuration as well.

A few things to observe:

  • When ZDM is working, no switch-overs are allowed. This will cause the process to error out.
  • By working I mean – from the second you start the ZDM migration and until it is paused at ZDM_CONFIGURE_DG_SRC.
  • When ZDM is paused, you can do as many switch-overs as you like. Just ensure that the original source database become the primary database again as soon as possible.
  • When you need to complete the migration, the source database must be the primary database and no switch-overs are allowed. Which does make sense because in this last phase, ZDM is switching over to the OCI target database.
  • What about fail-overs. Fail-overs means loss of data and to accept that you need to open the database with RESETLOGS. This causes all sort of havoc in your Data Guard setup. You are back to start.

At which phases can you switch over to your on-prem standby database without jeopardizing the ZDM migration

The Backup

ZDM needs a full backup that can be restored on your target.

  • DBCS: If your target database is one of the OCI Cloud Services (Virtual Machine, Bare Metal or Exadata DB System), ZDM will need to take a new full backup. Existing backups can’t be used.
  • ExaCC or Exadata on-prem: You can either take a new full backup or use an existing backup that is made available on disk. In addition, if you are so fortunate to have a Zero Data Loss Recovery Appliance (ZDLRA), you don’t need to take a backup. ZDM can just restore directly from ZDLRA.

If you are targeting a DBCS your DATA_TRANSFER_MEDIUM is set to OSS (Object Storage Service). The backup is stored in Object Storage using Oracle Database Cloud Backup Module for OCI. The backup in the source database and the restore in the target database will happen via a special sbt channel which streams the backup directly to and from Object Storage. This means:

  • The backup never hits the disk, so you don’t need additional disk space to hold the backup.
  • The duration of the backup is depending on your network speed to OCI. Since the backup is streamed directly to OCI, the network can become a bottleneck. If you have a slow connection to OCI, the backup will run equally slow. The same applies about the restore, however, the target database is already in OCI and does have a good connection to Object Storage.

ZDM will by default use 10 RMAN channels for the restore and the backup. With your knowledge of the source database, you might know better. You can tweak the number of channels in the response file. Look for the parameters SRC_RMAN_CHANNELS and TGT_RMAN_CHANNELS.

Based on your knowledge or testing you can determine which RMAN Compression algorithm that gives the best benefit on your database. You can adjust the compression algorithm in the response file using the parameter ZDM_RMAN_COMPRESSION_ALGORITHM. The default is MEDIUM which is normally gives the best balance between compression ratio and CPU time. And remember, RMAN Compression normally require a license for Advanced Compression Option but when you migrate with ZDM, there is a restricted use license.

While ZDM is taking a backup of the source database, no other backups should be running. Be sure to put your regular backups, including archive backups, on hold.

Redo Apply

In the source database, you should keep archive logs on disk until the target database has been restored, Data Guard has been configured, and the target database has caught up with redo apply. If you have a slow network connection and a huge database, it can take days until the backup has completed, restored has completed and redo apply has caught up.

  • Imagine you start the backup at sequence 100.
  • The restore of the target database finishes two days later. The source database is now at sequence 200.
  • ZDM configure Data Guard and starts redo transfer and redo apply. The source database is now at sequence 220.
  • Sequences 100-220 must be available on disk on the source database host, so the source (primary) database can transfer them to the target (standby) database.

It is not uncommon for VLDBs to generate redo on a daily basis that are double-digit TB. Just the other day I talked to a customer whose database generated 15 TB of archive logs a day.

First, you must be able to transfer the redo from the source database (primary) to the target database (standby). This is simple math: If you have 15 TB redo a day, you should be able to transfer that using a 1,5 Gbps connection (amount of redo / 24 / 60 / 60 * 8). If transferring redo becomes a problem, you can look into using redo transport compression. This can reduce the amount of data that must be transferred at the cost of CPU cycles. You can read more about it in the MOS note Redo Transport Compression in a Data Guard Environment (Doc ID 729551.1). I learned from colleagues in the Maximum Availability Architecture (MAA) team that TDE Tablespace Encryption and redo transport compression doesn’t play very well together. If your source database is encrypted, you should not expect that much benefit from redo transport compression.

Next, redo must be applied on the target database. Is the target database capable of applying redo so fast? On Exadata the answer is most likely: YES – but as always in IT, it depends. Redo Apply benchmark of Oracle Database Data Guard 
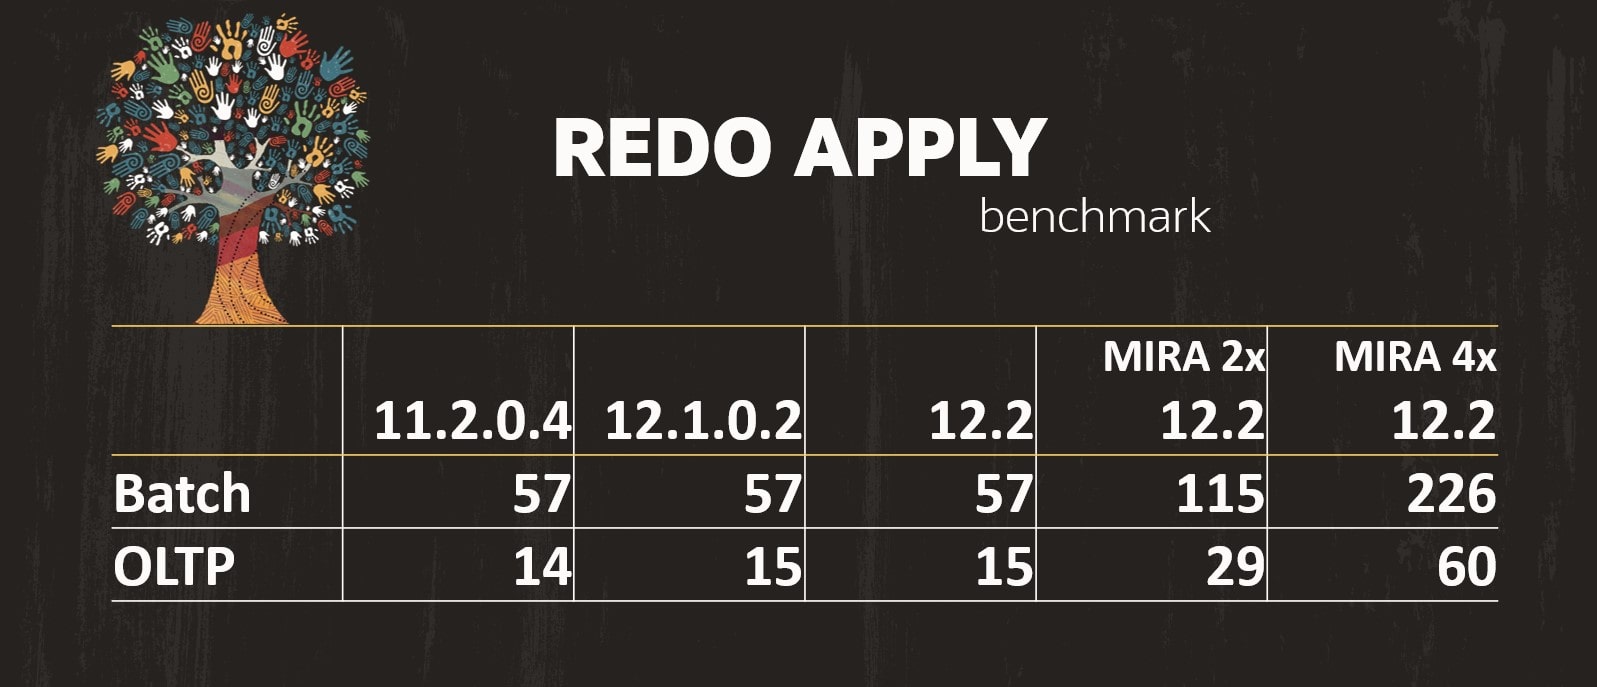
The numbers of the above graph comes from Redo Apply Best Practices – Oracle Data Guard and Active Data Guard. Based on your database release and the type of workload you have in the database; you can see the amount of redo that can be applied daily (in TB). The last two columns are using Multi-Instance Redo Apply (MIRA) with either two or four active RAC nodes. The numbers were generated on an Exadata.

Backup of Target Database

How do you backup your target database in OCI? You want to have a valid backup from the very second that you switch over to the target database.

The target placeholder database that you originally created will be overwritten by ZDM. This means that you can’t configure and enable automatic backup in OCI in advance. You must wait until the migration has completed until you enable automatic backup.

You could:

  • Extend the downtime window to allow automatic backup to be configured after the migration. Also, allow enough time for the first backup to complete.
  • Or, do your own backup in OCI. This is more cumbersome but will allow you to open the database for business immediately after the switchover. But you are in charge of the backup now. All the various bits and pieces are available:
    • Original backup is still in object storage.
    • Archive logs are on disk – you can back them up manually.
    • Perform incrementals if needed – put them somewhere safe.
    • In case of emergency – glue it all together

Data Guard on Target Database

Similar to automatic backup, you can’t create a Data Guard Association until ZDM has completed the migration. The cloud tooling does not support creating the standby database through a cascading standby. This means that you can’t build your OCI standby database until after ZDM has completed the migration – and the OCI database is the primary database. You can start to create the OCI Data Guard as soon as ZDM is done, but

  • You must tolerate that the OCI Data Guard is missing
  • Or, take downtime

Conclusion

Even huge Oracle Databases can be migrated to OCI using Zero Downtime Migration. You might need to make a few adjustments from the standard flow, but it is absolutely doable. Automatic backup and data guard can’t be created in OCI until after the migration. This might force you to take downtime. Besides the actual migration, you should also do your best to ensure performance stability once the database is open for business. For that purpose, you should have a look at our webinar Performance Stability, Tips and Tricks and Underscores.

Other Blog Posts in This Series

Zero Downtime Migration – Logical Online Migration of Very Large Databases

Things always work on PowerPoint slides. And they almost always work in our lab environments as well. And recorded demos are also pretty bullet-proof.

But what happens when you have a huge database to migrate? A Very Large Database (VLDB). First, things get more exciting. Second, there are more knobs to turn and the smallest thing might become a big thing. Here are some things to consider when you migrate VLDBs using the Logical Online method.

Existing Data Guard No need to worry about your existing on-prem Oracle Data Guard environment. The Logical Migration uses Oracle Data Pump and Oracle GoldenGate. Both tools can be used on a database in a Data Guard and does not interfere with Data Guard operations.

But no switchovers or failovers are allowed during replication. GoldenGate can be configured to fully support a Data Guard environment and seamlessly reconnect in case of a Data Guard switchover. But it requires advanced configuration of GoldenGate. Zero Downtime Migration (ZDM) does the GoldenGate configuration but does so in a basic way that does not support Data Guard switchovers.

Data Pump Data Pump is used for the initial load of data.

The initial load happens before downtime, so generally you shouldn’t worry too much about the time it takes to perform the Data Pump export and import. However, the longer it takes, the bigger a replication will GoldenGate need to catch up. If the gap is too big, it might become a problem.

Apply a proper degree of parallelism. Rule-of-thumb:

On-prem: 2 x number of physical cores OCI: Number of OCPUs You can change the Data Pump parallel setting using the ZDM response file parameters DATAPUMPSETTINGS_DATAPUMPPARAMETERS_EXPORTPARALLELISMDEGREE and DATAPUMPSETTINGS_DATAPUMPPARAMETERS_IMPORTPARALLELISMDEGREE

When you are importing in OCI, consider scaling up on CPUs. More CPUs, more Data Pump parallel, faster import. Bare Metal and Exadata DB Systems scales online, whereas Virtual Machines needs around 10 minutes of downtime.

ZDM applies Data Pump compression automatically. Remember you don’t need a license for Advanced Compression Option to use compression when you are migrating with ZDM. Our experience is that MEDIUM most of the time is the best alternative. It provides a good compression ratio at a low CPU footprint. Although HIGH can compress better, it often comes at a much higher CPU footprint. ZDM uses MEDIUM compression algorithm. It’s not possible to change the Data Pump compression algorithm. The interested reader may find a benchmark below, that compares the different compression algorithms:

ZDM automatically transforms BasicFile LOBs into SecureFile LOBs – which is very good. SecureFile LOBs are superior in many ways, also when it comes to importing. Based on a customer case, we did a benchmark that measures the time it takes to import LOB data. The customer saw a 3x improvement during by transforming to SecureFile LOBs – and got the benefits of SecureFile LOBs afterwards. ZDM transforms to SecureFile LOBs automatically. Don’t turn it off. Here are the log entries from the two imports. Notice the elapsed time:

BasicFile LOBs

10-OCT-20 21:43:21.848: W-3 . . imported "SCHEMA"."TABLE" 31.83 GB 681025 rows in 804 seconds using direct_path

SecureFile LOBs

15-OCT-20 18:16:48.663: W-13 . . imported "SCHEMA"."TABLES" 31.83 GB 681025 rows in 261 seconds using external_table Don’t use import over network link. Use dump files. Performance-wise there are some restrictions when you import over network link. These restrictions really hurt on a VLDB.

The Data Pump works will automatically be started on all nodes, if the target database is a RAC database. That should allow for the fastest possible import. If needed, you can force all workers on to the same node using DATAPUMPSETTINGS_DATAPUMPPARAMETERS_NOCLUSTER

But when you export to dump files, remember to ensure you have adequate disk space on the source database host to hold the dump file. Use mount points that can deliver good write performance and ideally, they should be separated from the storage that holds the database data files.

A Data Pump export does not affect your existing backup operations. But the export and the backup will fight over the same resources, so I recommend suspending major backup operations (level 0+1) until after the export.

Speaking of fighting over resources. You should run the export at off peak hours. That will allow the export to use many more resources. The export is not a fully consistent export. Each table is consistent, but ZDM does not use FLASHBACK_TIME or FLASHBACK_SCN to make the entire export consistent. This helps avoid ORA-01555 snapshot too old during the export. The SCN of each table is recorded in the dump file and GoldenGate later on uses that information to start replication on each table individually from the appropriate SCN.

GoldenGate Replication How much data will GoldenGate need to transfer from source database to GoldenGate hub and from GoldenGate hub to target database? GoldenGate stores the replication data in trail files. The trail files are smaller than redo logs. The size of trail files is typically 30-40 % of the size of the redo logs. Imagine a database generating 15 TB of redo a day. The size of the trail files will be 4,5-6 TB. If you further apply compression on the trail files, you can typically reduce the size to around 1/8. Using our example, the trail files are now 550-750 GB. Which is significantly less than the initial 15 TB.

In the ZDM response file there is a parameter called GOLDENGATESETTINGS_EXTRACT_PERFORMANCEPROFILE. The default value is MEDIUM, but you have the option of changing it do HIGH. This should increase the performance of the extract process.

ZDM configure GoldenGate to use Parallel Replicat. This gives you a few options. First, you can control the number of mappers by using the parameter GOLDENGATESETTINGS_REPLICAT_MAPPARALLELISM (default is 4). Also, apply parallelism is auto-tuned. You can set a minimum and maximum value using GOLDENGATESETTINGS_REPLICAT_MINAPPLYPARALLELISM and GOLDENGATESETTINGS_REPLICAT_MAXAPPLYPARALLELISM=50. Defaults are 4 and 50 so I don’t think it will be necessary to change.

By default, ZDM does not configure GoldenGate with DDL replication. Replicating without DDL gives the best performance. If you must have DDL replication in your migration project, you can look at the ZDM response file parameter GOLDENGATESETTINGS_REPLICATEDDL. But be prepared for a performance degradation.

In our webinar, Migrating Very Large Databases my team and I discuss what to consider when migrating databases with GoldenGate.

Last, you can find more advice in Administering Oracle GoldenGate 19.1, Tuning the Performance of Oracle GoldenGate.

GoldenGate Health Check Oracle GoldenGate comes with health check scripts that you can use on the source and target database. This will help you monitor and troubleshoot the process. Here is information on how to install and use the health check scripts. You can also find information in Administering Oracle GoldenGate 19.1, Using Healthcheck Scripts to Monitor and Troubleshoot.

Backup of Target Database When you use logical online migration in ZDM, you create the target database in advance. In contrast to physical migration, the target database is not overwritten. This means that you can configure automatic backup of your target OCI database before you complete the migration and switch over to OCI. You will even have time to and possibility of testing the backup.

I recommend that you configure automatic backup after the Data Pump initial load. This way there is less archive logs to back up as well.

Data Guard on Target Database Similar to automatic backup, you can also create your Data Guard association before the switchover. Likewise, wait until after the initial load has completed.

Conclusion Even huge Oracle Databases can be migrated to OCI using Zero Downtime Migration. You might need to make a few adjustments from the standard flow, but it is absolutely doable. Your database can be protected by backup and Data Guard from the very second you switch over to OCI. Besides the actual migration, you should also do your best to ensure performance stability once the database is open for business. For that purpose, you should have a look at our webinar Performance Stability, Tips and Tricks and Underscores.

Other Blog Posts in This Series Introduction Install And Configure ZDM Physical Online Migration Physical Online Migration to DBCS Physical Online Migration to ExaCS Physical Online Migration and Testing Physical Online Migration of Very Large Databases Logical Online Migration Logical Online Migration to DBCS Logical Offline Migration to Autonomous Database Logical Online Migration and Testing Logical Online Migration of Very Large Databases Logical Online and Sequences Logical Offline Migration How To Minimize Downtime Logical Migration and Statistics Logical Migration and the Final Touches Create GoldenGate Hub Monitor GoldenGate Replication The Pro Tips

Zero Downtime Migration – Physical Online Migration and Testing

Testing is an essential part of any migration project of your Oracle Database. With Zero Downtime Migration (ZDM) and the Physical Online method it has become a lot easier. Before going live (i.e. doing the Data Guard switchover) you can test on your production data on your future production system – the OCI database. That’s cool.

Concept

For the duration of your test convert the OCI target database into a snapshot standby database. A short recap on snapshot standby database:

  • A snapshot standby database is a type of updatable standby database that provides full data protection for a primary database.
  • A snapshot standby database receives and archives, but does not apply, redo data from its primary database. Redo data received from the primary database is applied when a snapshot standby database is converted back into a physical standby database, after discarding all local updates to the snapshot standby database.
  • A snapshot standby database diverges from its primary database over time because redo data from the primary database is not applied as it is received. Local updates to the snapshot standby database cause additional divergence. The data in the primary database is fully protected however, because a snapshot standby can be converted back into a physical standby database at any time, and the redo data received from the primary is then applied.

The plan is:

  1. Build the standby database in OCI.
  2. Migration is currently paused at ZDM_CONFIGURE_DG_SRC (-pauseafter ZDM_CONFIGURE_DG_SRC).
  3. Convert the OCI target database – which is a physical standby – into a snapshot standby.
  4. Do your test. Do whatever you want. The database is protected by Flashback Database, so you can insert and delete data, truncate, add tablespaces, you name it.
  5. When you are done with your tests, convert the OCI target database back into a physical standby database. Implicitly, the database is flashed back, and now the redo is getting applied again.
  6. After a little while the target database is now back in sync again.
  7. Complete migration at your will.

How

You find the steps needed to conver to snapshot standby and back again below. You can repeat the process as many times as you want.

Manual

To convert the standby database to snapshot standby:

alter database recover managed standby database cancel;
shutdown immediate
startup mount
alter database convert to snapshot standby;
alter database open;

Now, the database is opened in READ WRITE mode and you can use it for testing. To convert back to a physical standby database:

shutdown immediate
startup mount
alter database convert to physical standby;
shutdown immediate
startup
alter database recover managed standby database disconnect from session;

Manual on RAC

To convert the standby database to snapshot standby:

sqlplus / as sysdba <<EOF
   alter database recover managed standby database cancel;
EOF
srvctl stop database -d $ORACLE_UNQNAME
srvctl start database -d $ORACLE_UNQNAME -o mount
sqlplus / as sysdba <<EOF
   alter database convert to snapshot standby;
   alter database open;
EOF

Now, the database is opened in READ WRITE mode and you can use it for testing. The database is only opened on one node. You can open the other nodes by executing the following on each of the nodes:

alter database open;

To convert back to a physical standby database:

srvctl stop database -d $ORACLE_UNQNAME
sqlplus / as sysdba <<EOF
   startup mount
   alter database convert to physical standby;
   shutdown immediate
EOF
srvctl start database -d $ORACLE_UNQNAME
sqlplus / as sysdba <<EOF
   alter database recover managed standby database disconnect from session;
EOF

Data Guard Broker

To convert the standby database to a snapshot standby database using broker (CDB19_fra3zt is the target DB_UNIQUE_NAME):

convert database 'CDB19_fra3zt' to snapshot standby;

Now, the database is opened in READ WRITE mode and you can use it for testing. To convert back to a physical standby database:

convert database 'CDB19_fra3zt' to physical standby;

Conclusion

One of the really cool features of ZDM is that you can use my standby database for testing in OCI – before I decide to do the switchover. You can achieve this by converting to a snapshot standby database.

Finally, a thank you to my colleague Jose Bennani Pareja for helping out with RAC database information.

Other Blog Posts in This Series