

How to Upgrade with AutoUpgrade and Data Guard

This is a deprecated blog post. It is kept for reference only. Please visit the updated blog post series.


You can upgrade your database to a new release with AutoUpgrade and keep the Data Guard setup intact. The standby database(s) can be upgraded implicitly via the redo from the primary database, and there is no need to rebuild the standby database after upgrade.

The process: Overview of upgrade with a data guard
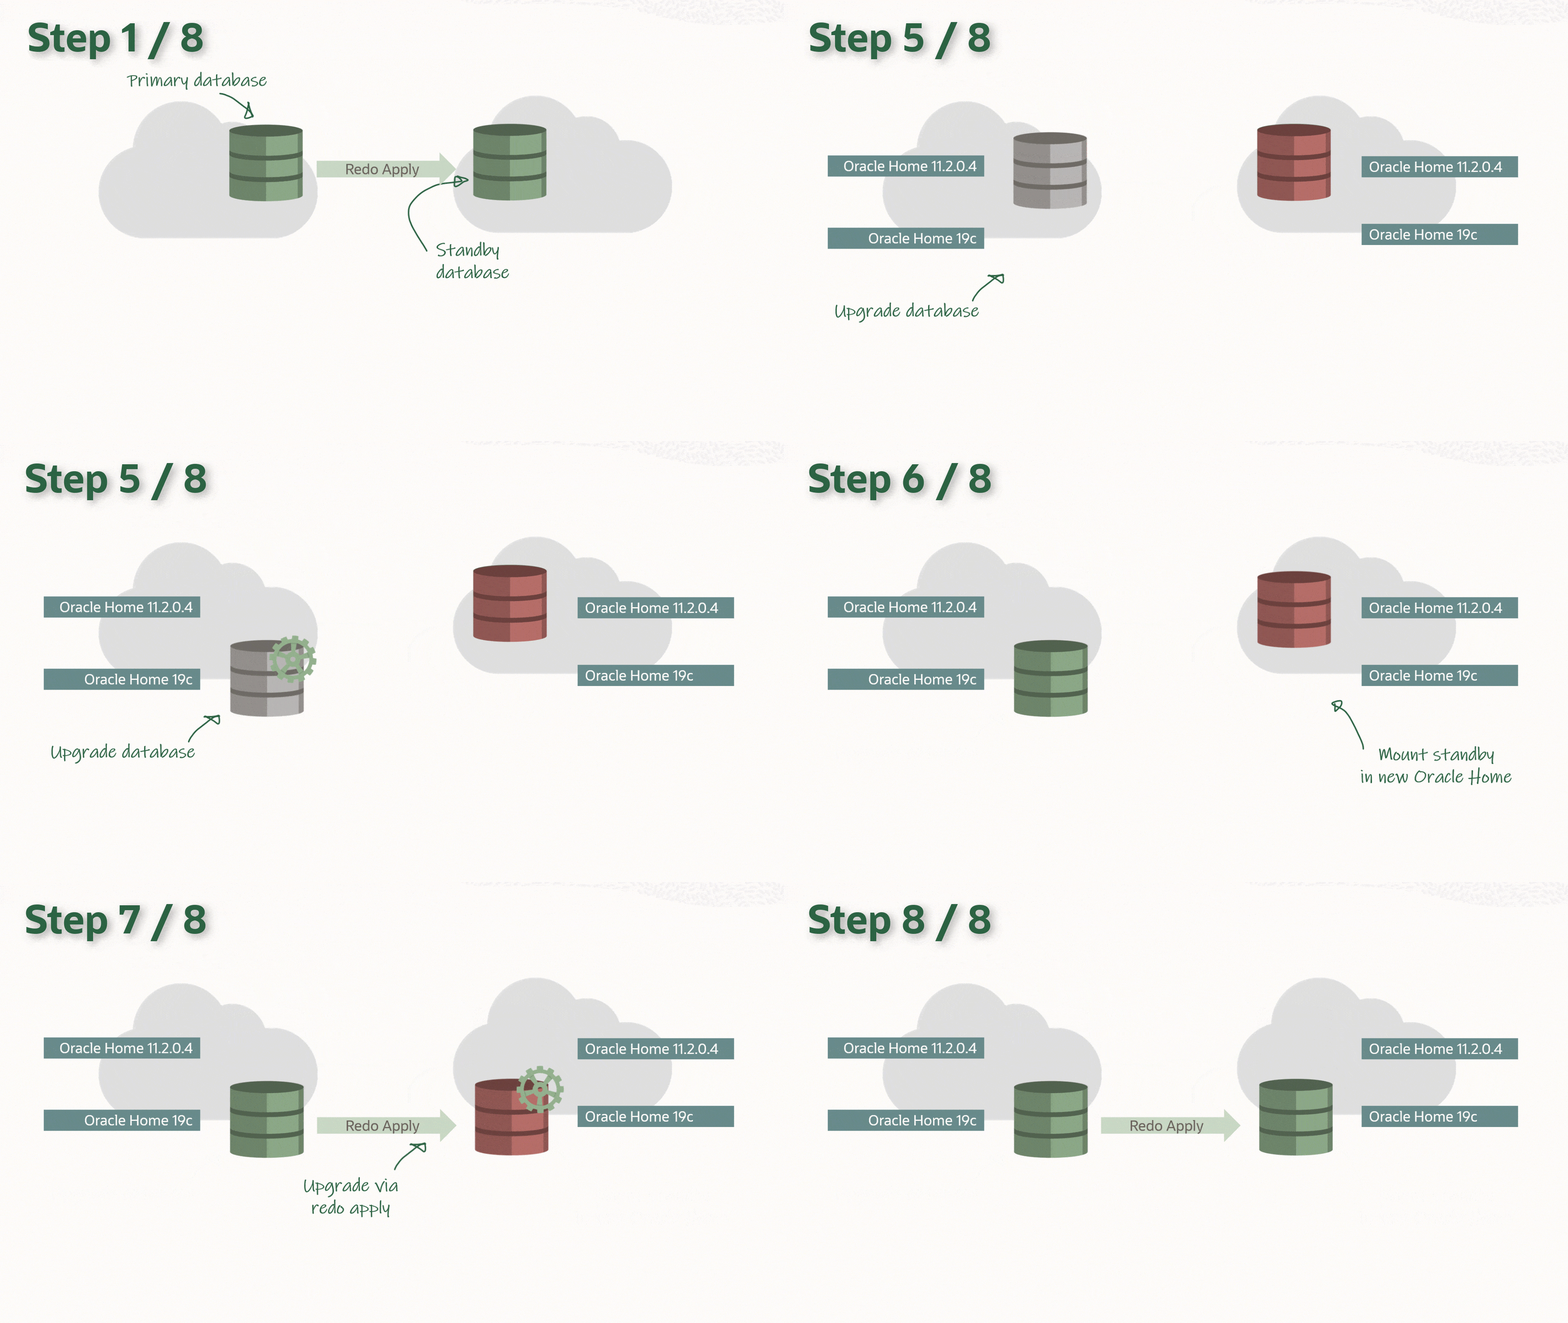
In the following I will be using this setup: Overview of the environment that is used for this procedure
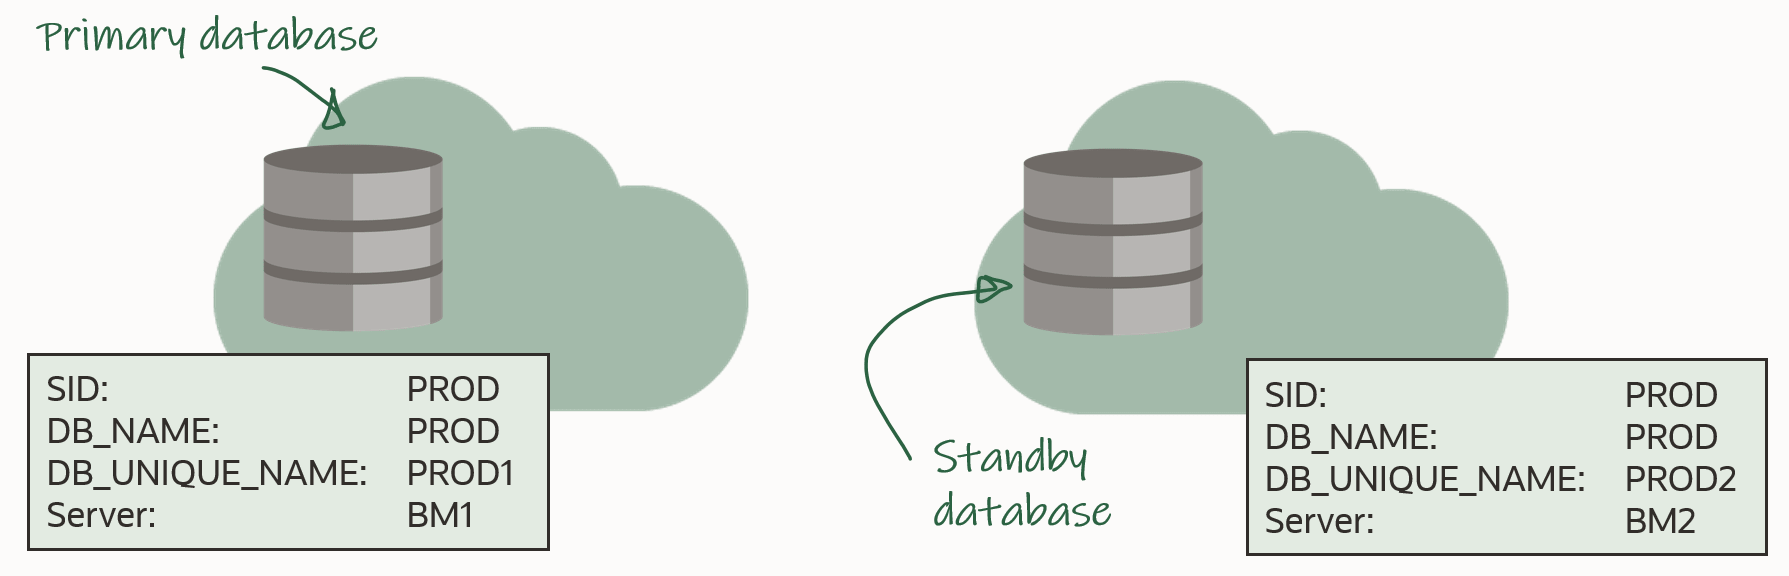
In advance, you should install the new Oracle Home on both primary and standby host. The two Oracle Homes should have the same patches applied, and I recommend that you always apply the latest Release Update.

Before Upgrade

You must use AutoUpgrade version 21.1.1 or newer. A newer version of AutoUpgrade can upgrade to older database releases as well, so don’t worry if the AutoUpgrade version doesn’t match the Oracle Database release that you are upgrading to.

AutoUpgrade can handle a Data Guard environment that is manually configured or via Data Guard Broker.

The procedure starts right before you start AutoUpgrade in DEPLOY mode (or alternatively in FIXUPS mode). Downtime has started and users are no logged connected to the database.

Stop Data Guard

On the standby database, generate commands to copy the Data Guard broker config files. Don’t execute them yet:

PROD2 SQL> select 'cp ' || value || ' /tmp' as cmd from v$parameter where name like 'dg_broker_config_file%';

Shut down the standby database. Disabling the database is strictly speaking not necessary, but a better-safe-than-sorry approach:

[oracle@bm2]$ $ORACLE_HOME/bin/srvctl stop database -d PROD2 -stopoption immediate
[oracle@bm2]$ $ORACLE_HOME/bin/srvctl disable database -d PROD2

If you are not managing the database with Grid Infrastructure (GI), just do a regular shutdown:

PROD2 SQL> shutdown immediate

Now, copy the broker config files into a temporary location. Use the cp commands that was executed earlier

[oracle@bm2]$ cp <broker_config_1> /tmp
[oracle@bm2]$ cp <broker_config_2> /tmp

Since redo transport has not been deferred yet in the primary database, it will complain about losing connection to the standby database. The alert log will contain an entry similar to this:

2020-12-03T06:30:12.751693+00:00
TT03 (PID:47477): Attempting LAD:2 network reconnect (3113)
TT03 (PID:47477): LAD:2 network reconnect abandoned
2020-12-03T06:30:12.752104+00:00
Errors in file /u01/app/oracle/diag/rdbms/prod1/PROD/trace/PROD_tt03_47477.trc:
ORA-03113: end-of-file on communication channel
TT03 (PID:47477): Error 3113 for LNO:3 to 'prod2'

It can be safely ignored, because it is after all a maintenance window and the database is about to be upgraded. Your monitoring system might detect this and start to complain.

Upgrade

Upgrade the database by starting AutoUpgrade in DEPLOY mode. AutoUpgrade will defer redo transport and stop Data Guard broker (if in use) automatically:

java -jar autoupgrade.jar -config PROD.cfg -mode deploy

After the upgrade you should perform the necessary tests to validate the new database release. Only when you are convinced to go live on the new release, you should continue.

Remember that the standby database was left behind before we started touching anything, so if all other fails, simply restart the standby database, and connect your users to it.

After Upgrade

Restart Data Guard

Update the listener on the standby host. Be sure to update the Oracle Home information in the listener.ora entry. Note, that your listener.ora might be stored in a non-default location, so use lsnrctl status to get the location. Finally, reload the listener:

[grid@bm2]$ $GRID_HOME/bin/lsnrctl status
[grid@bm2]$ vi $GRID_HOME/network/admin/listener.ora
[grid@bm2]$ $GRID_HOME/bin/lsnrctl reload

For the next commands, I will be using the same prompt, and I will need the following environment variables:

[oracle@bm2]$ export OLD_HOME=/u01/app/oracle/product/18.0.0.0/dbhome_1
[oracle@bm2]$ export NEW_HOME=/u01/app/oracle/product/19.0.0.0/dbhome_1
[oracle@bm2]$ export ORACLE_HOME=$NEW_HOME
[oracle@bm2]$ export ORACLE_SID=PROD
[oracle@bm2]$ #Set ORACLE_UNQNAME to DB_UNIQUE_NAME
[oracle@bm2]$ export ORACLE_UNQNAME=PROD2 

Next, if the standby database is using TNS_ADMIN in the default location ($ORACLE_HOME/network/admin), then be sure to copy the relevant TNS aliases into the new tnsnames.ora. There should be TNS aliases to the primary and standby database. Or, if there are no other databases in the same Oracle Home, you can simply copy the files:

[oracle@bm2]$ #Back up files
[oracle@bm2]$ cp $NEW_HOME/network/admin/sqlnet.ora $NEW_HOME/network/admin/sqlnet.ora.backup
[oracle@bm2]$ cp $NEW_HOME/network/admin/tnsnames.ora $NEW_HOME/network/admin/tnsnames.ora.backup
[oracle@bm2]$ #Copy from old to new home
[oracle@bm2]$ cp $OLD_HOME/network/admin/sqlnet.ora $NEW_HOME/network/admin
[oracle@bm2]$ cp $OLD_HOME/network/admin/tnsnames.ora $NEW_HOME/network/admin

Now, you can edit /etc/oratab and update the information about the Oracle Home to match the new Oracle Home. In my example, the database is managed by GI, so I should not configure auto-start in /etc/oratab. If you are not managing your databases with GI, you probably want to configure the standby database to start automatically (see appendix):

[oracle@bm2]$ #Backup file
[oracle@bm2]$ cp /etc/oratab /tmp/oratab
[oracle@bm2]$ #Use sed to remove the line that starts with ORACLE_SID
[oracle@bm2]$ sed '/^'"$ORACLE_SID"':/d' /tmp/oratab > /etc/oratab
[oracle@bm2]$ #Add new entry
[oracle@bm2]$ echo "$ORACLE_SID:$ORACLE_HOME:N" >> /etc/oratab

Copy SPFile and password file to the new Oracle Home:

[oracle@bm2]$ cp $OLD_HOME/dbs/orapw$ORACLE_SID $ORACLE_HOME/dbs
[oracle@bm2]$ cp $OLD_HOME/dbs/spfile$ORACLE_SID.ora $ORACLE_HOME/dbs

Copy the broker config files into the new Oracle Home. If you store your broker config files outside of the Oracle Home this might not be necessary to you:

[oracle@bm2]$ export ORACLE_HOME=/u01/app/oracle/product/19.0.0.0/dbhome_1
[oracle@bm2]$ export ORACLE_UNQNAME=PROD2 
[oracle@bm2]$ cp /tmp/dr1$ORACLE_UNQNAME.dat $ORACLE_HOME/dbs
[oracle@bm2]$ cp /tmp/dr2$ORACLE_UNQNAME.dat $ORACLE_HOME/dbs

Upgrade the database in GI, which updates the Oracle Home information, so GI will start the database in the correct Oracle Home. Next, re-enable and start the database:

[oracle@bm2]$ $ORACLE_HOME/bin/srvctl upgrade database -db $ORACLE_UNQNAME -oraclehome $ORACLE_HOME
[oracle@bm2]$ $ORACLE_HOME/bin/srvctl modify database -db $ORACLE_UNQNAME -startoption MOUNT -role PHYSICAL_STANDBY
[oracle@bm2]$ $ORACLE_HOME/bin/srvctl enable database -d $ORACLE_UNQNAME
[oracle@bm2]$ $ORACLE_HOME/bin/srvctl start database -d $ORACLE_UNQNAME

Or, if you are not using GI, simply start the database in the new Oracle Home:

PROD2 SQL> startup mount

Re-enable Data Guard

To re-enable the Data Guard config use DG CLI:

[oracle@bm1]$ $ORACLE_HOME/bin/dgmgrl sys@PROD1

And re-enable redo transport:

DGMGRL SYS@PROD1> edit database prod1 set state=transport-on;

Now, redo is shipping to the standby database, and it will apply it. When the redo that was generated during the upgrade is applied on the standby database, it is implicitly upgraded. You can monitor the progress of the apply by looking at the Apply Lag information. The Apply Lag will decrease until the standby database eventually catches up and they are fully synchronized:

DGMGRL SYS@PROD1> show database prod2;

The apply lag will continue to decrease when the redo stream is applied on the standby, and, thus, implicitly upgrades the database

Test

Use the broker to ensure everything is fine:

DGMGRL SYS@PROD1> show configuration
DGMGRL SYS@PROD1> show database prod1
DGMGRL SYS@PROD1> show database prod2

You should have SUCCESS listed for both databases Use Data Guard Broker to verify data guard setup after upgrade

Let’s validate the setup and try to make a switchover. The database will not allow a switchover if there are any problems in the Data Guard setup. It is a good way of checking things are fine:

DGMGRL SYS@PROD1> validate database prod1
DGMGRL SYS@PROD1> validate database prod2
DGMGRL SYS@PROD1> switchover to prod2

After upgrading a primary database (data guard) with autoupgrade you can use validate database to ensure everything is fine

If you don’t use Data Guard Broker, you use regular SQLs and SQLPlus to verify the Data Guard environment.

Conclusion

It is actually not that complicated to upgrade your database, even if it is part of a Data Guard setup. And with version 21.1.1 of AutoUpgrade is has become easier. A little extra legwork is needed to take care of the standby database. But the good thing is that your Data Guard setup is maintained throughout the process.

I made a video on YouTube that shows the procedure. And while you are there, I suggest that you subscribe to our channel.

Appendix

Config File

For your reference this is the config file, that I used. It contains only the required information. All other parameters have a default value:

upg1.sid=PROD
upg1.source_home=/u01/app/oracle/product/18.0.0.0/dbhome_1
upg1.target_home=/u01/app/oracle/product/19.0.0.0/dbhome_1

Synchronize Standby Database

When you run un AutoUpgrade in ANALYZE mode and check the preupgrade report, you will find this information message:

[checkname]          SYNC_STANDBY_DB
[stage]              PRECHECKS
[fixup_available]    NO
[runfix]             N/A
[severity]           INFO
[action]             Synchronize your standby databases before database upgrade.
[broken rule]        The standby database is not currently synchronized with its associated primary database.
[rule]               To keep data in the source primary database synchronized with its associated standby databases, all standby databases must be synchronized before database upgrade.  See My Oracle Support Note 2064281.1 for details.

What does it say? Basically, it says that all redo generated on the primary database before the downtime window started, should be sent to and applied on the standby database. This way, your standby database is ready to replace your primary database at any time, if something goes really wrong. Strictly speaking it is not necessary to ensure that, but it is strongly recommended.

GI-managed Database in /etc/oratab

When the database is managed by GI, you don’t need to have it configured in /etc/oratab. Personally, I like to have it anyway, because then you have a clear overview of what databases are on the server, and you can use /etc/oratab to set your environment, like when you are using oraenv script.

But I know that die-hard GI-folks might roll their eyes when I say it, but I like it this way.

Further Reading

Upgrading in the Cloud – VM DB Systems – Automated Upgrade to 19c – The Details

Following a previous blog post here are all the details on automated upgrades in OCI, and (possibly) the answers to your questions.

Precheck

The precheck ensures the database is ready to upgrade. It uses DBUA which again uses preupgrade.jar to execute the checks. It is similar to running AutoUpgrade in analyze mode. The check is non-intrusive and can be executed while the database is in use.

Normally, when you use preupgrade.jar we always recommend you download the latest version from My Oracle Support. However, this is not possible when you use the tooling. The new, target Oracle Home is always deployed as part of the precheck process – and deleted again after the precheck. There is no way you can replace the preupgrade.jar package. You must use the version of preupgrade.jar that comes with the Oracle Home.

If there are no issues that prevent you from upgrading, you will see this message: The precheck completed and found no errors - the database is ready to upgrade

However, it could also be that there is an error in the database that must be fixed: If a critical issue prevents you from upgrading, a message will be displayed in the console

If you want to see the output from the precheck you must log on to the database host and find the file:

vi $ORACLE_BASE/cfgtoollogs/dbua/upgrade<timestamp>/$ORACLE_UNQNAME/upgrade.xml

Only the XML output is available, which might be a little hard to read. If you prefer you can also download AutoUpgrade to the server and run it in analyze mode. It can produce a much better output, and it works even if the target Oracle Home is not present. Create a simple config file:

upg1.sid=DB11204
upg1.source_home=/u01/app/oracle/product/11.2.0.4/dbhome_1
upg1.target_version=19

And now start AutoUpgrade in analyze mode:

java -jar autoupgrade.jar -config DB11204.cfg -mode analyze

You can use the preupgrade report to determine which issues prevents the upgrade from starting.

The database must be in ARCHIVELOG mode and the size of your Fast Recovery Area (FRA) must be at least 15G (parameter db_recovery_file_dest_size). As well, you must have 15G of free space on the mount point that hosts the FRA.

Upgrade

When you upgrade your database, all PDBs in the database are upgraded as well. There is no way to change it. If a PDB is closed when the upgrade starts, it is opened and upgraded. After the upgrade, the PDB is left opened and in READ WRITE state. But the state is not saved, so after a CDB restart, the PDB will start in whatever state that has been previously saved.

The first version of the tooling does not support standby database. If your database is a primary database, you must remove the standby database, upgrade, and then recreate the standby database. It is in the plan for future enhancements to get this streamlined.

Fallback

Enterprise Edition databases are protected by a guaranteed restore point (GRP) and Flashback Database. The tooling automatically creates the GRP before it starts to work on the database. If an error occurs during the upgrade, you can use the OCI console to initiate a roll back.

If the database upgrade fails on an Enterprise Edition database it is possible to roll back to a guaranteed restore point using Flashback Database

After successful upgrade the GRP is dropped again. The GRP only protects the database during the upgrade, so you can’t rely on the GRP as a fallback mechanism if you decide to fall back after the upgrade. Let’s say that your testing reveals a critical problem after the upgrade, then your only fallback mechanism is to restore a backup.

Since Flashback Database is an Enterprise Edition feature, this fallback mechanism is not available on Standard Edition databases.

In addition, it is strongly recommended that you perform a manual backup of the database before you start the upgrade. The console will also give you this warning, before you can start the upgrade.

Monitoring and Troubleshooting

When you have started the upgrade, you can’t monitor it from the console. You must log on to the host. When you do so, be aware that the timestamps shown in the OCI console are UTC, but the timestamps in the log files on the host is local timestamp (depending on your region).

Using dbcli

Log on as root and use the dbcli tool to monitor the progress. First, list jobs:

[root@host]$ dbcli list-jobs

Which should produce a list like this: Use dbcli list-jobs to list the jobs - including the upgrade - that run on the host Next, you can get additional information about the job using the ID:

[root@host]$ dbcli describe-job -i <id>

Which give you more details: dbcli describe-job can give you more detailed information about the upgrade

Using DBUA Log Files

But you can get even better information by looking in the log files from DBUA. Use the job id from the dbcli command to find the log file:

[oracle@host]$ export ORACLE_BASE=/u01/app/oracle
[oracle@host]$ export DBCLI_JOBID=f4b2597f-990f-4442-a774-153f3713fb7a
[oracle@host]$ tail -f -n 10 $ORACLE_BASE/cfgtoollogs/dbua/$DBCLI_JOBID/silent.log

And for really detailed information look in this directory:

[oracle@host]$ export ORACLE_BASE=/u01/app/oracle
[oracle@host]$ export DBCLI_JOBID=f4b2597f-990f-4442-a774-153f3713fb7a
[oracle@host]$ cd $ORACLE_BASE/cfgtoollogs/dbua/$DBCLI_JOBID/$ORACLE_UNQNAME

Using DCS Agent

The OCI control plane communicates with your DB System using an agent, and sometimes it can be useful to look in those logs:

[root@host]$ cd /opt/oracle/dcs/log
[root@host]$ vi dcs-agent.log

To find the log entries that are related to a specific upgrade search for the job ID:

[root@host]$ cat dcs-agent.log | grep "<job-id>" | more

Q&A

Which version and release update can I upgrade to?

The tooling only allows upgrades to Database 19c. If you need to upgrade to any other version, you must do it manually.

You can decide to upgrade to an Oracle provided image or a custom image: When you upgrade you can choose an Oracle provided image, or your own custom database software image However, for both type of images, the Release Update (or patch level) must be the latest or previous two Release Updates. Even if you have a custom database software image that is older, it can’t be used. You must upgrade to one of the recent Release Updates. If you select 19.0.0.0 you will not get the base release, but the latest Release Update. If you use the APIs this is a smart way of specifying that you always want the latest Release Update.

Where are my log files?

The output from the precheck is stored here:

  • $ORACLE_BASE/cfgtoollogs/dbua/upgrade<timestamp>

The output from the actual upgrade is stored here:

  • $ORACLE_BASE/cfgtoollogs/dbua/<job-id>
  • $ORACLE_BASE/cfgtoollogs/dbua/<job-id>/$ORACLE_UNQNAME

In addition, you can get details about the upgrade using dbcli:

[root@host]$ dbcli list-jobs
[root@host]$ dbcli describe-job -i <job-id>

Why is it taking so long to perform a precheck?

It consists of three phases:

  1. Deploy new Oracle Home to the VM DB System
  2. Precheck of the database
  3. Removing the new Oracle Home

The precheck (phase 2) is really fast. Just as fast as if you would run AutoUpgrade in analyze mode or using preupgrade.jar. The extra time is needed to deploy and remove the Oracle Home again. For each execution of the precheck the procedure repeats, and a new Oracle Home is deployed. It is never re-used.

Why is the upgrade slower than if I do it manually?

Typically, when you upgrade a database you have already – outside of the maintenance window – deployed a new Oracle Home. When you use the tooling, this happens inside the maintenance window. The tooling can’t deploy an Oracle Home prior to the upgrade. In addition, the upgrade is executed with DBUA using default options, which for instance means that the time zone file is upgraded as well. If you are sensitive to downtime and would like to complete the upgrade faster, you must perform the upgrade manually.

Will my 11.2.0.4 database get converted to a PDB?

No, the database is upgraded as-is and there is no PDB conversion. We are working on making it possible to perform the non-CDB conversion as well. If you must convert the non-CDB to a PDB, you must move the database to a new VM DB System that already have a CDB provision. In that case, I would recommend that you use the manual upgrade and plug-in as described in another blog post.

Can I perform an automated upgrade using dbcli?

No, although the command line help of dbcli suggests that such an option exist, it can’t be used.

Other Posts in This Series

New Version of AutoUpgrade

Our developers just published a new version of AutoUpgrade. Head over to My Oracle Support and download version 21.1.1.

The version says 21, but it can still upgrade your databases to lower release. So, you should use this new version to upgrade to Oracle Database 19c as well.

The supported target Oracle Database versions that are supported by the new version of AutoUpgrade

What’s New

A total of 48 enhancements and bug fixes made it into the new release. It has been 35 working days since the last release (and that includes Thanksgiving week) which means that the team has put in – on average – close to 1,5 changes into AutoUpgrade every, single working day. I find that quite impressive. And it really supports our message that you should always use the latest version of AutoUpgrade.

In My Oracle Support note 2485457.1 you can find a complete change log. Also, you can also visit the 21c New Feature Guide for additional information.

Unplug/plug Upgrade

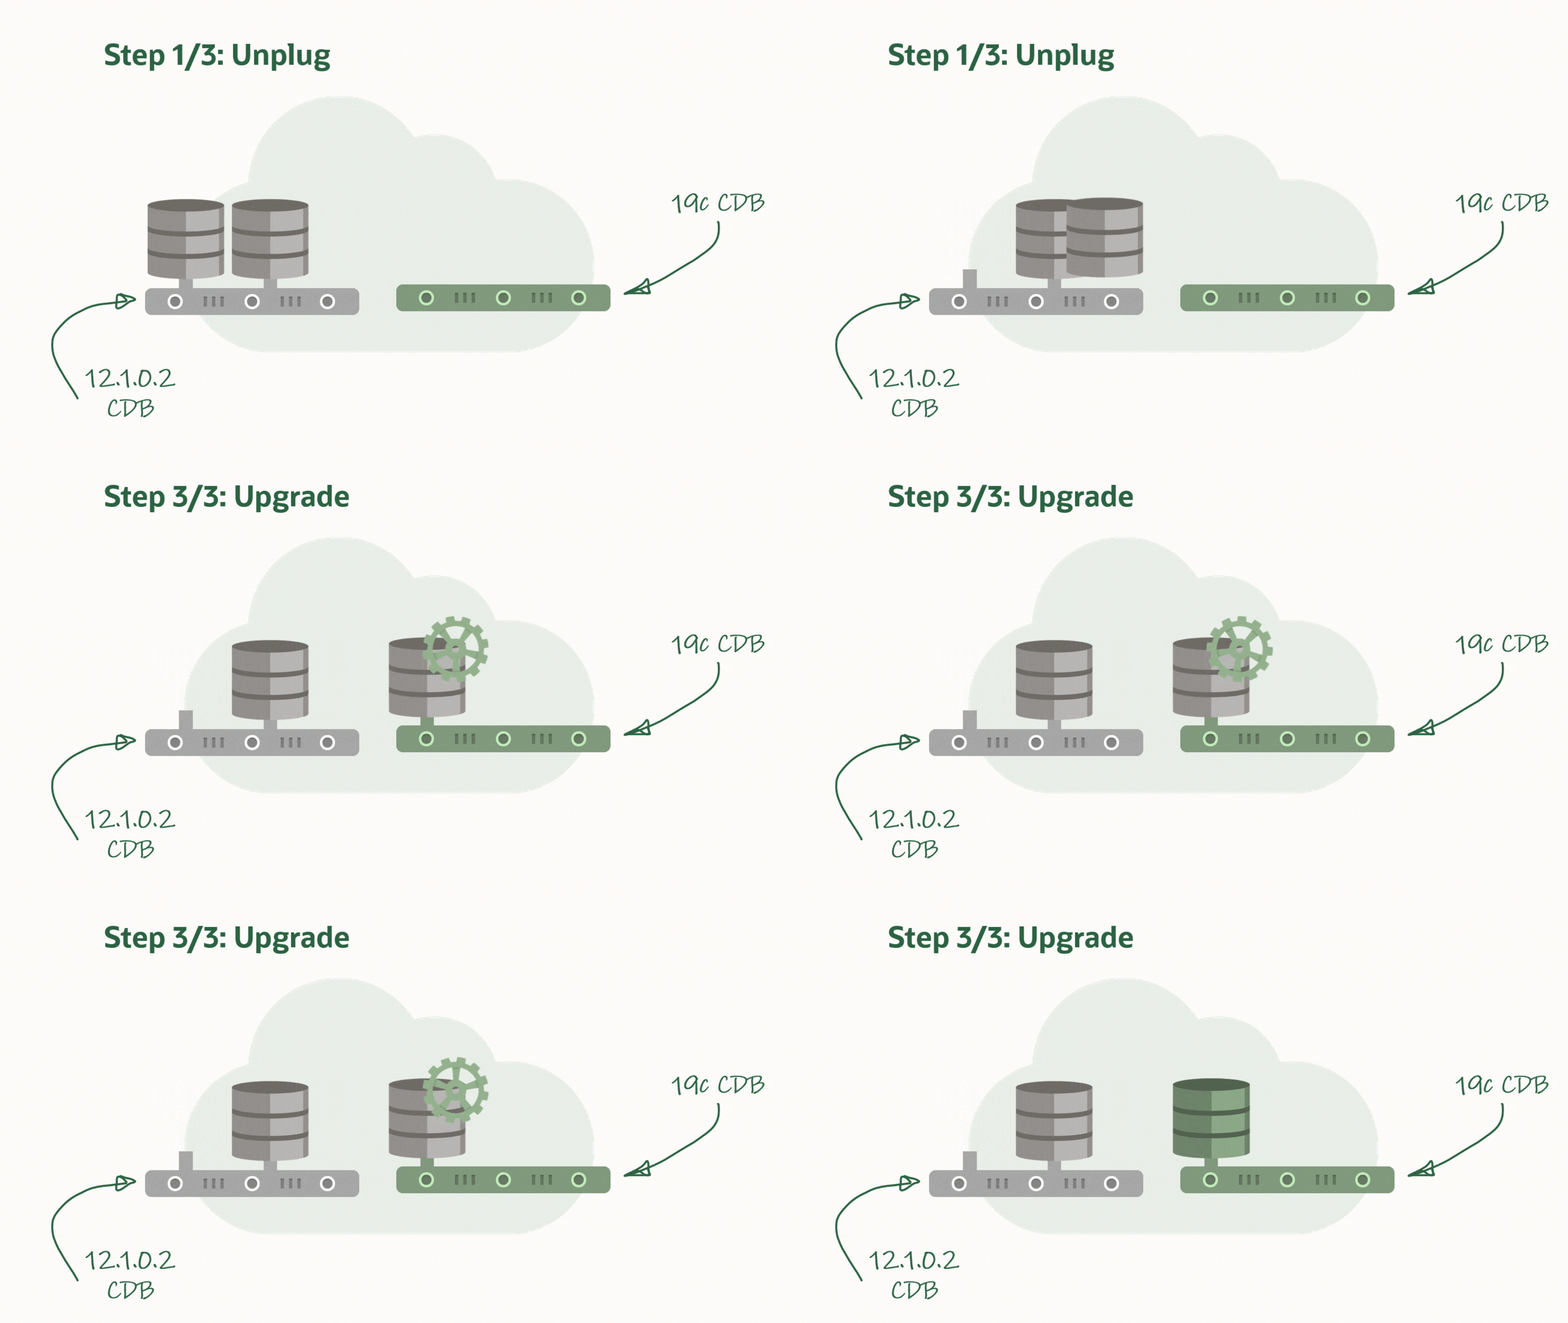
The first things that I would like to highlight is unplug/plug upgrade. Instead of upgrading an entire CDB, you can now choose to unplug one or many PDBs, plug them into a higher release CDB, and upgrade the individual PDBs.

How an unplug/upgrade works of an Oracle Database PDB

How do you specify to upgrade only one PDB? Use target_cdb and pdbs?

upg1.sid=CDB1
upg1.pdbs=PDB3
upg1.source_home=/u01/app/oracle/product/12.2.0.1
upg1.target_home=/u01/app/oracle/product/19
upg1.target_cdb=CDB2

When doing unplug/plug upgrades you must be aware of the COMPATIBLE setting in the higher release CDB. If COMPATIBLE is higher, when the PDB plugs in, COMPATIBLE will silently and automatically be raised by the CDB. This means that you lose the capability of doing downgrades and flashback database.

You can read more about unplug/plug upgrades in the documentation

AutoUpgrade and Oracle Data Guard

In addition, AutoUpgrade now detects that you are upgrading a primary database in a Data Guard setup. In that case, it will automatically defer redo log transport to the standby databases and disable the Data Guard broker. After the upgrade, the broker is automatically restarted, but you need to manually reconfigure the standby databases, and eventually re-enable redo log transport.

You might ask: Why don’t AutoUpgrade handle it all for me? This is to preserve your fallback capabilities. Even after a successful upgrade, you still might want to revert back to the old version. Let’s say your testing finds a critical issue. You might still have a restore point on the primary database, but what if – for some reason – flashing back fails? Then you still have your standby database which was disabled right before the upgrade.

You can read more about AutoUpgrade and Data Guard in the documentation.

More

A few hints for the interested reader to explore. Have a look at the config file option catctl_options. You can use that to control the level of parallelism for a specific upgrade.

Also, if you don’t want AutoUpgrade to handle your network files (e.g. sqlnet.ora, tnsnames.ora) you disable it using manage_network_files.

You can read more about those options in the documentation.

Conclusion

Get the latest version of AutoUpgrade and benefit from the many new features. Keep an eye out for additional blog posts that will dig deeper into the new features.

Is AutoUpgrade resumable?

Short answer: Yes!

Recently, I have been asked a few similar questions:

  • What happens if my SSH session with AutoUpgrade is lost? (see appendix)
  • What happens if AutoUpgrade crashes?
  • What happens if I exit the console by mistake?

First, don’t panic. Second, just restart AutoUpgrade using the same command line. During startup, AutoUpgrade will figure out that it should recover the lost session, and will restart the upgrades.

AutoUpgrade can automatically detect a previous session, and restart from where it left

When AutoUpgrade dies or is terminated, the database upgrades that it started, dies with it. This could happen if you lost your SSH session. The database upgrade stops, but the database is still running, most likely in UPGRADE mode. If you exit AutoUpgrade by mistake (typing exit in the job console), it will first stop the upgrade, and then shutdown the database. In any case, when you afterwards restart AutoUpgrade, it will figure out that a previous AutoUpgrade session was running. It will recover information from the previous session, and if needed restart the database. After that, it will restart the upgrade. If the previous database upgrade was at phase 54, AutoUpgrade will restart from phase 54. This means that all previous work in the upgrade is preserved, and you can resume as if nothing had happened.

Don’t Recover Previous Session

If you for some reason don’t want AutoUpgrade to recover the previous session. Let’s imagine that AutoUpgrade crashed, and you decided to restore the database. Now you want to start all over. In that case, you need to clear the recovery data, otherwise, AutoUpgrade will get confused.

You can read more about the parameters in the documentation.

The Little Hammer (Preferred)

You can clear the recovery for a specific job by adding clear_recovery_data on the command line and use jobs parameter to specific exactly for which jobs recovery data must be cleared.

$ java -jar autoupgrade.jar -config PROD.cfg -mode analyze -clear_recovery_data -jobs 100,101,102

Now, AutoUpgrade will start right from the beginning again but only for the specified jobs.

The Big Hammer

If you don’t specify jobs parameter then AutoUpgrade will clear recovery data for all jobs:

$ java -jar autoupgrade.jar -config PROD.cfg -mode analyze -clear_recovery_data

Be advised, that this will happen for all the upgrades that are specified in the config file. Remember, that one of the big benefits of AutoUpgrade is that one config file can be used to upgrade 10s or 100s of databases.

The Sledgehammer

I would recommend the previous hammers but use this approach as the last solution: Delete all files that are used by AutoUpgrade.

First, delete the directory specified in global.autoupg_log_dir. Next, delete the directory specified in .log_dir. Typically and by default, the second directory is a subdirectory to the first one, so in most cases you just have to delete the first directory. If you have multiple upgrades specified in the same config file you potentially need to delete multiple directories for prefix1.log_dir, prefix2.log_dir and so forth.

Be aware that you are clearing out all information that is used by AutoUpgrade. If you use the same global logging directory for multiple AutoUpgrade sessions (which I would not recommend), then you will be seriously messing things up. But if you are only upgrading this specific database on the server, then you can safely delete the directories to start all over.

Restoring a Test Database – Starting All Over

Very often a test database is upgraded multiple times. Even after a successful upgrade, you might want to retry the upgrade with different settings. If you use AutoUpgrade you must clear the recovery data as specified above. AutoUpgrade doesn’t know that you have restored the database. For all it know, the previous upgrade was successful.

Conclusion

Resuming an AutoUpgrade session is very simple. Just start AutoUpgrade with the same command line. It identifies the previous AutoUpgrade session, and resumes automatically. All the previous work is recovered, and the upgrade will resume from where it was stopped.

Appendix

Lost SSH Session

I heard from several people that they experienced the SSH session timing out because AutoUpgrade didn’t produce any screen output while the upgrade took place. We have put into a our plans to make some sort of regular screen output, so this should be avioded.

Before it is implemented, I would suggest that you look at the keep alive options in SSH:

$ man ssh

Personally, I always start SSH this way, and you can put it into your SSH config:

ssh -o ServerAliveInterval=300

Upgrade & Plug In: With ASM, Data Guard, TDE and no Keystore Password

I was helping a customer the other day together with Mike. They were upgrading from 18c to 19c and had to convert the database to a PDB as well. At first glance, it seemed pretty straightforward, but things got complicated because:

  • They have standby databases and want the Data Guard setup to survive the plug-in operation.
  • They are using ASM.
  • They are using TDE Tablespace Encryption and have also encrypted their SYSTEM and SYSAUX tablespace.
  • The DBA that will carry out the upgrade and plug-in is not allowed to have the TDE Keystore password. They have separation of duties, so only the security admins have the keystore password.

Can you do that? Yes, you can! Let me tell you how.

Upgrade

First, upgrade the database. You can easily maintain the Data Guard setup during an upgrade. I wrote a blog post about a little while ago. In addition, to upgrade a database with encrypted tablespaces you don’t need the keystore password. You must configure the database to use an auto login keystore, and that’s it. If you are concerned about the use of an auto-login keystore, you can simply remove it again after the upgrade.

External Store for a Keystore Password

The plug-in operation will require the keystore password. But the DBA doesn’t know it – so we need to find a solution for that. The solution is to store the keystore password in an external store. I also wrote a blog post about that a while ago. When you have it configured you can exchange the commands that require a keystore password, like:

SQL> ADMINISTER KEY MANAGEMENT ... KEYSTORE IDENTIFIED BY "S3c3tPassw0rd";

With this:

SQL> ADMINISTER KEY MANAGEMENT ... KEYSTORE IDENTIFIED BY EXTERNAL STORE;

The database will get the keystore password from an external store, which is basically a file in the file system which is encrypted with a password that only the database know.

The security admins would need to do this in the CDB that will receive the non-CDB database. They can do it in advance, so they can relax while the DBA carries out the operation in a maintenance window. If the TDE keystore is already configured using the WALLET_ROOT parameter, you can use the feature right away. Otherwise, you need a database restart to configure it.

Like with the auto-login keystore, if you are concerned about the security, you can simply disable it again after the operation.

Plug In

Now things get complicated. When you plug in your non-CDB database the manifest file contains information on where the data files are located – but only on the primary database. This is an extract of a manifest file (the one you create with DBMS_PDB.DESCRIBE):

<PDB>
  ...
  <tablespace>
    <name>SYSTEM</name>
    ...
	<file>
      <path>+DATA/SALES1/DATAFILE/system.311.1058127529</path>

After plug-in, the CDB can start to use the data files right away. It reads from the manifest files where the data files are located. But there is no information on where files are located on the standby database. To overcome this you must create aliases in the ASM instance on the standby host. The aliases will point back to the original data files (used by the standby database). So, when the plug-in happens and redo start to flow to the standby database, it will know which data files to recover. If you are storing data files in a regular file system, you could use soft links to serve the same purpose.

The procedure is already very well described:

I won’t repeat the procedure as the above articles are really good. But these articles don’t consider the situation where your SYSTEM and/or SYSAUX tablespace is encrypted.

If that is the case, you must import your encryption keys into CDB$ROOT before you execute the CREATE PLUGGABLE DATABASE command. In Reusing the Source Standby Database Files When Plugging a non-CDB as a PDB into the Primary Database of a Data Guard Configuration (Doc ID 2273304.1) it should happen right before step 17.2.2:

SQL> alter session set container=CDB$ROOT;
SQL> administer key management import keys ... keystore identified by external store ... ;
SQL> --Continue with step 17.2.2
SQL> create pluggable database .... ;

Dots and Underscores

When you follow the MOS notes you might wonder why the dots in the ASM aliases are replaced with underscores. At first glance, I had no idea, but it worked. I later learned the following:

The format for an ASM filename is [filetype|tablespacename].[ASM file number].[file incarnation], but basically it is three pieces of name separated by periods. We can’t create any filename or alias that mimics that format. So the scripts change those periods to underscores (‘_’). That is allowed.

ORA-15032 and ORA-15046

Most likely you get this error because there are already existing aliases on the ASM file. Only one alias is allowed per file.

  1. You can verify that by using the ls command in ASMCMD. If it is an alias the Name column will look similar to this alias1 => +DATA/......
  2. Ensure the database is not using the alias. If it does, rename the file in the database.
  3. Remove the alias from ASM. It is strongly recommended to use rmalias. Although also possible with rm I consider it much safer to use rmalias.

Conclusion

You can upgrade and convert your database to a PDB without comprising your standby database. In addition to that, you can configure your database in such a way that you don’t even need to type in the TDE keystore password.

How to Upgrade with Data Guard

This is a deprecated blog post. It is kept for reference only. Please visit the updated blog post series.


You can upgrade your database to a new release, and keep the data guard setup intact. The standby database(s) can be upgraded implicitly via the redo from the primary database, and there is no need to rebuild the standby database after upgrade.

The process: Overview of upgrade with a data guard

In the following I will be using this setup: Overview of the environment that is used for this procedure

In advance, you should install the new Oracle Home on both primary and standby host. The two Oracle Homes should have the same patches applied, and I recommend that you always apply the latest Release Update.

Before Upgrade

The procedure starts right before you run the preupgrade fixups. Downtime has started and users are no logged connected to the database.

Disable Data Guard Broker

If you don’t use Data Guard Broker, you can skip this chapter and go to the chapter Stop Data Guard. Connect to the broker and disable Fast Start Failover:

DGMGRL SYS@PROD1> disable fast_start failover

Next, you disable the broker configuration:

DGMGRL SYS@PROD1> disable configuration

Then, you can shut down the broker in the primary. Make a copy of the broker configuration files. Use the below SQL to generate commands to copy the files. Remember to execute the commands generated:

PROD1 SQL> alter system set dg_broker_start=false scope=both;
PROD1 SQL> select 'host cp ' || value || ' /tmp' as cmd from v$parameter where name like 'dg_broker_config_file%';
PROD1 SQL> --Now, execute the commands
PROD1 SQL> host ls /tmp/dr*.dat

Finally, you do the same for the standby database:

PROD2 SQL> alter system set dg_broker_start=false scope=both;
PROD2 SQL> select 'host cp ' || value || ' /tmp' as cmd from v$parameter where name like 'dg_broker_config_file%';
PROD1 SQL> --Now, execute the commands
PROD2 SQL> host ls /tmp/dr*.dat

Stop Data Guard

On the primary database, defer the redo log transport to the standby database. Strictly speaking, this is not necessary, but I do it from a "better-safe-than-sorry" aspect. Be sure to verify that log_archive_dest_state_2 is the actual archive destination for your standby database:

PROD1 SQL> show parameter log_archive_dest_2
PROD1 SQL> alter system set log_archive_dest_state_2='defer' scope=both;

Next, you cancel redo apply on the standby database:

PROD2 SQL> alter database recover managed standby database cancel;

Finally, you shut down the database:

PROD2 SQL> shutdown immediate

If you are using Grid Infrastructure (GI) to manage the database, you should stop and disable the database. Disabling the database is strictly speaking not necessary, but again a "better-safe-than-sorry" approach:

[oracle@bm2]$ $ORACLE_HOME/bin/srvctl stop database -d PROD2
[oracle@bm2]$ $ORACLE_HOME/bin/srvctl disable database -d PROD2

Upgrade

Now you can upgrade the primary database using the method you prefer. Complete all the post-upgrade tasks and perform the necessary tests to validate the new database release.

If something happens during upgrade and you want to revert, you can flash back the database (or restore on Standard Edition) and simply undo the before upgrade steps (start by enabling database, starting database, starting redo apply and so forth).

Remember that the standby databases was left behind before we started touching anything, so if all other fails, simply restart the standby database, and connect your users to it.

After Upgrade

Restart Data Guard

When you are happy with the upgrade, and your tests validate the new database release, you can proceed.

Update the listener on the standby host. Be sure to update the Oracle Home information in the listener.ora entry. Note, that your listener.ora might be stored in a non-default location, so use lsnrctl status to get the location. Finally, reload the listener:

[grid@bm2]$ $GRID_HOME/bin/lsnrctl status
[grid@bm2]$ vi $GRID_HOME/network/admin/listener.ora
[grid@bm2]$ $GRID_HOME/bin/lsnrctl reload

For the next commands, I will be used the same prompt, and I will need the following environment variables:

[oracle@bm2]$ export OLD_HOME=/u01/app/oracle/product/18.0.0.0/dbhome_1
[oracle@bm2]$ export NEW_HOME=/u01/app/oracle/product/19.0.0.0/dbhome_1
[oracle@bm2]$ export ORACLE_HOME=$NEW_HOME
[oracle@bm2]$ export ORACLE_SID=PROD
[oracle@bm2]$ #Set ORACLE_UNQNAME to DB_UNIQUE_NAME
[oracle@bm2]$ export ORACLE_UNQNAME=PROD2 

Next, if the standby database is using TNS_ADMIN in the default location ($ORACLE_HOME/network/admin), then be sure to copy the relevant TNS aliases into the new tnsnames.ora. There should be TNS aliases to the primary and standby database. Or, if there are no other databases in the same Oracle Home, you can simply copy the files:

[oracle@bm2]$ #Back up files
[oracle@bm2]$ cp $NEW_HOME/network/admin/sqlnet.ora $NEW_HOME/network/admin/sqlnet.ora.backup
[oracle@bm2]$ cp $NEW_HOME/network/admin/tnsnames.ora $NEW_HOME/network/admin/tnsnames.ora.backup
[oracle@bm2]$ #Copy from old to new home
[oracle@bm2]$ cp $OLD_HOME/network/admin/sqlnet.ora $NEW_HOME/network/admin
[oracle@bm2]$ cp $OLD_HOME/network/admin/tnsnames.ora $NEW_HOME/network/admin

Now, you can edit /etc/oratab and update the information about the Oracle Home to match the new Oracle Home:

[oracle@bm2]$ vi /etc/oratab

Copy SPFile and password file to the new Oracle Home:

[oracle@bm2]$ cp $OLD_HOME/dbs/orapw$ORACLE_SID $ORACLE_HOME/dbs
[oracle@bm2]$ cp $OLD_HOME/dbs/spfile$ORACLE_SID.ora $ORACLE_HOME/dbs

If you are using GI to manage the database, you must upgrade the database, meaning updating the Oracle Home information, so GI will start the database in the correct Oracle Home. Next, re-enable and start the database:

[oracle@bm2]$ $ORACLE_HOME/bin/srvctl upgrade database -db $ORACLE_UNQNAME -oraclehome $ORACLE_HOME
[oracle@bm2]$ $ORACLE_HOME/bin/srvctl modify database -db $ORACLE_UNQNAME -startoption MOUNT -role PHYSICAL_STANDBY
[oracle@bm2]$ $ORACLE_HOME/bin/srvctl enable database -d $ORACLE_UNQNAME
[oracle@bm2]$ $ORACLE_HOME/bin/srvctl start database -d $ORACLE_UNQNAME

Or, if you are not using GI, simply start the database:

PROD2 SQL> startup mount

Re-enable Redo Log Transport and Apply

On the primary database re-enable redo log transport to standby database:

PROD1 SQL> alter system set log_archive_dest_state_2='enable' scope=both;

On the standby database restart redo apply

PROD2 SQL> alter database recover managed standby database disconnect from session;

Re-enable Data Guard Broker

First, we need to copy the broker config files into the new Oracle Home. If you store your broker config files outside of the Oracle Home this might not be necessary to you:

[oracle@bm1]$ export ORACLE_HOME=/u01/app/oracle/product/19.0.0.0/dbhome_1
[oracle@bm1]$ export ORACLE_UNQNAME=PROD1
[oracle@bm1]$ cp /tmp/dr1$ORACLE_UNQNAME.dat $ORACLE_HOME/dbs
[oracle@bm1]$ cp /tmp/dr2$ORACLE_UNQNAME.dat $ORACLE_HOME/dbs

Do the same on the standby database host:

[oracle@bm2]$ export ORACLE_HOME=/u01/app/oracle/product/19.0.0.0/dbhome_1
[oracle@bm2]$ export ORACLE_UNQNAME=PROD2 
[oracle@bm2]$ cp /tmp/dr1$ORACLE_UNQNAME.dat $ORACLE_HOME/dbs
[oracle@bm2]$ cp /tmp/dr2$ORACLE_UNQNAME.dat $ORACLE_HOME/dbs

Now, you can restart the Data Guard Broker on both primary and standby database:

PROD1 SQL> alter system set dg_broker_start=true scope=both;

PROD2 SQL> alter system set dg_broker_start=true scope=both;

Finally, enable the broker configuration and fast start failover:

DGMGRL SYS@PROD1> show configuration
DGMGRL SYS@PROD1> enable configuration
DGMGRL SYS@PROD1> enable fast_start failover

Test

Use the broker to ensure everything is fine:

DGMGRL SYS@PROD1> show configuration
DGMGRL SYS@PROD1> show database prod1
DGMGRL SYS@PROD1> show database prod2

You should have SUCCESS listed for both databases Use Data Guard Broker to verify data guard setup after upgrade

Let’s try to make a switchover:

DGMGRL SYS@PROD1> switchover to prod2

If you don’t use Data Guard Broker, you use regular SQLs and SQLPlus to verify the data guard environment.

Conclusion

It is actually not that complicated to upgrade your database, even if it is part of a data guard setup. A little extra legwork is needed to take care of the standby database. But the good thing is that your DR setup is maintained althroughout the process.

I made a video on YouTube that shows the procedure. And while you are there, I suggest that you subscribe to our channel.

Keep an eye out for coming versions of AutoUpgrade. At time of writing our developers are working on streamlining the process. We want upgrade with data guard to be 100 % automated (or as close to as possible).

Further Reading

Webinar: Upgrade Your Databases to 19c

Danish Oracle User Group - DOUG

Danish Oracle User Group is hosting a talk tomorrow on Upgrade Your Databases to 19c. I will be presenting and talk about:

Oracle Database 19c is the long term release and this talk is about how to get there. The emphasis is on the AutoUpgrade tool which is the new, recommended way for upgrades. There will be demos that describe how you can get started and the options, you have. In addition, we will cover upgrade best practices and deep insights into the process.

You need to upgrade to Oracle Database 19c and this talk will prepare you.

Time: 25 November 2020 15:00 CET/Copenhagen

The session is open to anyone, so if you are interested simply go their webpage and get the connection details. There is an English version of the text a little down the page. I will give the talk in English.

If you want to have a sneak peek on the slides, there are already published.

I hope to see you tomorrow.

Enabling Local Undo With AutoUpgrade

If you have databases that run in shared undo mode you should switch to local undo mode. Starting from 12.2 this is the default and recommended undo mode, and it offers a lot of cool functionality. Obviously, at the expense of having multiple undo tablespaces. There are already many good blog posts out there that the benefits of local undo and how to enable it.

AutoUpgrade To The Rescue

If you are planning an upgrade with AutoUpgrade, you can also enable local undo during the upgrade. You should simply just configure it in the config file:

upg1.enable_local_undo=YES

And AutoUpgrade will take care of the rest for you. It will even create undo tablespaces in PDB$SEED and all of the PDBs. Once again AutoUpgrade can make your life easier.

What Happens

Before creating the new undo tablespaces, the database will determine the attributes of the tablespace. By default, it will use a ratio of 30% compared to CDB$ROOT:

  • Initial data file size (calculated from current file size)
  • Maximum data files size (MAXBYTES)
  • Grow by (INCREMENT_BY)

Example (default ration 30 %):

Attribute CDB$ROOT PDB
Initial data file size current file size, 500M 150M
Maximum data file size 32G 9.6G
Grow by 5M 1.5M

You can control the ratio using the parameter _seed_root_undo_ratio in CDB$ROOT. To set the percentage to 10% use the following command before the upgrade:

ALTER SYSTEM SET "_seed_root_undo_ratio"=10 SCOPE=SPFILE;

With this knowledge you can now calculate the space you need for all those extra undo tablespaces. Thus, you can avoid to run out of disk space, or have the tablespace set at undesirable size.

After the upgrade, I would advice you to review the undo tablespace size per PDB. Different workload requires different amount of undo. And especially the increment_by attribute can become so low that it will lead to too frequent data file grow operations.

If your database is already in local undo mode then the parameter _seed_root_undo_ratio has no effect at all. The database will not start a grow or shrink operation to meet the ratio defined by the parameter. Once you have switched to local undo mode, you are in full control yourself.

Conclusion

Be sure to enable local undo for all CDBs databases when you upgrade to 12.2 or later releases. If you have many PDBs and you use AutoUpgrade to enable it, be aware of disk space needed for all those tablespaces. And review the settings afterwards.

Mike Dietrich wrote about a similar situation when you create CDBs using DBCA.

Resources

Classic Preupgrade Tool and Change of Server

In short: If you are using the classic Preupgrade tool (preupgrade.jar) you should ensure that the tool is present in target Oracle Home. The MOS note How to Download and Run Oracle’s Database Pre-Upgrade Utility (Doc ID 884522.1) has been updated to highlight the following: > If the upgrade-to version is 12.2 or higher, then save the file to your target $ORACLE_HOME/rdbms/admin directory and then unzip the file.

You can use this example:

cp preupgrade_19_cbuild_7_lf.zip /u01/app/oracle/product/19.0.0.0/dbhome_1/rdbms/admin/
cd /u01/app/oracle/product/19.0.0.0/dbhome_1/rdbms/admin/
unzip preupgrade_19_cbuild_7_lf.zip

If you are moving the database to a new server as part of the upgrade, ensure that the same version of the Preupgrade tool is used on both the source and target database host.

Background

Lately, I have been involved in a few cases, where customers reported that the classic Preupgrade tool failed during post-upgrade fixups:

@postupgrade_fixups.sql 

DECLARE
*
ERROR at line 1:
ORA-20000: In run_check, Pre-Upgrade Package Requested Check "post_disable_bct_upg" does not exist 
ORA-06512: at line 1 
ORA-06512: at "SYS.DBMS_PREUP", line 293 
ORA-06512: at "SYS.DBMS_PREUP", line 5227 
ORA-06512: at "SYS.DBMS_PREUP", line 3239 
ORA-06512: at line 139 

After guidance from our developers, I learnt that you must extract the classic Preupgrade tool (all the files) into the target Oracle Home before you execute the post-upgrade fixups. Specifically, the files must go into $ORACLE_HOME/rdbms/admin. And you can safely overwrite the existing files. Or, back them up first if you are cautious.

This is especially relevant when you are upgrading the database and moving the database to a new server as well. I have a blog post series on upgrading on VM DB Systems in OCI and they all involve moving the database to a new server. And my initial editions of the posts didn’t have this information.

When you run the classic Preupgrade tool on the source database you should be using the latest version of the tool. You can download it from My Oracle Support. You run the tool on the source database before you shut it down, and move the database to another server. When the upgrade is completed, and you execute the post-upgrade fixups it will use auxiliary packages from the target Oracle Home to make some of the fixups. If the two versions of the auxiliary packages are out of sync, you might run into problems.

One of the developers wrote:

> When postupgrade_fixups.sql is executed, preupgrade_package.sql is executed again, but it is taken from the $ORACLE_HOME/rdbms/admin. As it has a different version, then it is not able to execute the postupgrade fixup

Conclusion

I have been upgrading databases for many years, and I haven’t been aware of this. That I haven’t run into problems before, is just pure luck, I assume.

And remember, always use the latest version of the tool from My Oracle Support.

Further Reading

Using the Pre-Upgrade Information Tool for Oracle Database How to Download and Run Oracle’s Database Pre-Upgrade Utility (Doc ID 884522.1) Database Preupgrade tool check list. (Doc ID 2380601.1)

How To Gather Fixed Object Statistics After Upgrade With AutoUpgrade

In a previous blog post I wrote about the importance of gathering fixed objects statistics at the right time.

I argued that you could create a scheduler job that re-gathers fixed objects statistics after a number of days (and the database is warmed-up). If you like that idea here is how you can implement that in AutoUpgrade.

Schedule Fixed Objects Statistics Gathering

CDB

First, create a file named /home/oracle/sched_gfos/sched_gfos.sql:

BEGIN
   DBMS_SCHEDULER.CREATE_JOB (
      job_name => '"SYS"."GATHER_FIXED_OBJECTS_STATS_ONE_TIME"',
	  job_type => 'PLSQL_BLOCK',
	  job_action => 'BEGIN DBMS_STATS.GATHER_FIXED_OBJECTS_STATS; END;',
	  start_date => SYSDATE+7,
	  auto_drop => TRUE,
	  comments => 'Gather fixed objects stats after upgrade - one time'   
   );
   DBMS_SCHEDULER.ENABLE (
      name => '"SYS"."GATHER_FIXED_OBJECTS_STATS_ONE_TIME"'
   );
END;
/

Next, create a script named /home/oracle/sched_gfos/sched_gfos.sh. It will run the SQL script in all PDBs including CDB$ROOT, except PDB$SEED. I don’t want to run in PDB$SEED because it is normally in READ ONLY state:

export ORACLE_SID=CDB1
export ORACLE_HOME=/u01/app/oracle/product/19
export PATH=$ORACLE_HOME/bin:$PATH
$ORACLE_HOME/perl/bin/perl $ORACLE_HOME/rdbms/admin/catcon.pl -n 4 -C 'PDB$SEED' -e -b sched_gfos -d /home/oracle/sched_gfos/ sched_gfos.sql

And then I add the following line to my config file:

upg1.after_action=/home/oracle/sched_gfos/sched_gfos.sh

Non-CDB

First, create a file named /home/oracle/sched_gfos/sched_gfos.sql:

BEGIN
   DBMS_SCHEDULER.CREATE_JOB (
      job_name => '"SYS"."GATHER_FIXED_OBJECTS_STATS_ONE_TIME"',
	  job_type => 'PLSQL_BLOCK',
	  job_action => 'BEGIN DBMS_STATS.GATHER_FIXED_OBJECTS_STATS; END;',
	  start_date => SYSDATE+7,
	  auto_drop => TRUE,
	  comments => 'Gather fixed objects stats after upgrade - one time'   
   );
   DBMS_SCHEDULER.ENABLE (
      name => '"SYS"."GATHER_FIXED_OBJECTS_STATS_ONE_TIME"'
   );
END;
/
EXIT

Next, create a script named /home/oracle/sched_gfos/sched_gfos.sh:

export ORACLE_SID=DB1
export ORACLE_HOME=/u01/app/oracle/product/19
export PATH=$ORACLE_HOME/bin:$PATH
sqlplus / as sysdba @/home/oracle/sched_gfos/sched_gfos.sql

And then I add the following line to my config file:

upg1.after_action=/home/oracle/sched_gfos/sched_gfos.sh

Appendix

A previous version of AutoUpgrade gathered fixed objects stats immediately after upgrade. This was not in line with our own recommendations. This has been fixed in AutoUpgrade 19.9.2. Thanks to a keen reader of the blog, Robert Ortel, who made a comment on this.

For reference, here is the workaround I shared to fix the wrong behaviour.

Prevent AutoUpgrade From Gathering Fixed Objects Statistics

AutoUpgrade is by design very flexible and there is a way to override the default fixups. It is very well described in our documentation and Mike Dietrich has a really good blog post about it.

The fixup that you want to override and disable is:

[checkname]          POST_FIXED_OBJECTS
[stage]              POSTCHECKS
[fixup_available]    YES
[runfix]             YES <== Change to NO 
[severity]           RECOMMEND

And you should change runfix to NO. Save the checklist file and reference it from the AutoUpgrade config file using the checklist parameter.