Here is a little teaser for our upcoming webinar on Database Upgrade Internals – and so much more on Wednesday 10 February 2021 at 10:00 CET. You can still sign up.
We have a special guest star joining, Frederick Alvarez – one of the masterminds behind AutoUpgrade. In addition, as usual Mike Dietrich will be there, and we have prepared a whole lot of new contents for this webinar. And – if I have to say so myself – it has become quite good and interesting. If you are still not convinced take a look at this!
What Actually Happens During Upgrade
We will go into the upgrade itself, dissect it, and discover what actually happens. Hopefully, it will no longer be a black box to you.
How are the workers processing the upgrade?
How is a container database upgraded?
What goes on in the phases of the upgrade?
I Need More Power, Scotty
We will also cover, how you can make your upgrade faster and show what you can achieve.
What is the benefit of gathering stats before the upgrade?
What Can You Achieve With AutoUpgrade
A deep dive into the checks that are executed by AutoUpgrade.
A list of some of the comprehensive checks that are executed by AutoUpgrade
One page monitoring
The Old Releases
For those of you on very old releases, we will discuss how you can upgrade to Oracle Database 19c.
What to consider when doing upgrades from very old releases
See You
Once the webinar is over we will publish a recording and make the slides available for download.
Under the hood, AutoUpgrade uses the Parallel Upgrade Utility or catctl.pl to do the database upgrade. The Parallel Upgrade Utility has a long list of options that you can configure. The parallel options being the most notable. In your AutoUpgrade config file you can now specify a subset of options to catctl.pl using the parameter catctl_options.
Now, you should not expect a 10x improvement by adding a ton of CPUs to your upgrade. Mike Dietrich posted a really good article that explains what matters to an upgrade when it comes to performance. But f you want to squeeze out the very last resources on your system during upgrade, or want to fine-tune the distribution of CPUs the resource consumption, you can do it with AutoUpgrade.
How
First, you can find a list of catctl parameters in the documentation.
When you have determined the parameters that you want to use, specify them in your config file either globally (for all upgrades):
global.catctl_options=-N 8
or locally for a specific upgrade:
upg1.catctl_options=-N 8
The above examples will run the upgrade of PDBs using eight parallel processes.
You should have a look in the documentation to know the minimum and maximum values for the settings. At least for the parallel settings it is really good to know.
Non-CDB
Support for this parameter and non-CDB databases was added in 21.1.2. To ensure that the upgrade runs with as many parallel processes as possible:
upg1.catctl_options=-n 8
CDB and PDB
When you upgrade a CDB the following happen:
First, CDB$ROOT is upgraded using eight parallel processes.
Next, a number of PDBs are upgraded concurrently, starting with PDB$SEED. The total number of parallel processes to use is controlled by the parameter n.
Each individual PDB is upgraded using a number of SQL processes as well. This is controlled by the parameter N.
This means that the number of PDBs that are upgraded at the same time is: n / N
What is the best value of n?
If you are conservative you set n to CPU_COUNT.
If you are bold, you could probably raise it further, because some of the phases in the upgrade runs serially or doesn’t use the full parallel capacity. Try to set n to CPU_COUNT + 10 % and see how loaded your CPUs get. Keep increasing until you find a suitable level.
In the documentation there are some really good examples and explanations of using N and n together.
On a system with CPU_COUNT=48, put the following in your AutoUpgrade config file to run 6 PDB upgrades concurrently using 8 parallel processes:
upg1.catctl_options=-n 48 -N 8
Note, regardless of what you specify, when it comes to CDB$ROOT AutoUpgrade will always run with the maximum number of parallel processes. CDB$ROOT is special and it must be upgraded before any of the other ones can start. Hence, it makes sense to get it completed as fast as possible.
If you are doing an unplug-plug upgrade of a single PDB it could be a good idea to add more parallel processes to that single upgrade. If you want to use 8 parallel processes:
upg1.catctl_options=-N 8
Conclusion
It can be useful to override the default parallel settings during upgrades. You should not expect a 10x performance improvement, but you might squeeze out the very last resources.
What is the best setting? It depends. You should go with the defaults, or test it using your own databases.
History
12 April 2021: Added information about support of non-CDB databases as of AutoUpgrade 21.1.2.
Wow! Mike and I gave a webinar yesterday: Cool Features – not only for DBAs. We showed a lot of cool features – and the audience recognised that by asking really cool questions. We had more than 100 questions to answer live, and below you can find the answer to those questions that we had to investigate further.
Ahh – one of my new favourites. A viewer asked whether there is any syntax check when you make an expression based parameter. So lets try. First command should work:
SQL> alter session set resumable_timeout='3000/2';

Session Altered.
Now, let’s make a syntax error and see what happens:
SQL> alter session set resumable_timeout='3000//2';

ORA-32005: error while parsing size specification [3000//2]

SQL> alter system set resumable_timeout='3000//2';

ORA-32005: error while parsing size specification [3000//2]

SQL> alter system set resumable_timeout='3000//2' scope=both;

ORA-32005: error while parsing size specification [3000//2]

SQL> alter system set resumable_timeout='3000//2' scope=memory;

ORA-32005: error while parsing size specification [3000//2]

SQL> alter system set resumable_timeout='3000//2' scope=spfile;

ORA-32005: error while parsing size specification [3000//2]
Conclusion: Your expressions are checked when you issue the ALTER SESSION or ALTER SYSTEM command.
But take care when using environment variables in your expressions. If the environment variable is available when you issue the statement, the command will succeed. However, if the environment variable is not present when the database restarts, then you will have a problem. This could be the case if you forget to add the environment variable to your profile or the environment in Grid Infrastructure (srvctl setenv).
If this happens, the startup will error out.
And finally, the expressions you put into a pfile are not checked before the database starts using that pfile. If there are invalid expressions in your pfile, the database startup will error out as well.
Online Table Move
Indexes and LOBs
When you move a table online the indexes remain valid during and after the move. Optionally, you can specify the UPDATE INDEXES clause to change the index storage attributes as well (like moving index to a new tablespace):
SQL> alter table t1 move online tablespace data update indexes(i1 tablespace data);
The initial version of blog post claimed that indexes become unusable during online table move unless you specified the UPDATE INDEXES clause. This is not true! Kudos to Olaf Nowatzki for information me. Thanks!
The LOB segments that are created to support the LOB columns remain in the same tablespace, even if you move the table to a new tablespace. But if you want, you can also move the LOB segment as well:
SQL> alter table t1 move online tablespace data lob(c1) store as (tablespace data);
A viewer was concerned whether he could move a table online and also update indexes because one of the indexes was really wide. Apparently, in a previous version this had been an issue to them. I tested this out with an index on 10 columns defined as VARCHAR2(128 BYTE). And this was not a problem.
If you index is even wider; test it yourself – or consider whether you really need such an index.
It is supported move an IOT online as well – but not partitioned IOTs.
The Rest
If the table has unused columns when you move it, it will still have unused columns. They are not affected by a move operation. Actually, Connor McDonald made a really good video where he talks about unused columns.
Also, an attendee wanted to know whether the online command generated more UNDO or TEMP. Let’s see what happens with my 125 MB large table (no indexes):
Metric
Online move
Regular move
undo change vector size
96504
37988
session pga memory
5750416
4243088
As you can see it does require more UNDO to move the table online. But the numbers might change on a busy system with many indexes and LOBs. TEMP appears to be relative unaffected – it might change if I have unique indexes and must rebuild those.
Lesson learned – expect more resource usage – test before trying in production.
And finally – does online table move work on tables with OLS (Label Security) policies? I don’t know – so far I haven’t been able to get confirmation. My immediate answer is NO. Take for instance DBMS_REDEFINITION – it is not supported when the table has OLS policies, so I assume the same applies for online table move.
Online Convert To Partitioned Table
This feature only works on a non-partitioned (or regular table). If your table is already partitioned, and you want to change to a different partitioning method, you must use another method (like DBMS_REDEFINITION).
Online Data File Move
When you move a data file online, the database creates an exact copy of the data file in the new location. It is bit-by-bit identifical.
This also means that any free space in the data file is not reclaimed, nor is the High Water Mark affected.
Standby Database Operations
I demoed how the standby database in 19c can do automatic flashback, when the primary database flashes back. A viewer asked whether you can flash back to the same restore point multiple times without the standby database complaining.
My immediate answer was: yes, you can flash back to the same restore point multiple times. The documentation doesn’t mention such a restriction, so I was eager to try it out.
I made a data guard setup in OCI and I was able to flash back to the same restore point three times – and the standby database followed each time.
Gradual Password Rollover
With gradual password rollover a user can temporarily have two passwords. A viewer asked whether you can identify the sessions that are still connecting with the old password. And you can with unified audit trail provided you are auditing logons. In that case simply look at the AUTHENTICATION_TYPE column of the audit entries for LOGON actions:
SQL> select   authentication_type, event_timestamp
     from     unified_audit_trail
     where    action_name='LOGON' and dbusername='APP_USER'
     order by event_timestamp;
Look at the VERIFIER information. If a user is using the old password in a rollover period, the identifier is suffixed -OLD. Similar, the suffix is -NEW if the new password is used.
This is a very useful addition to gradual password rollover.
Conclusion
Thanks to everyone that participated today. We had so much fun preparing the webinar for you. And really – thanks for all the cool questions. Doing stuff remote is really hard, and you really feel disconnected from the audience. But it helps a lot with good questions.
You can use AutoUpgrade to upgrade a database using only a single command line. No config file is needed!
Whenever we talk about AutoUpgrade, we also mention the config file. The file that contains information about what has to be upgraded. A very simple version of such a config file could look like this:
This is the preferred and recommended way of using AutoUpgrade. But you can actually specify everything on the command line.
Upgrade in One Line
By using the command line option config_values you can now specify the config file entries on the command line. Instead of using the above config file you could execute:
Notice how I used config_values to specify the contents of the config file. The prefix that you have to use in the config file (in this case upg1) is not used here (only for global entries, like global.autoupg_log_dir).
If you have several databases to upgrade, you separate them with as asterisk (*):
Next, AutoUpgrade will create a config file using the information supplied either using config_values or from the environment.
From here on AutoUpgrade behaves as usual.
Conclusion
If needed, you can provide all input to AutoUpgrade in one command line. This is useful if you are using AutoUpgrade in scripts or from Ansible or similar orchestration tools.
I would still recommend the use of a config file. It is easier to read and write the options in a nice formatted text file. Further, you avoid the potential trouble of escaping characters on the command line. And, finally, you avoid having a very long an unreadable command line.
These arguments are, by the way, the same we use when we recommend using a parameter file (.par) for Data Pump.
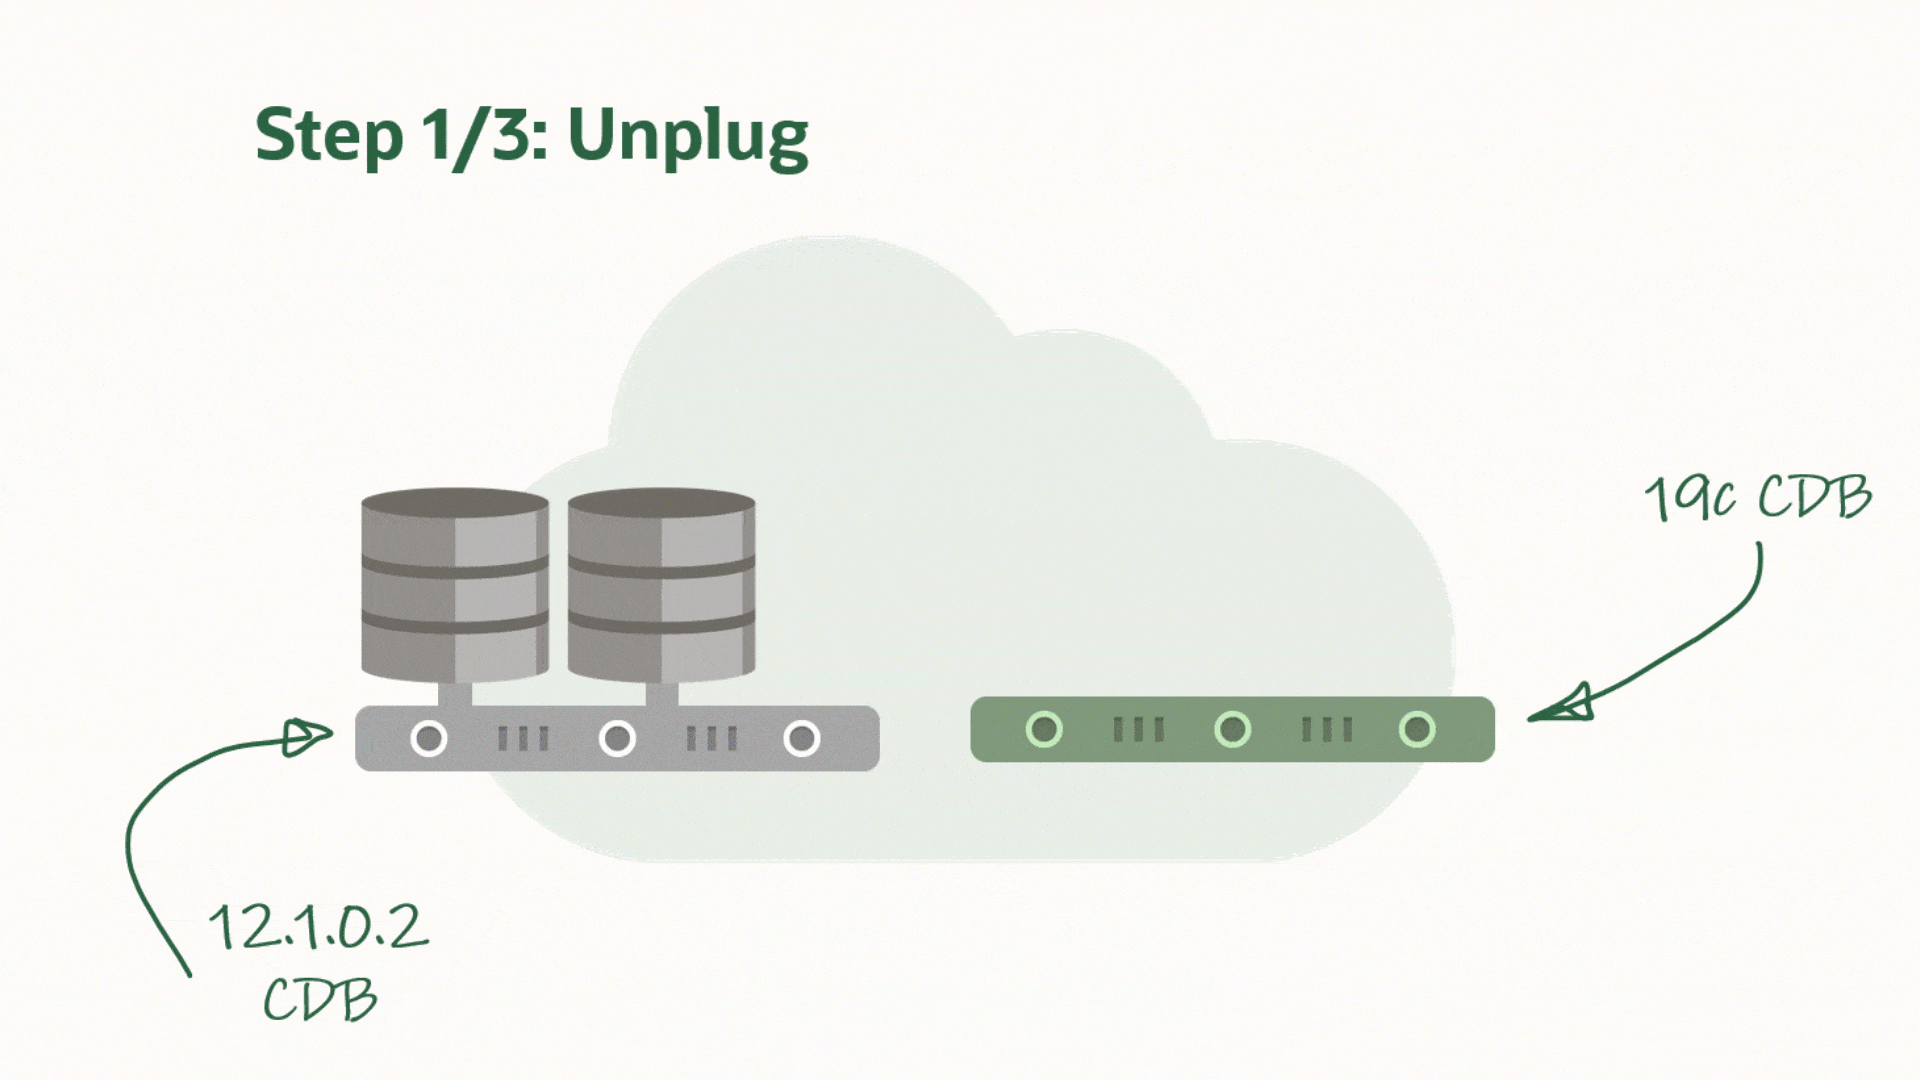
AutoUpgrade now supports unplug-plug upgrades. You unplug a PDB from a lower release CDB and you plug it into a higher release CDB. After plug-in the PDB is upgraded and eventually it can be opened in normal, READ WRITE mode.
When it comes to upgrading in the multitenant world, I am a big fan of unplug-plug upgrades. The concept comes with a number of benefits:
It is much faster to upgrade an individual PDB using unplug-plug compared to a CDB with just one PDB in it. When you do an unplug-plug upgrade, the database just need to upgrade the PDB. Compare that to a CDB which first upgrades CDB$ROOT, and then PDB$SEED and any user PDBs.
You don’t have to arrange downtime for all the PDBs in the CDB. Downtime is just needed for the PDB that you will upgrade.
Combine it with refreshable PDBs and you can still have a really good fallback option. You can check out a previous blog post to see how you can use refreshable PDBs.
AutoUpgrade and Unplug-plug Upgrade
Starting from version 21, AutoUpgrade can now perform unplug-plug upgrades. A newer version of AutoUpgrade can upgrade to older database releases as well, so don’t worry if the AutoUpgrade version doesn’t match the Oracle Database release that you are upgrading to.
There are some requirements that must be met in order to perform unplug-upgrade, so I suggest that you take a look in the documentation.
You have to create the target CDB yourself. It is by design that AutoUpgrade doesn’t do this for you. First, creating a CDB requires a lot of information and it can be done in many different ways (ASM? Which components? RAC?). You would need a very long config file to supply all that information. Also, it takes time to create a CDB and if AutoUpgrade would have to do that inside the maintenance window, it would be prolonged considerably.
During unplug-plug upgrades AutoUpgrade also allows you to change the name of the PDBs and you can decide whether you want to reuse the unplugged data files or take a copy.
AutoUpgrade will unplug PDBs hr and logistics from CDB1 and plug them into CDB2. In addition, it will change the name of hr to people when it is plugged into CDB2. Finally, you must specify the Oracle Home of the two CDBs, so AutoUpgrade can set the environment correctly and connect to the databases.
If you use lsj command to monitor the progress it does actually look like you are only upgrading one of the PDBs:
upg> lsj
+----+-------+---------+---------+-------+--------------+--------+------------------+
|Job#|DB_NAME|    STAGE|OPERATION| STATUS|    START_TIME| UPDATED|           MESSAGE|
+----+-------+---------+---------+-------+--------------+--------+------------------+
| 100|   CDB1|DBUPGRADE|EXECUTING|RUNNING|20/12/22 15:25|15:29:03|13%Upgraded PEOPLE|
+----+-------+---------+---------+-------+--------------+--------+------------------+
Total jobs 1
But if you look into the details with status -job 100 you can see that both PDBs are upgraded in parallel:
upg> status -job 100

... (removed a lot of information)

Details:
[Upgrading] is [0%] completed for [cdb1-people]
                 +---------+-------------+
                 |CONTAINER|   PERCENTAGE|
                 +---------+-------------+
                 |   PEOPLE|UPGRADE [13%]|
                 |LOGISTICS|UPGRADE [13%]|
                 +---------+-------------+
When the upgrade completes, the PDBs are ready to be used. I suggest that you verify that the databases are open in READ WRITE mode and not in restricted mode. Finally, save the state, so the PDBs start automatically together with the CDB:
SQL> select name, open_mode, restricted from v$pdbs where name in ('PEOPLE', 'LOGISTICS');
SQL> --Verify open_mode=read write and restricted=no
SQL> alter pluggable database people save state;
SQL> alter pluggable database logistics save state;
Caution
With unplug-plug upgrades you can’t use Flashback Database as your fallback plan. It doesn’t work across the plug-in operation. You either have to:
Instruct AutoUpgrade to copy the unplugged data files before it plugs into the higher release CDB. That way, you still have the old unplugged data files, and just re-create the PDB in the lower release CDB. But you will have extra downtime because you need to copy the data files.
Use Refreshable PDBs to build a copy of your PDB in the higher release, target CDB. When you want to do the upgrade, perform the last refresh and upgrade the refreshable PDB.
Both of the above options require additional disk space to hold a copy of the database.
Of course, you can also use your regular backups as fallback.
What If
Your Target CDB Has a Standby Database?
For now, don’t use AutoUpgrade to make unplug-plug upgrades, if the target CDB has standby databases. A plug-in operation with a standby database is a tricky maneuvre, at least when you want to re-use the data files. We are still trying to figure out how to implement it in AutoUpgrade.
Having said that, it is absolutely doable. You can read more about in the following MOS notes:
For now, don’t use AutoUpgrade to perform unplug-plug upgrades, if any tablespace in the PDB is encrypted with TDE Tablespace Encryption. We are working on making AutoUpgrade capable of better interacting with the TDE keystore, so keep an eye out for coming versions.
If TDE Tablespace Encryption is enabled in the target CDB, you can still use AutoUpgrade. The PDB will be plugged in as an unencrypted PDB.
Conclusion
Doing unplug-plug upgrades is now supported by AutoUpgrade as of version 21. It includes useful features for renaming PDBs and using copies of unplugged data files.
There is a video on YouTube that shows the procedure. And while you are there, I suggest that you subscribe to our channel.
This is a deprecated blog post. It is kept for reference only. Please visit the updated blog post series.
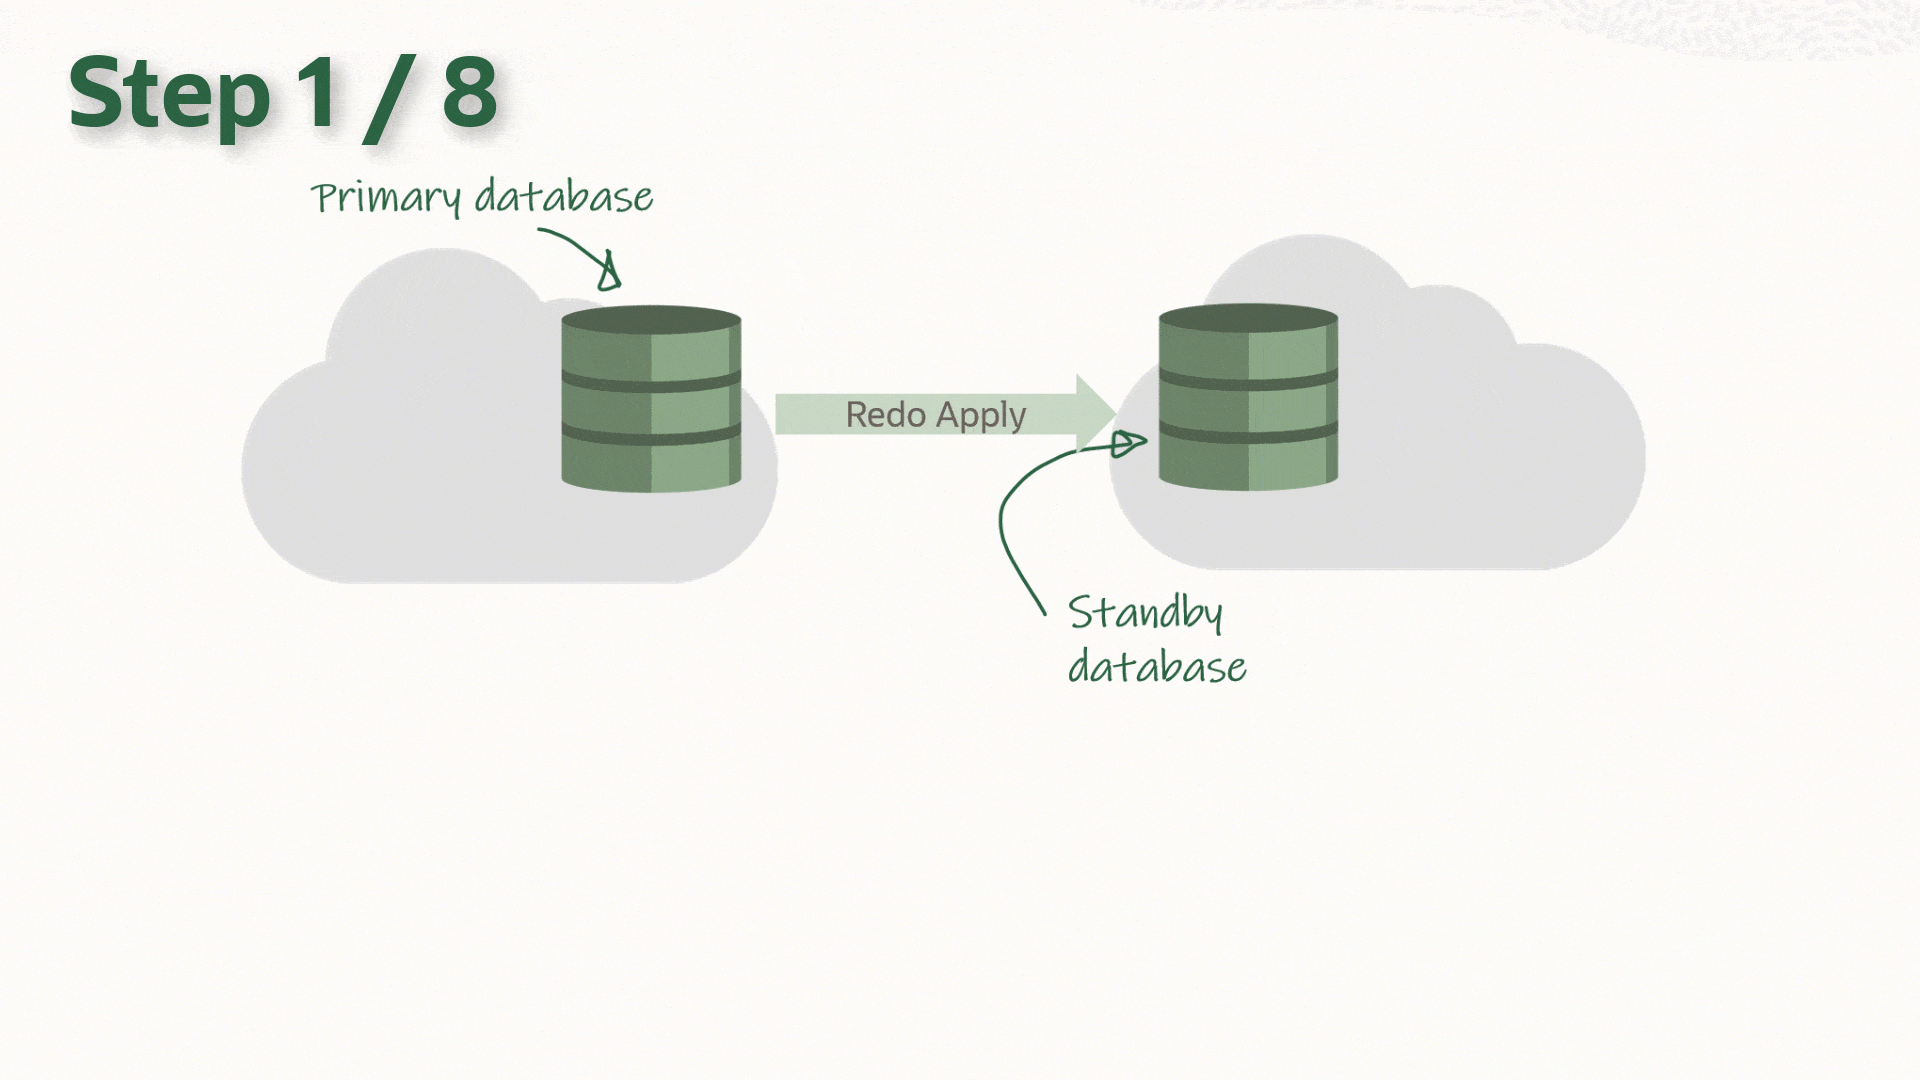
You can upgrade your database to a new release with AutoUpgrade and keep the Data Guard setup intact. The standby database(s) can be upgraded implicitly via the redo from the primary database, and there is no need to rebuild the standby database after upgrade.
The process:
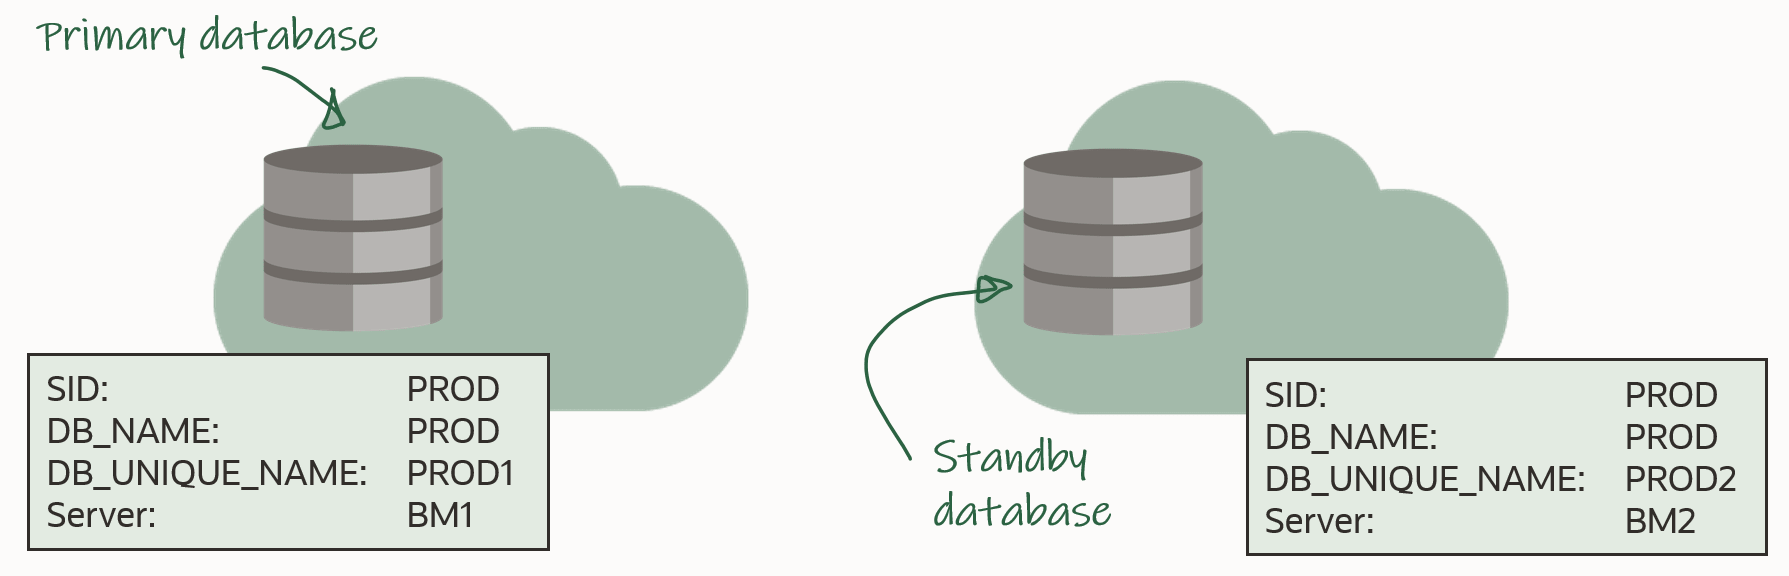
In the following I will be using this setup:
In advance, you should install the new Oracle Home on both primary and standby host. The two Oracle Homes should have the same patches applied, and I recommend that you always apply the latest Release Update.
Before Upgrade
You must use AutoUpgrade version 21.1.1 or newer. A newer version of AutoUpgrade can upgrade to older database releases as well, so don’t worry if the AutoUpgrade version doesn’t match the Oracle Database release that you are upgrading to.
AutoUpgrade can handle a Data Guard environment that is manually configured or via Data Guard Broker.
The procedure starts right before you start AutoUpgrade in DEPLOY mode (or alternatively in FIXUPS mode). Downtime has started and users are no logged connected to the database.
Stop Data Guard
On the standby database, generate commands to copy the Data Guard broker config files. Don’t execute them yet:
PROD2 SQL> select 'cp ' || value || ' /tmp' as cmd from v$parameter where name like 'dg_broker_config_file%';
Shut down the standby database. Disabling the database is strictly speaking not necessary, but a better-safe-than-sorry approach:
Since redo transport has not been deferred yet in the primary database, it will complain about losing connection to the standby database. The alert log will contain an entry similar to this:
2020-12-03T06:30:12.751693+00:00
TT03 (PID:47477): Attempting LAD:2 network reconnect (3113)
TT03 (PID:47477): LAD:2 network reconnect abandoned
2020-12-03T06:30:12.752104+00:00
Errors in file /u01/app/oracle/diag/rdbms/prod1/PROD/trace/PROD_tt03_47477.trc:
ORA-03113: end-of-file on communication channel
TT03 (PID:47477): Error 3113 for LNO:3 to 'prod2'
It can be safely ignored, because it is after all a maintenance window and the database is about to be upgraded. Your monitoring system might detect this and start to complain.
Upgrade
Upgrade the database by starting AutoUpgrade in DEPLOY mode. AutoUpgrade will defer redo transport and stop Data Guard broker (if in use) automatically:
After the upgrade you should perform the necessary tests to validate the new database release. Only when you are convinced to go live on the new release, you should continue.
Remember that the standby database was left behind before we started touching anything, so if all other fails, simply restart the standby database, and connect your users to it.
After Upgrade
Restart Data Guard
Update the listener on the standby host. Be sure to update the Oracle Home information in the listener.ora entry. Note, that your listener.ora might be stored in a non-default location, so use lsnrctl status to get the location. Finally, reload the listener:
[grid@bm2]$ $GRID_HOME/bin/lsnrctl status
[grid@bm2]$ vi $GRID_HOME/network/admin/listener.ora
[grid@bm2]$ $GRID_HOME/bin/lsnrctl reload
For the next commands, I will be using the same prompt, and I will need the following environment variables:
Next, if the standby database is using TNS_ADMIN in the default location ($ORACLE_HOME/network/admin), then be sure to copy the relevant TNS aliases into the new tnsnames.ora. There should be TNS aliases to the primary and standby database. Or, if there are no other databases in the same Oracle Home, you can simply copy the files:
[oracle@bm2]$ #Back up files
[oracle@bm2]$ cp $NEW_HOME/network/admin/sqlnet.ora $NEW_HOME/network/admin/sqlnet.ora.backup
[oracle@bm2]$ cp $NEW_HOME/network/admin/tnsnames.ora $NEW_HOME/network/admin/tnsnames.ora.backup
[oracle@bm2]$ #Copy from old to new home
[oracle@bm2]$ cp $OLD_HOME/network/admin/sqlnet.ora $NEW_HOME/network/admin
[oracle@bm2]$ cp $OLD_HOME/network/admin/tnsnames.ora $NEW_HOME/network/admin
Now, you can edit /etc/oratab and update the information about the Oracle Home to match the new Oracle Home. In my example, the database is managed by GI, so I should not configure auto-start in /etc/oratab. If you are not managing your databases with GI, you probably want to configure the standby database to start automatically (see appendix):
[oracle@bm2]$ #Backup file
[oracle@bm2]$ cp /etc/oratab /tmp/oratab
[oracle@bm2]$ #Use sed to remove the line that starts with ORACLE_SID
[oracle@bm2]$ sed '/^'"$ORACLE_SID"':/d' /tmp/oratab > /etc/oratab
[oracle@bm2]$ #Add new entry
[oracle@bm2]$ echo "$ORACLE_SID:$ORACLE_HOME:N" >> /etc/oratab
Copy SPFile and password file to the new Oracle Home:
Copy the broker config files into the new Oracle Home. If you store your broker config files outside of the Oracle Home this might not be necessary to you:
Upgrade the database in GI, which updates the Oracle Home information, so GI will start the database in the correct Oracle Home. Next, re-enable and start the database:
Or, if you are not using GI, simply start the database in the new Oracle Home:
PROD2 SQL> startup mount
Re-enable Data Guard
To re-enable the Data Guard config use DG CLI:
[oracle@bm1]$ $ORACLE_HOME/bin/dgmgrl sys@PROD1
And re-enable redo transport:
DGMGRL SYS@PROD1> edit database prod1 set state=transport-on;
Now, redo is shipping to the standby database, and it will apply it. When the redo that was generated during the upgrade is applied on the standby database, it is implicitly upgraded. You can monitor the progress of the apply by looking at the Apply Lag information. The Apply Lag will decrease until the standby database eventually catches up and they are fully synchronized:
DGMGRL SYS@PROD1> show database prod2;
Test
Use the broker to ensure everything is fine:
DGMGRL SYS@PROD1> show configuration
DGMGRL SYS@PROD1> show database prod1
DGMGRL SYS@PROD1> show database prod2
You should have SUCCESS listed for both databases
Let’s validate the setup and try to make a switchover. The database will not allow a switchover if there are any problems in the Data Guard setup. It is a good way of checking things are fine:
If you don’t use Data Guard Broker, you use regular SQLs and SQLPlus to verify the Data Guard environment.
Conclusion
It is actually not that complicated to upgrade your database, even if it is part of a Data Guard setup. And with version 21.1.1 of AutoUpgrade is has become easier. A little extra legwork is needed to take care of the standby database. But the good thing is that your Data Guard setup is maintained throughout the process.
I made a video on YouTube that shows the procedure. And while you are there, I suggest that you subscribe to our channel.
Appendix
Config File
For your reference this is the config file, that I used. It contains only the required information. All other parameters have a default value:
When you run un AutoUpgrade in ANALYZE mode and check the preupgrade report, you will find this information message:
[checkname]          SYNC_STANDBY_DB
[stage]              PRECHECKS
[fixup_available]    NO
[runfix]             N/A
[severity]           INFO
[action]             Synchronize your standby databases before database upgrade.
[broken rule]        The standby database is not currently synchronized with its associated primary database.
[rule]               To keep data in the source primary database synchronized with its associated standby databases, all standby databases must be synchronized before database upgrade.  See My Oracle Support Note 2064281.1 for details.
What does it say? Basically, it says that all redo generated on the primary database before the downtime window started, should be sent to and applied on the standby database. This way, your standby database is ready to replace your primary database at any time, if something goes really wrong.
Strictly speaking it is not necessary to ensure that, but it is strongly recommended.
GI-managed Database in /etc/oratab
When the database is managed by GI, you don’t need to have it configured in /etc/oratab. Personally, I like to have it anyway, because then you have a clear overview of what databases are on the server, and you can use /etc/oratab to set your environment, like when you are using oraenv script.
But I know that die-hard GI-folks might roll their eyes when I say it, but I like it this way.
We can all agree 2020 was a bad year. Let’s hope 2021 will be much better.
Over the last months I have made a lot of videos, which is really hard work. Especially since I am not a native English speaker, I often need to re-take a video several times. I saved all my bad recordings and I decided to create a bloopers video. I hope it can help you leave 2020 with a smile.
In case you are taking some time off in the coming days and you get a little bored, I suggest you head over to our YouTube channel and catch up on some tech-stuff.
Following a previous blog post here are all the details on automated upgrades in OCI, and (possibly) the answers to your questions.
Precheck
The precheck ensures the database is ready to upgrade. It uses DBUA which again uses preupgrade.jar to execute the checks. It is similar to running AutoUpgrade in analyze mode. The check is non-intrusive and can be executed while the database is in use.
Normally, when you use preupgrade.jar we always recommend you download the latest version from My Oracle Support. However, this is not possible when you use the tooling. The new, target Oracle Home is always deployed as part of the precheck process – and deleted again after the precheck. There is no way you can replace the preupgrade.jar package. You must use the version of preupgrade.jar that comes with the Oracle Home.
If there are no issues that prevent you from upgrading, you will see this message:
However, it could also be that there is an error in the database that must be fixed:
If you want to see the output from the precheck you must log on to the database host and find the file:
vi $ORACLE_BASE/cfgtoollogs/dbua/upgrade<timestamp>/$ORACLE_UNQNAME/upgrade.xml
Only the XML output is available, which might be a little hard to read. If you prefer you can also download AutoUpgrade to the server and run it in analyze mode. It can produce a much better output, and it works even if the target Oracle Home is not present. Create a simple config file:
You can use the preupgrade report to determine which issues prevents the upgrade from starting.
The database must be in ARCHIVELOG mode and the size of your Fast Recovery Area (FRA) must be at least 15G (parameter db_recovery_file_dest_size). As well, you must have 15G of free space on the mount point that hosts the FRA.
Upgrade
When you upgrade your database, all PDBs in the database are upgraded as well. There is no way to change it. If a PDB is closed when the upgrade starts, it is opened and upgraded.
After the upgrade, the PDB is left opened and in READ WRITE state. But the state is not saved, so after a CDB restart, the PDB will start in whatever state that has been previously saved.
The first version of the tooling does not support standby database. If your database is a primary database, you must remove the standby database, upgrade, and then recreate the standby database. It is in the plan for future enhancements to get this streamlined.
Fallback
Enterprise Edition databases are protected by a guaranteed restore point (GRP) and Flashback Database. The tooling automatically creates the GRP before it starts to work on the database. If an error occurs during the upgrade, you can use the OCI console to initiate a roll back.
After successful upgrade the GRP is dropped again. The GRP only protects the database during the upgrade, so you can’t rely on the GRP as a fallback mechanism if you decide to fall back after the upgrade. Let’s say that your testing reveals a critical problem after the upgrade, then your only fallback mechanism is to restore a backup.
Since Flashback Database is an Enterprise Edition feature, this fallback mechanism is not available on Standard Edition databases.
In addition, it is strongly recommended that you perform a manual backup of the database before you start the upgrade. The console will also give you this warning, before you can start the upgrade.
Monitoring and Troubleshooting
When you have started the upgrade, you can’t monitor it from the console. You must log on to the host. When you do so, be aware that the timestamps shown in the OCI console are UTC, but the timestamps in the log files on the host is local timestamp (depending on your region).
Using dbcli
Log on as root and use the dbcli tool to monitor the progress. First, list jobs:
[root@host]$ dbcli list-jobs
Which should produce a list like this:
Next, you can get additional information about the job using the ID:
[root@host]$ dbcli describe-job -i <id>
Which give you more details:
Using DBUA Log Files
But you can get even better information by looking in the log files from DBUA. Use the job id from the dbcli command to find the log file:
And for really detailed information look in this directory:
[oracle@host]$ export ORACLE_BASE=/u01/app/oracle
[oracle@host]$ export DBCLI_JOBID=f4b2597f-990f-4442-a774-153f3713fb7a
[oracle@host]$ cd $ORACLE_BASE/cfgtoollogs/dbua/$DBCLI_JOBID/$ORACLE_UNQNAME
Using DCS Agent
The OCI control plane communicates with your DB System using an agent, and sometimes it can be useful to look in those logs:
[root@host]$ cd /opt/oracle/dcs/log
[root@host]$ vi dcs-agent.log
To find the log entries that are related to a specific upgrade search for the job ID:
[root@host]$ cat dcs-agent.log | grep "<job-id>" | more
Q&A
Which version and release update can I upgrade to?
The tooling only allows upgrades to Database 19c. If you need to upgrade to any other version, you must do it manually.
You can decide to upgrade to an Oracle provided image or a custom image:
However, for both type of images, the Release Update (or patch level) must be the latest or previous two Release Updates. Even if you have a custom database software image that is older, it can’t be used. You must upgrade to one of the recent Release Updates.
If you select 19.0.0.0 you will not get the base release, but the latest Release Update. If you use the APIs this is a smart way of specifying that you always want the latest Release Update.
Where are my log files?
The output from the precheck is stored here:
$ORACLE_BASE/cfgtoollogs/dbua/upgrade<timestamp>
The output from the actual upgrade is stored here:
The precheck (phase 2) is really fast. Just as fast as if you would run AutoUpgrade in analyze mode or using preupgrade.jar. The extra time is needed to deploy and remove the Oracle Home again. For each execution of the precheck the procedure repeats, and a new Oracle Home is deployed. It is never re-used.
Why is the upgrade slower than if I do it manually?
Typically, when you upgrade a database you have already – outside of the maintenance window – deployed a new Oracle Home. When you use the tooling, this happens inside the maintenance window. The tooling can’t deploy an Oracle Home prior to the upgrade. In addition, the upgrade is executed with DBUA using default options, which for instance means that the time zone file is upgraded as well.
If you are sensitive to downtime and would like to complete the upgrade faster, you must perform the upgrade manually.
Will my 11.2.0.4 database get converted to a PDB?
No, the database is upgraded as-is and there is no PDB conversion. We are working on making it possible to perform the non-CDB conversion as well. If you must convert the non-CDB to a PDB, you must move the database to a new VM DB System that already have a CDB provision. In that case, I would recommend that you use the manual upgrade and plug-in as described in another blog post.
Can I perform an automated upgrade using dbcli?
No, although the command line help of dbcli suggests that such an option exist, it can’t be used.
Our developers just published a new version of AutoUpgrade. Head over to My Oracle Support and download version 21.1.1.
The version says 21, but it can still upgrade your databases to lower release. So, you should use this new version to upgrade to Oracle Database 19c as well.
What’s New
A total of 48 enhancements and bug fixes made it into the new release. It has been 35 working days since the last release (and that includes Thanksgiving week) which means that the team has put in – on average – close to 1,5 changes into AutoUpgrade every, single working day. I find that quite impressive. And it really supports our message that you should always use the latest version of AutoUpgrade.
In My Oracle Support note 2485457.1 you can find a complete change log. Also, you can also visit the 21c New Feature Guide for additional information.
Unplug/plug Upgrade
The first things that I would like to highlight is unplug/plug upgrade. Instead of upgrading an entire CDB, you can now choose to unplug one or many PDBs, plug them into a higher release CDB, and upgrade the individual PDBs.
How do you specify to upgrade only one PDB? Use target_cdb and pdbs?
When doing unplug/plug upgrades you must be aware of the COMPATIBLE setting in the higher release CDB. If COMPATIBLE is higher, when the PDB plugs in, COMPATIBLE will silently and automatically be raised by the CDB. This means that you lose the capability of doing downgrades and flashback database.
You can read more about unplug/plug upgrades in the documentation
AutoUpgrade and Oracle Data Guard
In addition, AutoUpgrade now detects that you are upgrading a primary database in a Data Guard setup. In that case, it will automatically defer redo log transport to the standby databases and disable the Data Guard broker. After the upgrade, the broker is automatically restarted, but you need to manually reconfigure the standby databases, and eventually re-enable redo log transport.
You might ask: Why don’t AutoUpgrade handle it all for me? This is to preserve your fallback capabilities. Even after a successful upgrade, you still might want to revert back to the old version. Let’s say your testing finds a critical issue. You might still have a restore point on the primary database, but what if – for some reason – flashing back fails? Then you still have your standby database which was disabled right before the upgrade.
You can read more about AutoUpgrade and Data Guard in the documentation.
More
A few hints for the interested reader to explore. Have a look at the config file option catctl_options. You can use that to control the level of parallelism for a specific upgrade.
Also, if you don’t want AutoUpgrade to handle your network files (e.g. sqlnet.ora, tnsnames.ora) you disable it using manage_network_files.
You can read more about those options in the documentation.
Conclusion
Get the latest version of AutoUpgrade and benefit from the many new features. Keep an eye out for additional blog posts that will dig deeper into the new features.
Recently, I have been asked a few similar questions:
What happens if my SSH session with AutoUpgrade is lost? (see appendix)
What happens if AutoUpgrade crashes?
What happens if I exit the console by mistake?
First, don’t panic. Second, just restart AutoUpgrade using the same command line. During startup, AutoUpgrade will figure out that it should recover the lost session, and will restart the upgrades.
When AutoUpgrade dies or is terminated, the database upgrades that it started, dies with it. This could happen if you lost your SSH session. The database upgrade stops, but the database is still running, most likely in UPGRADE mode.
If you exit AutoUpgrade by mistake (typing exit in the job console), it will first stop the upgrade, and then shutdown the database.
In any case, when you afterwards restart AutoUpgrade, it will figure out that a previous AutoUpgrade session was running. It will recover information from the previous session, and if needed restart the database. After that, it will restart the upgrade. If the previous database upgrade was at phase 54, AutoUpgrade will restart from phase 54. This means that all previous work in the upgrade is preserved, and you can resume as if nothing had happened.
Don’t Recover Previous Session
If you for some reason don’t want AutoUpgrade to recover the previous session. Let’s imagine that AutoUpgrade crashed, and you decided to restore the database. Now you want to start all over. In that case, you need to clear the recovery data, otherwise, AutoUpgrade will get confused.
You can read more about the parameters in the documentation.
The Little Hammer (Preferred)
You can clear the recovery for a specific job by adding clear_recovery_data on the command line and use jobs parameter to specific exactly for which jobs recovery data must be cleared.
Be advised, that this will happen for all the upgrades that are specified in the config file. Remember, that one of the big benefits of AutoUpgrade is that one config file can be used to upgrade 10s or 100s of databases.
The Sledgehammer
I would recommend the previous hammers but use this approach as the last solution: Delete all files that are used by AutoUpgrade.
First, delete the directory specified in global.autoupg_log_dir. Next, delete the directory specified in .log_dir. Typically and by default, the second directory is a subdirectory to the first one, so in most cases you just have to delete the first directory. If you have multiple upgrades specified in the same config file you potentially need to delete multiple directories for prefix1.log_dir, prefix2.log_dir and so forth.
Be aware that you are clearing out all information that is used by AutoUpgrade. If you use the same global logging directory for multiple AutoUpgrade sessions (which I would not recommend), then you will be seriously messing things up. But if you are only upgrading this specific database on the server, then you can safely delete the directories to start all over.
Restoring a Test Database – Starting All Over
Very often a test database is upgraded multiple times. Even after a successful upgrade, you might want to retry the upgrade with different settings.
If you use AutoUpgrade you must clear the recovery data as specified above. AutoUpgrade doesn’t know that you have restored the database. For all it know, the previous upgrade was successful.
Conclusion
Resuming an AutoUpgrade session is very simple. Just start AutoUpgrade with the same command line. It identifies the previous AutoUpgrade session, and resumes automatically. All the previous work is recovered, and the upgrade will resume from where it was stopped.
Appendix
Lost SSH Session
I heard from several people that they experienced the SSH session timing out because AutoUpgrade didn’t produce any screen output while the upgrade took place. We have put into a our plans to make some sort of regular screen output, so this should be avioded.
Before it is implemented, I would suggest that you look at the keep alive options in SSH:
$ man ssh
Personally, I always start SSH this way, and you can put it into your SSH config:


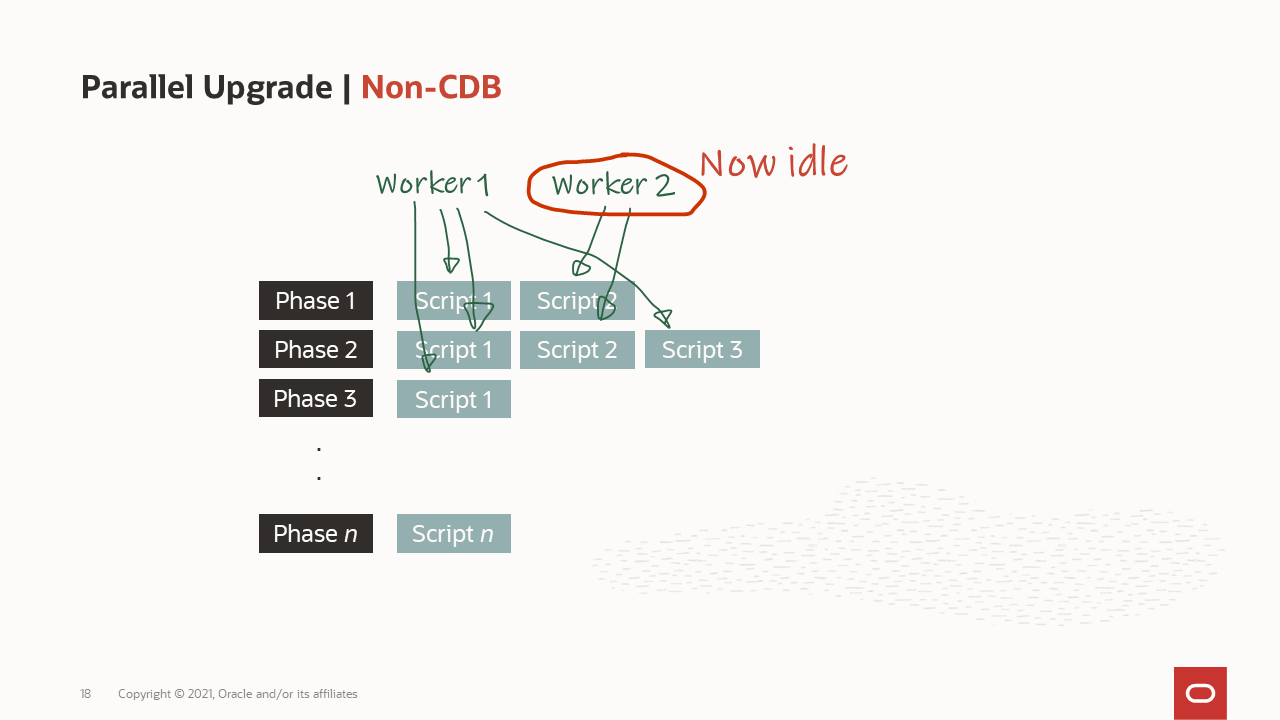 How are the workers processing the upgrade?
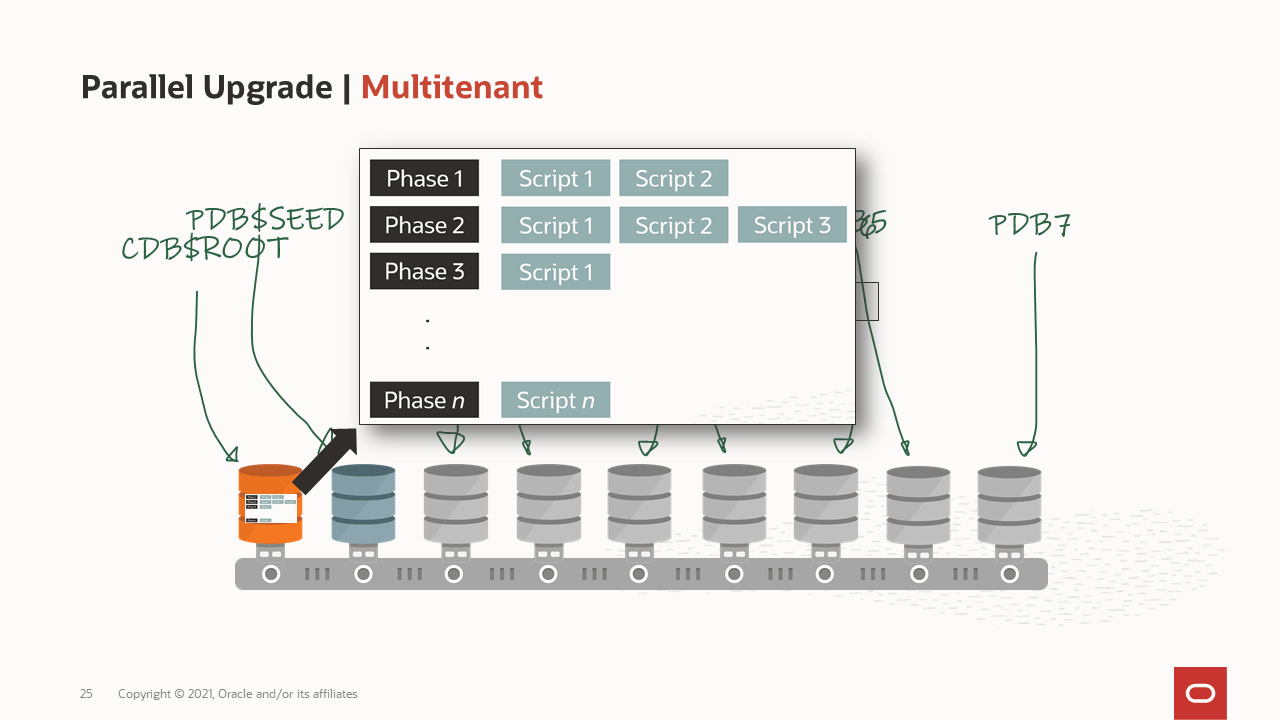 How is a container database upgraded?
 What goes on in the phases of the upgrade?
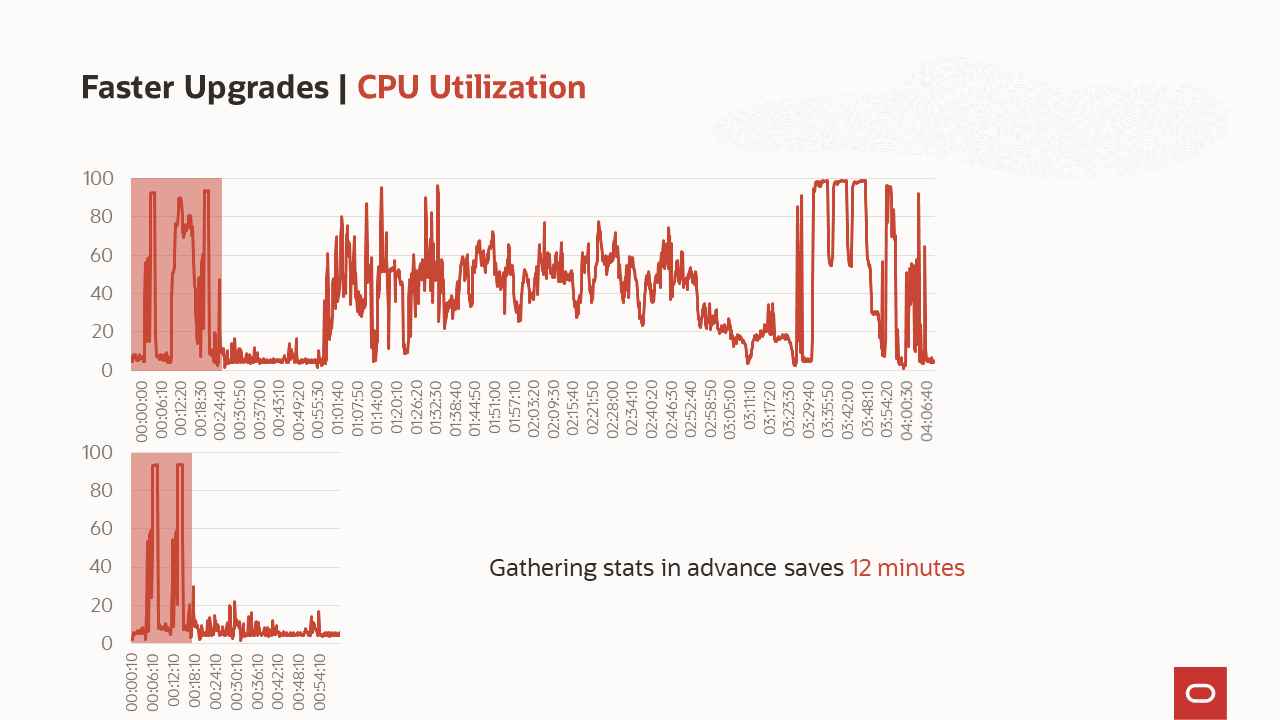 What is the benefit of gathering stats before the upgrade?
 A list of some of the comprehensive checks that are executed by AutoUpgrade
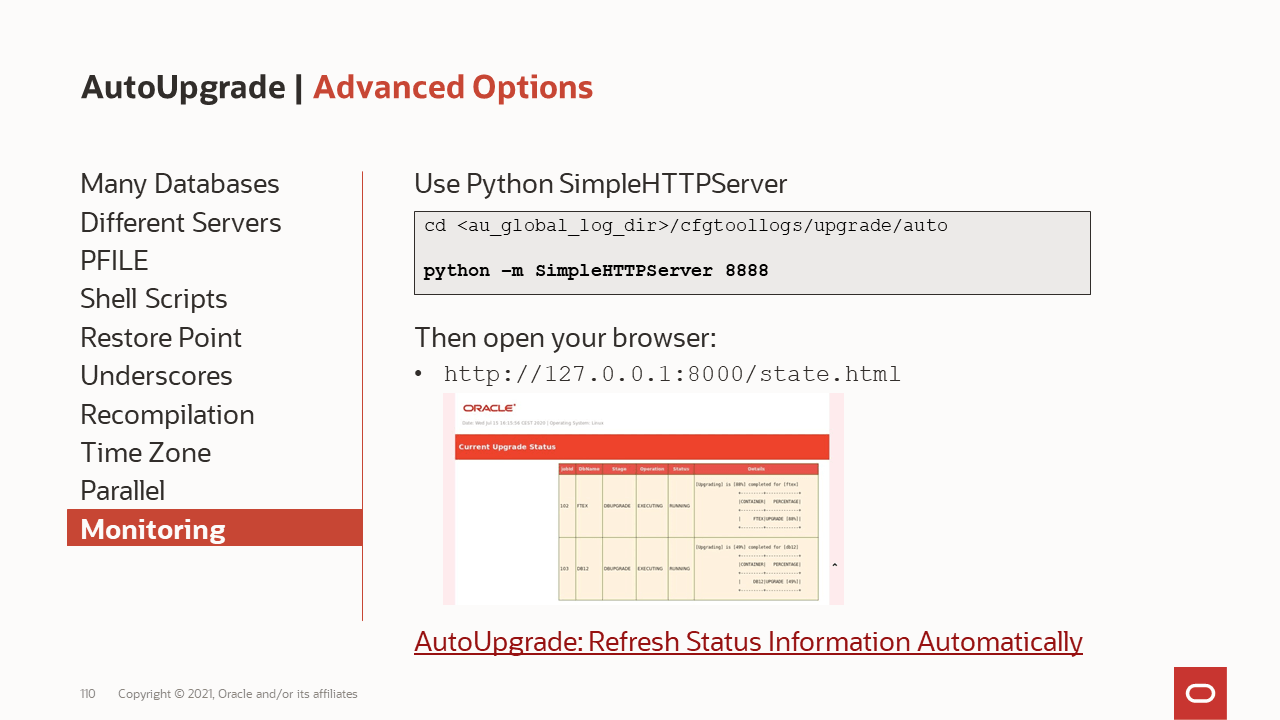 One page monitoring
 What to consider when doing upgrades from very old releases


 Next, you can get additional information about the job using the ID:
 However, for both type of images, the Release Update (or patch level) must be the latest or previous two Release Updates. Even if you have a custom database software image that is older, it can’t be used. You must upgrade to one of the recent Release Updates.
If you select 19.0.0.0 you will not get the base release, but the latest Release Update. If you use the APIs this is a smart way of specifying that you always want the latest Release Update.
However, for both type of images, the Release Update (or patch level) must be the latest or previous two Release Updates. Even if you have a custom database software image that is older, it can’t be used. You must upgrade to one of the recent Release Updates.
If you select 19.0.0.0 you will not get the base release, but the latest Release Update. If you use the APIs this is a smart way of specifying that you always want the latest Release Update.