Troubleshooting Rabbit Hole: From Data Guard to Data Integrity Checks

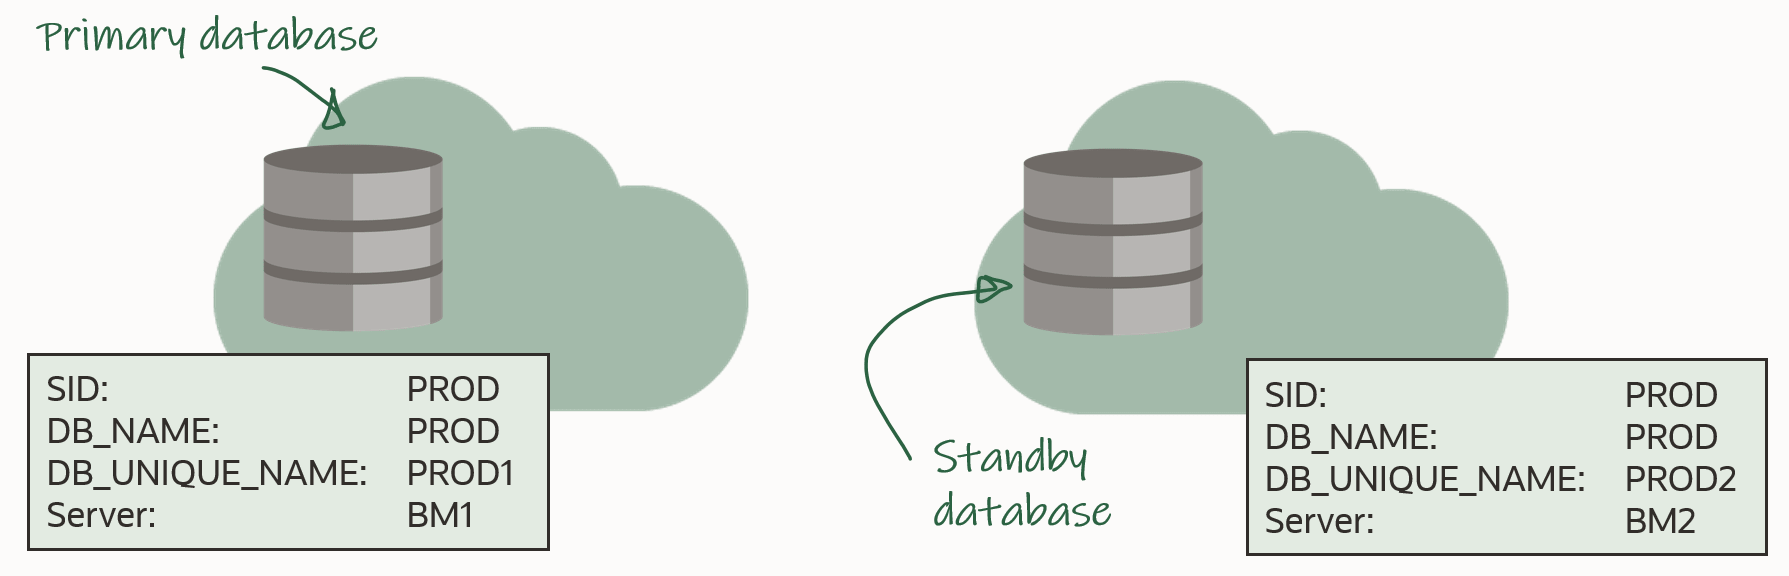
I always fear the worst when I get a TNS error. It’s not my expertise. A TNS error was exactly what I got while I configured a Data Guard environment. Redo Transport didn’t work; the redo logs never made it to the standby database.

The Error

I took a look in the alert log on the primary database and found this error:

2022-05-10T08:25:28.739917+00:00
"alert_SALES2.log" 5136L, 255034C
        TCP/IP NT Protocol Adapter for Linux: Version 12.2.0.1.0 - Production
  Time: 10-MAY-2022 18:09:02
  Tracing not turned on.
  Tns error struct:
    ns main err code: 12650

TNS-12650: No common encryption or data integrity algorithm
    ns secondary err code: 0
    nt main err code: 0
    nt secondary err code: 0
    nt OS err code: 0

A little further in the alert log, I found proof that the primary database could not connect to the standby database:

2022-05-10T18:09:02.991061+00:00
Error 12650 received logging on to the standby
TT04: Attempting destination LOG_ARCHIVE_DEST_2 network reconnect (12650)
TT04: Destination LOG_ARCHIVE_DEST_2 network reconnect abandoned
2022-05-10T18:09:02.991482+00:00
Errors in file /u01/app/oracle/diag/rdbms/sales2_fra3cx/SALES2/trace/SALES2_tt04_75629.trc:
ORA-12650: No common encryption or data integrity algorithm
Error 12650 for archive log file 1 to '...'

The Investigation

As always, Google it! Although I have used DuckDuckGo for privacy reasons instead of Google for many years, I still say google it, which is fairly annoying.

The search revealed this MOS note: ORA-12650: No Common Encryption Or Data Integrity Algorithm When Using SQLNET.CRYPTO_CHECKSUM_TYPES_SERVER=sha256 (Doc ID 2396891.1) Although it is fairly old, it led me to look for issues with data integrity checks defined in sqlnet.ora.

The primary database had the following defined in sqlnet.ora:

SQLNET.CRYPTO_CHECKSUM_SERVER=REQUIRED
SQLNET.CRYPTO_CHECKSUM_TYPES_SERVER=(SHA1)
SQLNET.CRYPTO_CHECKSUM_CLIENT=REQUIRED
SQLNET.CRYPTO_CHECKSUM_TYPES_CLIENT=(SHA1)

The above means that any connection made to or from this database must use data integrity checks. CRYPTO_CHECKSUM_SERVER and CRYPTO_CHECKSUM_CLIENT defines that. Also, the database will only accept connections using the SHA1 algorithm.

Then I looked in sqlnet.ora on the standby database:

SQLNET.CRYPTO_CHECKSUM_CLIENT=ACCEPTED
SQLNET.CRYPTO_CHECKSUM_SERVER=ACCEPTED
SQLNET.CRYPTO_CHECKSUM_TYPES_CLIENT=(SHA256,SHA384,SHA512,SHA1)
SQLNET.CRYPTO_CHECKSUM_TYPES_SERVER=(SHA256,SHA384,SHA512)

This database does not require data integrity checks. But if the other party requests or requires it, then the server is fine with it. That’s the meaning of ACCEPTED. But look at the allowed algorithms. When acting as server (i.e. receiving connections from someone else), it does not allow SHA1 algorithm, the only one allowed by the counterpart.

The Solution

I decided to remove all instances of SHA1 because:

  • It is an old algorithm
  • Any 12c database or client supports newer algorithms
  • In this environment, I don’t have any old 11g servers or clients

I added all the SHA-2 algorithms as supported algorithms. Now, sqlnet.ora in both databases look like this:

SQLNET.CRYPTO_CHECKSUM_TYPES_CLIENT=(SHA256,SHA384,SHA512)
SQLNET.CRYPTO_CHECKSUM_TYPES_SERVER=(SHA256,SHA384,SHA512)

This solved the problem and now redo transport worked fine.

If I wanted to go maximum security, I should allow only the SHA512 algorithm in both sqlnet.ora files:

SQLNET.CRYPTO_CHECKSUM_TYPES_CLIENT=(SHA512)
SQLNET.CRYPTO_CHECKSUM_TYPES_SERVER=(SHA512)

And force both databases to always use data integrity checks:

SQLNET.CRYPTO_CHECKSUM_SERVER=REQUIRED
SQLNET.CRYPTO_CHECKSUM_CLIENT=REQUIRED

Security

Some questions I asked myself while reading the Security Guide 19c.

Why do you want data integrity checks in our connections?

To protect against two types of attack:

  1. Data modification attack An unauthorized party intercepting data in transit, altering it, and retransmitting it is a data modification attack. For example, intercepting a $100 bank deposit, changing the amount to $10,000, and retransmitting the higher amount is a data modification attack.
  2. Replay attack Repetitively retransmitting an entire set of valid data is a replay attack, such as intercepting a $100 bank withdrawal and retransmitting it ten times, thereby receiving $1,000.

Can I do more to strengthen security in sqlnet.ora?

Yes. You should definitely also take a look at network encryption to protect data-in-transit. Take a look at Configuring Oracle Database Native Network Encryption and Data Integrity in the Security Guide 19c. These four parameters are of interest:

Also, reading Securing the Oracle Database – A technical primer can inspire you.

What’s wrong with SHA-1?

It’s old and has been made insecure by computer evolution. From Wikipedia:

In cryptography, SHA-1 (Secure Hash Algorithm 1) is a cryptographically broken but still widely used hash function which takes an input and produces a 160-bit (20-byte) hash value known as a message digest – typically rendered as a hexadecimal number, 40 digits long. It was designed by the United States National Security Agency, and is a U.S. Federal Information Processing Standard.

Since 2005, SHA-1 has not been considered secure against well-funded opponents; as of 2010 many organizations have recommended its replacement. NIST formally deprecated use of SHA-1 in 2011 and disallowed its use for digital signatures in 2013. As of 2020, chosen-prefix attacks against SHA-1 are practical. As such, it is recommended to remove SHA-1 from products as soon as possible and instead use SHA-2 or SHA-3. Replacing SHA-1 is urgent where it is used for digital signatures.

I Never Meet Joel, But I Have Met His Spirit #JoelKallmanDay

I didn’t know Joel Kallman. I heard about his name, and I knew he had something to do with APEX. But we never had to opportunity to meet each other. After his untimely death, I became aware of his huge impact on the Oracle community. So many people shared so many great stories about him and how he influenced the Oracle community. It became apparent to me how much he meant for the Oracle community.

This post is about the Oracle community. When I started working with Oracle, I quickly found out how great the community was. People were happily sharing knowledge – on blogs, at conferences, in videos. I was blown away by the amount of help and guidance I could get. For free – and even with a huge smile on top of that. I was a rookie and all that help made a huge difference. This is what I mean – when I say I believe I have met Joel’s spirit. But still, after many years working with Oracle, I use and value the community.

Since I joined Oracle, it has been on my to-do list to do a rolling upgrade. I never tried that for real. Last week, I had time to try out rolling upgrades with DBMS_ROLLING. Provision a Data Guard environment, open the documentation, get a cup of coffee, and off we go…

At one point, I was stuck. Like in – really stuck! Friday night – even after trying Connor’s gin/tonic debugging – still stuck. Saturday morning – after a good night’s, sleep still stuck. Errors, errors, errors!

Luckily, I attended a talk at UKOUG Tech Talk in April this year about rolling upgrades. Clive and Zahid did a really good presentation on rolling upgrades with a lot of valuable technical knowledge. Flip through the slides, and then – voila – problem solved. Now I could proceed with the upgrade. Thanks Clive, thanks Zahid.

If it hadn’t been for the community – for people happily sharing knowledge and helping each other – for Joel’s spirit, I would probably still be stuck in that rolling upgrade.

Never stop sharing knowledge!

New Webinars Coming Your Way

These days there is an abundance of virtual events. I feel exhausted from it from time to time. So you might ask yourself. Is there really room for virtual events?

The answer is: Yes, there is :-)

We have added more upcoming webinars to our Virtual Classroom Series: Upgrade to Oracle Database 19c. If you enjoyed the previous ones, I am sure that you will love these as well.

Webinar Date Sign Up
10 How Low Can You Go? Zero Downtime Operations October 21, 2021 Link
11 Secure Your Job – Fallback Is Your Insurance November 11, 2021 Link
12 Migrating Very Large Databases December 9, 2021 Link
13 Data Pump Extreme – Deep Dive with Development January 27, 2022 Link

Of course, we still keep our promise to you: All tech – no marketing, no buzzwords

If you miss any of the webinars, head over to the Webinar page and find the recording and the slides. All the previous nine webinars are there as well.

I hope to see you there!

Oracle Database 21c Is Here

Last week Oracle released Oracle Database 21c for additional platforms: Linux and Exadata. Other platforms will follow. You should keep an eye out for Release Schedule of Current Database Releases (Doc ID 742060.1) for further information.

Things to Notice

In my part of the Oracle Database, there are things to notice. I want to highlight:

To get all the details, visit the Upgrade and Utilities part of the new features documentation. There are some good examples of how the features can be used.

Behaviour Changes

Read-Only Oracle Home (ROOH) is now the default. Be sure to set the following environment variables to control the location of these directories:

  • ORACLE_BASE_HOME
  • ORACLE_BASE_CONFIG

I like ROOH, but it takes some time to get used to. For instance, network/admin files (tnsnames, sqlnet) and dbs files (pfile, spfile) are now in a new location.

The Pre-Upgrade Information Tool or preupgrade.jar is removed and replaced by AutoUpgrade. A few new parameters have been introduced to make the transition easier.

Innovation Release

Remember, 21c is an innovation release, which means a shorter support window than Long Term Releases such as Oracle Database 19c. If you adopt Innovation Releases, you should be prepared to upgrade to the next database release within one year after the next database release ships.

I would not recommend that you upgrade your production systems to Oracle Database 21c due to the limited support period. Not unless you are prepared to upgrade the database soon again – when support runs out. Oracle Database 19c is the current Long Term Support release. I recommend that for production databases.

Different release types for Oracle Database - innovation vs long term support

To learn more about innovation release and our release model, have a look at our slide deck. We discuss it in the first chapter.

New Features

I want to mention a few new features. They haven’t attracted as much attention as the marque features, but they are still cool.

Expression based init.ora parameters make it possible to base database parameters (init.ora) on calculations made on the system’s configuration. For example, setting the database parameter CPU_COUNT to half the number of CPUs (Windows):

alter system set cpu_count='$NUMBER_OF_PROCESSORS/2';

For more details, check out my video on YouTube.

Placeholders in SQL DDL Statements can improve application security because sensitive information, like passwords, doesn’t need to be hardcoded in SQL DDL. Example: You can make this statement:

CREATE USER :!username IDENTIFIED BY :!password ...

And Oracle Call Interface programs can substitute the placeholders into:

CREATE USER "DANIEL" IDENTIFIED BY "MyS3cr3tP!d" ...

This is similar to data binding but occurs in Oracle Client.

Conclusion

The complete 21c documentation is online, so I suggest that you head on over there and have a look. In the upgrade guide, you can find the list of behavior changes and also deprecated and desupported functionality. And finally, but most interesting perhaps, is Learning Database New Features.

Try it out in Always Free ADB or explore the Oracle LiveLabs.

Follow-up On Cool Features Webinar – Jan 2021

Wow! Mike and I gave a webinar yesterday: Cool Features – not only for DBAs. We showed a lot of cool features – and the audience recognised that by asking really cool questions. We had more than 100 questions to answer live, and below you can find the answer to those questions that we had to investigate further.

But first a few practical remarks:

Virtual Classroom Series - Upgrade to Oracle Database 19c

Expression Based Parameters

Ahh – one of my new favourites. A viewer asked whether there is any syntax check when you make an expression based parameter. So lets try. First command should work:

SQL> alter session set resumable_timeout='3000/2';

Session Altered.

Now, let’s make a syntax error and see what happens:

SQL> alter session set resumable_timeout='3000//2';

ORA-32005: error while parsing size specification [3000//2]

SQL> alter system set resumable_timeout='3000//2';

ORA-32005: error while parsing size specification [3000//2]

SQL> alter system set resumable_timeout='3000//2' scope=both;

ORA-32005: error while parsing size specification [3000//2]

SQL> alter system set resumable_timeout='3000//2' scope=memory;

ORA-32005: error while parsing size specification [3000//2]

SQL> alter system set resumable_timeout='3000//2' scope=spfile;

ORA-32005: error while parsing size specification [3000//2]

Conclusion: Your expressions are checked when you issue the ALTER SESSION or ALTER SYSTEM command.

But take care when using environment variables in your expressions. If the environment variable is available when you issue the statement, the command will succeed. However, if the environment variable is not present when the database restarts, then you will have a problem. This could be the case if you forget to add the environment variable to your profile or the environment in Grid Infrastructure (srvctl setenv). If this happens, the startup will error out.

And finally, the expressions you put into a pfile are not checked before the database starts using that pfile. If there are invalid expressions in your pfile, the database startup will error out as well.

Online Table Move

Indexes and LOBs

When you move a table online the indexes remain valid during and after the move. Optionally, you can specify the UPDATE INDEXES clause to change the index storage attributes as well (like moving index to a new tablespace):

SQL> alter table t1 move online tablespace data update indexes(i1 tablespace data);

The initial version of blog post claimed that indexes become unusable during online table move unless you specified the UPDATE INDEXES clause. This is not true! Kudos to Olaf Nowatzki for information me. Thanks!

The LOB segments that are created to support the LOB columns remain in the same tablespace, even if you move the table to a new tablespace. But if you want, you can also move the LOB segment as well:

SQL> alter table t1 move online tablespace data lob(c1) store as (tablespace data);

A viewer was concerned whether he could move a table online and also update indexes because one of the indexes was really wide. Apparently, in a previous version this had been an issue to them. I tested this out with an index on 10 columns defined as VARCHAR2(128 BYTE). And this was not a problem. If you index is even wider; test it yourself – or consider whether you really need such an index.

It is supported move an IOT online as well – but not partitioned IOTs.

The Rest

If the table has unused columns when you move it, it will still have unused columns. They are not affected by a move operation. Actually, Connor McDonald made a really good video where he talks about unused columns.

Also, an attendee wanted to know whether the online command generated more UNDO or TEMP. Let’s see what happens with my 125 MB large table (no indexes):

Metric Online move Regular move
undo change vector size 96504 37988
session pga memory 5750416 4243088

As you can see it does require more UNDO to move the table online. But the numbers might change on a busy system with many indexes and LOBs. TEMP appears to be relative unaffected – it might change if I have unique indexes and must rebuild those. Lesson learned – expect more resource usage – test before trying in production.

And finally – does online table move work on tables with OLS (Label Security) policies? I don’t know – so far I haven’t been able to get confirmation. My immediate answer is NO. Take for instance DBMS_REDEFINITION – it is not supported when the table has OLS policies, so I assume the same applies for online table move.

Online Convert To Partitioned Table

This feature only works on a non-partitioned (or regular table). If your table is already partitioned, and you want to change to a different partitioning method, you must use another method (like DBMS_REDEFINITION).

Online Data File Move

When you move a data file online, the database creates an exact copy of the data file in the new location. It is bit-by-bit identifical.

This also means that any free space in the data file is not reclaimed, nor is the High Water Mark affected.

Standby Database Operations

I demoed how the standby database in 19c can do automatic flashback, when the primary database flashes back. A viewer asked whether you can flash back to the same restore point multiple times without the standby database complaining.

My immediate answer was: yes, you can flash back to the same restore point multiple times. The documentation doesn’t mention such a restriction, so I was eager to try it out.

I made a data guard setup in OCI and I was able to flash back to the same restore point three times – and the standby database followed each time.

Gradual Password Rollover

With gradual password rollover a user can temporarily have two passwords. A viewer asked whether you can identify the sessions that are still connecting with the old password. And you can with unified audit trail provided you are auditing logons. In that case simply look at the AUTHENTICATION_TYPE column of the audit entries for LOGON actions:

SQL> select   authentication_type, event_timestamp 
     from     unified_audit_trail 
     where    action_name='LOGON' and dbusername='APP_USER' 
     order by event_timestamp;

Your result will be something like:

authentication_type
(TYPE=(DATABASE));(CLIENT ADDRESS=((PROTOCOL=tcp)(HOST=10.0.1.225)(PORT=24974)));(LOGON_INFO=((VERIFIER=12C-NEW) (CLIENT_CAPABILITIES=O5L_NP,O7L_MR,O8L_LI)));
(TYPE=(DATABASE));(CLIENT ADDRESS=((PROTOCOL=tcp)(HOST=10.0.1.225)(PORT=24983)));(LOGON_INFO=((VERIFIER=12C-OLD) (CLIENT_CAPABILITIES=O5L_NP,O7L_MR,O8L_LI)));

Look at the VERIFIER information. If a user is using the old password in a rollover period, the identifier is suffixed -OLD. Similar, the suffix is -NEW if the new password is used.

This is a very useful addition to gradual password rollover.

Conclusion

Thanks to everyone that participated today. We had so much fun preparing the webinar for you. And really – thanks for all the cool questions. Doing stuff remote is really hard, and you really feel disconnected from the audience. But it helps a lot with good questions.

See you next time.

How to Upgrade with AutoUpgrade and Data Guard

This is a deprecated blog post. It is kept for reference only. Please visit the updated blog post series.


You can upgrade your database to a new release with AutoUpgrade and keep the Data Guard setup intact. The standby database(s) can be upgraded implicitly via the redo from the primary database, and there is no need to rebuild the standby database after upgrade.

The process: Overview of upgrade with a data guard

In the following I will be using this setup: Overview of the environment that is used for this procedure

In advance, you should install the new Oracle Home on both primary and standby host. The two Oracle Homes should have the same patches applied, and I recommend that you always apply the latest Release Update.

Before Upgrade

You must use AutoUpgrade version 21.1.1 or newer. A newer version of AutoUpgrade can upgrade to older database releases as well, so don’t worry if the AutoUpgrade version doesn’t match the Oracle Database release that you are upgrading to.

AutoUpgrade can handle a Data Guard environment that is manually configured or via Data Guard Broker.

The procedure starts right before you start AutoUpgrade in DEPLOY mode (or alternatively in FIXUPS mode). Downtime has started and users are no logged connected to the database.

Stop Data Guard

On the standby database, generate commands to copy the Data Guard broker config files. Don’t execute them yet:

PROD2 SQL> select 'cp ' || value || ' /tmp' as cmd from v$parameter where name like 'dg_broker_config_file%';

Shut down the standby database. Disabling the database is strictly speaking not necessary, but a better-safe-than-sorry approach:

[oracle@bm2]$ $ORACLE_HOME/bin/srvctl stop database -d PROD2 -stopoption immediate
[oracle@bm2]$ $ORACLE_HOME/bin/srvctl disable database -d PROD2

If you are not managing the database with Grid Infrastructure (GI), just do a regular shutdown:

PROD2 SQL> shutdown immediate

Now, copy the broker config files into a temporary location. Use the cp commands that was executed earlier

[oracle@bm2]$ cp <broker_config_1> /tmp
[oracle@bm2]$ cp <broker_config_2> /tmp

Since redo transport has not been deferred yet in the primary database, it will complain about losing connection to the standby database. The alert log will contain an entry similar to this:

2020-12-03T06:30:12.751693+00:00
TT03 (PID:47477): Attempting LAD:2 network reconnect (3113)
TT03 (PID:47477): LAD:2 network reconnect abandoned
2020-12-03T06:30:12.752104+00:00
Errors in file /u01/app/oracle/diag/rdbms/prod1/PROD/trace/PROD_tt03_47477.trc:
ORA-03113: end-of-file on communication channel
TT03 (PID:47477): Error 3113 for LNO:3 to 'prod2'

It can be safely ignored, because it is after all a maintenance window and the database is about to be upgraded. Your monitoring system might detect this and start to complain.

Upgrade

Upgrade the database by starting AutoUpgrade in DEPLOY mode. AutoUpgrade will defer redo transport and stop Data Guard broker (if in use) automatically:

java -jar autoupgrade.jar -config PROD.cfg -mode deploy

After the upgrade you should perform the necessary tests to validate the new database release. Only when you are convinced to go live on the new release, you should continue.

Remember that the standby database was left behind before we started touching anything, so if all other fails, simply restart the standby database, and connect your users to it.

After Upgrade

Restart Data Guard

Update the listener on the standby host. Be sure to update the Oracle Home information in the listener.ora entry. Note, that your listener.ora might be stored in a non-default location, so use lsnrctl status to get the location. Finally, reload the listener:

[grid@bm2]$ $GRID_HOME/bin/lsnrctl status
[grid@bm2]$ vi $GRID_HOME/network/admin/listener.ora
[grid@bm2]$ $GRID_HOME/bin/lsnrctl reload

For the next commands, I will be using the same prompt, and I will need the following environment variables:

[oracle@bm2]$ export OLD_HOME=/u01/app/oracle/product/18.0.0.0/dbhome_1
[oracle@bm2]$ export NEW_HOME=/u01/app/oracle/product/19.0.0.0/dbhome_1
[oracle@bm2]$ export ORACLE_HOME=$NEW_HOME
[oracle@bm2]$ export ORACLE_SID=PROD
[oracle@bm2]$ #Set ORACLE_UNQNAME to DB_UNIQUE_NAME
[oracle@bm2]$ export ORACLE_UNQNAME=PROD2 

Next, if the standby database is using TNS_ADMIN in the default location ($ORACLE_HOME/network/admin), then be sure to copy the relevant TNS aliases into the new tnsnames.ora. There should be TNS aliases to the primary and standby database. Or, if there are no other databases in the same Oracle Home, you can simply copy the files:

[oracle@bm2]$ #Back up files
[oracle@bm2]$ cp $NEW_HOME/network/admin/sqlnet.ora $NEW_HOME/network/admin/sqlnet.ora.backup
[oracle@bm2]$ cp $NEW_HOME/network/admin/tnsnames.ora $NEW_HOME/network/admin/tnsnames.ora.backup
[oracle@bm2]$ #Copy from old to new home
[oracle@bm2]$ cp $OLD_HOME/network/admin/sqlnet.ora $NEW_HOME/network/admin
[oracle@bm2]$ cp $OLD_HOME/network/admin/tnsnames.ora $NEW_HOME/network/admin

Now, you can edit /etc/oratab and update the information about the Oracle Home to match the new Oracle Home. In my example, the database is managed by GI, so I should not configure auto-start in /etc/oratab. If you are not managing your databases with GI, you probably want to configure the standby database to start automatically (see appendix):

[oracle@bm2]$ #Backup file
[oracle@bm2]$ cp /etc/oratab /tmp/oratab
[oracle@bm2]$ #Use sed to remove the line that starts with ORACLE_SID
[oracle@bm2]$ sed '/^'"$ORACLE_SID"':/d' /tmp/oratab > /etc/oratab
[oracle@bm2]$ #Add new entry
[oracle@bm2]$ echo "$ORACLE_SID:$ORACLE_HOME:N" >> /etc/oratab

Copy SPFile and password file to the new Oracle Home:

[oracle@bm2]$ cp $OLD_HOME/dbs/orapw$ORACLE_SID $ORACLE_HOME/dbs
[oracle@bm2]$ cp $OLD_HOME/dbs/spfile$ORACLE_SID.ora $ORACLE_HOME/dbs

Copy the broker config files into the new Oracle Home. If you store your broker config files outside of the Oracle Home this might not be necessary to you:

[oracle@bm2]$ export ORACLE_HOME=/u01/app/oracle/product/19.0.0.0/dbhome_1
[oracle@bm2]$ export ORACLE_UNQNAME=PROD2 
[oracle@bm2]$ cp /tmp/dr1$ORACLE_UNQNAME.dat $ORACLE_HOME/dbs
[oracle@bm2]$ cp /tmp/dr2$ORACLE_UNQNAME.dat $ORACLE_HOME/dbs

Upgrade the database in GI, which updates the Oracle Home information, so GI will start the database in the correct Oracle Home. Next, re-enable and start the database:

[oracle@bm2]$ $ORACLE_HOME/bin/srvctl upgrade database -db $ORACLE_UNQNAME -oraclehome $ORACLE_HOME
[oracle@bm2]$ $ORACLE_HOME/bin/srvctl modify database -db $ORACLE_UNQNAME -startoption MOUNT -role PHYSICAL_STANDBY
[oracle@bm2]$ $ORACLE_HOME/bin/srvctl enable database -d $ORACLE_UNQNAME
[oracle@bm2]$ $ORACLE_HOME/bin/srvctl start database -d $ORACLE_UNQNAME

Or, if you are not using GI, simply start the database in the new Oracle Home:

PROD2 SQL> startup mount

Re-enable Data Guard

To re-enable the Data Guard config use DG CLI:

[oracle@bm1]$ $ORACLE_HOME/bin/dgmgrl sys@PROD1

And re-enable redo transport:

DGMGRL SYS@PROD1> edit database prod1 set state=transport-on;

Now, redo is shipping to the standby database, and it will apply it. When the redo that was generated during the upgrade is applied on the standby database, it is implicitly upgraded. You can monitor the progress of the apply by looking at the Apply Lag information. The Apply Lag will decrease until the standby database eventually catches up and they are fully synchronized:

DGMGRL SYS@PROD1> show database prod2;

The apply lag will continue to decrease when the redo stream is applied on the standby, and, thus, implicitly upgrades the database

Test

Use the broker to ensure everything is fine:

DGMGRL SYS@PROD1> show configuration
DGMGRL SYS@PROD1> show database prod1
DGMGRL SYS@PROD1> show database prod2

You should have SUCCESS listed for both databases Use Data Guard Broker to verify data guard setup after upgrade

Let’s validate the setup and try to make a switchover. The database will not allow a switchover if there are any problems in the Data Guard setup. It is a good way of checking things are fine:

DGMGRL SYS@PROD1> validate database prod1
DGMGRL SYS@PROD1> validate database prod2
DGMGRL SYS@PROD1> switchover to prod2

After upgrading a primary database (data guard) with autoupgrade you can use validate database to ensure everything is fine

If you don’t use Data Guard Broker, you use regular SQLs and SQLPlus to verify the Data Guard environment.

Conclusion

It is actually not that complicated to upgrade your database, even if it is part of a Data Guard setup. And with version 21.1.1 of AutoUpgrade is has become easier. A little extra legwork is needed to take care of the standby database. But the good thing is that your Data Guard setup is maintained throughout the process.

I made a video on YouTube that shows the procedure. And while you are there, I suggest that you subscribe to our channel.

Appendix

Config File

For your reference this is the config file, that I used. It contains only the required information. All other parameters have a default value:

upg1.sid=PROD
upg1.source_home=/u01/app/oracle/product/18.0.0.0/dbhome_1
upg1.target_home=/u01/app/oracle/product/19.0.0.0/dbhome_1

Synchronize Standby Database

When you run un AutoUpgrade in ANALYZE mode and check the preupgrade report, you will find this information message:

[checkname]          SYNC_STANDBY_DB
[stage]              PRECHECKS
[fixup_available]    NO
[runfix]             N/A
[severity]           INFO
[action]             Synchronize your standby databases before database upgrade.
[broken rule]        The standby database is not currently synchronized with its associated primary database.
[rule]               To keep data in the source primary database synchronized with its associated standby databases, all standby databases must be synchronized before database upgrade.  See My Oracle Support Note 2064281.1 for details.

What does it say? Basically, it says that all redo generated on the primary database before the downtime window started, should be sent to and applied on the standby database. This way, your standby database is ready to replace your primary database at any time, if something goes really wrong. Strictly speaking it is not necessary to ensure that, but it is strongly recommended.

GI-managed Database in /etc/oratab

When the database is managed by GI, you don’t need to have it configured in /etc/oratab. Personally, I like to have it anyway, because then you have a clear overview of what databases are on the server, and you can use /etc/oratab to set your environment, like when you are using oraenv script.

But I know that die-hard GI-folks might roll their eyes when I say it, but I like it this way.

Further Reading

Leave 2020 with a Smile

We can all agree 2020 was a bad year. Let’s hope 2021 will be much better.

Over the last months I have made a lot of videos, which is really hard work. Especially since I am not a native English speaker, I often need to re-take a video several times. I saved all my bad recordings and I decided to create a bloopers video. I hope it can help you leave 2020 with a smile.

In case you are taking some time off in the coming days and you get a little bored, I suggest you head over to our YouTube channel and catch up on some tech-stuff.

See you next year,

Daniel

How to Upgrade with Data Guard

This is a deprecated blog post. It is kept for reference only. Please visit the updated blog post series.


You can upgrade your database to a new release, and keep the data guard setup intact. The standby database(s) can be upgraded implicitly via the redo from the primary database, and there is no need to rebuild the standby database after upgrade.

The process: Overview of upgrade with a data guard

In the following I will be using this setup: Overview of the environment that is used for this procedure

In advance, you should install the new Oracle Home on both primary and standby host. The two Oracle Homes should have the same patches applied, and I recommend that you always apply the latest Release Update.

Before Upgrade

The procedure starts right before you run the preupgrade fixups. Downtime has started and users are no logged connected to the database.

Disable Data Guard Broker

If you don’t use Data Guard Broker, you can skip this chapter and go to the chapter Stop Data Guard. Connect to the broker and disable Fast Start Failover:

DGMGRL SYS@PROD1> disable fast_start failover

Next, you disable the broker configuration:

DGMGRL SYS@PROD1> disable configuration

Then, you can shut down the broker in the primary. Make a copy of the broker configuration files. Use the below SQL to generate commands to copy the files. Remember to execute the commands generated:

PROD1 SQL> alter system set dg_broker_start=false scope=both;
PROD1 SQL> select 'host cp ' || value || ' /tmp' as cmd from v$parameter where name like 'dg_broker_config_file%';
PROD1 SQL> --Now, execute the commands
PROD1 SQL> host ls /tmp/dr*.dat

Finally, you do the same for the standby database:

PROD2 SQL> alter system set dg_broker_start=false scope=both;
PROD2 SQL> select 'host cp ' || value || ' /tmp' as cmd from v$parameter where name like 'dg_broker_config_file%';
PROD1 SQL> --Now, execute the commands
PROD2 SQL> host ls /tmp/dr*.dat

Stop Data Guard

On the primary database, defer the redo log transport to the standby database. Strictly speaking, this is not necessary, but I do it from a "better-safe-than-sorry" aspect. Be sure to verify that log_archive_dest_state_2 is the actual archive destination for your standby database:

PROD1 SQL> show parameter log_archive_dest_2
PROD1 SQL> alter system set log_archive_dest_state_2='defer' scope=both;

Next, you cancel redo apply on the standby database:

PROD2 SQL> alter database recover managed standby database cancel;

Finally, you shut down the database:

PROD2 SQL> shutdown immediate

If you are using Grid Infrastructure (GI) to manage the database, you should stop and disable the database. Disabling the database is strictly speaking not necessary, but again a "better-safe-than-sorry" approach:

[oracle@bm2]$ $ORACLE_HOME/bin/srvctl stop database -d PROD2
[oracle@bm2]$ $ORACLE_HOME/bin/srvctl disable database -d PROD2

Upgrade

Now you can upgrade the primary database using the method you prefer. Complete all the post-upgrade tasks and perform the necessary tests to validate the new database release.

If something happens during upgrade and you want to revert, you can flash back the database (or restore on Standard Edition) and simply undo the before upgrade steps (start by enabling database, starting database, starting redo apply and so forth).

Remember that the standby databases was left behind before we started touching anything, so if all other fails, simply restart the standby database, and connect your users to it.

After Upgrade

Restart Data Guard

When you are happy with the upgrade, and your tests validate the new database release, you can proceed.

Update the listener on the standby host. Be sure to update the Oracle Home information in the listener.ora entry. Note, that your listener.ora might be stored in a non-default location, so use lsnrctl status to get the location. Finally, reload the listener:

[grid@bm2]$ $GRID_HOME/bin/lsnrctl status
[grid@bm2]$ vi $GRID_HOME/network/admin/listener.ora
[grid@bm2]$ $GRID_HOME/bin/lsnrctl reload

For the next commands, I will be used the same prompt, and I will need the following environment variables:

[oracle@bm2]$ export OLD_HOME=/u01/app/oracle/product/18.0.0.0/dbhome_1
[oracle@bm2]$ export NEW_HOME=/u01/app/oracle/product/19.0.0.0/dbhome_1
[oracle@bm2]$ export ORACLE_HOME=$NEW_HOME
[oracle@bm2]$ export ORACLE_SID=PROD
[oracle@bm2]$ #Set ORACLE_UNQNAME to DB_UNIQUE_NAME
[oracle@bm2]$ export ORACLE_UNQNAME=PROD2 

Next, if the standby database is using TNS_ADMIN in the default location ($ORACLE_HOME/network/admin), then be sure to copy the relevant TNS aliases into the new tnsnames.ora. There should be TNS aliases to the primary and standby database. Or, if there are no other databases in the same Oracle Home, you can simply copy the files:

[oracle@bm2]$ #Back up files
[oracle@bm2]$ cp $NEW_HOME/network/admin/sqlnet.ora $NEW_HOME/network/admin/sqlnet.ora.backup
[oracle@bm2]$ cp $NEW_HOME/network/admin/tnsnames.ora $NEW_HOME/network/admin/tnsnames.ora.backup
[oracle@bm2]$ #Copy from old to new home
[oracle@bm2]$ cp $OLD_HOME/network/admin/sqlnet.ora $NEW_HOME/network/admin
[oracle@bm2]$ cp $OLD_HOME/network/admin/tnsnames.ora $NEW_HOME/network/admin

Now, you can edit /etc/oratab and update the information about the Oracle Home to match the new Oracle Home:

[oracle@bm2]$ vi /etc/oratab

Copy SPFile and password file to the new Oracle Home:

[oracle@bm2]$ cp $OLD_HOME/dbs/orapw$ORACLE_SID $ORACLE_HOME/dbs
[oracle@bm2]$ cp $OLD_HOME/dbs/spfile$ORACLE_SID.ora $ORACLE_HOME/dbs

If you are using GI to manage the database, you must upgrade the database, meaning updating the Oracle Home information, so GI will start the database in the correct Oracle Home. Next, re-enable and start the database:

[oracle@bm2]$ $ORACLE_HOME/bin/srvctl upgrade database -db $ORACLE_UNQNAME -oraclehome $ORACLE_HOME
[oracle@bm2]$ $ORACLE_HOME/bin/srvctl modify database -db $ORACLE_UNQNAME -startoption MOUNT -role PHYSICAL_STANDBY
[oracle@bm2]$ $ORACLE_HOME/bin/srvctl enable database -d $ORACLE_UNQNAME
[oracle@bm2]$ $ORACLE_HOME/bin/srvctl start database -d $ORACLE_UNQNAME

Or, if you are not using GI, simply start the database:

PROD2 SQL> startup mount

Re-enable Redo Log Transport and Apply

On the primary database re-enable redo log transport to standby database:

PROD1 SQL> alter system set log_archive_dest_state_2='enable' scope=both;

On the standby database restart redo apply

PROD2 SQL> alter database recover managed standby database disconnect from session;

Re-enable Data Guard Broker

First, we need to copy the broker config files into the new Oracle Home. If you store your broker config files outside of the Oracle Home this might not be necessary to you:

[oracle@bm1]$ export ORACLE_HOME=/u01/app/oracle/product/19.0.0.0/dbhome_1
[oracle@bm1]$ export ORACLE_UNQNAME=PROD1
[oracle@bm1]$ cp /tmp/dr1$ORACLE_UNQNAME.dat $ORACLE_HOME/dbs
[oracle@bm1]$ cp /tmp/dr2$ORACLE_UNQNAME.dat $ORACLE_HOME/dbs

Do the same on the standby database host:

[oracle@bm2]$ export ORACLE_HOME=/u01/app/oracle/product/19.0.0.0/dbhome_1
[oracle@bm2]$ export ORACLE_UNQNAME=PROD2 
[oracle@bm2]$ cp /tmp/dr1$ORACLE_UNQNAME.dat $ORACLE_HOME/dbs
[oracle@bm2]$ cp /tmp/dr2$ORACLE_UNQNAME.dat $ORACLE_HOME/dbs

Now, you can restart the Data Guard Broker on both primary and standby database:

PROD1 SQL> alter system set dg_broker_start=true scope=both;

PROD2 SQL> alter system set dg_broker_start=true scope=both;

Finally, enable the broker configuration and fast start failover:

DGMGRL SYS@PROD1> show configuration
DGMGRL SYS@PROD1> enable configuration
DGMGRL SYS@PROD1> enable fast_start failover

Test

Use the broker to ensure everything is fine:

DGMGRL SYS@PROD1> show configuration
DGMGRL SYS@PROD1> show database prod1
DGMGRL SYS@PROD1> show database prod2

You should have SUCCESS listed for both databases Use Data Guard Broker to verify data guard setup after upgrade

Let’s try to make a switchover:

DGMGRL SYS@PROD1> switchover to prod2

If you don’t use Data Guard Broker, you use regular SQLs and SQLPlus to verify the data guard environment.

Conclusion

It is actually not that complicated to upgrade your database, even if it is part of a data guard setup. A little extra legwork is needed to take care of the standby database. But the good thing is that your DR setup is maintained althroughout the process.

I made a video on YouTube that shows the procedure. And while you are there, I suggest that you subscribe to our channel.

Keep an eye out for coming versions of AutoUpgrade. At time of writing our developers are working on streamlining the process. We want upgrade with data guard to be 100 % automated (or as close to as possible).

Further Reading

Webinar: Upgrade Your Databases to 19c

Danish Oracle User Group - DOUG

Danish Oracle User Group is hosting a talk tomorrow on Upgrade Your Databases to 19c. I will be presenting and talk about:

Oracle Database 19c is the long term release and this talk is about how to get there. The emphasis is on the AutoUpgrade tool which is the new, recommended way for upgrades. There will be demos that describe how you can get started and the options, you have. In addition, we will cover upgrade best practices and deep insights into the process.

You need to upgrade to Oracle Database 19c and this talk will prepare you.

Time: 25 November 2020 15:00 CET/Copenhagen

The session is open to anyone, so if you are interested simply go their webpage and get the connection details. There is an English version of the text a little down the page. I will give the talk in English.

If you want to have a sneak peek on the slides, there are already published.

I hope to see you tomorrow.

XTTS: Introduction – Minimal Downtime Migration with Full Transportable Export Import and Incremental Backups

If you need to migrate a database to the cloud or anywhere else for that matter, you should consider using cross-platform transportable tablespaces and incremental backup (XTTS). Even for really large databases – 10s or 100s of TB – you can still migrate with minimal downtime. And it works across different endian formats. In fact, for the majority of cross-endian projects this method is used.

In addition to minimal downtime, XTTS has the following benefits:

  • You can implicitly upgrade the database by migrating directly into a higher release
  • You can migrate from a non-CDB and into a PDB
  • You can keep downtime at a minimum by using frequent incremental backups
  • You can migrate across endianness – e.g. from AIX or Solaris to Oracle Linux

Endian-what?

Endianness is determined by the operating system. Simplified, it determines in which order bytes are stored in memory:

  • Big endian: stores the most significant byte of a word at the smallest memory address.
  • Little endian: stores the least-significant byte at the smallest address.

Wikipedia has an article for the interested reader.

Which platform uses which endian format? There is a query for that:

SQL> select platform_name, endian_format from v$transportable_platform;

If your source and target platform does not use the same endian format, then you need a cross-endian migration.

How Does It Work

To concept is explained in this video on our YouTube Channel:

Basically, you need to migrate two things:

  • Data
  • Metadata

Data

The data itself is stored in data files and you will be using transportable tablespaces for this. Since the source and target platform are not the same, the data files must be converted to the new format. Only the data files that make up user tablespaces are transported. The system tablespaces, like SYSTEM and SYSAUX, are not transported.

If you have a big database, it will take a lot of time to copy the data files. Often this is a problem because the downtime window is short. To overcome this you can use a combination of RMAN full backups (backup set or image copies) and incremental backups.

There are a few ways to do this which is covered in the following MOS notes:

The first two methods are using version 3 of a Perl script (xttdriver.pl), whereas the last method uses version 4 of the same Perl script. Version 4 offers a much simplified method and I will use that version for this blog post series.

Version 4 of the Perl script has a list of requirements. If your project can’t meet these requirements, check if the previous version 3 can be used.

Metadata

Transferring the data files is just part of the project. Information on what is inside the data files, the metadata, is missing because the system tablespaces were not transferred. The metadata is needed by the target database, otherwise, the data files are useless. The Transportable Tablespace concept as a whole does not work for system tablespaces, but instead we can use Data Pump.

You can use either:

  • Traditional transportable tablespace
  • Or, the newer full transportable export/import (FTEX)

For this blog post series, I am only focusing on FTEX. But if you run into problems with FTEX, or if you can’t meet any of the FTEX requirements, you should look into the traditional transportable tablespace method.

Here are a few examples of metadata that Data Pump must transfer:

  • Users
  • Privileges
  • Packages, procedudes and functions
  • Table and index defintions (the actual rows and index blocks are in the data files)
  • Temporary tables
  • Views
  • Synonyms
  • Directories
  • Database links
  • And so forth

Conclusion

By using a combination of cross-platform transportable tablespaces and incremental backups, you can migrate even huge databases to the cloud. And it even works for cross-endian migrations, like AIX or Solaris to Oracle Linux.

You can watch our YouTube playlist and watch videos on cross-platform transportable tablespaces.

Further Reading

Other Blog Posts in This Series