
In Oracle Database 19c, use of sqlnet.ora to define the keystore (or wallet) location has been deprecated. Instead you should use the database parameter WALLET_ROOT. If you upgrade to Oracle Database 19c with AutoUpgrade, it has become a lot easier. Let AutoUpgrade do the work for you.
How To
If you instruct AutoUpgrade to use the new encryption parameters it will not only add the parameters to the SPFile but also copy the keystore file to the location defined. This is what you have to do:
- Create a text file which contains the definition of
WALLET_ROOTandTDE_CONFIGURATION. I call it /tmp/au-pfile-tde. Optionally, change the location of the keystore to fit your organization.
WALLET_ROOT='/etc/oracle/keystores/$ORACLE_SID'
TDE_CONFIGURATION='KEYSTORE_CONFIGURATION=FILE'
- Instruct AutoUpgrade to add those parameter during and after upgrade. Add the following to your AutoUpgrade config file:
upg1.add_during_upgrade_pfile=/tmp/au-pfile-tde
upg1.add_after_upgrade_pfile=/tmp/au-pfile-tde
That’s it! AutoUpgrade will detect that you are changing the keystore location, and it will copy the keystore files to the new location at the appropriate time.
Important
- When you use
WALLET_ROOTthe keystore files should always be stored in a subfolder called tde. This means that the keystore files will end up in /etc/oracle/keystores/$ORACLE_SID/tde. You should not add /tde manually toWALLET_ROOT. The database will do that automatically when it looks up the keystore. - If you want to move the keystore into ASM, there is a special procedure that you must follow. AutoUpgrade can’t do that for you. Check How To Migrate TDE Wallet From Local OS File System to ASM ? (Doc ID 2369614.1).
Now What
Since you have moved the keystore files to a new location there are some things that you should take care of:
- You can remove the sqlnet.ora parameter
ENCRYPTION_WALLET_LOCATION. It is not used anymore. - The keystore files that were stored in the old location (that defined by
ENCRYPTION_WALLET_LOCATION) can be moved manually to a backup location. I would never recommend that you delete keystore files – NEVER! Instead move the old files to a backup location and keep them there. - The keystore files are to be considered critical and contain sensitive information, so ensure that the new location has the same security measures as the old one – like:
- Restricted file permissions
- Auditing
- Backup
Background
Traditionally, if you have an encrypted database, you need to define the keystore location in sqlnet.ora using the parameter ENCRYPTION_WALLET_LOCATION. You would set it to something like this:
ENCRYPTION_WALLET_LOCATION=
 (SOURCE=
  (METHOD=FILE)
   (METHOD_DATA=
    (DIRECTORY=/etc/oracle/keystores/$ORACLE_SID)))
For many reasons, sqlnet.ora was not a good location for this parameter, and especially with the introduction of isolated keystore mode, a new method was needed.
In came WALLET_ROOT and TDE_CONFIGURATION database initialization parameters. The former, WALLET_ROOT, defines the location of the keystore. The latter, TDE_CONFIGURATION, defines which kind of keystore is in use. Typically, it is set to FILE – that’s when you use a software keystore (a file in the OS). But it could also be OKV if you are Oracle Key Vault.
For a software keystore you would set it to something like:
ALTER SYSTEM SET WALLET_ROOT='/etc/oracle/keystores/$ORACLE_SID' SCOPE=SPFILE;
ALTER SYSTEM SET TDE_CONFIGURATION='KEYSTORE_CONFIGURATION=FILE' SCOPE=SPFILE;
SHUTDOWN IMMEDIATE
STARTUP
Now, the database finds the keystore location using the WALLET_ROOT parameter which is much more smooth.
As of Oracle Database 19c, configuration the keystore using sqlnet.ora has been deprecated, and as with any other deprecated functionality, you should move to a fully supported alternative.
Further Reading
- Blog post: TDE from a Non-Security Guy
- Blog post: How to Stop Hardcoding Your TDE Keystore Password
- My Oracle Support: Latest version of AutoUpgrade
- Documentation: Configuring a Software Keystore
- Documentation: Security Considerations for Transparent Data Encryption


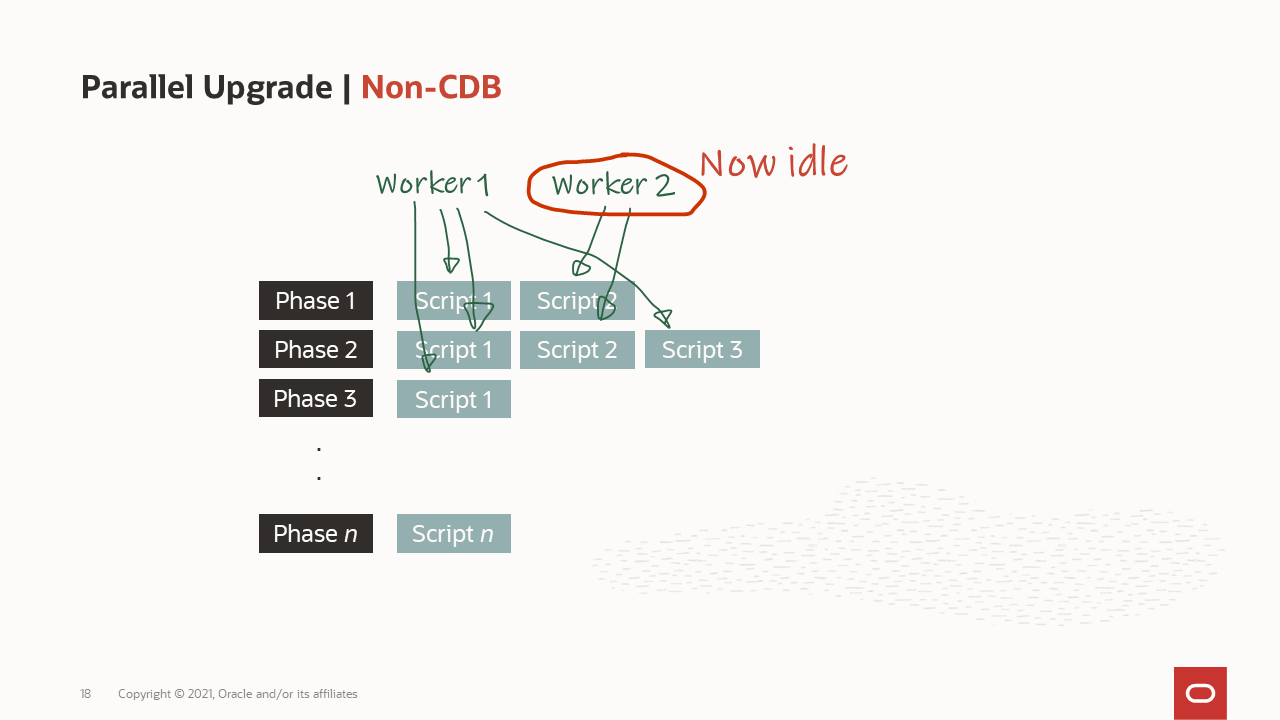 How are the workers processing the upgrade?
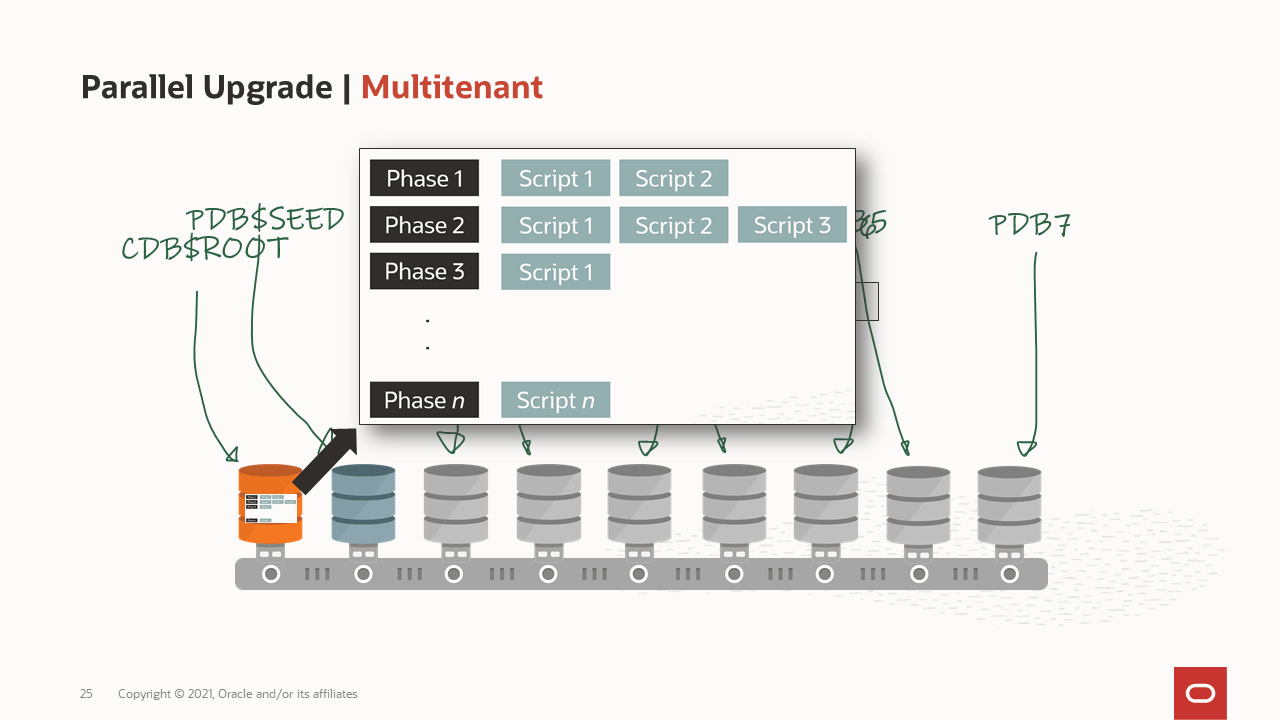 How is a container database upgraded?
 What goes on in the phases of the upgrade?
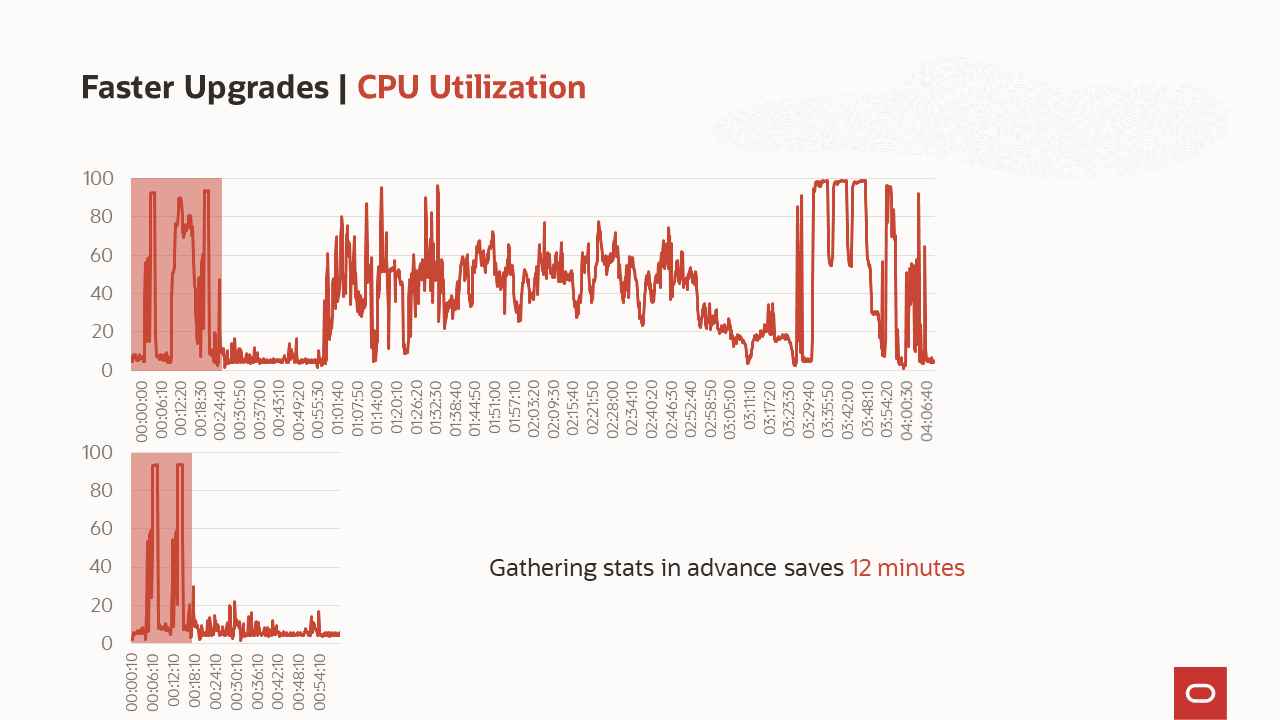 What is the benefit of gathering stats before the upgrade?
 A list of some of the comprehensive checks that are executed by AutoUpgrade
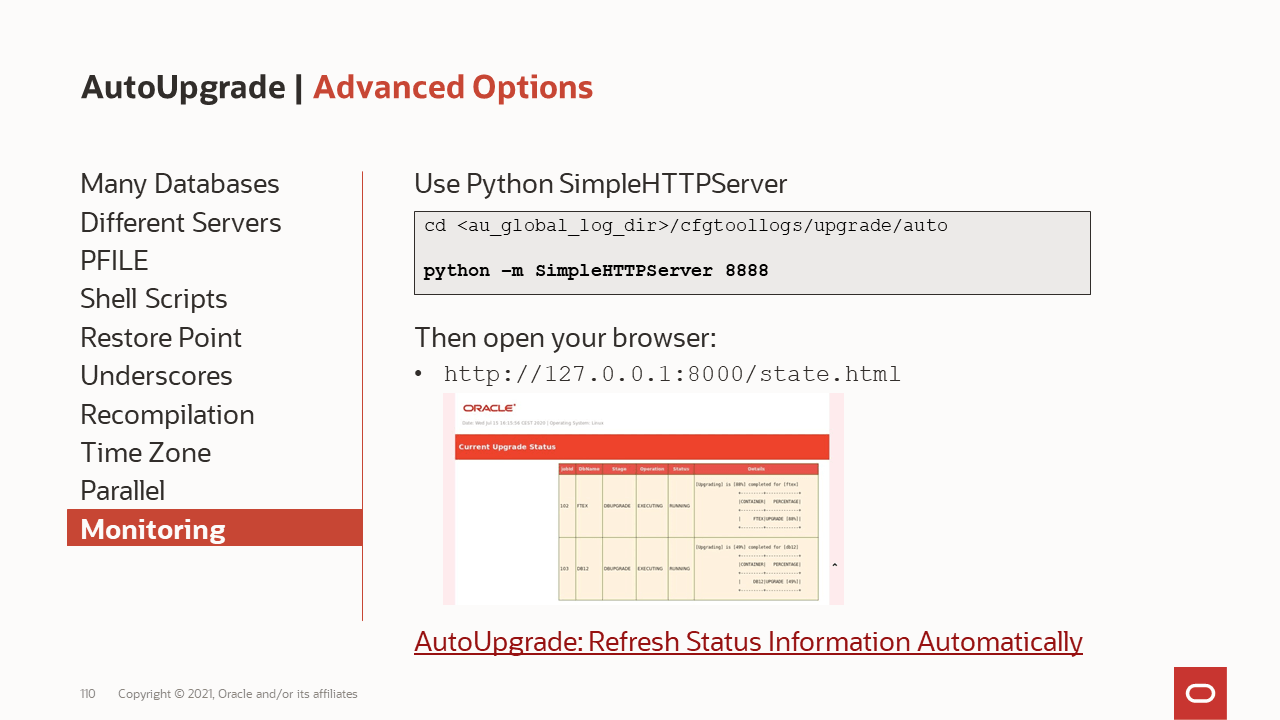 One page monitoring
 What to consider when doing upgrades from very old releases


 Next, you can get additional information about the job using the ID:
 However, for both type of images, the Release Update (or patch level) must be the latest or previous two Release Updates. Even if you have a custom database software image that is older, it can’t be used. You must upgrade to one of the recent Release Updates.
If you select 19.0.0.0 you will not get the base release, but the latest Release Update. If you use the APIs this is a smart way of specifying that you always want the latest Release Update.
However, for both type of images, the Release Update (or patch level) must be the latest or previous two Release Updates. Even if you have a custom database software image that is older, it can’t be used. You must upgrade to one of the recent Release Updates.
If you select 19.0.0.0 you will not get the base release, but the latest Release Update. If you use the APIs this is a smart way of specifying that you always want the latest Release Update.